 The Professor
Cube
Introduction
Basic Terminology:
|
|
1: Centers |
|
2. Edge-Centers |
|
|
3. Corner-Centers |
|
|
4. Outer Edges |
|
|
5. Center Edges |
|
|
6. Corners |
For this solution, I will be 121n1323b using a handy picture-based move system. But this may require a bit of explanation. Icons will be displayed next to a cube to show what they mean.
![]()

The icon means turn the marked layer 90 degrees clockwise.
![]()

![]()

The arrow has two heads, indicating that a turn of 180 degrees can be done in
either direction with the same result.
![]()
![]()

If you see something like this, it will be more convenient to turn both layers
simultaneously.
Important: changing the orientation of the cube in space can affect how the icons are used.
![]()
![]()

The cube is oriented differently. Though the effect is the same, the icons are
different.
 Part
1: Top edge-centers.
Gray squares indicate that the color of these pieces is not important right now. You will need to repeat these procedures a maximum of four times.
Step 1: Locate the green center. It will be located in the very middle of a face. The face where it is located will be green.
Step 2: Locate a green edge-center, and rotate the top face so it matches one of these five cases, and follow the moves indicated.
 Case
1.
 ![]()
![]()
 Case
2.
 ![]()
 Case
3.
 ![]()
![]()
 Case
4.
 ![]()
![]()
 Case
5.
 ![]()
Step 3: Repeat Step 2 as needed.
 Part
2: Top corner-centers.
Step 4: Locate a green corner-center not located on the green face. You will have to do this a maximum of four times. Match it to one of these scenarios and follow the indicated moves.
 Case
1:
 ![]()
![]()
![]()
![]()
 Case
2:
 ![]()
![]()
![]()
![]()
 Case
3:
 ![]()
![]()
![]()
 Case
4:
 ![]()
![]()
![]()
![]()
 Case
5:
 ![]()
![]()
![]()
![]()
![]()
![]()
Step 5: Repeat Step 4 as needed.
 Part
1: Bottom corner-centers.
Step 1: Turn your cube upside-down so that the yellow face is on top.
Step 2: Locate a yellow corner-center, and match it to one of these four cases. Make sure that the gap you are moving it to is in the position shown in the diagrams. You will have to do this a maximum of four times.
 Case
1:
 ![]()
![]()
![]()
![]()
 Case
2:
 ![]()
![]()
![]()
![]()
 Case
3:
 ![]()
![]()
![]()
![]()
 Case
4:
 ![]()
![]()
![]()
Step 3: Repeat Step 2 as needed.
 Part
2: Bottom edge-centers.
Step 4: Keeping the cube yellow-side-up, locate a yellow-edge center that is not on the top face. Match it to one of these cases, and rotate the top face so that the gap matches the location shown.
 Case
1:
 ![]()
![]()
![]()
![]()
![]()
![]()
![]()
 Case
2:
 ![]()
![]()
![]()
![]()
![]()
![]()
![]()
 Case
3:
 ![]()
![]()
![]()
![]()
![]()
![]()
![]()
 Case
4:
 ![]()
![]()
![]()
![]()
![]()
![]()
Step 5: Repeat Step 4 as needed.
 Part
1: Top corners.
Step 1: Rotate your cube so that the green face is on top again.
Step 2: Locate a green corner on the bottom face, and rotate the bottom face so that the corner is directly below the spot it needs to move to. If a corner is in the right place, but turned incorrectly, go to Cases 4 and 5. If you have run out of corners to remove from the bottom face, go to Case 6.
Also, note that the colors of your cube may not match those on the diagram. For example, substitute red for blue and white for red if need be.
 Case
1:
 ![]()
![]()
![]()
 Case
2:
 ![]()
![]()
![]()
 Case
3:
 ![]()
![]()
![]()
![]()
![]()
![]()
 Case
4:
 ![]()
![]()
![]()
![]()
![]()
![]()
 Case
5:
 ![]()
![]()
![]()
![]()
![]()
![]()
 Case
6:
 ![]()
![]()
![]()
Step 3: Repeat Step 2 as needed.
 Part
2: Bottom corners.
Step 4: Rotate the cube so the yellow face is on top again.
Step 5: If you can turn the bottom layer so that all four corners are in their correct position, do that, and move onto Step 6. Otherwise turn the bottom layer so that zero or one of the corners are in the right place and match it to one of these cases. Don't worry about the corners being oriented correctly, that's what step 3 is for.
 Case
1:
 ![]()
![]()
![]()
![]()
![]()
![]()
![]()
![]()
 Case
2:
 ![]()
![]()
![]()
![]()
![]()
![]()
![]()
![]()
 Case
3:
Case
3:![]()
![]()
![]()
![]()
![]()
![]()
![]()
![]()
![]()
![]()
![]()
![]()
![]()
![]()
Step 5: Check to see if the bottom corners are all correctly oriented. If they are, then move onto Phase 4. If they are not, then try to match them to one of the five cases below. Remember that your colors may be different. The ones shown here are merely for clarity. If you cannot make them match, go to Step 6.


Cases 1-5: ![]()
![]()
![]()
![]()
![]()
![]()
![]()
![]()
Step 6: Doing Step 5 will put the bottom corners in one of two configurations.
 Case
6:
 ![]()
![]()
![]()
![]()
![]()
![]()
![]()
![]()
 Case
7:
 ![]()
![]()
![]()
![]()
![]()
![]()
![]()
![]()
 Part
1: Bottom edges I.
Step 1: Make sure you still have the cube yellow-side up, as in the previous step.
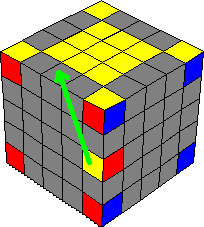
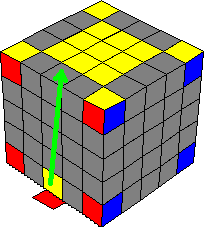
Step 2: Begin putting yellow edges in their places, by matching them to one of the cases below. Important: Leave one set of edges unsolved. This will be important when you fix the top edges. The diagram has the yellow-blue edges left unsolved, though you could pick any of the other three. If you run out of edges to move into place, go to Step 3.
To
match edges to one of the cases below, any of ![]() ,
,
![]() ,
,
![]() ,
or
,
or ![]() (sometimes
repeated) should help.
(sometimes
repeated) should help.
 Case
1:
 ![]()
![]()
![]()
![]()
 Case
2:
 ![]()
![]()
![]()
![]()
 Case
3:
 ![]()
![]()
![]()
![]()
 Case
4:
 ![]()
![]()
![]()
![]()
 Case
5:
 ![]()
![]()
![]()
![]()
 Case
6:
 ![]()
![]()
![]()
![]()
 Case
7:
 ![]()
![]()
![]()
 Case
8:
 ![]()
![]()
![]()
 Case
9:
 ![]()
![]()
![]()
Step 3: If you run out of edges to move to the yellow layer, you will have two options. One is to locate some on the green layer and use this sequence. However, if all of the edges are in the yellow layer but you have ones that are out of place, use one of the sequences from Step 2 to put a random piece in its place, thereby moving it out of the top layer and allowing you to place it correctly.
 Case
10:
 ![]()
![]()
![]()
![]()
![]()
![]()
![]()
![]()
![]()
![]()
![]()
![]()
![]()
![]()
![]()
Step 4: Repeat Steps 2 and 3 as needed.
 Part
2: Top edges.
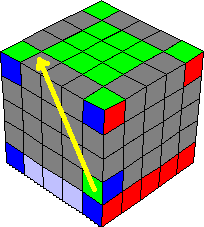
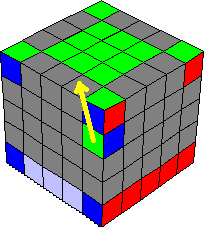
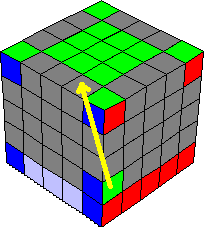
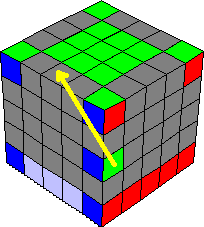
Step 5: Rotate your cube so that the green face is on top again. This will be very similar to what you just did for the yellow face, except that you won't be leaving a gap this time. Important: Make sure that the gap you left in the previous step is always in the position indicated by the light blue squares.
Step
6: Start putting green edges in place. Use ![]() ,
,
![]() ,
or
,
or ![]() to
make your cube match the diagram.
to
make your cube match the diagram.
 Case
1:
 ![]()
![]()
![]()
![]()
 Case
2:
 ![]()
![]()
![]()
![]()
 Case
3:
 ![]()
![]()
![]()
![]()
 Case
4:
 ![]()
![]()
![]()
![]()
 Case
5:
 ![]()
![]()
![]()
![]()
 Case
6:
 ![]()
![]()
![]()
![]()
 Case
7:
 ![]()
![]()
![]()
 Case
8:
 ![]()
![]()
![]()
 Case
9:
 ![]()
![]()
![]()
Step 7: If you run out of edges to move to the yellow layer, you will have two options. One is to locate some on the green layer and use this sequence. However, if all of the edges are in the yellow layer but you have ones that are out of place, use one of the sequences from Step 6 to put a random piece in its place, thereby moving it out of the top layer and allowing you to place it correctly.
 Case
10:
 ![]()
![]()
![]()
![]()
![]()
![]()
![]()
![]()
![]()
![]()
![]()
![]()
![]()
![]()
![]()
Step 8: Repeat Steps 6 and 7 as needed.
 Part
3: Bottom edges II.
Step 9: Look at the "keyhole" you left back in Step 2. If one of the outer edges is in place but the other is not, or if both are placed incorrectly, you will need to clean out the "keyhole" space, as shown in Case 1. Make sure no other "keyhole" pieces are located in the marked spaces if you do this. However, if only the central edge is mixed up, go to Case 2.
 Case
1:
 ![]()
![]()
![]()
![]()
![]()
![]()
![]()
![]()
![]()
![]()
![]()
![]()
![]()
![]()
![]()
 Case
2:
 ![]()
![]()
![]()
![]()
![]()
![]()
![]() Skip
to Cases 8 and 9.
Skip
to Cases 8 and 9.
Now you need to match up the two outer edges. If they are in the same layer, as shown in the next two diagrams, you will need to use the appropriate sequence.
|
|
|
|
|
|
Now we
need to match the central edge to the other two, unless it is in its proper
location. Use ![]() as
needed to line it up with the two outer edges. If it lines up properly, skip to
the next part. If it does not, go to Case 7.
as
needed to line it up with the two outer edges. If it lines up properly, skip to
the next part. If it does not, go to Case 7.
 Case
7:
 ![]()
![]()
![]()
![]()
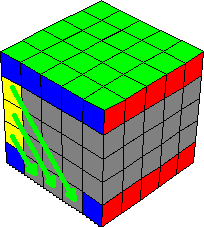
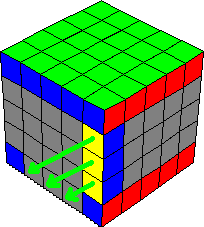
Now we can fill in the "keyhole." Rotate the center layers to make the cube match one of these diagrams. If the outer edges are properly placed, go to Cases 10 and 11. If the central edge is in its proper place, go to Cases 12 and 13.
 Case
8:
 ![]()
![]()
![]()
![]()
![]()
![]()
![]()
![]()
![]()
![]()
![]()
![]()
![]()
![]()
![]()
 Case
9:
 ![]()
![]()
![]()
![]()
![]()
![]()
![]()
![]()
![]()
![]()
![]()
![]()
![]()
![]()
![]()
 Case
10:
 ![]()
![]()
![]()
![]()
![]()
![]()
![]()
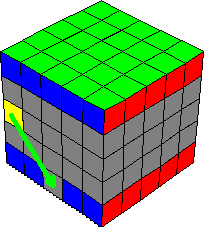 Case
11:
 ![]()
![]()
![]()
![]()
![]()
![]()
![]()
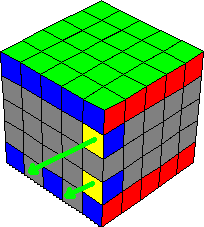 Case
12:
 ![]()
![]()
![]()
![]()
![]()
![]()
![]()
![]()
![]()
![]()
![]()
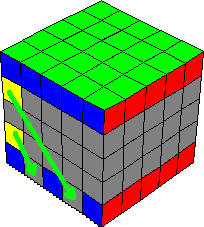 Case
13:
 ![]()
![]()
![]()
![]()
![]()
![]()
![]()
![]()
![]()
![]()
![]()
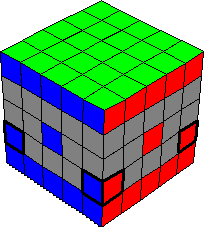 Part
1: Lower middle edges.
Step 1: Rotate your cube so that it's on its side, as shown in the diagrams.
Step
2: Rotate the red-blue edge in place as shown. If you can't get it
into place, do ![]()
![]()
![]()
![]()
![]() and
try again.
and
try again.

Step
3: Rotate the red-white edge in place as shown in the drawing, if it
is not already in place. If you cannot put it in place, do ![]()
![]()
![]() and
try again.
and
try again.

![]()
![]()
![]()
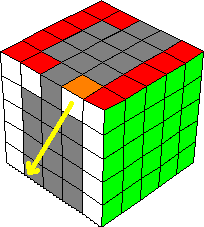
Step
4: Rotate the cube in your hands as shown, and do ![]() as
needed to place the white-orange edge in place as shown in the drawing. If it
is already in place, go to Step 5. If you cannot put it in place, do
as
needed to place the white-orange edge in place as shown in the drawing. If it
is already in place, go to Step 5. If you cannot put it in place, do ![]()
![]()
![]() and
try again.
and
try again.
![]()
![]()
![]()
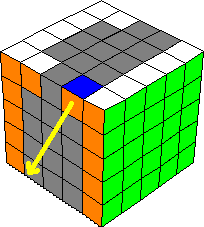
Step 5: Rotate the cube in your hands again. If the last edge piece in this layer is in place, move on to Part 2. Otherwise, rotate the orange-blue edge in place as shown in the drawing.
![]()
![]()
![]()
![]()
![]()
![]()
![]()
![]()
![]()
![]()
![]()
![]()
![]()
![]()
 Part
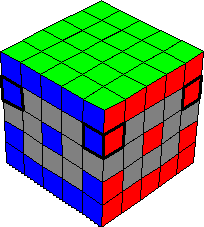
2: Upper middle edges.
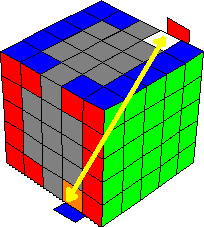
Step
6: Do ![]() once
or twice to get as many of the pieces in this layer aligned as you can. If all
four line up, you're lucky. Go to Part 3. Otherwise, match your cube to one of
these cases.
once
or twice to get as many of the pieces in this layer aligned as you can. If all
four line up, you're lucky. Go to Part 3. Otherwise, match your cube to one of
these cases.
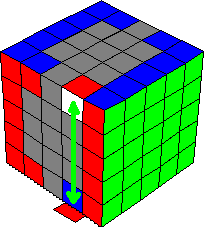 Case
1:
 ![]()
![]()
![]()
![]()
![]()
![]()
![]()
![]()
![]()
![]()
![]()
 Case
2:
 ![]()
![]()
![]()
![]()
![]()
![]()
![]()
![]()
![]()
![]()
![]()
![]()
![]()
![]()
![]()
![]()
![]()
 Part
3: Central middle edges.
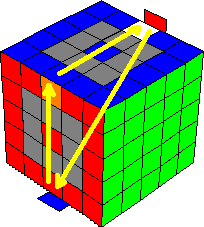
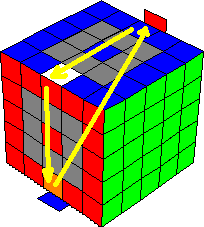
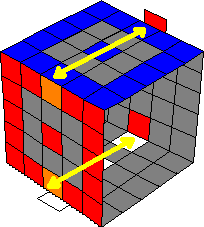
Step 7: Rotate the middle layer so that the centers match up with the pieces you already have solved. Check to see if the middle edges are in the right place. If they are, then move onto Step 8. If they're not, match them to one of these cases. Remember your colors may be different, and some of the edges may be "flipped."
 Case
1:
 ![]()
![]()
![]()
![]()
 Case
2:
 ![]()
![]()
![]()
![]()
 Case
3:
 ![]()
![]()
![]()
![]()
Step 8: Some of these edge pieces may need to be "flipped." If they're all correct, move on to Phase 6. Otherwise, match your cube to one of these cases.
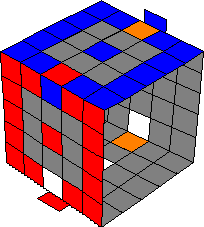 Case
1:
 ![]()
![]()
![]()
![]()
![]()
![]()
![]()
![]()
![]()
![]()
![]()
![]()
![]()
![]()
![]()
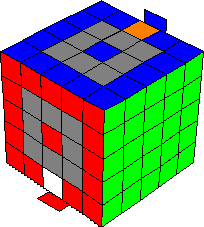 Case
2:
 ![]()
![]()
![]()
![]()
![]()
![]()
![]()
![]()
![]()
![]()
![]()
![]()
![]()
![]()
![]()
![]()
![]()
![]()
![]()
![]()
![]()
![]()
 Case
3:
 ![]()
![]()
![]()
![]()
![]()
![]()
![]()
![]()
![]()
![]()
![]()
![]()
![]()
![]()
![]()
![]()
![]()
![]()
![]()
![]()
 Part
1: Middle corner-centers.
For this section, you will be shifting the cube around quite a bit. Things to remember: If you end up with a situation where you have two centers from opposite faces switched, you'll need to move one to an adjacent face first, and go from there.
Step 1: Match your cube to one of the 16 scenarios below. Note that the move sequences are more or less the same; it's the same basic move set with different moves preceding and following.
|
|
|
|
|
|
|
|
|
|
|
|
|
|
|
|
|
|
|
|
|
|
|
|
Step 2: Repeat Step 1 until all corner-centers are correctly placed.
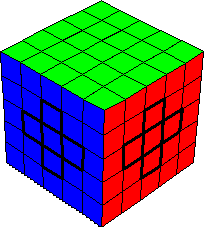 Part
2: Middle edge-centers.
Step 3: Match your cube to one of the 16 scenarios below. Note that the move sequences are more or less the same; it's the same basic move set with different moves preceding and following.
|
|
|
|
|
|
|
|
|
|
|
|
|
|
|
|
|
|
|
|
|
|
|
|
Step 4: Repeat Step 3 until all the edge-centers are solved. When you complete that task, you have solved the entire cube. And for that:
Congratulations!
|