![]() ADM535
ADM535
ADM535
|
Release 640 04/05/2006 |
|
|
|
|


n SAP Web AS 6.20
n 2002/Q4
n

n Some software products marketed by SAP AG and its distributors contain proprietary software components of other software vendors.
n Microsoft, Windows, Outlook, and PowerPoint are registered trademarks of Microsoft Corporation.
n IBM, DB2, DB2 Universal Database, OS/2, Parallel Sysplex, MVS/ESA, AIX, S/390, AS/400, OS/390, OS/400, iSeries, pSeries, xSeries, zSeries, z/OS, AFP, Intelligent Miner, WebSphere, Netfinity, Tivoli, and Informix are trademarks or registered trademarks of IBM Corporation in the United States and/or other countries.
n Oracle is a registered trademark of Oracle Corporation.
n UNIX, X/Open, OSF/1, and Motif are registered trademarks of the Open Group.
n Citrix, ICA, Program Neighborhood, MetaFrame, WinFrame, VideoFrame, and MultiWin are trademarks or registered trademarks of Citrix Systems, Inc.
n HTML, XML, XHTML and W3C are trademarks or registered trademarks of W3C®, World Wide Web Consortium, Massachusetts Institute of Technology.
n Java is a registered trademark of Sun Microsystems, Inc.
n JavaScript is a registered trademark of Sun Microsystems, Inc., used under license for technology invented and implemented by Netscape.
n MaxDB is a trademark of MySQL AB, Sweden.
n SAP, R/3, mySAP, mySAP.com, xApps, xApp, and other SAP products and services mentioned herein as well as their respective logos are trademarks or registered trademarks of SAP AG in Germany and in several other countries all over the world. All other product and service names mentioned are the trademarks of their respective companies. Data contained in this document serves informational purposes only. National product specifications may vary.
n These materials are subject to change without notice. These materials are provided by SAP AG and its affiliated companies ("SAP Group") for informational purposes only, without representation or warranty of any kind, and SAP Group shall not be liable for errors or omissions with respect to the materials. The only warranties for SAP Group products and services are those that are set forth in the express warranty statements accompanying such products and services, if any. Nothing herein should be construed as constituting an additional warranty.

User notes
n These training materials are not a teach-yourself program. They complement the explanations provided by your course instructor. Space is provided on each page for you to note down additional information.
n There may not be sufficient time during the course to complete all the exercises. The exercises provide additional examples that are covered during the course. You can also work through these examples in your own time to increase your understanding of the topics.


n For current information regarding supported combinations of SAP software and the IBM DB2 Universal Database, refer to SAP Service Marketplace at https://service.sap.com.
n Pay special attention to upgrade restrictions that apply to particular combinations.
n You may encounter names other than the IBM DB2 Universal Database (UDB) used as synonyms in SAP documentation (such as the SAP Notes):
DB2 Common Server (or DB2 CS for short)
DB2 UDB
n DB6 is the internal abbreviation for DB2 Universal Database technology on UNIX and Windows. Do not use DB2 when searching for information in SAPNet because this abbreviation is used for DB2 on z/OS.

n When installing SAP products, you will receive DB2 software as part of your installation package. SAP provides the correct DB2 package for you.
n The IBM DB2 Universal Database Enterprise Edition (EE) is provided for OLTP type systems such as SAP R/3 Enterprise and SAP Web Application Server.
n The IBM DB2 Universal Database Enterprise-Extended Edition (EEE) is provided for OLAP type systems such as SAP BW, and SAP APO.
n An EEE server with one partition works practically the same as an EE server, however, if you want to install OLTP and OLAP type systems on the same server, you must install the enterprise-extended edition.
n During the installation of the non-partitioned database instance, you must make special adjustments to receive the requested unpartitioned instance.
n These restrictions are lifted with IBM DB2 Universal Database Enterprise Server Edition (ESE).

n The IBM DB2 Universal Database Enterprise Edition (EE) and the IBM DB2 Universal Database Enterprise-Extended Edition (EEE) have been merged into a single product, the IBM DB2 Universal Database Enterprise Server Edition (ESE).
n The ESE product provides the ability to create and manage multiple database partitions. SAP customers with DB2 licenses from SAP have the appropriate license to use the database partitioning feature.
n SAP installations with SAPINST always install a database instance that is enabled for multiple partitions, however OLTP systems must be set up with a single partition.
n As an additional consideration, the decision must be made to create multiple database partitions on a single SMP server or to create multiple database partitions across more than one physical server (that is, a clustered hardware configuration).

n With DB2 Universal Database, you may start to use a database with a UNIPROCESSOR setup.
n You may add CPUs to have a symmetric multi processing (SMP) system. Here DB2 Universal Database allows the multi-process/multi-threaded execution of SQL statements on a single database server.
n You may also move your database from an unpartitioned server setup to a multi-partitioned setup, using several physical servers. You can do this using the partitioning feature of DB2 Enterprise Server Edition, massive parallel processing (MPP).
n You can mix SMP and MPP as in the usage of IBM DB2 Universal Database Enterprise Server Edition with partitioned databases on SMP servers.

n Standard installations with SAP software in OLTP environments provide application-side scalability through the addition of application servers to the existing system.
n The database server is set up to store the SAP application data. In OLTP environments, this will be a single physical system and a single database partition. With appropriate sizing, the database server will not form the bottleneck.

n With OLAP-style workloads (complex SQL queries) and in very large database (VLDB) environments, a multi-partitioned DB2 database may serve the purpose of providing database server side scalability.
n Here a multi-partitioned setup of the DB2 database, which spans several servers, may be more reasonable from a system-throughput perspective.
n Because multi-partitioned database setups do not provide constraints in database size growth, this is the preferable option for multi-terabyte databases.

n With IBM DB2 Universal Database Enterprise Server Edition V8.1, SAP delivers all DB2 database servers to be multi-partition enabled. Still, for OLTP systems, there must be one database partition only.
n In multi-partitioned databases, the partitions are grouped into database partition groups to form subsets of the distributed database. This is for storage allocation purposes, as you will see later.
n Each multi-partitioned database contains at least three predefined database partition groups:
IBMCATGROUP - the partition group with the tablespace containing the system catalogs
IBMTEMPGROUP - the default partition group for system temporary tablespaces
IBMDEFAULTGROUP - the default partition group for the user defined tablespaces

n With MCOD SAP systems, multiple SAP systems connect to a single database server. MCOD stands for multiple SAP components in one database.
n The database server distinguishes between the different SAP systems by storing the tables of the system using different schema owners. For the above example, the SAP systems PR1, PR2, PR3 connect to database PR1. Each system uses separate tables.
n The application servers connect with their respective connect users: sappr1, sappr2, and sappr3, respectively.
n For systems that will never be run in MCOD setups, the recommended SAP connect user is sapr3 because this designation is independent of the SAP system that is connected. This makes it easier to copy SAP systems.
n Changing the schema name is not supported. If you want to change the schema name of tables, you have to copy the tables manually.

n Once you have established a connection with a dispatcher through the SAP GUI and a session is started for you in the system, the following steps are executed for each request:
n Data is passed from the SAP GUI to the dispatcher using the SAP GUI protocol based on TCP/IP
The dispatcher classifies the request and places it in the appropriate request queue.
The request is passed in order of receipt to a free dialog work process.
The subprocess taskhandler restores the user context in a step known as roll-in. The user context contains mainly data from currently running transactions called by this user and its authorizations.
The taskhandler calls the dynpro processor to convert the screen data to ABAP variables.
The ABAP processor executes the coding of the process after input (PAI) module from the preceding screen, along with the process before output (PBO) module of the following screen. It also communicates, if necessary, with the database.
The dynpro processor then converts the ABAP variables again to screen fields. When the dynpro processor has finished its task, the taskhandler becomes active again.
The current user context is stored by the taskhandler in shared memory (rollout).
Resulting data is returned through the dispatcher to the front-end computer.

n SQL requests that are sent from the SAP application server will be processed within the SAP Database Interface (DBI). The DBI is SAP's database independent interface layer for SQL processing.
n DBI sends SQL requests to the SAP Database Support Layer for database-specific processing. For each database vendor, SAP provides a separate database support layer. Because SAP uses DB6 as its internal technical code for DB2 Universal Database for UNIX and Windows, the SAP application servers on DB2 Universal Database servers call the DB6-DBSL.
n Via DBI and DBSL, SAP Open SQL requests are transformed into DB2-specific calls of the DB2 Call Level Interface (CLI). CLI operations are typical commands such as PREPARE, EXECUTE, FETCH, and CLOSE.

n The SAP Database Support Layer is a set of C routines, which call the IBM DB2 Call Level Interface (CLI).
n The CLI is documented in the DB2 Call Level Interface Guide and Reference Version 8.
n In the example shown in the slide, the DBSL function DbSlConnectDB6 calls the following routines:
SQLAllocHandle - to allocate a DB2 statement handle
SQLExtendedPrepare - to prepare an SQL statement
SQLExecute - to execute the prepared SQL statement
SQLFetch - to retrieve the result set of the SQL statement. (The additional information in the example indicates that one result was found.)
SQLFreeStmt - to free up the statement handle
n The above excerpt from an SAP DBSL Trace is shown for educational purposes only. In normal operations of SAP systems, no knowledge about the trace is necessary.

n SAP provides scripts to start the SAP server. The startsap script starts the database instance using the startdb script, which will in turn start the db2start DB2 command.
n With db2start, the following per-instance engine dispatchable units (EDUs) are started:
db2wdog - the DB2 watchdog EDU. This EDU is used to monitor the process hierarchy on UNIX servers to handle abnormal process termination
db2sysc - the DB2 system controller EDU
db2tcpcm - the EDU responsible for servicing remote TCP/IP connection requests
db2ipccm - the EDU servicing local IPC connection requests
n The configuration for the DB2 instance is stored in the instance configuration file.
The content of this internal binary file
can be displayed with the DB2 command:
DB2 GET DBM CFG
The file's content can be modified with
the command:
DB2 UPDATE DBM CFG USING <parameter>
<value>

n The database is activated with the following command:
db2 activate database <DBSID>
n As soon as the database is activated, the following per-database EDUs are started:
db2loggr - Manages DB2 log files
db2loggw - Writes from log buffer to log file
db2fmtlg - Manages pre-allocation of DB2 log files
db2dlock - Manages the deadlock detection in the database partition
db2pfchr - Handles read-ahead of large quantities of data as soon as requested by DB2 (this is prefetcher EDU)
db2pclnr - Responsible for picking dirty pages from buffer pool(s) for copy to DB2 containers (this is page cleaner EDU)
n
The configuration of the database
<DBSID> is stored in the DB2 Database Configuration File. The contents of
this binary file can be viewed with the DB2 command:
DB2 GET DB CFG FOR <DBSID>
n
Its contents can be manipulated with the
following command:
DB2 UPDATE DB CFG FOR <DBSID> USING
<PARAMETER> <VALUE>

n If an SAP application needs to retrieve data from a DB2 database server, it will connect via the remote listener if it is not running on the same logical server as the database partition. The remote listener will ask the db2 system controller to start a db2agent EDU for direct connection with the SAP application.
n When requesting a database connection on the same logical system as the database partition, the Inter-Process Connection Manager starts the db2agent EDUs directly.
n In order to display all active applications that are connected to the database, the following command can be used:
DB2 LIST APPLICATIONS FOR DATABASE <DBSID> [SHOW DETAIL]
n A connection to the database can be established with the DB2 command:
DB2 CONNECT TO <DBSID>
n The connection can be terminated with the DB2 command:
DB2 TERMINATE
n To disconnect all applications, the following command can be used:
DB2 FORCE APPLICATION ALL

n When the DB2 instance is started, the per-instance memory, also known as database-manager shared memory, is allocated. The maximum size of the memory can be controlled by the DB2 DBM parameter 'instance_memory' (V8 only, not V7). By default, this parameter is set to automatic, allowing for growth according to consumption.
n When the DB2 Database is activated or started, the per-database memory is allocated. The maximum size of the per-database memory can be controlled by the DB2 DB parameter 'database_memory' (V8 only, not V7). This memory is used by all applications of the database concurrently.
n The most important memory areas that reside in the database memory are the database heap and buffer pool(s). The sizes of these memory areas are related to each other. Other memory areas are the lock list, the package, and catalog caches.
n When an db agent EDU is allocated to an application, the agent will allocate its agent private memory. This memory contains memory heaps for sorting (sort heap), application processing (application heap), and so on.
n Because large database servers will run many db agent EDUs (notice that the memory consumption is directly related to the number of connected applications), the per-agent memory consumption should not be under-estimated.

n When SAP software is shut down in a controlled process, the stopsap db script is used to call stopdb, which in turn executes the following DB2 commands:
db2 deactivate database <dbsid>
db2stop
n During the deactivation of the database, the database buffers are copied back to DB2 containers and all files are closed. This includes the DB2 log files.
n As soon as there are no active databases, the db2stop command stops the per-instance processes.

n The DB2 implementation on Windows is multi-threaded. As with UNIX, there are three distinct functional groups, but they are implemented as threads. All threads run within the Windows program db2syscs.exe.
n Use the Windows resource tool kit program qslice to view the threads in a program. With this program, you can monitor the growing number of threads in program db2syscs during SAP startup.
n More information can be accessed using the Windows Performance Monitor perfmon.exe, which is located in the administrative program group.
n Except for the above mentioned differences, the implementations of DB2 on UNIX and Windows are very similar.

n This example shows the EDUs that are used during remote database connection setup.
n For the connection setup (numbers), the following scenario applies:
The SAP work process, or any SAP application requesting a DB2 database connection, attaches to the TCP/IP listener (db2tcpcm) on a predefined TCP/IP port. This port is defined in the DBM CFG parameter SVCENAME.
The TCP/IP listener asks the DB2 system controller to start a db2agent EDU
A db2agent is started.
The db2agent can now communicate directly with the application. The db2tcpcm is free to service additional requests.
n For the network communication (letters), the following scenario applies:
A The application sends a connection request from an arbitrary socket to the database server (port name sapdb2<dbsid>).
B A new socket is created on an arbitrary port for the db2agent.
C The db2agent responds on the new socket and the communication is established. First, the maximum requested I/O block size is negotiated by the client (RQRIOBLK). For each blocking cursor, there is always a buffer of RQRIOBLK size on the client side. This can allocate a substantial amount of memory per work process (check for blocked cursors in the Application Snapshot using transaction ST04).

n The example in the slide shows the DB2 processes that are used during local DB2 database connection setup. Here the communication method is inter-process communication (IPC).
n For connection setup, the following scenario applies:
Because the database is cataloged locally, the application program connects to the local listener (db2ipccm) through a message queue owned by db2ipccm. Information about the IPC is returned to the appl 11411x235l ication program.
The db2agent is retrieved from the DB2 Agent Pool or, if no agent is available, it is created as a separate process. On Windows, a db2agent thread is created. The number of idle agents in the pool is defined with NUM_POOLAGENTS. The maximum number of agents is defined with MAXAGENTS.
Local connections are established through the application support layer (ASL) heap, which acts as the main IPC component between the application and the db2agent. This heap resides in shared memory.
n Local connections are faster than connections made through TCP/IP.
n The maximum number of agents, specified with MAXAGENTS, helps to prevent denial-of-service attacks on DB2 database servers.

n All work processes connect to the database using the predefined connect-user. Most of the time, however, this will be sapr3; however, for MCOD systems, the connect user will be system-specific, for example, sapprd. SAP system users do not have a database system user ID.
n A work process is active for one user only during the dialog step between screen input and screen output. Before screen output, the work process issues a commit to the database. This means different users use the same work process and database connection consecutively. The work process does not connect to and disconnect from the database between the dialog steps.
n This example shows the processes used for handling SQL statements:
An SQL statement is sent from the SAP work process to its associated db2agent.
The DB2 Optimizer in the DB2 agent transforms the SQL statement into an execution plan on data. This process is preparation. The plan may also be cached already in the DB2 Package Cache so preparation may not be needed.
The prepared statement will then be executed, and a result set will be formed. Several I/O servers - or prefetchers - may work on the requests, performing I/O in parallel, if the amount of data to be read is large. For normal operations, with very selective SQL statements, prefetching will not be needed.
The work process retrieves the result set to the application using a FETCH SQL command.

n This example shows the processes that handle database logging:
Statements that will alter data - such as UPDATE/INSERT/DELETE SQL statements - are sent from the SAP application to the associated DB2 agent.
The DB2 page holding the data is altered in the buffer pool. Much later, it will be transferred to disk. At the same time, the DB2 agent process writes information about the changes to the data to the log buffer. DB2 uses the log records for this write operation.
The db2loggw process is responsible for writing the contents of the log buffer to the current active log file. This is done when an application ends the transaction by issuing a COMMIT SQL statement, every second, and when the log buffer is full.
I/O cleaners or page cleaners copy updated pages to disk when triggered. I/O cleaners get triggered when:
The maximum amount of log space that should be read during crash recovery has been reached (DB CFG parameter SOFTMAX)
The maximum percentage of changed pages has been reached (DB CFG parameter CHNGPGS_THRESH)
No pages are available during insert/update. In this case, victim page cleaning is started.
I/O cleaners can be configured in a wide range. On OLTP systems, SAP recommends running one I/O cleaner per disk, but not more than necessary. You will receive informational messages in the DB2 Diagnostic Log File whenever there are not enough I/O cleaners.

n The operating system user db2<dbsid> is the DB2 instance owner and the SAP database administrator.
n This operating system user <sapsid>adm is authorized to start and stop the SAP system and the DB2 Database Manager (instance). <sapsid>adm has the DB2 authorizations DBADM and SYSCTRL. DB2-specific monitoring functions invoked by SAP application server functions require SYSCTRL authorization. This user belongs to the operating system group db<dbsid>ctl.
n Various connect users are possible, depending on your SAP release and setup. These operating system users - sap<sapsid1>, sap<sapsid2>, sap<sapsid3>, and so forth, and sapr3, - own all SAP database objects (tables, indexes and views). All database connection and instance access operations for an SAP application server are performed using these user IDs. These users belong to the operating system group SAPSYS and are created only on SAP systems that have the SAP system database installed (not on remote application servers). These users have the following database authorizations: CREATETAB, BINDADD, CONNECT, and IMPLICIT_SCHEMA.

n The following database authorizations are important for performing database administration tasks in the SAP environment. With DB2, they are implemented as operating system groups.
n SYSADM is the highest level of administrative authority. Users with SYSADM authorization can run utilities, issue database and database manager commands, and access the data in any table in any database within the database manager instance. This authorization can control all database objects in the instance, including databases, tables, views, indexes, table spaces, node groups, buffer pools, event monitors, and more. SYSADM is assigned to the operating system group specified by the configuration parameter SYSADM_GROUP. Only a user with SYSADM authorization can perform functions such as Change database manager configuration or Grant DBADM authority. Note: User db2<dbsid> has SYSADM authorization.
n SYSCTRL is the highest level of system control authority. Users with SYSCTRL authorization can perform maintenance and utility operations against the database manager instance and its databases. These operations can affect system resources, but they do not allow direct access to data in the databases. System control authorization is designed for users administering a database manager instance containing sensitive data. SYSCTRL authorization is assigned to the group specified by the configuration parameter SYSCTRL_GROUP. Only a user with SYSCTRL authorization (or higher) can force users off the system, create or drop a database, create/drop/alter a table space, or restore a new database. Users with SYSCTRL authorization also have the implicit privilege to connect to a database. Note: User <sapsid>adm has SYSCTRL authorization.
n SYSMAINT is the second level of system control authority. However, SYSMAINT is not used in the SAP environment.

n To protect data and resources, DB2 uses a combination of external security services and internal access control information.
n During the first step, authentication, the user must identify herself or himself by logging on to the system using an operating system user and the appropriate password when connecting to the database. DB2 verifies the given combination using operating system services (logon).
n During the second step, authorization, the database manager decides if the user is allowed to perform the requested action or to access the requested data. There are two types of permissions recorded by DB2: privileges and authority levels. Authority levels provide a method of grouping privileges and control maintenance and utility operations.
n Both users db2<dbsid> and <sapsid>adm have sufficient authorization to perform DB2 administration in an SAP system.
n The database administration tool SAP DB2 Admin Extensions requires the restricted database administration privileges available in authorization level SYSCTRL.
n SAP DB2 Admin Extensions have access only to the tables required for performing SAP database administration in the background and to tables that reside in the administration database ADM<DBSID>. These privileges are assigned during SAP installation or upgrade.

n In the SAP DB2 database server environment, directory and file names are standardized on Windows.
n During the installation of the SAP system on Microsoft Windows, the user is prompted for the drive locations of the above directories. Note: Windows does not offer a single directory tree with mounted file systems.
n The following list explains the usage of the directories. You can put many of the directories on the same drive, depending on the system usage:
\sqllib - location for the DB2 executable programs
\db2<dbsid> - DB2 instance directory containing instance configuration data
\db2\<DBSID>\log_dir - directory where DB2 log files are created and used by the database
\db2\<DBSID>\log_archive - directory containing old log files, which are not used by the database
\db2\<DBSID>\log_retrieve - directory for storage of the log files during recovery
\db2\<DBSID>\db2dump - directory with diagnostic information
\db2\<SAPSID>\sapdata1\[NODE0000]... - directories that are used to store DB2 data

n On UNIX systems, the DB2 V8.1 software is installed in /opt/IBM/db2/V8.1.
n The DB2 Instance Data is stored in the directory /db2/db2<dbsid>.
n The Instance Database Directory is located in /db2/<DBSID>/db2<dbsid>.
n The files of the SAP Database are stored in the directories /db2/<sapsid>/sapdata1/[NODE0000] ... /db2/<sapsid>/sapdataN/[NODE0000], and /db2/<sapsid>/sapdatat or /db2/<sapsid>/saptemp<x>/[NODE0000].
n The DB2 log files will be written to /db2/<dbsid>/log_dir by the DB2 database software.
n The DB2 log files will be copied to /db2/<dbsid>/log_archive when not used any more.
n For DB2 recovery purposes, SAP installs a log_retrieve directory. The log files will be stored here during a database recovery.

n The DB2 database uses tablespaces. From a logical point of view, a tablespace holds database objects, such as tables and indexes. On disk, a tablespace consists of one or more data files, known as containers. The capacity of a tablespace can be increased by adding containers to it.
n With <SAPSID> being PRD, the SAP naming convention for tablespace names is PRD#<tablespace_name><extension>.
n The abbreviations in the tablespace name are part of the container name. Containers are numbered starting with 000. A full path specification for a DB2 container for SAP system PRD would be:
/db2/PRD/sapdata1/NODE0000/PRD#BTABD.container00 (UNIX)
h:\db2\PRD\sapdata1\NODE0000\PRD#BTABD.container00 (Windows)
n Note: The SAP system and SAP tools (such as SAP Storage Management in ST04 suggest that the naming conventions be observed. Following the SAP naming convention ensures fast and efficient support from SAP.


|
|
Unit: Database Architecture |
|
|
At the conclusion of this exercise, you will be able to: Start and stop a DB2 database Assess the layout of an SAP system on disk under observation of the naming rules |
Preparation:
To access your training system and use your training database <Txx>
during the following exercises, please start your Web browser. Use the server
name and port number provided by your instructor and enter the following URL: Error! Hyperlink
reference not valid.>. A graphical desktop will
appear in your browser window. Please enter the password sapdb2 to
access the desktop. From now on, you can use the desktop to open multiple
windows.
You will also be able to reconnect to your desktop, in case you close your Web
browser window.
1-1 Database Operations: Starting and Stopping
1-1-1 Start your DB2 training instance <db2txx>.
1-1-2 Start your training database <Txx> manually.
1-1-3 How many connections are made to the database?
1-1-4 Connect to the database.
1-1-5 Stop your training database and then stop the DB2 training instance.
1-2 DB2 EDUs
1-2-1 How can the DB2 EDUs be viewed in the training system?
1-2-2 With the DB2 training instance <db2txx> being stopped, how many DB2 EDUs do you see?
1-2-3 Start the DB2 training instance. Which are the processes that are now started?
1-2-4 Activate the training database <Txx>. What are the per-database processes?
1-3 Storage Conventions
1-3-1 Where are the tablespaces of the SAP training system DEV located on disk?
1-4 Database users and groups
1-4-1 Where is the name of the database system administrator group defined ?
1-4-2 Which are the special usernames used in SAP systems, and what are their group assignments?
|
|
Unit: Database Architecture |
1-1 Database Operations: Starting and Stopping
1-1-1 In order to start your DB2 training instance <db2txx>, enter the command db2start
1-1-2 To start your
training database <Txx>, you can activate the database using
db2 activate db <Txx>
1-1-3 To see the connections which are made to the database, enter
db2 list applications The following response should be expected
SQL1611W No data was returned by
Database System Monitor. SQLSTATE=00000 You will see that no data is returned, since
you have just started the DB2 instance.
1-1-4 To connect to the database, enter db2 connect to <Txx>
The database will respond to you with
Database Connection Information
Database server = DB2/LINUX 8.1.0
SQL authorization ID = DB2Txx
Local database alias = Txx
1-1-5 To stop the
DB2 database and instance, you need to disconnect first, then
stop the DB2 database and instance.
db2 terminate
db2 deactivate db <txx>
db2stop
1-2 DB2 EDUs.
1-2-1 Since the training system is a Linux server, EDUs are implemented
as processes. To view the EDUs, you can use ps, or pstree: Here
is an example of pstree:
-db2sysc---db2sysc-+-13*[db2sysc]
`-db2sysc---db2sysc
1-2-2 The answer to this question depends on the number of other DB2 instances and databases that are running on your server . But even with all other training databases shut down, you will see that the SAP training system DEV is running its own databases and DB2 instance.
1-2-3 After starting your DB2 training instance with db2start
use the Unix commands
ps -ef |
grep -i <Txx>
to see that the per-instance processes are started (db2sysc, db2ipccm, and so
on).
1-2-4 After activating the training database with db2 activate db <Txx>
you can see that the per-database processes are started (db2pfchr, db2pclnr,
and so on).
1-3 Storage Conventions
1-3-1 The location of the tablespaces of the database of the SAP training system can not be described, since tablespaces are virtual objects, while DB2 containers map to the physical location. The containers reside in /db2/DEV/sapdata1/NODE0000, /db2/DEV/sapdata2/NODE0000, /db2/DEV/sapdata3/NODE0000, /db2/DEV/sapdata4/NODE0000, /db2/DEV/sapdata5/NODE0000, and /db2/DEV/sapdata6/NODE0000.
1-4 Database users and groups
1-4-1 The name of the group is defined in the database manager
configuration. You can view the database manager configuration with
db2 get database manager configuration
or - in short -
db2 get dbm cfg
Here, the SYSADM_GROUP parameter holds the group name.
1-4-2 In SAP systems, there are three different types of users that are relevant to the database operation. This is the "connect user" as defined during installation. It can be sapr3, or sap<sapsid>. The connect user is not a member of a special DB2 group. For SAP system administration, you will use the <sapsid>adm user, which is member of the SYSCTRL_GROUP. The database administrative user is db2<dbsid>, which is member of the SYSADM_GROUP.


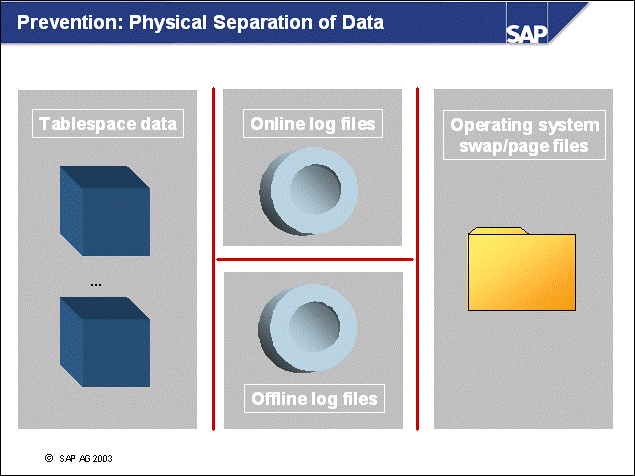
n A well-designed disk layout ensures minimal impact of data loss due to hardware errors, as well as well-performing system operation. The following rules should be obeyed for reasons of performance and safety.
n The operating system directories (especially the paging or swap files/devices) should be separated from all database directories (performance).
n Because database logging involves intensive and synchronous input/output (I/O), the online log directory should be located on fast, preferably dedicated disks (performance).
n If the online log directory is lost, a restore and rollforward will be necessary. In this case, it is crucial that all offline log files created since the last backup are available to prevent data loss. This goal can be achieved by separating online and offline log files on different physical devices. Additionally Dual Logging is recommended (safety).
n If database containers are lost, a restore and subsequent rollforward are necessary. To be able to reapply all transactions, both online and offline log directories should be separated from the container devices (safety).

n As part of your backup strategy, you must consider the consequences of losing specific database files and you must take appropriate measures to reduce these risks:
If database containers are lost, the database (or at
least the tablespaces affected) has to be restored.
To minimize the risk of losing a container, you should mirror the directories
containing the DB2 containers: /db2/<DBSID>/sapdata<x> for
UNIX; <drive:>\db2\<DBSID>\sapdata<y>
for Windows.
If an online log file is lost, the database server will perform an emergency shutdown, and a subsequent restart recovery is not possible. Therefore, you have to restore the database. Because transaction information is lost with the log file, data loss is unavoidable. Therefore, SAP recommends providing redundancy for the online log directory by using DUAL LOGGING with the DB CFG parameter MIRRORLOGPATH (If you use Version 7.2, you should use the registry variable DB2_NEWLOGPATH2).
The same problems occur if database configuration files are lost. Again, redundancy of the instance directory/file system is advised: /db2/<DBSID>/db2<dbsid> for UNIX; <drive:>\db2<dbsid> for Windows.
If an offline log file is lost, the ongoing database operation is not directly affected. However, in case of a restore, the database cannot be rolled forward to its latest consistent state. (An immediate database backup is mandatory if loss of an offline log file is detected.) To prevent this data loss, you should mirror the offline log files.
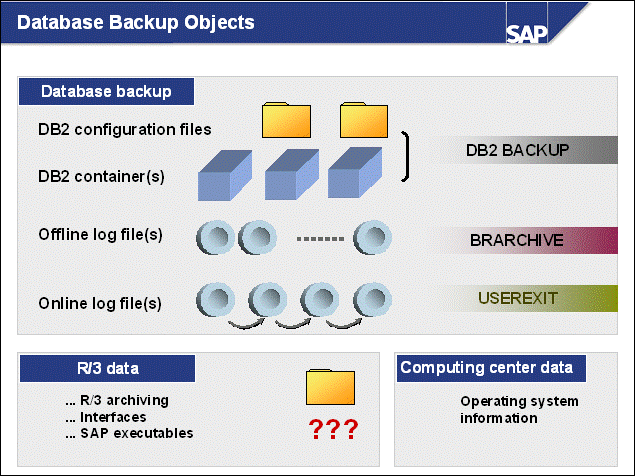
n To implement your database backup strategy, you must know which objects are backed up and which tools are used:
If you use the DB2 backup utility, the databases are backed up under control of the DB2 instance. DB2 backup processes create backup images that contain both the database's data and the contents of the database configuration files. This backup image does not consist of a copy of container and configuration files, instead it includes their contents.
To back up the offline log files from the log_archive directory/file system, we recommend using the SAP tool brarchive.
SAP data is not backed up with DB2 tools or brarchive. You have to use operating system tools to do this.
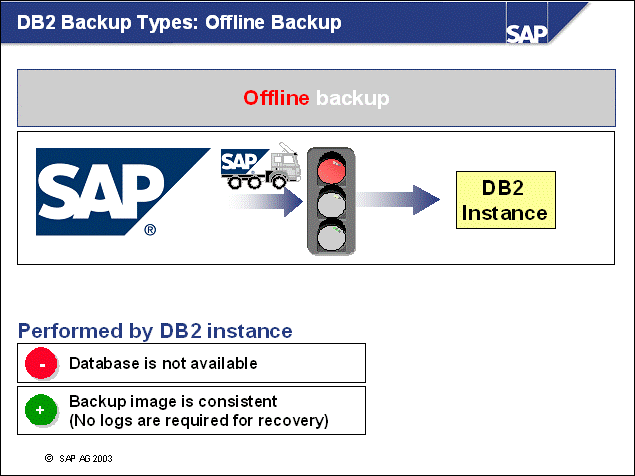
n One way to perform a DB2 backup is the offline backup. To be able to perform this backup, no application can be connected to the database. The DB2 backup utility creates the backup image and does not allow any new connections during the course of the backup.
n Offline backups are always consistent because the backup images are read from a database in consistent state with no active transactions.
n To preserve the buffer qualities of SAP application server buffers, the SAP system may remain up and running during the time of the backup. However, all work processes are disconnected from the database and remain in a reconnecting state. That is, end users cannot use the work processes during the backup. After the backup is complete and the database is available again, these processes reconnect to the database using the reconnect feature of the SAP DBSL.
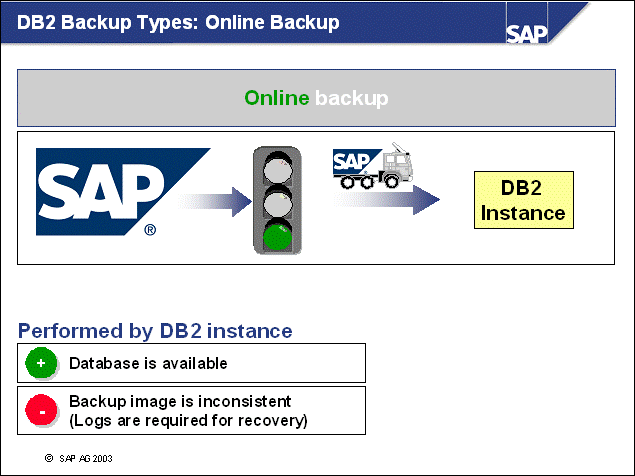
n Using the DB2 online backup, the DB2 backup utility runs in parallel to ongoing activities of database applications, such as SAP applications.
n Because transactions are executed during an online backup, the backup image created cannot reflect a consistent state of the database. If a restore of an online backup is necessary, all changes that occurred during online backup have to be applied again.
n Therefore, it is absolutely necessary to provide all the log files that were written during an online backup to obtain a consistent state of the database.
n Because SAP operation continues during online backups, system availability is increased while high application server buffer qualities are maintained.
n Note: DB2 can perform online backups only if your database is operating in Log Retention mode.
n Since Version 7, the current log file will be archived when the online backup is complete.
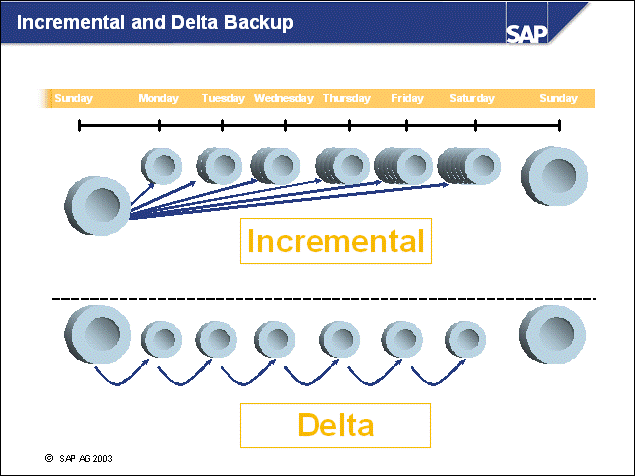
n Incremental backups contain all pages that have been changed since the last full backup.
n Delta backups contain all pages that have been changed since the last backup of any granularity.
n If you switch on DB CFG parameter TRACKMOD, the database engine tracks which pages have been changed. This means that only modified pages are included in the backup image of an incremental or delta backup.
n Incremental and delta backups offer the following benefits:
Smaller backup size because only modified pages are included
Minimization of I/O
Ability to recover with less rollforward time (for example, weekly full backup versus weekly full backup plus daily incremental or delta)

n There are two ways to back up a DB2 UDB database. The first method uses the DB2 CLP.
n You can issue a DB2 backup command directly from the command line. If you are not familiar with the syntax of the utility, you can obtain help by issuing the following command:
db2 '? Backup'
n You need SYSADM, SYSCTRL or SYSMAINT authority to be able to perform a backup.
n In a multi-partition environment, you should use the prefix db2_all. A command for a backup on a complete database with more than one partition should be as follows:
db2_all "db2 'backup db <DBSID> to <path>'"

n The SAP system provides the second method for performing DB2 database backups.
n You can schedule periodic database backups if you use the DBA Planning Calendar (from transaction ST04, choose Jobs DBA Planning Calendar (or transaction DB13)).

n DB2 database backups are performed under the control of the DB2 instance. Because of this architecture, the DB2 backup utility reads only the contents of the objects that need to be backed up (rather than backing up files on operating system level).
n Both the contents of the containers for the specified tablespaces and the configuration information (such as the container location, sizes, and database configuration values) are read by the utility and written into a DB2-specific backup image.
n The backup image may reside on disk devices or tape drives, or may use advanced storage solutions such as Tivoli Storage Manager and Legato Networker.
n Each backup image that is created is identified by a unique timestamp. A corresponding entry is logged into DB2's backup and recovery history file.

n The db2agent EDU (engine dispatchable unit) communicates with and controls the operation of two special processes, db2med and db2bm, which are started with the backup.
n The db2med processes are media controllers. They transfer data from backup buffers that are full. The number of db2med processes depends on the number of backup devices or sessions.
n The db2bm processes are buffer manipulators. Their task is to move data from tablespace to backup buffer (not buffer pools). The number of buffer manipulators is set in parameter PARALLELISM. Because one buffer manipulator will work on a tablespace at a time, you should not set the value for PARALLELISM higher than the number of tablespaces. The db2bm processes use prefetchers to improve parallelism to access the tablespaces.
n The number of buffers must be high enough to keep the output device(s) busy.
n The size of the backup buffer should be a multiple of the largest extent size, for example, 1024 or 2048 of 4 KB pages (4 MB, 8 MB).
n Example: You have two DLT tape drives and five RAID1 mirrored disks for the containers. If you have correct striping of the containers, you will keep all disks busy when backing up five tablespaces at the same time (PARALLELISM=5). With the given number of output devices (2), the degree of parallelism (5), and two spare backup buffers, configure nine backup buffers. The quantity of prefetchers used by the backup in this example is 5. Because the SAP system may also do prefetching, you should take this into account when configuring the number of prefetchers in your database (DB CFG parameter NUM_IOSERVERS).

n In the BUFFERS parameter, you can specify how many memory areas are used to store data before it is written to the target media.
n The number of sessions is determined by the number of target devices (which must equal the number of media control processes).
n When determining your optimal backup configuration, test a variation of the settings with subsequent measurements.

n For optimal performance, you should use more than one process to exploit parallelism. To do this, you must have at least one backup buffer available for each of the following:
Each db2med process writing to a medium
Each db2bm process transferring data from tablespaces to backup buffers
n In live systems, backup buffers are transferred to media much slower than they are filled by the db2bm processes. You should therefore always have filled buffers waiting for db2med processes.
n During online backups, backup buffers reside in random access memory (RAM) together with other programs and buffers (buffer pool). You must take this into account when defining your memory sizing.
n Because the utility heap size (DB CFG parameter UTIL_HEAP_SZ) of SAP systems is normally rather small, you should manually increase the heap to accommodate a larger number of backup buffers or larger backup buffer sizes.

n When you use fixed block sizes for devices, only 512, 1024, 2048, and 4096 bytes are supported as block sizes. This is because DB2 BACKUP writes a 4 KB header onto the tape device.
n Note: Backup buffer sizes are not restricted with fixed device block sizes.
n If the device block size is set to 0, variable block size will be used. The use of variable block sizes needs special consideration. For more information, see SAP Note 199665.
n If you use variable block sizes to increase backup performance, the following condition must be met:
The buffer size specified in the backup command must be less than or equal to the maximum variable block size supported by the hardware/OS vendor.
n If the backup buffer size and tape block size do not have the correct combination, backup will complete successfully but it will not be possible to perform a restore from that backup image.
n Note: If you are not backing up to tape, larger backup buffers are better. For example, you can use larger backup buffers when you perform backups to disk and hierarchical storage systems, such as TSM and Legato Networker.
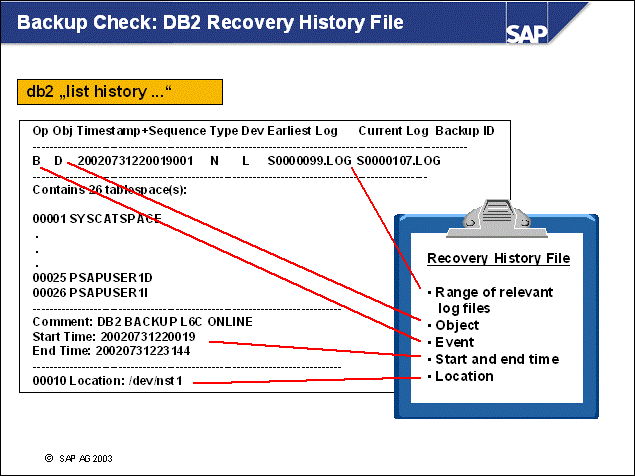
n The summarized backup information in the recovery history file can be used to recover all or part of the database to a given point in time. The file includes the following information:
The part of the database that was backed up and how it was backed up
The time when the backup was made
The location of the backup image (the device information)
The last time a restore was performed
n Every backup operation (tablespace and full database) includes a copy of the recovery history file. The recovery history file is linked to the database. When a database is dropped, the recovery history file is deleted. Restoring a database to a new location restores the recovery history file. When a database image is restored to the original database, the existing history recovery file is not overwritten.
n If the current database is unusable or not available and the associated recovery history file is damaged or deleted, an option on the restore command allows only the recovery history file to be restored. The recovery history file can then be reviewed to provide information about the backups to use to restore the database.
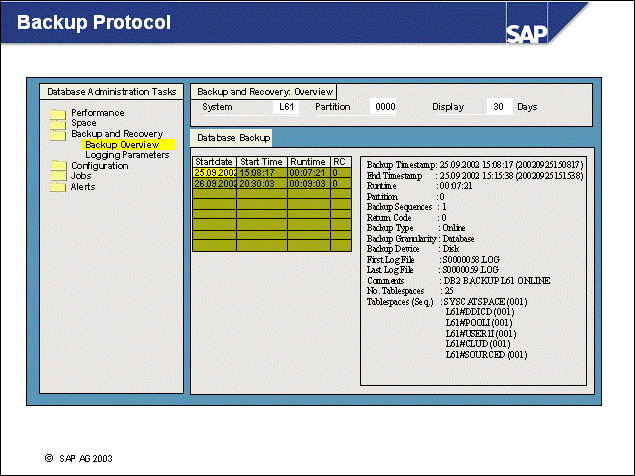
n From transaction ST04, choose Backup and Recovery Backup overview (transaction DB12) to see the summarized backup information.
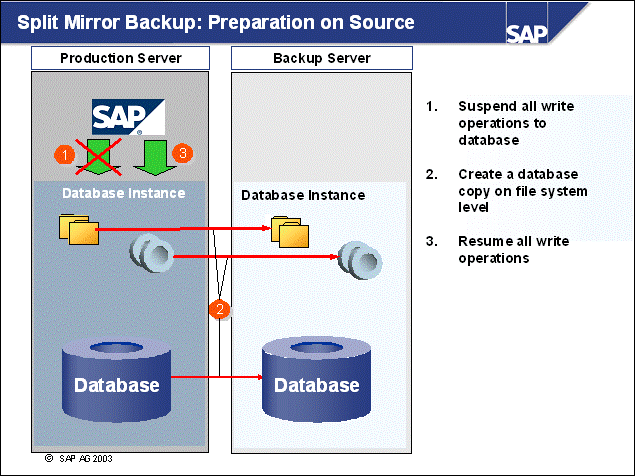
n Instead of backing up the production database as discussed until now, you can consider using an advanced backup concept, such as using the features of the underlying disk subsystem.
n The benefit of an advanced backup concept is to minimize the impact a backup operation has on the production environment.
n The objective here is to have a clone of the production database for use on another system. Use the following procedure on the production (or source) system:
1. Suspend I/O with this command:
db2 set write suspend for database
This step suspends all write operations to the database. Read-only transactions will
continue as long as they do not request resources held by the suspended I/O.
2. Split the mirror:
Now the file system copy of all database file, log files and instance information
must be performed. You can use storage subsystems or a copy of the file systems on
the same server, or you can copy the files to another server.
3. Resume I/O with this command:
db2 set write resume for database
After this operation, you must resume all write operations to the database.
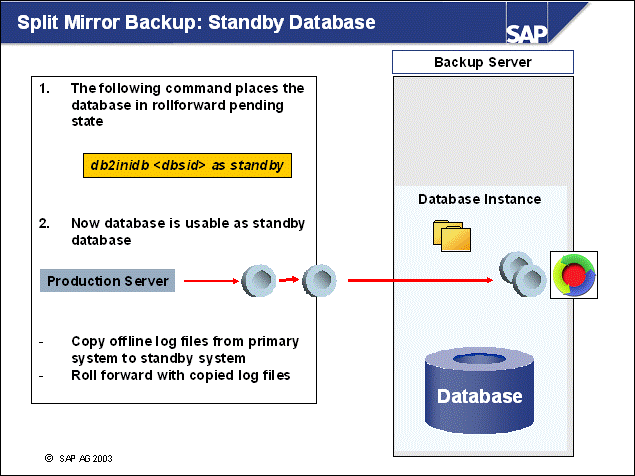
n With this advanced backup scenario, a second (standby) database is permanently in the state rollforward pending. It cannot be accessed by applications, instead it waits for more transaction log files.
n Follow these steps for using the split mirror as a standby database:
1. Start the standby DB2 instance with the command:
db2start
2. Establish the standby database with the command:
db2inidb <dbsid> as standby
n Whenever a log file is released on the production system, db2uext2 copies it to the log files's standard target device (for example, log_archive). In addition, db2uext2 can create a second copy in a common directory that is shared by the production and standby database servers.
n On the standby database server, db2uext2 is used to retrieve the log files during rollforward.
n These log files might not have to be applied immediately, but after a configured period of time. This makes it possible to prevent logical errors from being applied to the standby database.
n A backup taken after db2inidb and before the rollforward phase can be restored on the production system. A subsequent rollforward is possible.
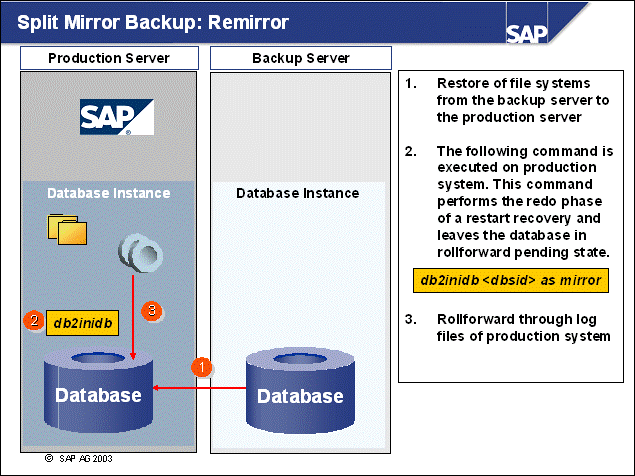
n The third way to split the mirror is to copy the database files without log files back to the source machine.
n To copy the database files back to the source machine without the log files, enter the following commands:
1. Start the production DB2 instance with the command:
db2start
2. Reestablish the mirrored copy with the statement:
db2inidb <dbsid> as mirror
3. Replay all work with the statement:
db2 'rollforward db <dbsid> to end of logs and stop'
The log files of the primary system will be used for this action.

n On this slide, you see one way to use this database copy.
1. Start the standby DB2 instance with the command:
db2start
2. Use the following command to perform the redo phase and undo phase of a restart recovery:
db2inidb <dbsid> as snapshot
n Note: Backups taken from this snapshot cannot be used to roll forward the primary system.
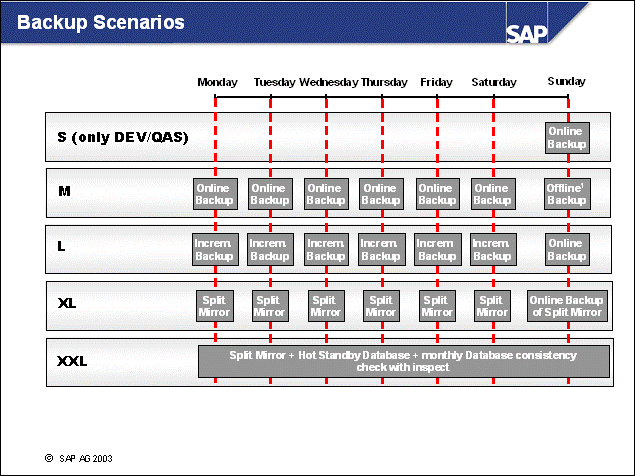
n The above slide shows SAP's recommendations for use of the different backup options. The T-shirt size model (S, M, L, XL, and XXL) can be used for the database size and system availability.
n There is no technical reason to force customers to create an offline backup with DB2 database servers. You could have your own implementation-specific requirements that might lead to the conclusion that offline backups are necessary although downtime will be introduced. In this case, SAP will endorse your decision as well.
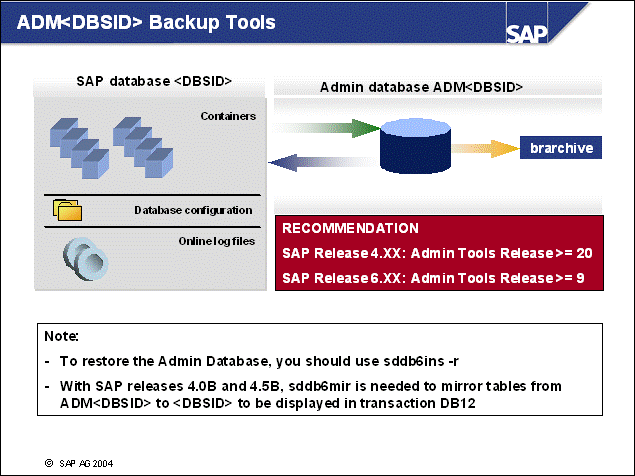
n We strongly recommend using the most current Admin Tool release.
n The contents of the admin database ADM<DBSID> are backed up during each brarchive run.
n The restore of the Admin database can be performed with:
sddb6ins -r
n For more information, refer to the Database Administration Guide for SAP on IBM DB2 Universal Database for Unix and Windows and the "Tools for DB2 Database Servers" unit.
|
|
Unit: Managing Backups |
|
|
At the conclusion of this exercise, you will be able to: Schedule and perform different backups Get and evaluate the backup protocols |
Preparation:
To access your training system and use your training database <Txx>
during the following exercises, please start your Web browser. Use the server
name and port number provided by your instructor and enter the following URL: Error! Hyperlink
reference not valid.>. A graphical desktop will
appear in your browser window. Please enter the password sapdb2 to
access the desktop. From now on, you can use the desktop to open multiple
windows.
You will also be able to reconnect to your desktop in case you close your Web
browser window.
Go to directory /db2/<Txx>: cd /db2/<Txx>
Create a backup directory: mkdir backup
Change to the backup directory: cd backup
1-1 Change the configuration of your training database <Txx>
1-1-1 Change the DB CFG parameter LOGRETAIN to ON.
1-1-2 Enable the TRACKMOD parameter.
1-1-3 Which activity do you use to make those changes active?
1-1-4 Connect to the database and explain what you see.
1-2 Perform an offline backup of your training database <Txx>.
1-3 Perform an offline tablespace backup of the following tablespaces: PSAPPOOLD, PSAPBTABD. Write down the timestamp for the backup image. You will need it later.
1-4 Retrieve the DB2 recovery history information of your training database <Txx> for all backups using the DB2 CLP.
1-5 Retrieve the DB2 recovery history information of your training database <Txx> for all backups taken since yesterday using the DB2 CLP.
1-6 Assume the DB2 recovery history file was destroyed. Restore the recovery history file from the backup created in 1-3 using the DB2 CLP.
Retrieve information about all backups of the SAP training system DEV that have been performed up to now. Do not use the DB2 CLP.
1-8 Which other option do you have (beside using the backup command from the DB2 CLP) to perform or schedule backups?
|
|
Unit: Managing Backups |
1-1 Change the database configuration.
1-1-1 Use
the following command
db2 "update
db cfg for <Txx> using logretain on trackmod on"
Since we have not supplied a DB2 Logging
User Exit, we can not follow the SAP convention to switch USEREXIT to ON.
Therefore, the DB2 Log Files will stay in log_dir without further archival.
1-1-2 The requested change has already been made with the above command.
1-1-3 Restart the DB2 instance with
db2stop
db2start
1-1-4 As soon as logretain becomes active, the database will not accept any connections, except for backup. Therefore you will not be able to connect to the database at this time.
1-2 Use the following command:
db2 "backup database <Txx> to /db2/<Txx>/backup with 4 buffers parallelism 2"
1-3 Use the following command:
db2 "backup database <Txx> tablespace PSAPPOOLD, PSAPBTABD to /db2/<Txx>/backup with 4 buffers parallelism 2"
This is not enough, since you must also ensure that the indexes of the tables are backed up as well.
Since the tables and indexes should be in the same backup image, a better solution will be the following command:
db2 "backup database <Txx> tablespace PSAPPOOLD, PSAPPOOLI, PSAPBTABD, PSAPBTABI to /db2/<Txx>/backup with 4 buffers parallelism 2"
1-4 Use the following command:
db2 "list history backup all for <Txx>"
1-5 Use the following command:
db2 "list history backup since <yyyymmdd> for <Txx>"
1-6 Use the following command:
db2 "restore db <Txx> history file online from /db2/<Txx>/backup taken at <timestamp of backup image noted in 1-3>"
1-7 Log on to the SAP training system DEV. In transaction ST04, go to Backup and Recovery -> Backup Overview, and use the information in section Database Backup.
1-8 In transaction ST04, go to Jobs -> DBA Planning Calendar (DB13). It is possible to perform and schedule different types of backups from there. The benefit of this procedure is that you do not need an operating system account.


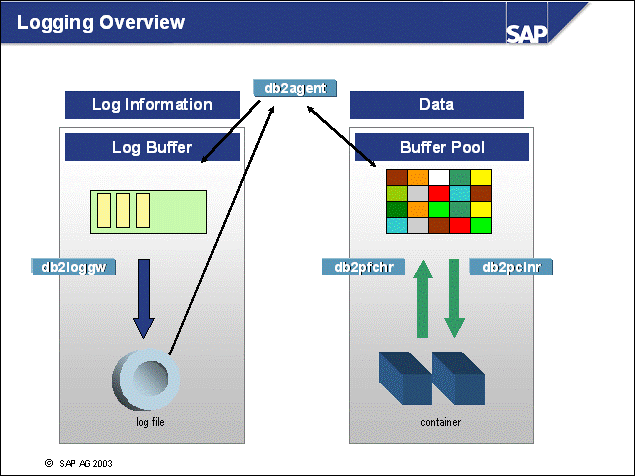
n In the above slide, you see how DB2 uses two different methods to write changes to disk:
n Using the buffer pool, pages are changed in the buffer pool by the DB2 Agent (db2agent) engine dispatchable units (EDUs). Information about these changes is written to the log buffer by the db2agent using log records. The path of the log information is as follows:
Log records are written from the log buffer to log files in directory log_dir by the db2 log writer EDU. This is done (1) when an application performs a COMMIT SQL statement, (2) every second, and (3) when the log buffer is full - whatever comes first.
During a rollback, the db2agent reads the log records from the log file.
The pages are updated in the buffer pool(s).
n Page cleaners copy updated pages to disk when triggered. Page cleaners get triggered when (1) the maximum amount of log space that should be read during crash recovery has been reached (DB CFG parameter SOFTMAX), (2) the maximum percentage of changed pages has been reached (DB CFG parameter CHNGPGS_THRESH), and (3) no pages are available during insert or update. In this case, "victim page cleaning" is started.
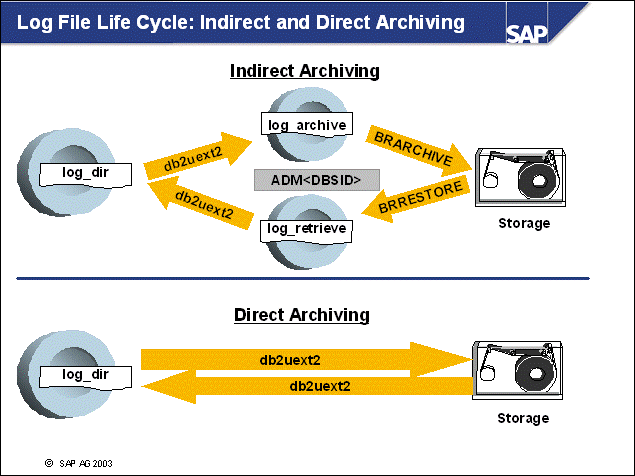
n With two-step log file management (Indirect Archiving), the DB2 logging user exit (db2uext2) and the SAP tools brarchive and brrestore are used:
The DB2 logging user exit copies log files from the online log directory (log_dir) to the offline log directory, log_archive. For each log file copied, an entry is created in the administration database, ADM<DBSID>. The logging user exit also copies log files from the log_retrieve directory to the online log directory (log_dir) when a rollforward command is issued.
The SAP tool brarchive provides log file backup functionality. For each log file that is copied to or deleted from the offline log directory (log_archive), a corresponding entry in the administration database is made.
The SAP tool brrestore provides log file restore functionality. For each log that is restored to directory log_retrieve, a corresponding entry in the administration database is made.
The tables of the administration database ADM<DBSID> will be updated during log file management operations.
n With one-step log file management (Direct Archiving), the following occurs:
Log files are transferred immediately to storage. As a consequence, brarchive or brrestore are not needed in this scenario.
Log files are stored on safe, external media as soon as possible. If a roll-forward recovery occurs, these log files can be retrieved directly by the DB2 logging user exit. No operator intervention is required. (For the two-step scenario, log files have to be retrieved from storage.)

n This slide shows how log files are handled during Indirect Archiving:
When a log file is filled with records, the DB2 logging user exit is called by the database to copy the log file into the directory log_archive. The copied log file is the offline log. When all referenced pages have been written from the buffer pool(s) to disk, the online log file is ready for renaming in the log_dir directory. A copy remains as an offline log in the log_archive directory.
Log files that reside in the log_archive directory can be archived to storage with brarchive.
For this setup, you should install the SAP DB2 Admin Tools with an administraion database.
n To get protocol information about DB2 logging user exit executions, call transaction ST04, choose Backup and Recovery -> Backup Overview -> section User exit. Section brarchive provides similar information about brarchive executions.
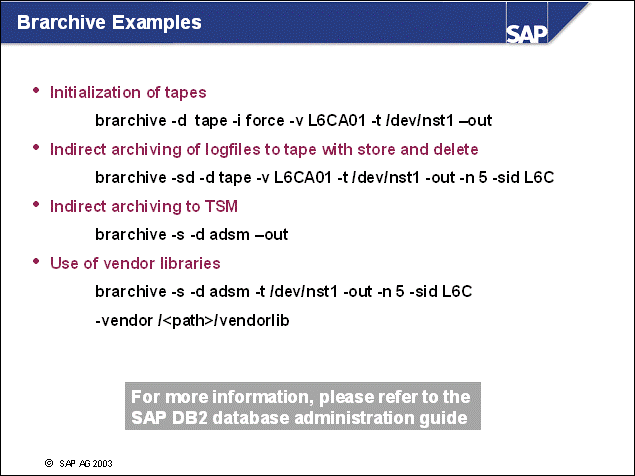
n brarchive is used to archive offline log files to storage, such as to tape or to a storage management solution. brarchive retrieves the range of log files that are to be archived from the administration database.
n If you use a storage management solution as brarchive's target device, tape management is performed automatically by the storage management system.
n Important: You should initialize tapes for a whole backup cycle.
n The environment file init<DBSID>.db6 is the primary source for setting the admin tool configuration. We strongly recommend using this file to configure the Admin Tool-specific environment variables. This file was not available before SAP R/3 4.6A. For more information, refer to the SAP DB2 database administration guide, Database Administration Guide for SAP on IBM DB2 Universal Database for UNIX and Windows.
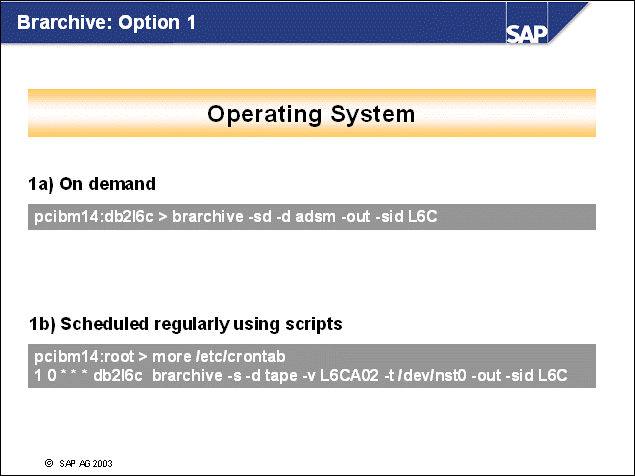
n You can use the command line interface of brarchive in two ways:
As shown in example 1a, you can issue the brarchive command directly from the command prompt.
As shown in example 1b, you can use a scheduler to schedule backups of offline log files using a script.
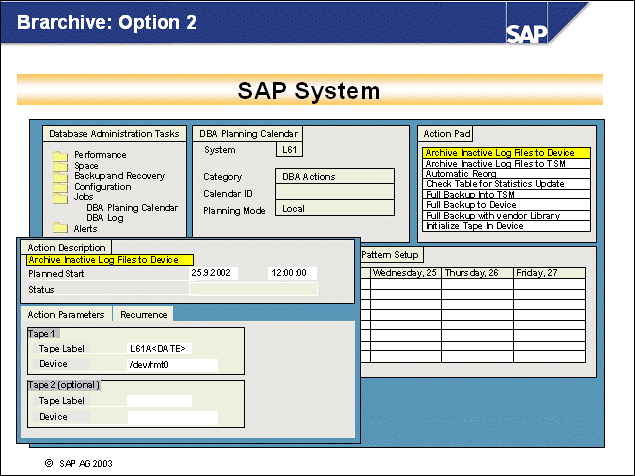
n The second option uses the SAP DBA Planning Calendar (from transaction ST04, choose Jobs DBA Planning Calendar (or transaction DB13).
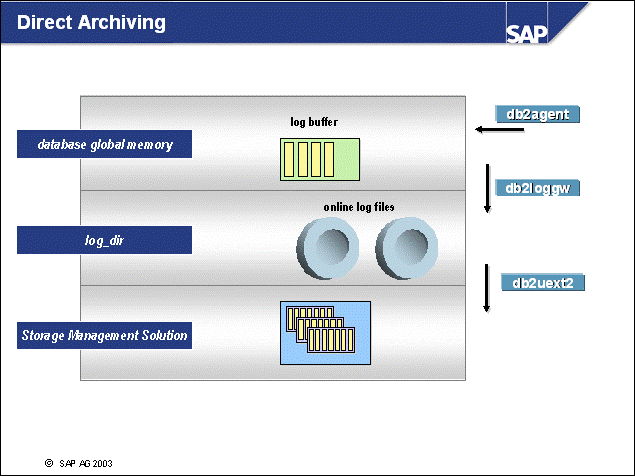
n You can set up one-step log file management by changing the configuration of the DB2 logging user exit. Here log files are transferred immediately to storage. Consequently, brarchive and the Admin Database are not needed.
n The benefit of this approach is that log files are stored on safe, external media as soon as possible. If a roll- forward recovery is necessary, these log files can be retrieved directly by the DB2 logging user exit. No operator intervention is required.
n To avoid file system full conditions in the log_dir directory, make sure that your storage management solution is highly available.
n Set the DB2DB6_UEXIT_DIRECT variable in the environment file init<DBSID>.db6 to indicate direct archiving. Use the following syntax:
For TSM: DB2DB6_UEXIT_DIRECT = TSM: [<Management Class>]
For a vendor's user exit program: DB2DB6_UEXIT_DIRECT = VENDOR and DB2DB6_VENDOR_UEXIT = <vendor user exit program>
For more information, refer to the SAP DB2 database administration guide.
n For this setup, you should install the admin tools without the Admin Database.
n In Version 8, you can use infinite logging. This means it is possible to support environments with large jobs that require more log space than you would normally allocate to the primary logs. For this, the database configuration parameter LOGSECOND must be set to -1.
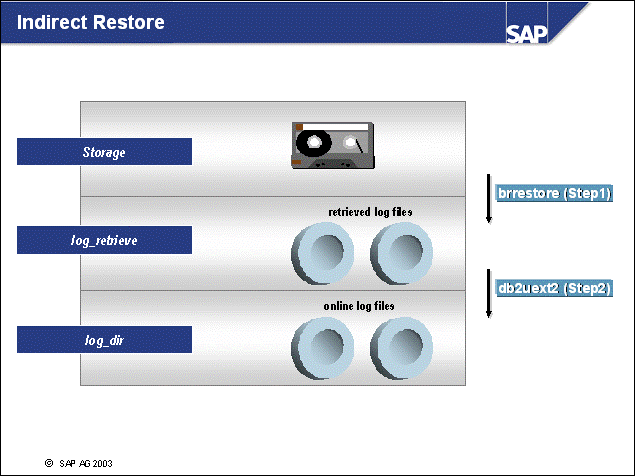
n The brrestore configuration is set in the environment file init<DBSID>.db6. The parameter DB2DB6_RETRIEVE_PATH is important in this file because it specifies the path used to retrieve log files from storage.
n Brrestore must be called manually or scheduled through the DBA Planning Calendar, whereas the DB2 logging user exit is called automatically.
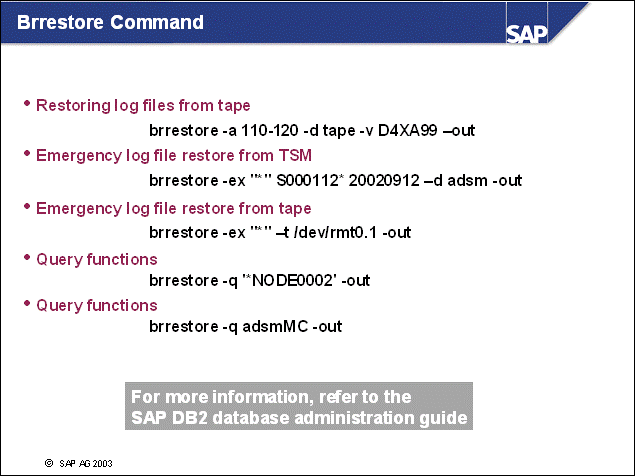
n The brrestore command can be used to retrieve any log file archived using brarchive.
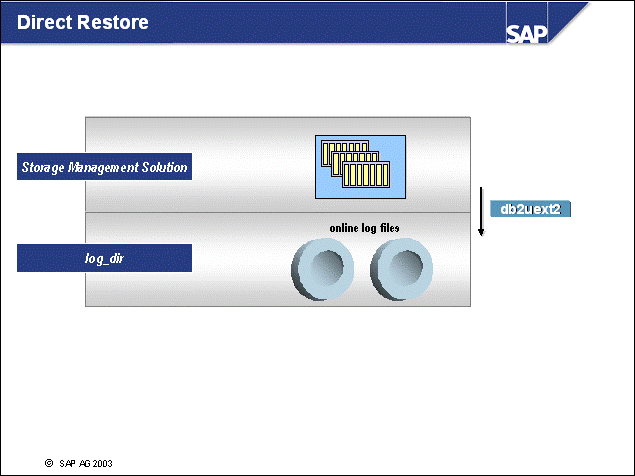
n As for Direct Archiving, for Direct Restore the variable DB2DB6_UEXIT_DIRECT must be set in the environment file init<DBSID>.db6.
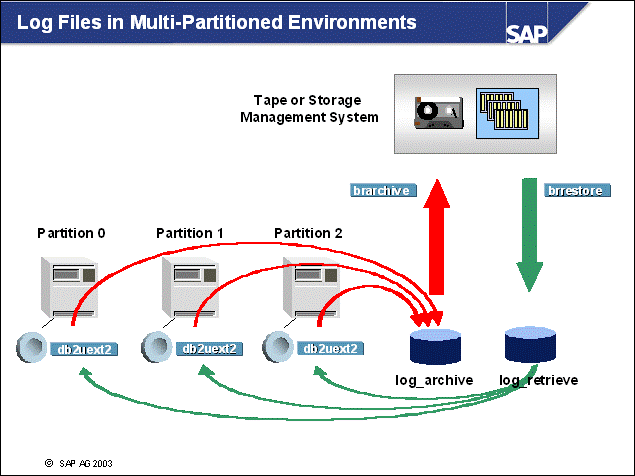
n When using multiple partitions, the database will produce log files on a per-partition basis. The DB2 logging user exit will copy the log files from each log_dir directory (local to each partition) to the shared log_archive directory. Note: The node number is part of the log file name, after it has been copied from the partition to log_archive.
n Using the global directory log_archive, the SAP tool brarchive is used to store all the log files of the partitions to tape or a storage management system.
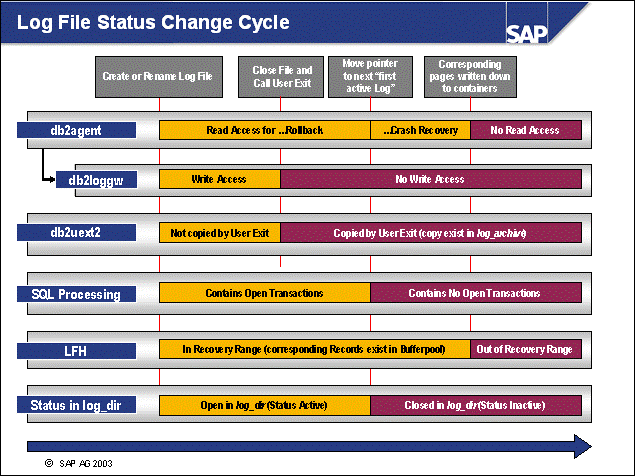
n This slide shows the different processes or threads and states of the log file.
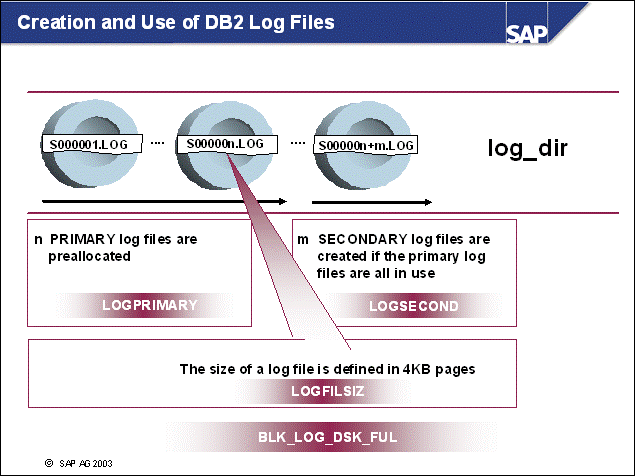
n At database startup, DB2 searches for log files in directory log_dir. If no log files exist, all primary log files are created by DB2 before the database is made available.
n The number of these log files is defined in the DB CFG parameter LOGPRIMARY.
n The size of the log files (in 4 KB pages) is defined in the DB CFG parameter LOGFILSIZ.
n All log files are created during database operation Restore into new. In most cases, you may not see the full number of log files.
n Secondary log files are created on demand during database operations. The total number of secondary log files is defined with the DB CFG parameter LOGSECOND.
n If the primary log files are all in use, secondary log files are created.
n If the log_dir is full, the DB CFG parameter BLK_LOG_DSK_FUL=ON will ensure that no transactions are rolled back. DB2 will wait until log_dir contains free space again. (With DB2 Version 7, the DB2 registry variable DB2_BLOCK_ON_LOG_DISK_FULL must be set.)
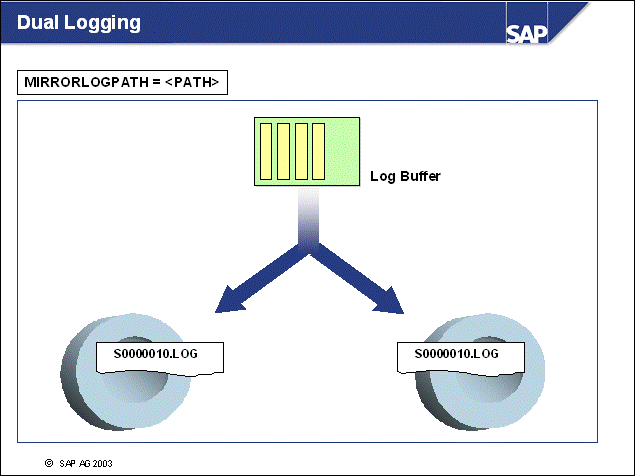
n Log mirroring or dual logging helps to protect the database from the following:
Accidental deletion of an online log file
Data corruption caused by hardware failure
n If you are concerned about possible damages in online log files, you should use the DB CFG parameter MIRRORLOGPATH. (In DB2 Version 7, you should use the registery variable DB2_NEWLOGPATH2.)
n With Dual Logging, DB2 will write a second and identical copy of log files to a different path. We recommend that you place the second log path on a different disk.
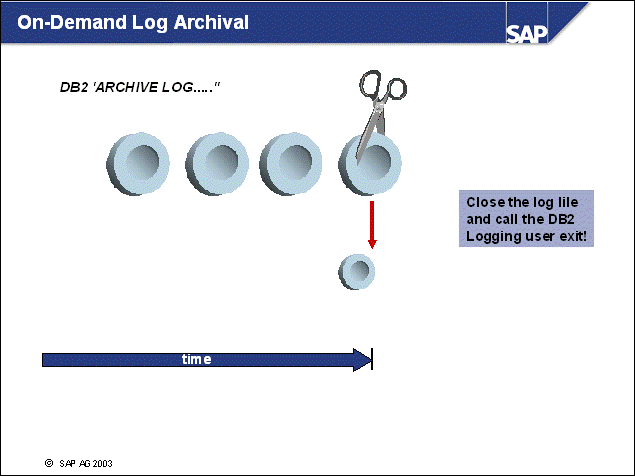
n DB2 supports the manual closing of log files. If the user exit is enabled, the log files will be archived.
n With this option, you can get a complete set of log files up to a known point.
n To initiate on-demand log archiving, enter the following command:
db2 archive log for database <dbsid>
n This command is used automatically at the end of an online backup.
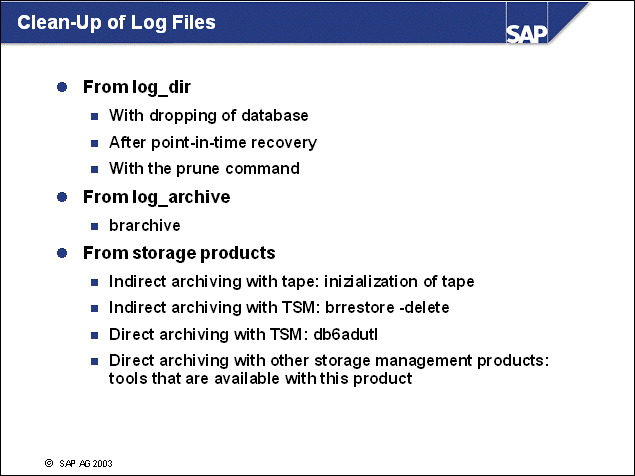
n The strategy of deleting log files depends on the backup frequency, the number of log files generated per day, and the size of the available storage. Log files are located in the log directory or the log archive directory.
log_dir - Normally there is no need to delete files from this directory. Caution: Do not delete files that are still needed by the database.
log_archive - Log files are stored in the log archive directory only if you use indirect archiving. You can delete log files with one of these commands
brarchive -sd
brarchive -ssd
During this action, log files will be saved and deleted. If only -s or -ss are used, the delete stored action, -ds, must be run subsequently.
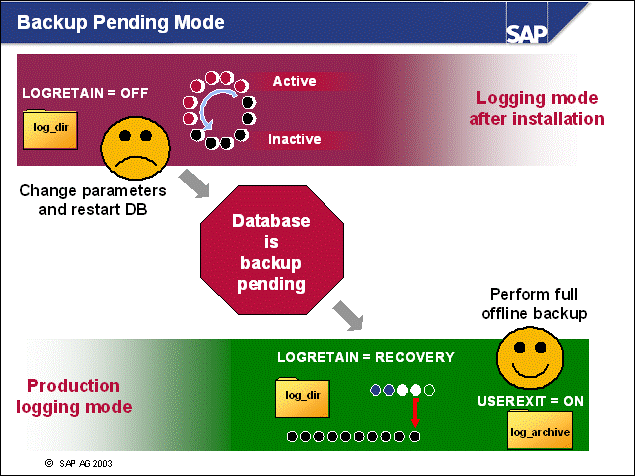
n The initial setting of the DB CFG parameters LOGRETAIN and USEREXIT has to be changed after the installation to enable roll-forward recovery. To view the logging configuration of your database, call transaction ST04, choose Backup and Recovery -> Logging Parameters.
n When these parameters are set and become effective (for example, after restarting the database), DB2 goes into backup pending state. You must then perform a complete offline database backup. This backup is used as the starting point for recovery.
n You cannot connect to the database until this offline database backup has been successfully completed.
|
|
Unit: Managing Database Log Files |
|
|
At the conclusion of this exercise, you will be able to: Monitor and manage the log files of a DB2 database Set up a logging configuration that minimizes the risk of losing data |
Preparation:
To access your training system and use your training database <Txx>
during the following exercises, please start your Web browser. Use the server
name and port number provided by your instructor and enter the following URL: Error! Hyperlink
reference not valid.>. A graphical desktop will
appear in your browser window. Please enter the password sapdb2 to
access the desktop. From now on, you can use the desktop to open multiple
windows.
You will also be able to reconnect to your desktop in case you close your Web
browser window.
1-1 Review the logging mode of the SAP training system DEV. Use an SAP monitoring transaction to get the information.
1-2 What is the maximum space needed for all (possible) log files?
Retrieve information about all DB2 logging user exit and brarchive executions in the SAP training system DEV.
1-4 Truncate the current log file of your training database <Txx>.
1-5 Which feature of DB2 can be used to avoid the loss of log files? How is it enabled?
1-6 Assume that your SAP training system database (not the training database <Txx>) is running in Log Retention Mode. Which options exist for archiving database log files to offline storage?
|
|
Unit: Managing Database Log Files |
1-1 Log on to the SAP training system DEV. In transaction ST04, go to Backup and Recovery -> Logging Parameters. The information can be found in section Logging Configuration.
1-2 Use Size of
Log Files (logfilsiz), Number of Primary Log Files (logprimary) and Number
of Secondary Log Files (logsecond) in section Logging Configuration
in order to calculate the space requirement with the following formula:
space = (logprimary + logsecond) * logfilsiz.
1-3 In transaction ST04, go to Backup and Recovery -> Backup Overview. Use the information provided in sections User Exit and brarchive.
1-4 Execute the following command: db2
"archive log for db <Txx>"
With this, the current log file is truncated. Since USEREXIT is not
switched on, you will see that the log file is not archived, as it would work
in a standard SAP configuration.
1-5 The dual logging feature can be used to avoid the loss of log files due to mishandling or storage problems. It is enabled by using the DB CFG parameter mirrorlogpath.
1-6 There are two possibilities: Direct Archiving and Indirect Archiving.
Indirect Archiving: SAP's DB2 logging user exit copies log files from the
online log directory (log_dir) to the offline log directory (log_archive). Then
the SAP tool brarchive is used to transfer the offline log files to storage.
Direct Archiving: SAP's DB2 logging user exit transfers the log files from the
online log directory directly to storage.
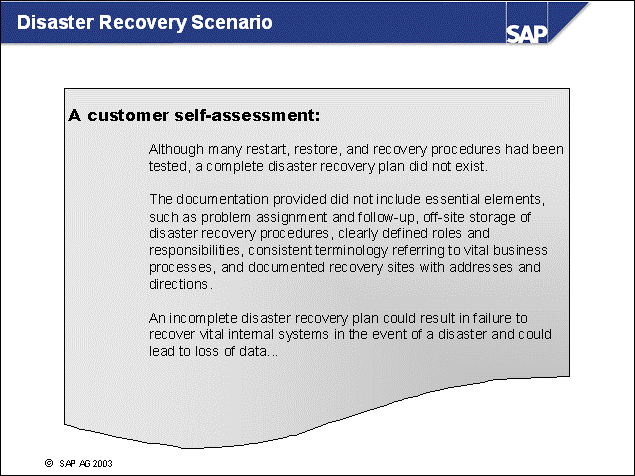
n The above self-assessment was made by an SAP customer. It highlights the importance of these key recovery issues:
Disaster recovery plan (including recovery sites)
Documentation (storage and availability)
Training for recovery
Role descriptions
n Although loss of data does not sound dangerous, you should understand that if there is a loss of production data, your business processes are exposed. In the worst case, you are risking the financial health of your company.
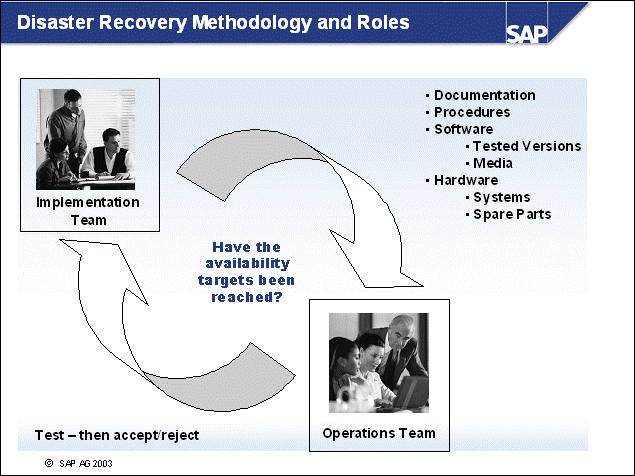
n When implementing a disaster recovery plan, you should consider forming two groups as follows:
Implementation team - This team creates and implements the procedures, and documents the disaster recovery plan.
Operations team - This team tests the plan based on the available documentation, if possible with minimal knowledge of the current implementation. This team is responsible for signing off the strategy. This strategy should be approved only if the availability targets (time to productive use of the data) have been met and the documentation is proven to be error-free and non-ambiguous.
n You should take into account that staff who have been trained to perform the recovery may not be available. This means that the staff onsite during the disaster recovery should be able to follow the documentation to recover the business data without additional help.
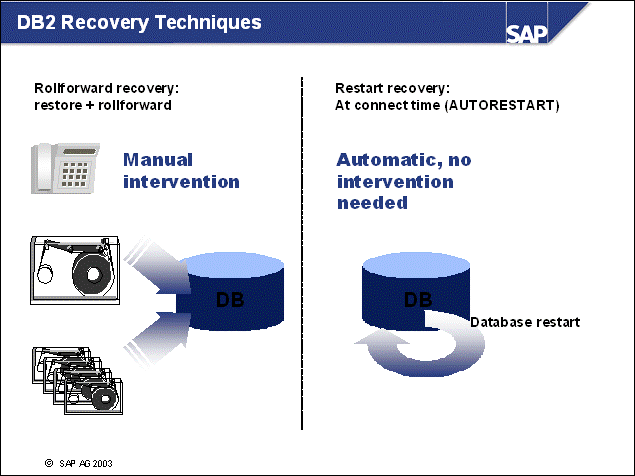
n DB2 offers two types of recovery:
A rollforward recovery must be performed when all or parts of the disks have been lost or corrupted. The process is lengthy and requires manual intervention.
A restart recovery is performed by DB2 whenever the database server has not been properly shut down. In this case, the contents of the buffer pool(s) are lost. This can be caused by a system hardware failure or power loss.
Restarting the DB2 database initiates a crash recovery. DB2 reruns all transactions that were performed previously but were not recorded on disk. The DB2 log file header file (/db2/<DBSID>/db2<dbsid>/NODE0000/SQL00001/SQLOGCTL.LFH) contains the log sequence number, which will be used as a starting point for this type of recovery. If you lose this file, you will not be able to restart your database and rollforward recovery must be performed.
To ensure that DB2 automatically starts the restart recovery, the DB2 database parameter AUTORESTART must be set to On, the default setting in SAP systems.
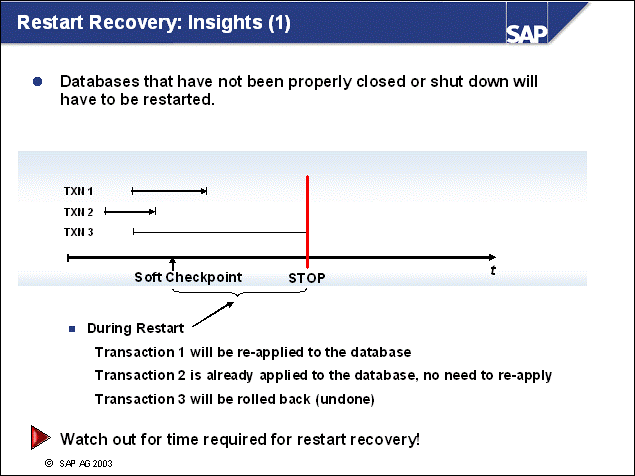
n Restart recovery involves re-applying changes to the database that have not been written to disks.
n During Restart, the database server performs the same workload that was already performed during normal processing since the last soft checkpoint.
n Therefore, you should look closely at restart performance by adjusting the SOFTMAX parameter according to your system availability requirements:
With small SOFTMAX, restart takes less time but there are more frequent soft checkpoints.
With larger SOFTMAX, restart potentially processes more log records because there are fewer frequent soft checkpoints. In addition, there will be less disk activity during normal processing.
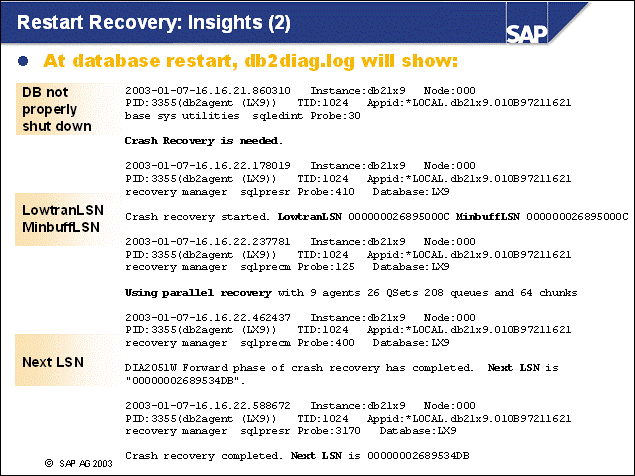
n Restart recovery involves the following steps:
Detection for proper shutdown of the database. If the database was stopped improperly, restart recovery will be needed.
Re-applying the changes to the database (REDO phase).
Removing uncommitted changes in the database (UNDO phase).
n LowtranLSN - LSN of the first log record written by the oldest uncommitted transaction is read from LFH. With multiple uncommitted transactions, this is the oldest log record (sorted by write time).
n MinbuffLSN - LSN of the oldest change to unwritten data pages. Because these pages have not been written (checkpoints or other events), the changes to pages, starting from this page and sorted by LSN, have probably been lost.
n NextLSN - LSN of the next log record that will be written. It is higher than all the LSNs used in the system.
n DB2 adjusts the number of DB2 agents used in the restart recovery based on the number of CPUs in the database server. The multiple DB2 agents re-apply the transactions in parallel. This can be seen in the slide (Using parallel recovery.).
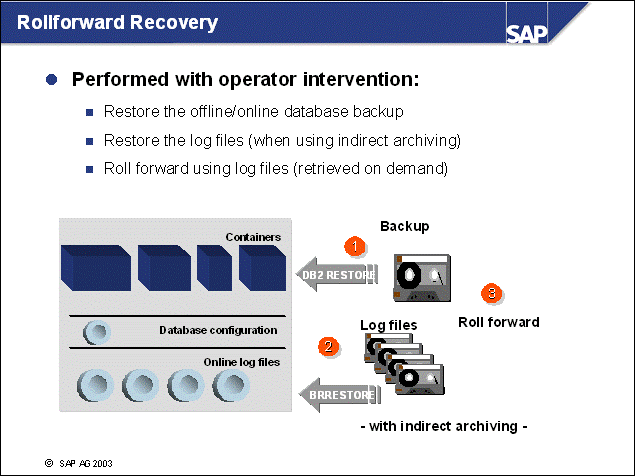
n With a rollforward recovery, a backup image (online or offline) and all the subsequent log files created after the backup are used to recover the database to a consistent state.
n When you design your backup strategy, consider how much time you want to spend on a recovery. A current backup enables you to perform a faster recovery because there are fewer log files to re-apply.
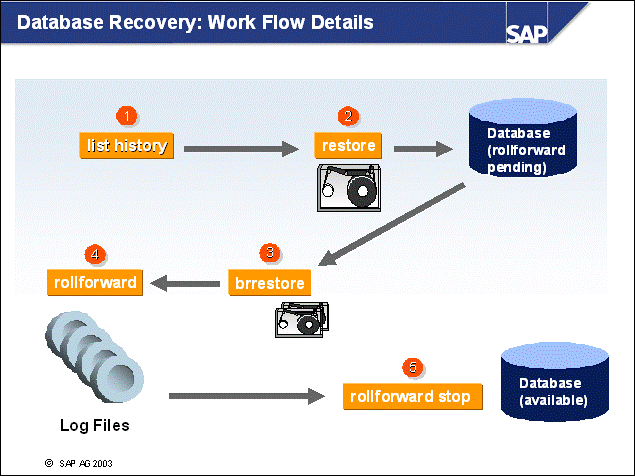
n You must perform a database recovery in several steps:
Use the DB2 recovery history file to search for the timestamp of the most recent backup. If you performed full database backups, you can identify the backup image using this timestamp. If the size of your database mandated backups on tablespace level, you must search for multiple backups.
Restore the database using the DB2 command restore.
Retrieve the log files that are requested in the recovery history file. The file specifies the log files needed to make an online backup available, for example, the log files created during the online backup. If you want to recover all operations made to the database, you must retrieve all the log files that have been created since the online backup was started.
In the rollforward phase, use the DB2 rollforward command to re-apply the transactions using the log files that have been retrieved.
Finally, you must instruct the database to stop the rollforward. The database will then be made available.
n This example does not show the rollback phase, which is the last step in this process. During the rollforward process, all committed transactions are reapplied to the database. At the end of the rollforward, a list of open transactions exists. These transactions are still waiting for a commit. For data consistency reasons, open transactions are then rolled back to make sure that changes that are not committed are not applied to the database.
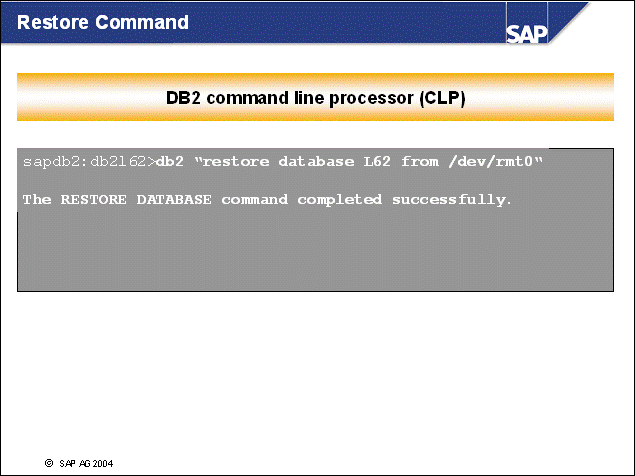
n You can issue a DB2 restore command directly from a CLP session. If you are not familiar with the syntax of the utility, you can obtain help by issuing the following command:
db2 '? Restore'
n In a multi-partition environment, you should use the prefix db2_all. This means that a command for a restore on a complete database with more than one partition should be as follows:
db2_all "db2 'restore db <DBSID> from <path>'"
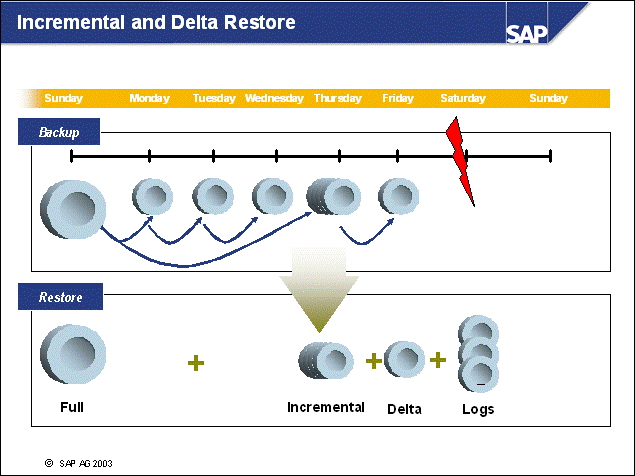
n Incremental backups can be restored by restoring the full backup image and the incremental backup image (only possible when database configuration parameter TRACKMOD is set to ON).
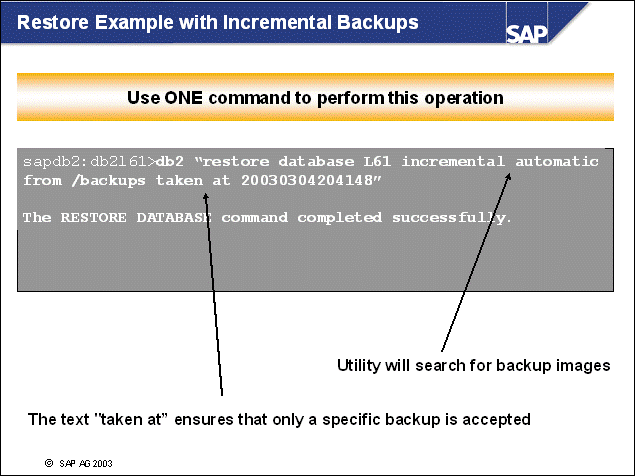
n DB2 incremental backup images can be retrieved by specifying the newest incremental backup timestamp and the keyword incremental automatic. In this case, DB2 selects the appropriate full backup image (if possible) initially. Then, DB2 applies the incremental changes that have been stored in the specified backup image.
n The contents of the /backups directory will be as follows:
-rw-r----- 1
db2l61 dbl61adm 12615680 Mar 4 20:34
/tmp/SAMPLE.0.db2l61.NODE0000.CATN0000.20030304203434.001
-rw-r----- 1 db2l61 dbl61adm 12615680 Mar 4 20:36
/tmp/SAMPLE.0.db2l61.NODE0000.CATN0000.20030304203548.001
-rw-r----- 1 db2l61 dbl61adm 4227072 Mar 4 20:41
/tmp/SAMPLE.0.db2l61.NODE0000.CATN0000.20030304204148.001
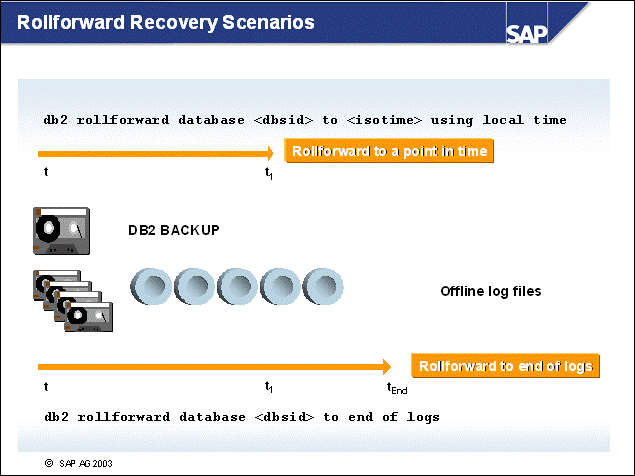
n There are two ways to perform a rollforward recovery:
You can roll the database forward to a certain point in time.
You can roll the database forward to the end of the logs.
n If you perform a point-in-time recovery, ensure that you are using universal time CUT) - also known as Greenwich mean time - because the database server calculates the timestamps based on this time zone (DB2 Version 7) With DB2 Version 8, you can also use local time. Applications from different time zones may connect to the database, but internal processing is done in CUT
n Note: The timestamp used for backups is based on the local time zone of the database server.
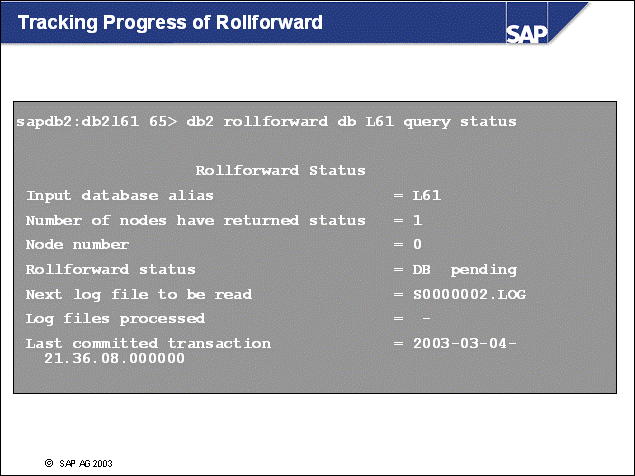
n The clause query status allows you to monitor the progress of the recovery.
n By knowing the name of the first and last log file needed for recovery, you can calculate the total number of log files needed for recovery and interpolate recovery time.
n With the above DB pending state, the database can be rolled forward. With the not pending state, the database is accessible.
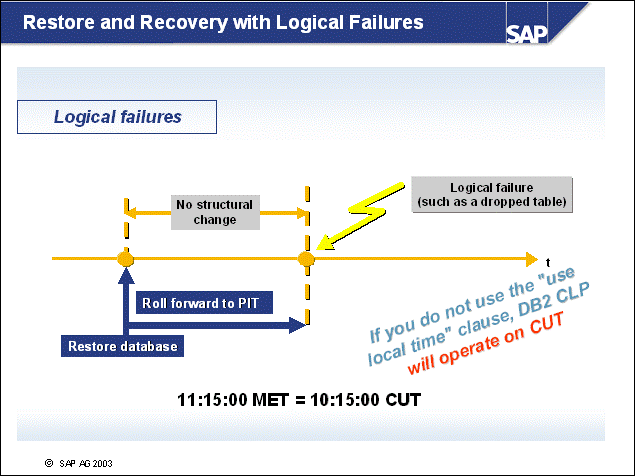
n In this example, the database is returned to a previous given status and then rolled forward to another (later) specified time. The following steps outline the procedure for doing this:
First, a restore is performed using the most recent backup.
Then all required archived log files are copied back from the archive tapes.
The database is then rolled forward to the specific point in time when the logical failure occurred.
n This type of recovery is called point-in-time (PIT) recovery. You should only use PIT recovery if the data that is not applied to the database can somehow be re-created (since it has been added in transactions later than the PIT).
n Time specifications for the PIT have to be made in CUT (DB2 Version 7), or can be performed using your local time zone (DB2 Version 8). The UNIX date command helps you to retrieve local time and CUT.
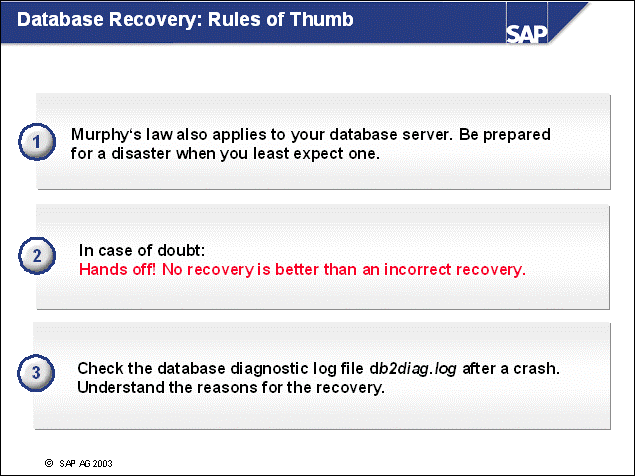
n When performing a database recovery, apply the rules of thumb listed above.
n As long as you have adhered to a proper data backup strategy, it should always be possible to restore your database to a complete and consistent status. Depending on the knowledge and experience of your administrator, you may need to call on external help.
n The db2diag.log file most likely shows the reason for the database recovery, from the database software perspective. You must be able to understand the reasons to ensure that they never happen again.
n Ensure that your last backup is available either on tape or on a hierarchical storage management system such as Legato Networker and TSM
n Using a tested recovery scenario allows you to minimize the number of errors during this process. You should practice recovery using the tools with sample databases.
n Operation of SAP software is not possible while the database is being restored.
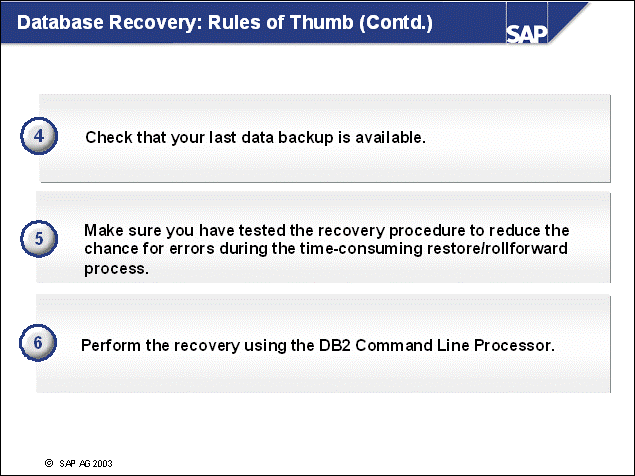
n If you encounter problems during recovery, you should request help from SAP. As soon as you have resolved the problems with the help of SAP, continue with the recovery.
n Using direct DB2 commands to perform recovery is not an easy task and should be performed by very experienced DB2 database administrators only.
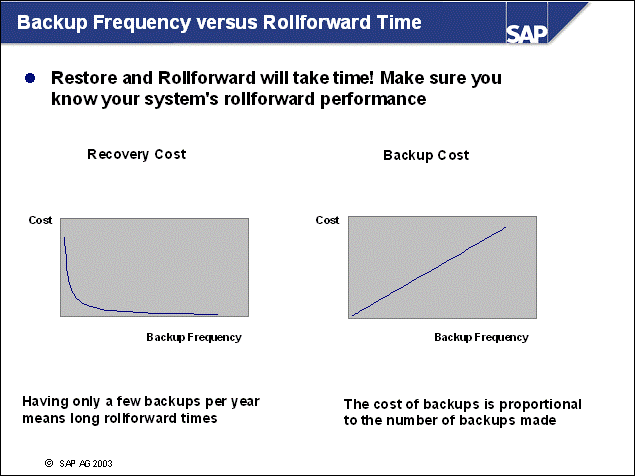
n Recovery cost is the estimated cost of downtime. Downtime is dependent on the time to recover the database. Restoring a backup and rolling forward the database will be more time consuming with more log files to process (when fewer backups are made). With more frequent backups, your downtime will be shorter because fewer log files have to be applied after restore.
n Backup cost includes tape cartridges used, tape unit and tape robot down payment, and wear and tear. It also includes system performance impact through added I/O. The cost will increase with more backups made.
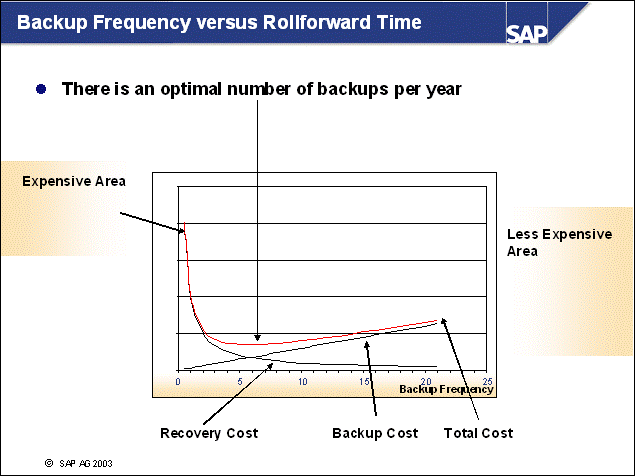
n The calculations shown here clearly show the importance of finding the optimal backup frequency.
n The total cost for the strategy is a sum of the backup cost and the recovery cost. When you create your backup strategy, you must consider the following:
Having consistent readable backups is the only way to ensure a database can be recovered.
Ensure that you use high-quality disks and/or redundancy to minimize the need for recovery.
Fast recovery is crucial. Test your system's throughput. Do not rely on estimates.
For critical systems, consider advanced solutions such as DB2 SUSPEND WRITE.
n Remember, database administrators are always asked about backup costs, but never about the cost of downtime.
n Check if incremental or delta backup improves your situation.
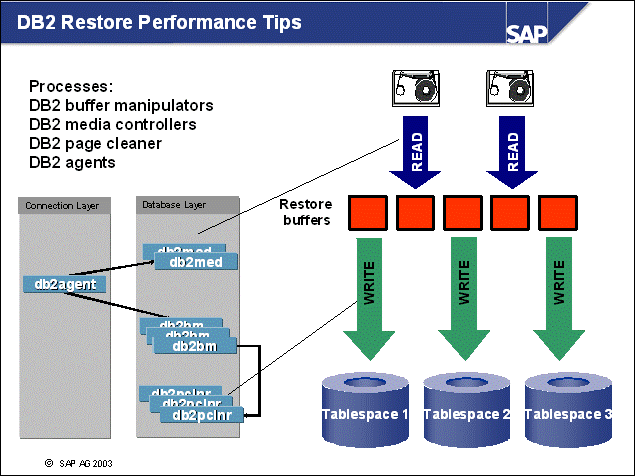
n The db2agent EDU (engine dispatchable unit) communicates with and controls the operation of the db2med and db2bm processes, also during a restore.
n During restore operations, the media controllers transfer data from device to restore buffers. When a buffer is full, it is transferred to disk on FIFO basis. The number of db2med processes depends on the number of restore devices or sessions. The parameter PARALLELISM may be used during a restore, but if you are not using multiple tape devices or TSM sessions, multiple db2bm processes are not used. It is always much faster to empty the buffers to disk than to fill them from tape or TSM. For example, you should use PARALLELISM when reading the backup images from disk.
n The number of buffers should be large enough to keep the media controllers and their devices busy (more than 2).
n The size of the restore buffer must be equal to or a multiple of the backup buffer size that you specified when the backup image was taken, for example, 1024 or 2048 of 4 KB pages (4 MB, 8MB). If you achieve good backup performance with a certain backup buffer size, you can ensure excellent restore performance by using the same size for the restore buffers.
n Note: During a restore, DB2 uses page cleaners to transfer the buffer contents to disk.
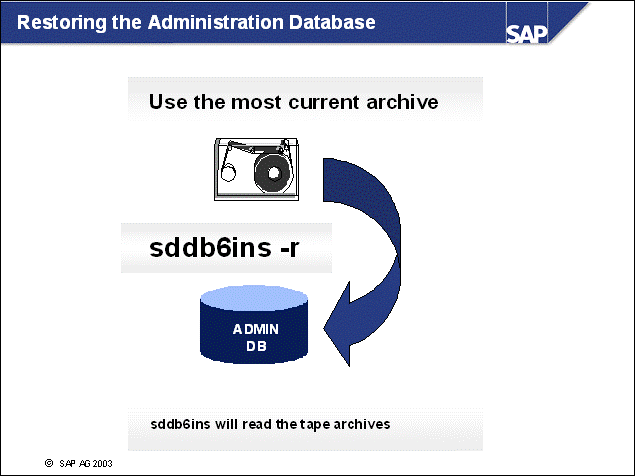
n An export of essential information about that database is archived. The brarchive command performs this automatically. The backup image is a compressed archived file (CAR file) consisting of individual table exports. This image does not contain action or action detail information such as that shown on SAP-DB2admin's journal pages. This data is deleted after the administration database is recreated using this image.
n
With up-to-date Admin Tools, you will be able to
restore the administration database using
sddb6ins -r.
n For details of the new sddb6ins functionality that replaces the sddb6mir -r option, please refer to SAP Note 533979.
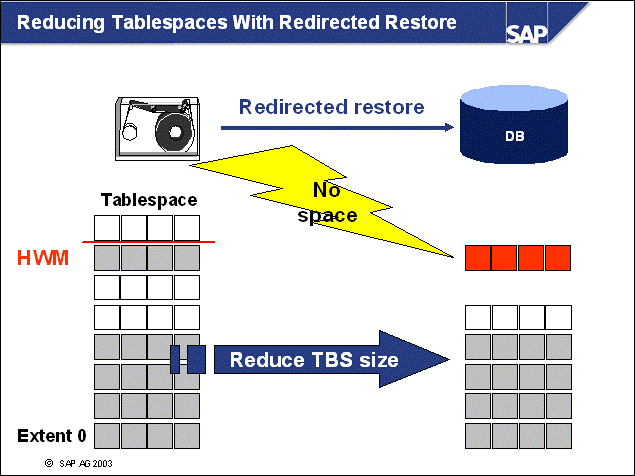
n When reducing the tablespace size using redirected restore, you must ensure that the total size of the tablespace is not reduced below the high watermark of the tablespace.
n If this is not the case, DB2 RESTORE will try to write an extent that does not exist any more on disk.
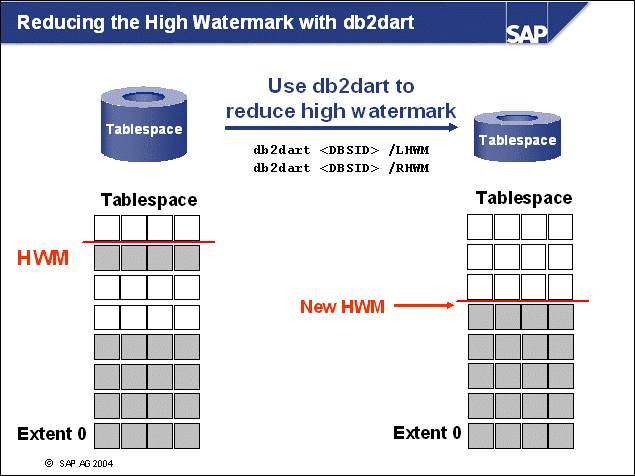
n To reduce the high watermark on a tablespace, you can perform the action Reorg all tables in tablespaces in the DBA Planning Calendar (from transaction ST04, choose Jobs Planning Calendar (transaction DB13)). If the high watermark was not changed, you must repeat this procedure (if necessary, several times). In an extreme case, the number of repetitions equals the number of tables in the tablespace.
n You can use db2dart to specify the tables that are connected to the high watermark.
n For a complete reference on how to reduce the high watermark (HWM) on a tablespace using db2dart, refer to SAP Note 152531 and 486559
n Under certain circumstances, you may not be able to reduce the HWM below a certain page number. This is because a tablespace object map may reside at this page.
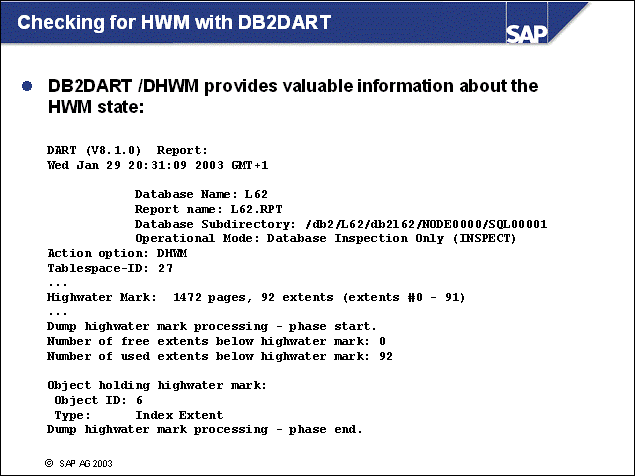
n When calling DB2DART /DHWM, processing will focus on details that are helpful for reduction of the high watermark (HWM). In this example, the Object ID 6 holds the HWM. By analyzing the details of the DB2DART output, you can assess the possibility for lowering the HWM.
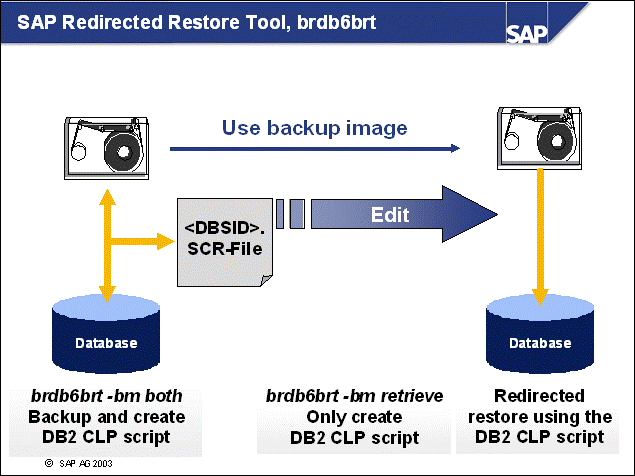
n SAP offers the executable brdb6brt (brt = backup and restore tool), which creates a DB2 CLP script that can be edited to perform a redirected restore. This database maintenance tool can be used to perform the following:
Back up a database and create a DB2 CLP file for subsequent restores
Create only a DB2 CLP file for subsequent restores
Check the modified DB2 CLP file for correctness (for example, disk space)
n You can also use the DB2 command line processor and the DB2 CLP script as an input file to restore a database with different container names, container paths, or container sizes.
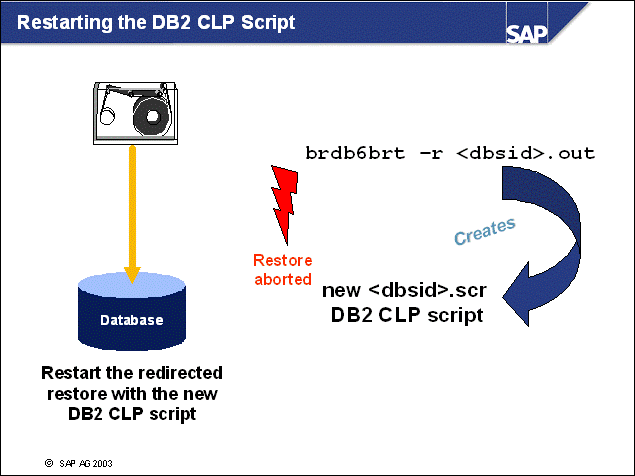
n All actions and error messages from brdb6brt are displayed on the screen and reported in the file <dbsid>.out. The file resides in the current working directory, in most cases the directory where <dbsid>.scr can be found. As a general recommendation, you should ensure that all files that are generated from start of the backup until recreation of the database are placed in the same directory.
n To restart the script, you must execute brdb6brt with option flag -r and parameter <dbsid>.out. Together with the log files, this tool can determine which commands have been executed without errors and which need to be put into a new script. The newly created script is <dbsid>.<nnn>, where <nnn> is a number string between 000 and 999, starting with 000. The first time you restart the script, a second script <dbsid>.000 will be created. This script can be edited and examined for the errors reported by the DB2 CLP.
n The new script has to be executed by db2 -tvf <dbsid>.000.
n If another error occurs during execution of the new script, a restart is still possible using brdb6brt -r <dbsid>.out. However, this will create a script with the name <dbsid>.001.
n The log file <dbsid>.out may not be changed or deleted until the database has been restored completely and the screen displays the message, "The RESTORE procedure has now finished successfully."
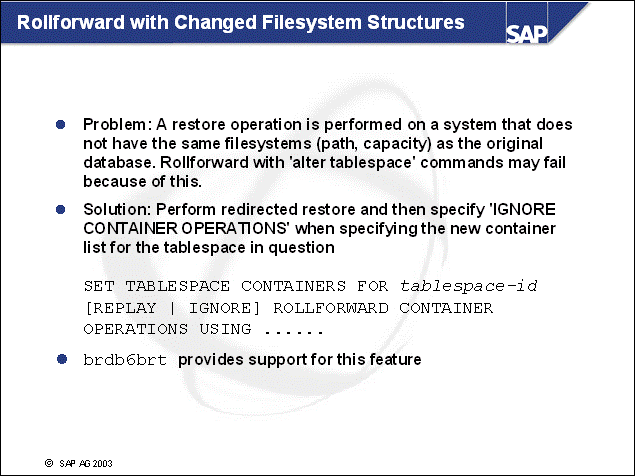
n SAP Note 511372 provides details on this feature in brdb6brt.
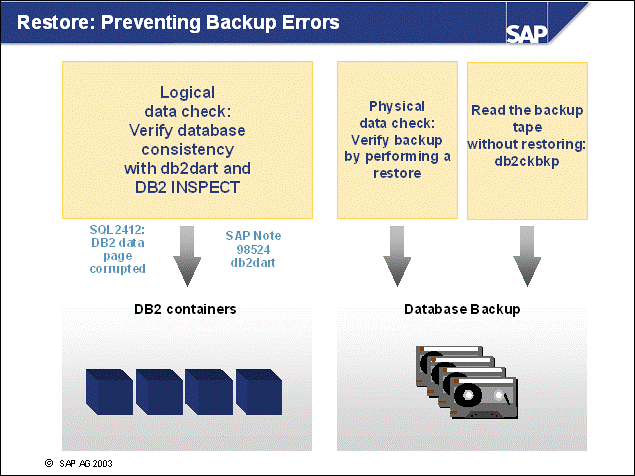
n Your backup strategy must include a verification of the database to be backed up and a verification of the database backup image.
n For the database:
Corrupt DB2 pages (error SQL2412) can appear in your SAP database as a result of operating system or hardware errors. Corrupt DB2 pages may lead to an unusable backup image. Because corrupted pages cannot be read, data will be lost.
The existence of corrupted pages becomes evident only when trying to access the page. A corrupt DB2 page will not be recognized during a database backup operation, therefore, corrupt pages can remain undetected in your system for a long time.
You must also perform a logical data check to verify the consistency of the DB2 database. You can perform this logical data check in regular intervals using db2dart or DB2 INSPECT.
n For the database backup image:
Perform a physical data check to verify the tapes used for a database backup. After a successful backup, perform a test restore of the database to check the physical consistency of the data blocks on tape, and the availability of tape devices and its device drivers.
You can also check the database backup image using the tool db2ckbkp. Details for usage of the tool can be found in the IBM DB2 Universal Database Command Reference V8.

n Recovery situations can be extremely complicated. Rash actions can result in permanent loss of data, which makes a complete recovery impossible.
n Remember to make a backup copy of all online log files first.
n Please test your recovery scenario.
n Please test it again.
n In addition, schedule regular tests. Regular tests are necessary because they will be your life insurance.

|
|
Unit: Database Recovery |
|
|
At the conclusion of this exercise, you will be able to: Recover a database Perform precise rollforward operations |
Preparation:
To access your training system and use your training database <Txx>
during the following exercises, please start your Web browser. Use the server
name and port number provided by your instructor and enter the following URL: Error! Hyperlink
reference not valid.>. A graphical desktop will
appear in your browser window. Please enter the password sapdb2 to
access the desktop. From now on, you can use the desktop to open multiple
windows.
You will also be able to reconnect to your desktop, in case you close your Web
browser window.
1-1 Recover your training database <Txx>
1-1-1 Delete all containers belonging to PSAPUSER1D. To determine the location of the containers, use db2 "list tablespace containers for <tablespace id>". To get the tablespace id, use db2 "list tablespaces". Does the deletion of containers result in error messages in the db2diag.log or changes in the tablespace status?
1-1-2 Restore the database from the backup that was made during the exercises in the Managing Backups Unit.
1-1-3 What is the status of the database after the restore has completed?
1-2 Rollforward Operations
1-2-1 When is the use of DB2 ROLLFORWARD during a recovery operation optional, and when is it mandatory?
1-2-2 Make sure that your training database <Txx> is running in Log Retention Mode and truncate the DB2 log file several times. What can you see in log_dir?
1-2-3 Create table ZTEST in PSAPUSER1D with one column, holding 10 characters with the following SQL statement: create table ZTEST (F1 char(10)) in PSAPUSER1D. Write down your exact time (using the date command). You will need it later!
1-2-4 Drop tablespace PSAPUSER1D with the following SQL statement: drop
tablespace PSAPUSER1D. Restore PSAPUSER1D from the backup that was made
during the exercises in the Managing Backups Unit.
What would happen if you were to rollforward to end of logs (please do
not perform this operation)?
Rollforward to the latest possible time, without dropping the
tablespace again. Prove that you can access the table ZTEST.
|
|
Unit: Database Recovery |
1-1 Recover your training database <Txx>
1-1-1 To retrieve the tablespace information, you
must have a connection to the database. Therefore you must enter:
db2 connect to <Txx>
db2 list tablespaces
db2 list tablespace containers for 17
To delete the containers of tablespace PSAPUSER1D in database <Txx>,
use: rm /db2/<Txx>/sapdata6/PSAPUSER1D.container001
The file db2diag.log resides in /db2/db2<txx>/sqllib/db2dump. To display the contents use tail
db2diag.log
To view the status of the tablespace, use db2 list
tablespaces
1-1-2 To restore the backup enter the DB2 RESTORE command:
db2 restore database <txx> from /db2/<Txx>/backup taken at
<timestamp>
To determine the appropriate timestamp, use db2 "list history backup
all for <Txx>"
Since you will replace the existing database, you must enter y
to confirm the action.
1-1-3 To query the status, use db2 "rollforward db <txx> query
status"
If you want to connect to the database, you must still perform the ROLLFORWARD
STOP operation
db2 rollforward db <txx> stop
after which you can connect to the database again.
1-2 Rollforward Operations
1-2-1 When using an offline backup, the rollforward operation is not mandatory, but still possible. When using an online backup, you must use rollforward to apply (at least) all the log files that were created during the backup operation.
1-2-2 To review if the database is running in log retention mode, enter
db2 get db cfg for <txx> | grep LOGRETAIN
which should show "RECOVERY". To truncate log files, use
db2 archive log for db <txx>
several times. You will see short log files, which have been truncated.
1-2-3 To create ZTEST, connect to <Txx> and enter
db2 connect to <Txx>
db2 "create table ZTEST (F1 char(10)) in PSAPUSER1D"; date
The date is important for the subsequent rollforward operation. In the
following, we assume the date April 1 2003, 15.30:38 local time.
1-2-4 Drop
the tablespace with
db2 drop tablespace psapuser1d
Keep in mind that the above operations are STATEMENTS and not COMMANDS.
They are therefore logged in the DB2 log files. When restoring the database and
rolling forward to end of logs, the CREATE TABLE and DROP operation is
re-applied as well.
We need to make sure that we use the time noted in 1-2-3. Use the following
commands (the timestamp is an example):
db2 restore database <Txx> from /db2/<Txx>/backup taken at
<timestamp>
(To determine the appropriate timestamp, use db2 "list history
backup all for <Txx>")
db2 rollforward db <txx> to "2003-04-01-15.31" using local
time
db2 rollforward db <txx> stop
Since the local time clause is applied, no calculations to UTC must be
performed. But since we want to be able to access ZTEST, the time must be shortly
after 15.30:38. The command
db2 "select * from ZTEST"should show that ZTEST is available again.
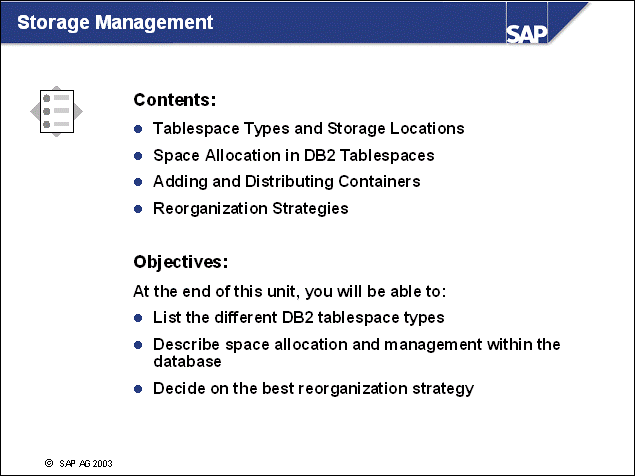
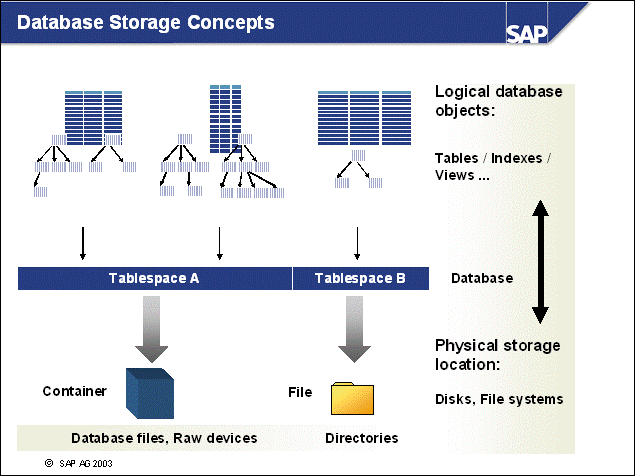
n SAP data is stored in database tables, which are the primary database objects. Other database objects include indexes and views.
n For data access using SQL, knowing the location of data is not necessary. But the proper assignment of tables and indexes to tablespace will improve database throughput. For example, SAP tables and their respective indexes are always stored in different tablespaces. If a read/write head of a disk has read index information, access using a read/write head to related data in the table will be independent if the data tablespace resides on a different disk.
n During SAP database creation, the tables and indexes are assigned to predefined SAP tablespaces. Although it is possible to move tables or indexes to a different tablespace, you should schedule these procedures well in advance because the process of moving data involves database downtime.
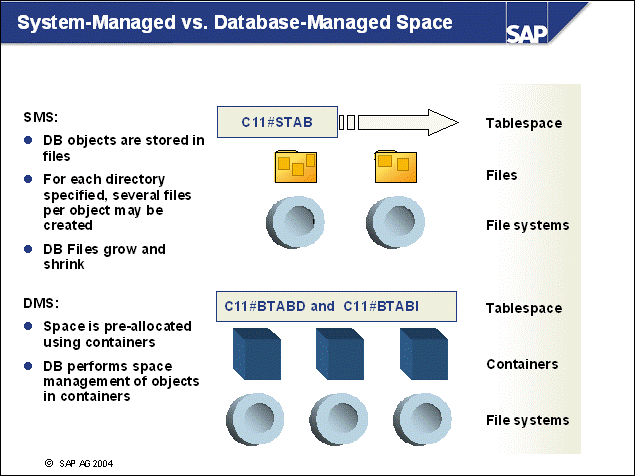
n DB2 provides two ways to manage storage in tablespaces:
System-managed space (SMS)
Database-managed space (DMS)
n System-managed space is appropriate if you do not want to pre-allocate the space for objects in a tablespace. With SMS, one or more directories are presented as container names. The directories must be available and empty during the tablespace creation. For very large SAP systems, the directories should have their own file system on UNIX, residing on a separate disk.
n When an object (such as a table or an index) is created, a file is created in the directory. If an extent has been filled up, a file will be created in the next directory. This is performed in a circular mode
n If an object is dropped, the files are deleted. If an object is reorganized, the file size is adapted. SMS is ideal for temporary tablespaces.
n Database-managed space is SAP's standard DB2 tablespace definition. With DMS-based tablespaces, containers are pre-allocated either by DB2 having FILE based containers or by the system administrator having DEVICE-based containers such as RAW devices (UNIX) or PARTITIONS (Windows).
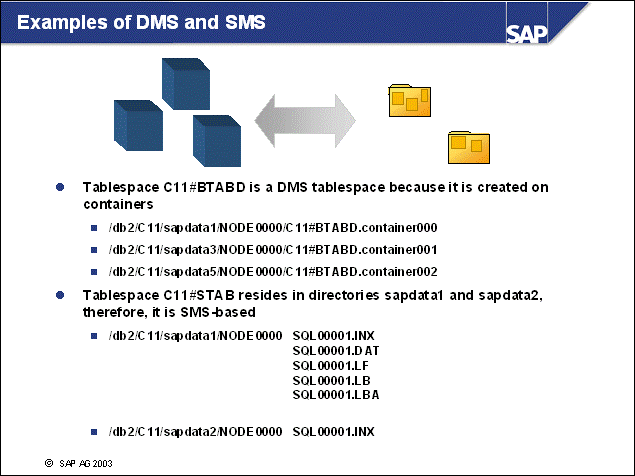
n For database-managed space (DMS), the containers provide storage by being implemented as files or being implemented as raw devices. This space is pre-allocated and initialized during container allocation.
n For system-managed space (SMS), data is stored by DB2 in many different files:
Each table is stored in a file (DAT)
Each index is stored in a file (INX)
Each LONG column is stored in a file (LF).
Long Field column data and allocation information are stored in a file (LB, LBA).
n To check the types of the tablespaces in your SAP system, use transaction ST04, choose Space -> Tablespaces.
n
Alternatively, you can use the following command:
DB2 'LIST TABLESPACES'
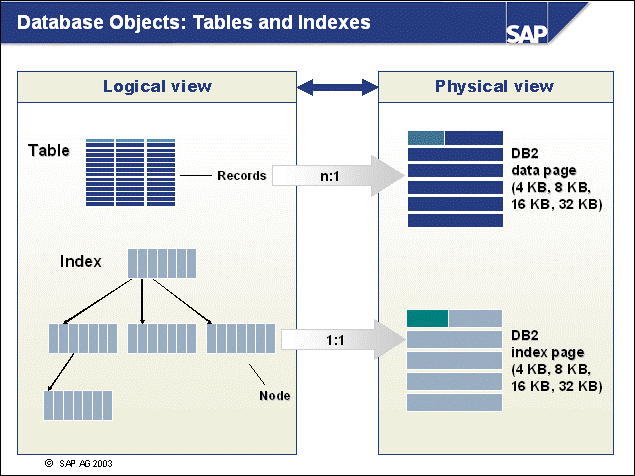
n Tables contain records of data. One or more records of a table are stored in a DB2 data page. Pages are the minimum I/O unit of DB2. A DB2 data page can contain one or more records. But a record must fit in a data page.
n If a record of a table does not fit in a 4096 byte (4 KB) page, the table must be defined in a tablespace that is based on a larger page size. DB2 also provides page sizes of 8192 bytes (8 KB), 16384 bytes (16 KB), and 32768 bytes (32 KB).
n For improved access to data, indexes are predefined by SAP developers. Indexes can also be defined later as further need arises. An index is defined using a few columns of a table, which are accessed frequently. Index data structures allow for efficient retrieval of small quantities of data. Indexes are based on nodes, their storage is maintained within DB2 index pages. Because the pointers pointing to other index nodes are also stored in the index pages, storage of indexes is not as compact as the storage of data records.
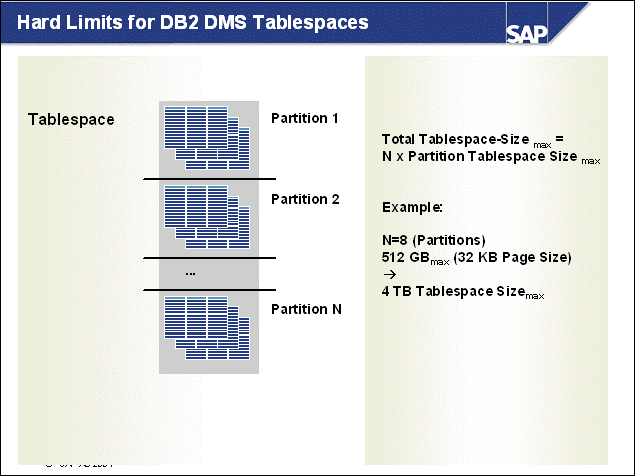
n The maximum size of a DB2 tablespace is based on the following values:
The maximum per-partition size of a tablespace varies with page size:
with 4 KB page size, the maximum per-partition tablespace size is 64 GB
with 8 KB page size, the maximum per-partition tablespace size is 128 GB
with 16 KB page size, the maximum per-partition tablespace size is 25 GB
with 32 KB page size, the maximum per-partition tablespace size is 512 GB
Having a maximum number of 1000 partitions, the actual hard physical limit for a DB2 tablespace is finally approximately
64 TB (4 KB)
128 TB (8 KB)
256 TB (16 KB)
512TB (32 KB)
n SMS tablespaces have different limits on a per-object level.
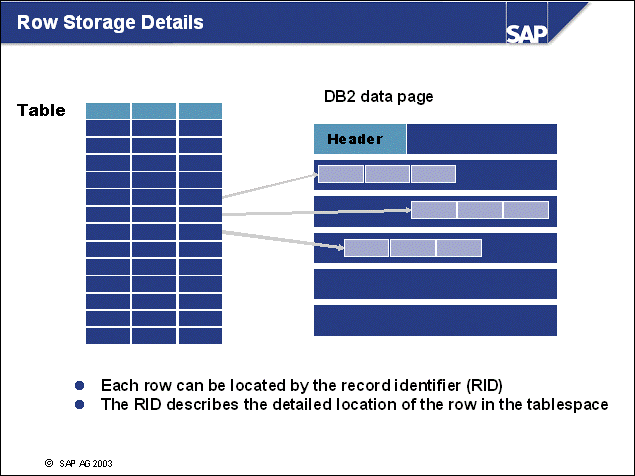
n Data pages are structured into three parts:
Page header - Contains information such as last change transaction LSN (log sequence number). This information is important for recovery purposes and for the backup utilities.
Slot directory - Contains pointers to the actual storage location of the data record in the page. These pointers are offsets into the page.
Space - Allows the storage of the DB2 records.
n The maximum size of the records stored in a page varies with the page size. On a 4 KB page, the maximum length of a row is 4005 bytes. If more data is to be stored in a row, one or more columns of the table have to be stored in LOB or LONG fields. Alternatively, the table has to be stored in a tablespace with a larger page size. With 8 KB pages, the maximum length can be 8101, and so on. More details can be found in the IBM DB2 manual, Administration Guide: Planning, in the "Physical Database Design - Space Requirements for User Table Data" section.
n The maximum size of a row can be calculated based on information from the IBM DB2 manual, SQL Reference Volume 2, in the "CREATE TABLE" section.
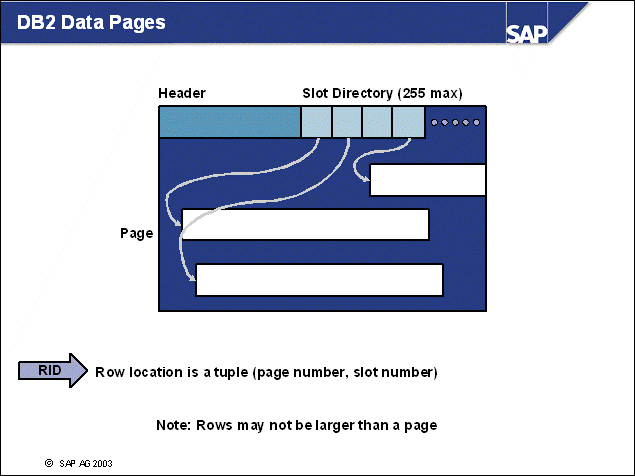
n Each record in DB2 can be located by the record identifier (RID), which consists of the data page number (3 bytes) and the entry number in the slot directory (1 byte). The slot entry contains the byte-offset to the data page, which must be used as the start location for the data record.
n Deleted space is marked in the slot directory, and can be used again for new records of the same table.
n The slot directory contains a maximum of 255 entries. For tables with small records compared to the page size, there might be unused space on each of the pages.
Example: With 4 KB pages and a table defined with a single CHAR(1) field, only 255 records can be stored on each data page. The inaccessible free space for each of the pages of the table is more than 3 KB.
n Note: The above problem does not exist in SAP systems unless you use DB2 pages of 8 KB, 16 KB or 32 KB.
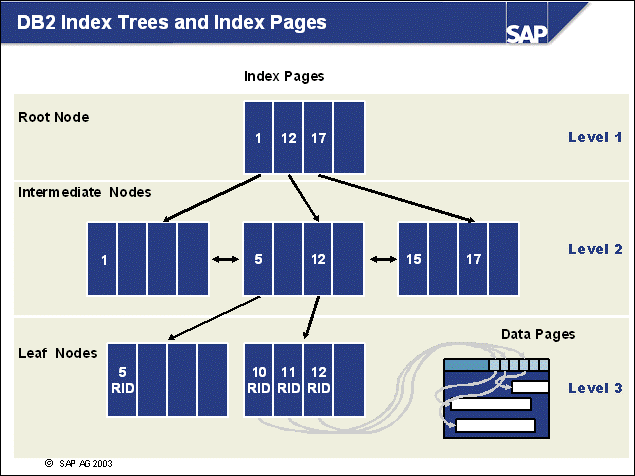
n Indexes are structured in B+ trees, which consist of the following nodes:
A single root node
Many leaf nodes, which do not point to further nodes
Intermediate nodes, which are in-between
n The DB2 Index Manager looks up a key value in the index as follows:
The DB2 Index Manager looks up the root node and searches for a key that is equal to or larger than the value.
Then, the DB2 Index Manager looks up the page number stored with this key, loads the respective page, and searches the page for a key that is equal or larger.
This process continues until the DB2 Index Manager finds a leaf page containing the key value searched for.
With the RID stored with the value, DB2 looks up the page and addresses the record if necessary.
n The administrative storage overhead in each index page is 100 bytes. The rest of the page is free for index values, page numbers, or RIDs. Free space on index pages is provided by DB2 during page allocation to ensure that key values can be inserted later.
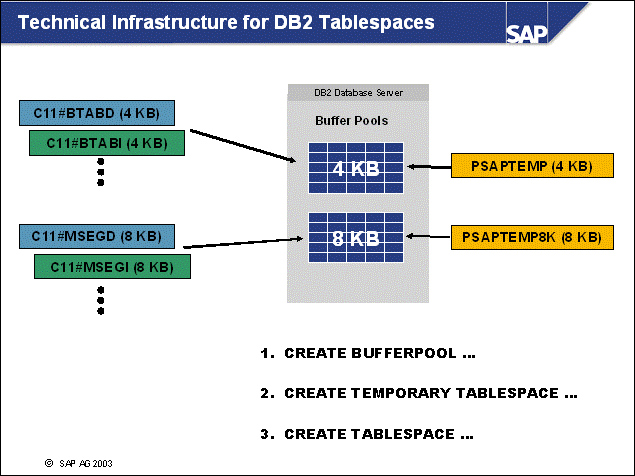
n Pages are buffered in buffer pool(s). To allow for the buffering, you must provide a buffer pool with the same page size and assign the buffer pool to the tablespace.
n If this is not done, DB2 will start with an emergency buffer pool of 1000 pages. This will impact your system performance.
n For temporary tables, which are created by the database system, a temporary tablespace of the corresponding page size must exist.
n When creating tablespaces, certain rules apply:
For all tablespaces with a page size other than 4 KB, you must make sure that a buffer pool and a temporary tablespace with the same page size exists.
DB2 must have all tablespaces of a spanned object with the same page size. A spanned object is a table with regular data in one tablespace, index data in another tablespace, and long data (long varchar and LOB objects) in another tablespace.
Because LONG tablespaces are not buffered and file systems provide additional buffering, never put their containers on a RAW device.
Because REGULAR and INDEX tablespaces are buffered, you can put the containers of these tablespaces on RAW devices to reduce CPU use.
Note: Memory addressability limits exist for 32-bit systems (2 GB or smaller). Buffer pools are therefore restricted in size.
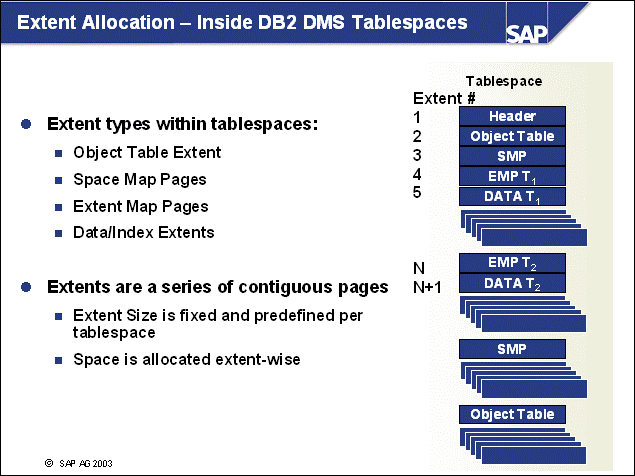
n The Object Table Extent provides the directory of objects in the tablespace.
n DB2's SMPs (Space Map Pages) provide a bitmap describing the layout of the next
1000 Extents (4 KB page size)
2026 Extents (8 KB page size)
4074 Extents (16 KB page size)
8170 Extents (32 KB page size)
n Extent Map Pages describe the extents that are used for an object. They contain the page numbers of the first data page in the extents of the object. The tablespace parameter EXTENTSIZE is used to define this storage unit.
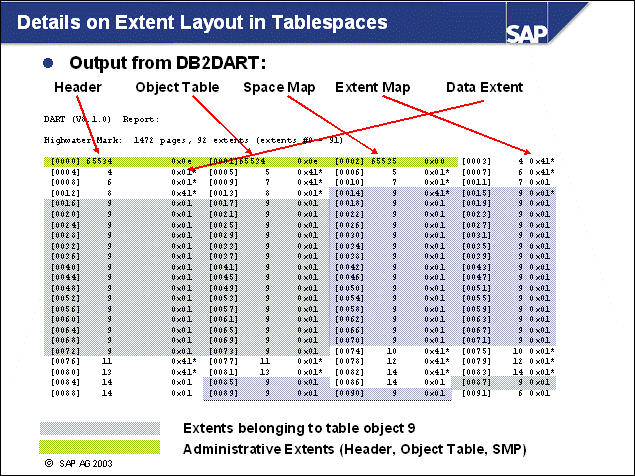
n The extents shown in the table include the following:
0000 and 0001 - the tablespace header and the tablespace object table
0002 - the first space map page (SMP)
0003 - the first object's extent map page (EMP), the object ID is 4
0004 - the data page for object ID 4
n Object 9 occupies many extents (starting with 0014) and is fragmented within the tablespace because it also occupies extents 0085, 0087, and 0089 to 0090.
n
To get the above listing of a tablespace, use the
following command:
db2dart <dbsid> /DHWM
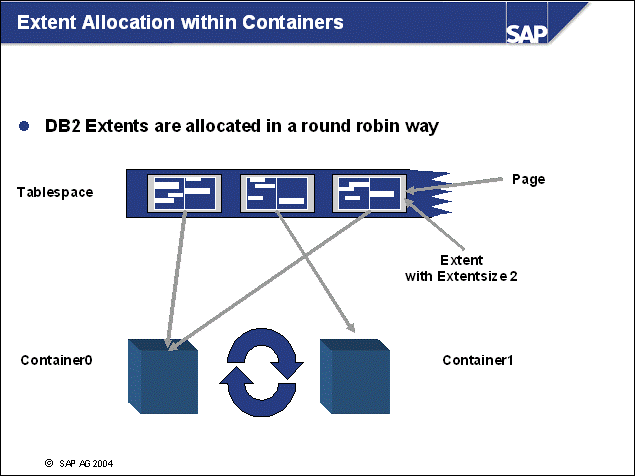
n The allocation of new space for DMS tablespaces takes place on a per-extent basis.
n Each tablespace is defined based on an extent size, which is a multiple of the page size of the tablespace.
n Each new extent is allocated in the next DB2 container until all containers have been used. Then, the first container is used again.
n This process ensures distribution of data to the available containers.
n To get detailed information about the tablespaces in your SAP system (for example page size, extent size, allocated pages, used pages or number of containers), use transaction ST04, choose Space -> Tablespaces.
n
Alternatively, you can use the following command:
DB2 'LIST TABLESPACES SHOW DETAIL'
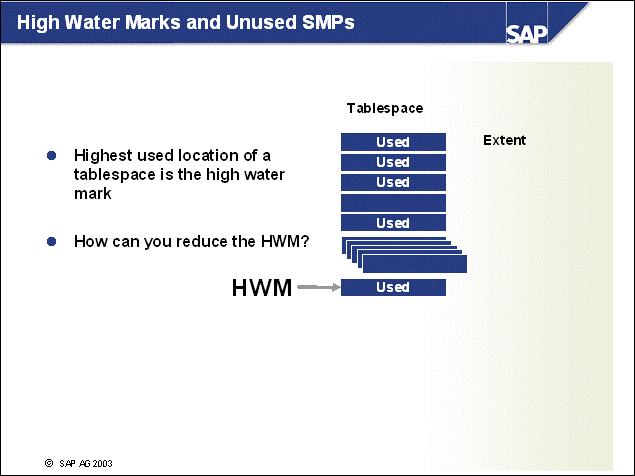
n High water marks prevent database administrators (DBAs) from reducing the size of tablespaces.
n In some situations, even empty tablespaces could have HWMs, which are high within the tablespace. In this situation, when the correct sequence of tables are used, the HWM can be reduced with DB2 REORG. Note that the REORG might not use a temporary tablespace.
n To retrieve the list of tables, use DB2DART /LHWM .
n The high water mark cannot be reduced sometimes, for example, when an object map is created in high extents.
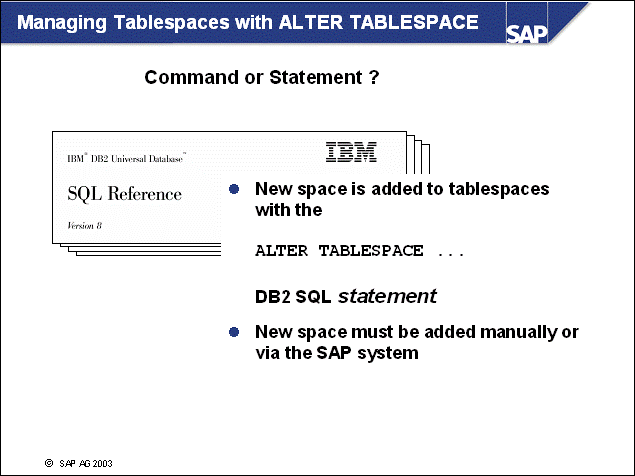
n There are important differences between DB2 commands and DB2 SQL statements. Most notably, statements are integrated into the transactional concept of the database server. You may COMMIT a statement or ROLLBACK the statement.
n Transactions are stored in DB2 log files by their nature because they must be re-played during recovery operations. Because DB2 storage management commands are statements, they are stored in log files as well, and reapplied during rollforward.
n
An example of adding a container (size 100000 pages)
to a tablespace using the DB2 SQL statement is shown here:
ALTER TABLESPACE C11#BTABD ADD (FILE
´/db2/C11/sapdata1/NODE0000/C11#BTABD.container007´ 100000)
n Alternatively, you can use transaction ST04, choose Space -> Tablespaces, then mark the appropriate tablespace and choose Change.
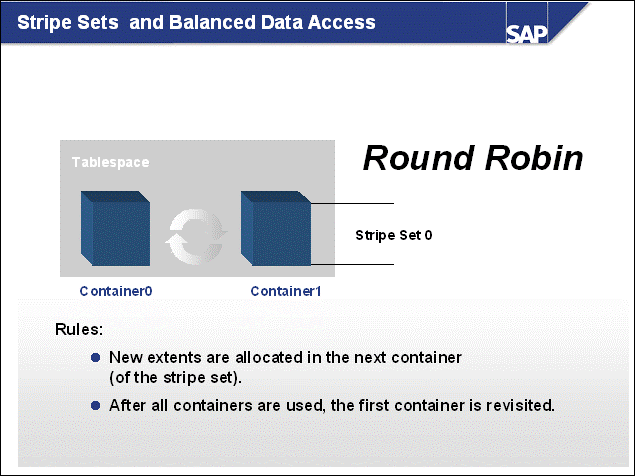
n With the above two containers, each new extent will be allocated in the other container not currently used. This ensures software-based striping of data in the containers.
n Because the extents are evenly striped across these two containers, these containers form a stripe set.
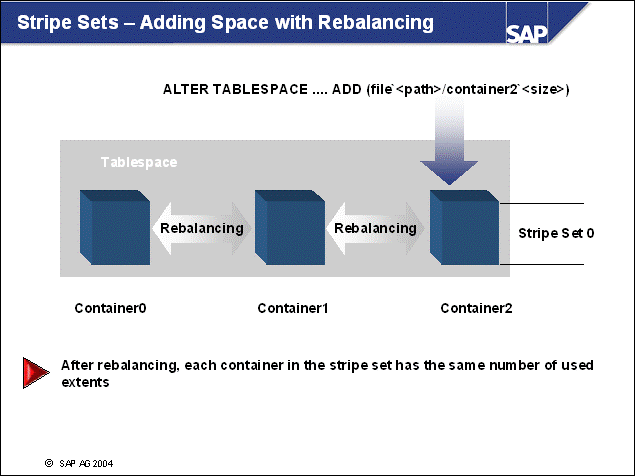
n A tablespace can be extended by using the DB2 CLP or the SAP system.
n The new space is added to the tablespace after the rebalancer has finished.
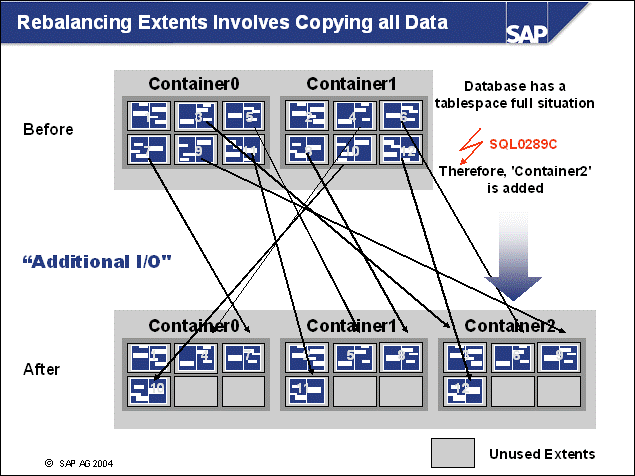
n When running out of free extents within a tablespace, at the least you will have to add more space to the tablespace. This can be done by adding a new container.
n The example in the figure shows the reassignment of extents within containers. Because a new container is available, the extents will be redistributed by DB2.
n This will result in balanced I/O workload, however, because almost all of the extents will be moved, the input/output effort involved with extending a tablespace is considerable.
n Because runtimes on a very large DB2 database may be very long, you should try to schedule the operation during periods of low system activity such as weekends.
n To monitor the growth of the tablespaces in your SAP system, use transaction ST04, choose Space -> History -> Database and Tablespaces. You can get the statistics for the last days, weeks or months.
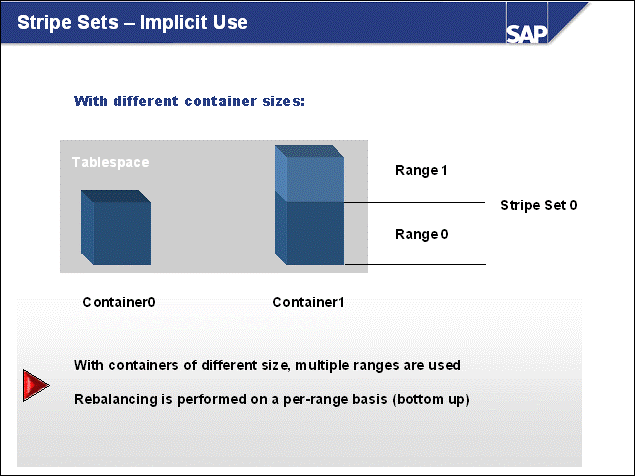
n With different container sizes, DB2 automatically defines multiple ranges, based on striping. Although the initial striped allocation of extents is possible in both containers in the example, the containers will be fully allocated at a certain moment. Then, more extents can be allocated only in Container . This will define a new range (range 1).
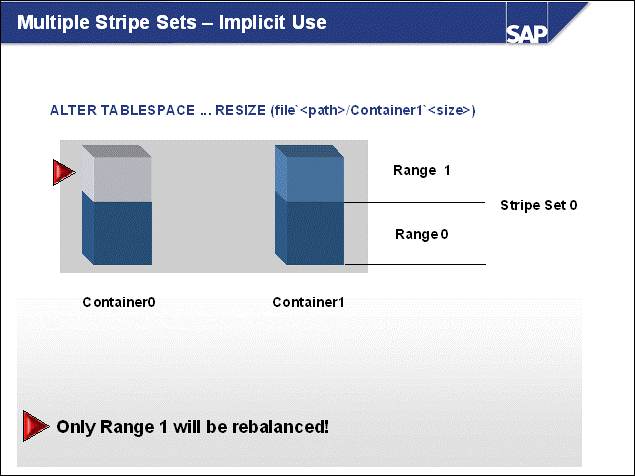
n Because Container0 in Stripe Set 0 is resized, the Stripe Set needs to be rebalanced.
n Because Range 0 is already balanced, only Range 1 has to be rebalanced.
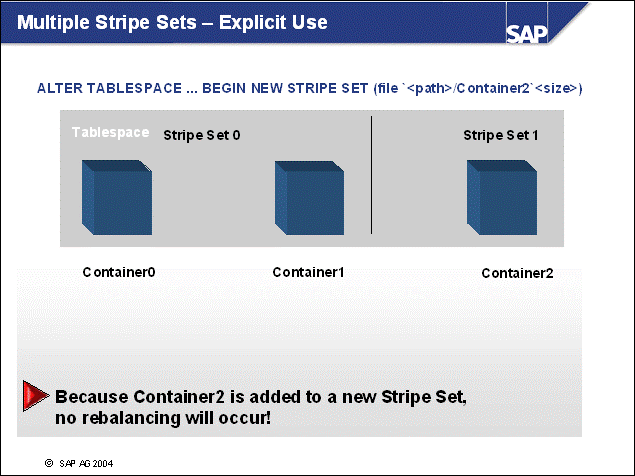
n You can also explicitly add a container to a new stripe set, to avoid rebalancing.
n In the example in the figure, Container2 is added in a new stripe set and no rebalancing is made. This is in contrast to traditional DB2 behavior where rebalancing was mandatory.
n
A tablespace map for a tablespace with two containers
is shown below (initial configuration of the above example)
Range Stripe Stripe Max Max Start End Adj. Containers
Number Set Offset Extent Page Stripe Stripe
0] [ 0] 0 735 11775 0 735 0 2 (0 )
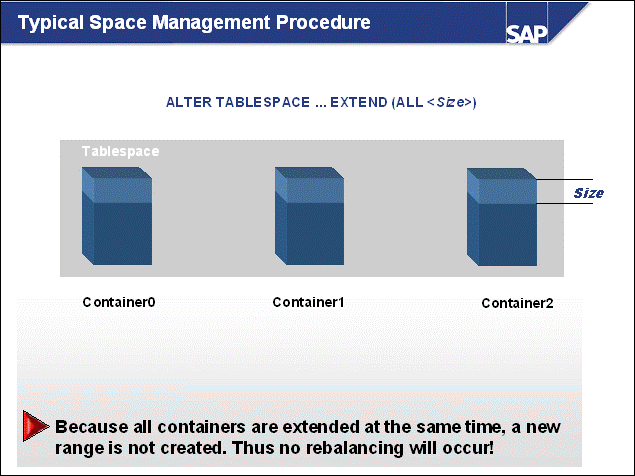
n The best way to extend a tablespace is to equally extend the size of all containers. This ensures that a new range is not created and rebalancing will not occur.
n
An example of extending the size of all containers of
a tablespace by 100000 pages is shown here:
DB2 'ALTER TABLESPACE C11#BTABD EXTEND (ALL 100000)'
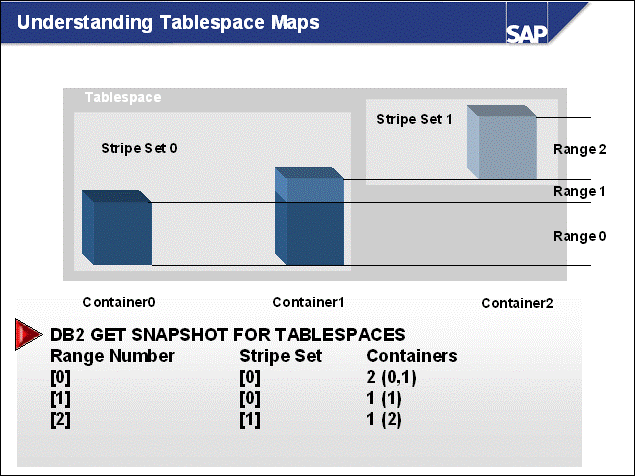
n Starting with DB2 Universal Database Version 8, the Tablespace Snapshot displays the Tablespace Map, as shown in the figure.
n In the example, Container2 has been added to a new stripe set, accounting for additional space during space expansion without rebalancing.
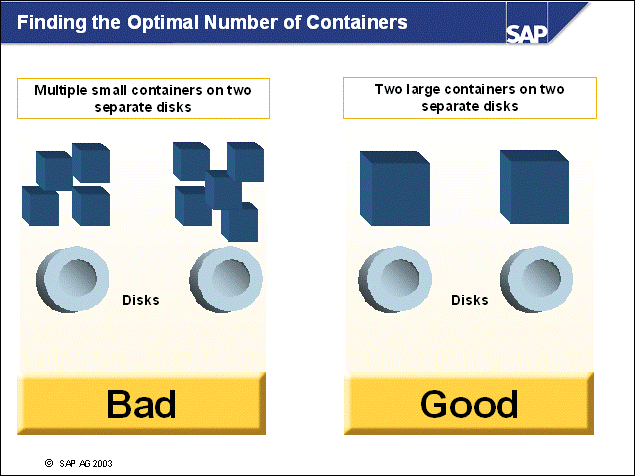
n Having many containers on a disk will enforce striped access to a single disk. This is not recommended because it results in a scattered access pattern to the disk, which typically does not work well.
n SAP recommends using one larger container per tablespace and per disk.
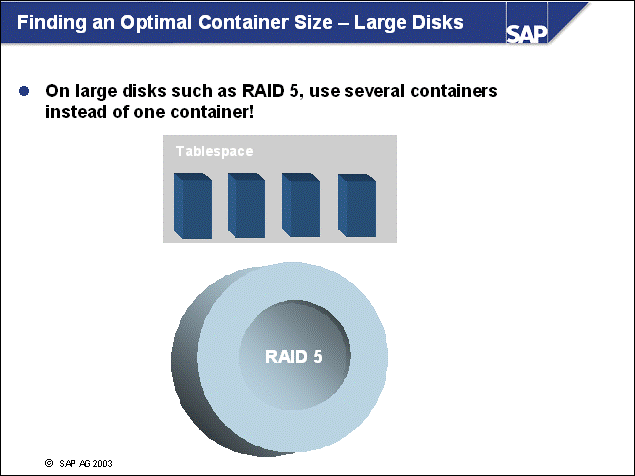
n With large logical disks, database administrators are confronted with the possibility of using very large containers (larger than 30 GB). Because of the underlying filesystem properties, access to large files may be slowed down with contention issues.
n Therefore, SAP recommends using several smaller containers on a large RAID device, for example:
With a tablespace of (planned) 50 GB size, 4 containers with 12.5 GB size should be created.
With a tablespace of (planned) 100 GB size, 8 containers of maximum 12.5 GB size should be created.
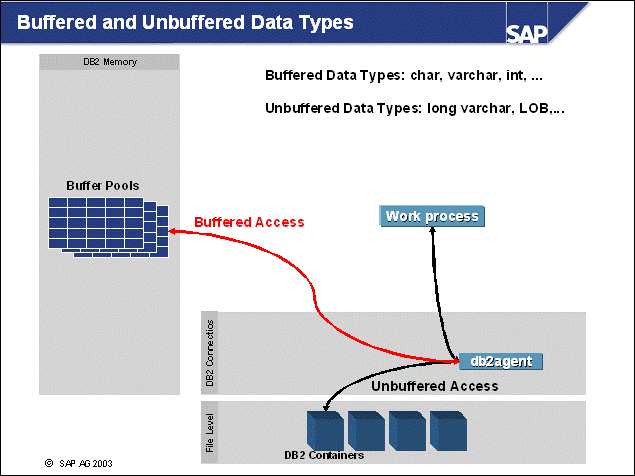
n The database server stores all data, except for LOB and LONG data, in its buffer pools for caching purposes.
n The unbuffered data is not stored in the buffer pool(s) for performance and size reasons. LOB fields can be several MB in size, which could easily displace important data in the buffer pool(s).
n SAP has made a conscious decision to store large amounts of data, that is buffered by other means, in LONG or LOB fields. Still some tables, that contain unbuffered fields, are not buffered. APQD and VBDATA are examples of such tables.
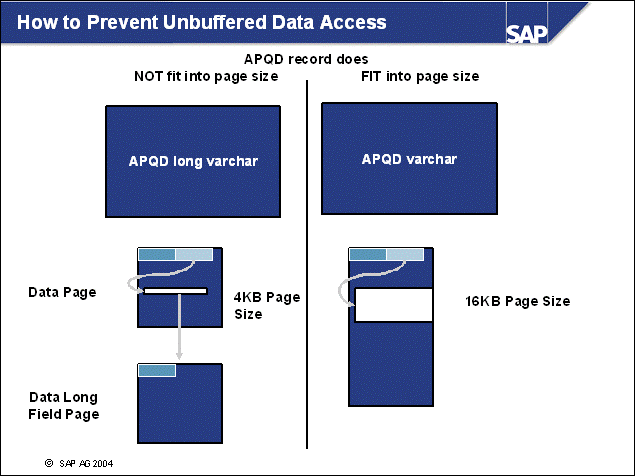
n It is possible to move a table with LONG fields to tablespaces with larger page sizes.
n When doing this, the SAP data dictionary will query the underlying DB2 tablespaces for page size infomation. If possible, the table in the new tablespace is created without a LONG field. The data is then copied from old to new tablespace and the tables are renamed.
n The size of the long field has to be considered when choosing the page size of the new tablespace: The SAP DB2 Database Interface (DBSL) selects LONG fields on 4 KB pages whenever a field is longer than 3800 bytes. For 8 KB pages, the maximum field size is 7800 bytes, and so forth.
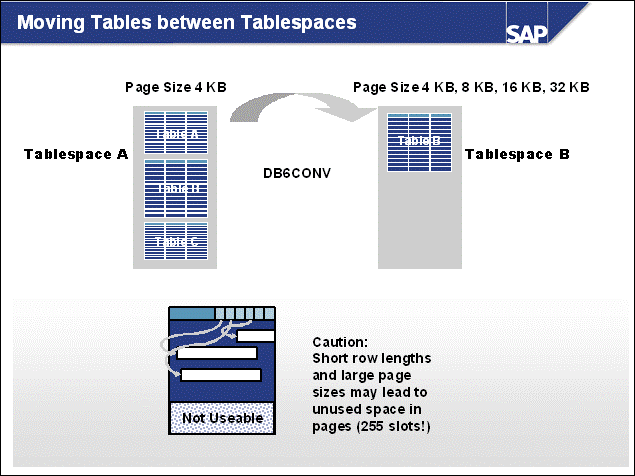
n When the total allocated space for a tablespace reaches the limit of 64 GB (with 4 KB pages) and REORG does not yield additional space, you must move tables to other, probably new, tablespaces to allow for further growth of the tables. This limit varies with the page size and can be 64 GB, 128 GB, 256 GB, 512 GB).
n To move a table from one tablespace to another, use SAP utilities such as DB6CONV. This allows for larger table sizes when copied to a tablespace with larger page size.
n A table is copied based on primary index (almost like REORG).
n For details, refer to SAP Note 362325.
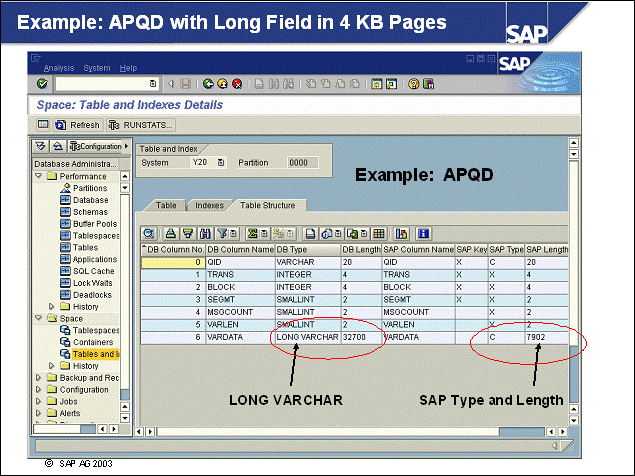
n In the example in the figure, table APQD is defined with several columns. The VARDATA column has an SAP type of CHAR and an SAP length of 7902.
n On 4 KB page sizes, this results in a mapping to DB2 data type LONG VARCHAR because a VARCHAR(7902) is not possible on 4 KB pages.
n If you move table APQD to a tablespace with 16 KB page size, column VARDATA can be defined as a VARCHAR(7902) and is therefore buffered.
n Remember that buffering large data areas is not advisable on systems with small buffer pools.
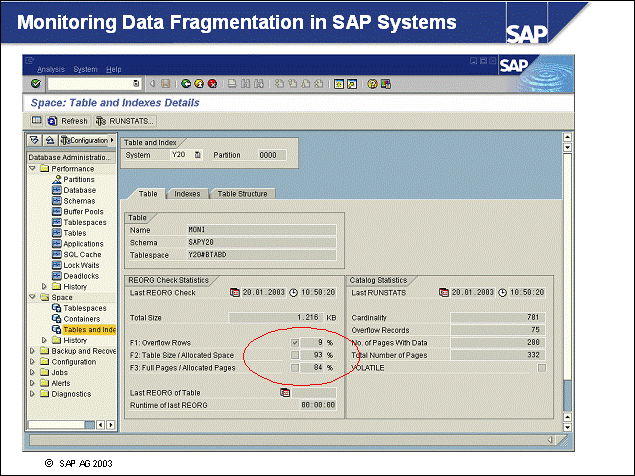
n To analyze the fragmentation data on a table, use transaction ST04, choose Space -> Tables and Indexes. With many deletions, it might make sense to reorganize a table. This is indicated in the F2 (Table Size/Allocated Space) or F3 (Full Pages/Allocated Pages) fields.
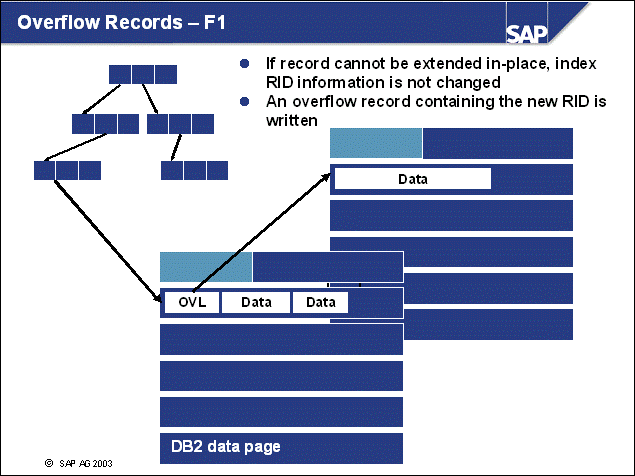
n Overflow records occur with tables defined using one or more VARCHAR data fields. If an in-place extension of these fields is not possible, DB2 places an overflow record in the original location of the row. It will contain the RID of the new location holding the extended record.
n Overflow accesses involve two read operations. They may be in-page, in-extent, but in the worst case, they may be out-of extent. This means the data is not in proximity of the original location and another page must be read.
n Overflow accesses might reduce I/O performance, however, only careful analysis of the situation will show you if a table has to be reorganized. Two examples:
Table CDHDR contains 67 overflow records and the size is 4 MB. Even with heavy use of all of the rows of the table, this table may easily fit into the buffer pool. There will not be any I/O impact.
Table ACCTID contains 10% overflow records and the size is 5 GB. It will not fit into the buffer pool and large scans are made to the table. With heavy read activity on the table, the table should be reorganized twice a year.
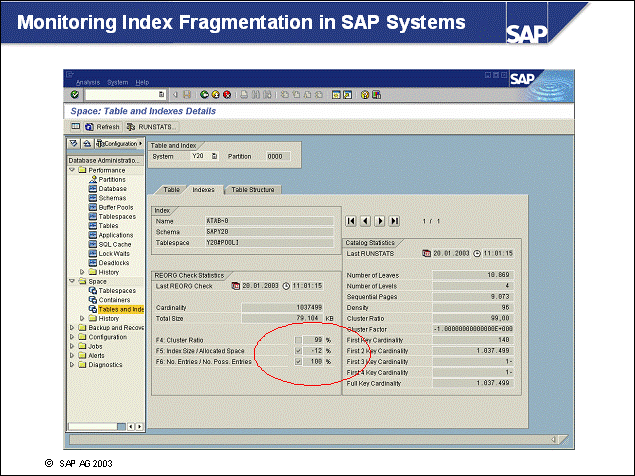
n To analyze the index fragmentation of a table, use transaction ST04, choose Space -> Tables and Indexes.
n The formulas for F4 (Cluster Ratio), F5 (Index Size/Allocated Space), and F6 (No Entries/No Possible Entries) are documented in the IBM DB2 manual, Command Reference (REORGCHK command).
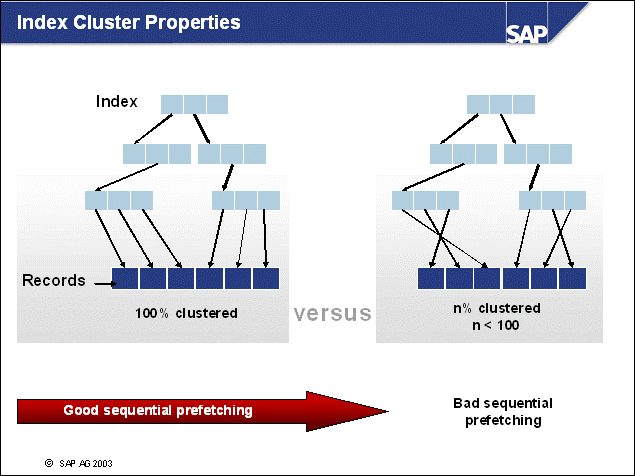
n When data is selected from the DB2 database, first an index is accessed, then data pages from a table are read if the table column is not part of the index.
n If the data records, which are stored in pages, and the index are clustered, DB2 can efficiently perform sequential prefetching techniques. This improves the speed of the availability of the data pages in buffer pool.
n If the data records and the index are poorly clustered, sequential prefetching cannot be performed. After the RIDs have been sorted by DB2, list prefetching may be used instead.
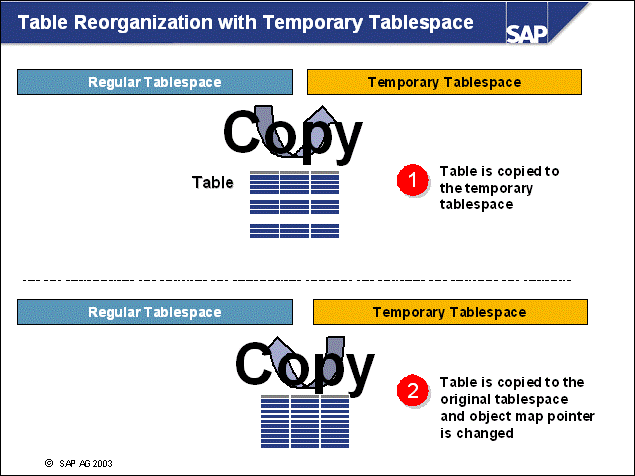
n Using temporary tablespace, DB2 REORG copies the table contents to a temporary table and then copies the table back to the original location.
n This method allows for REORG for large tables. This is because the temporary tablespace can be increased temporarily and then reduced in size again.
n You will notice that REORG will consume two or even three times the space of the table object during processing. The actual space consumption depends on the index definitions and sizes.
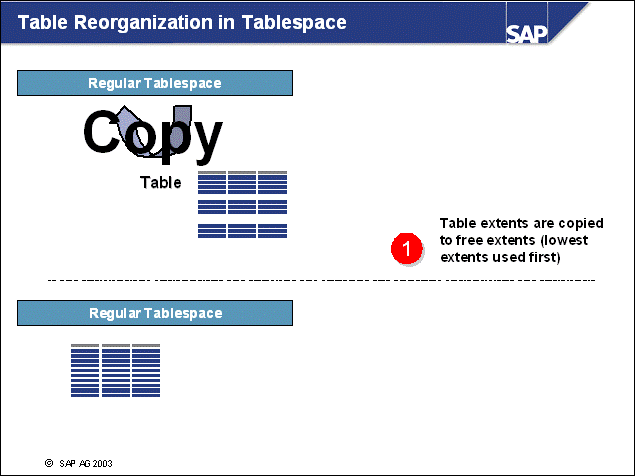
n You can also reorganize tables with the traditional REORG command without using a temporary tablespace.
n In this case, the table will be exclusively locked by DB2 and copied to a new location in the tablespace.
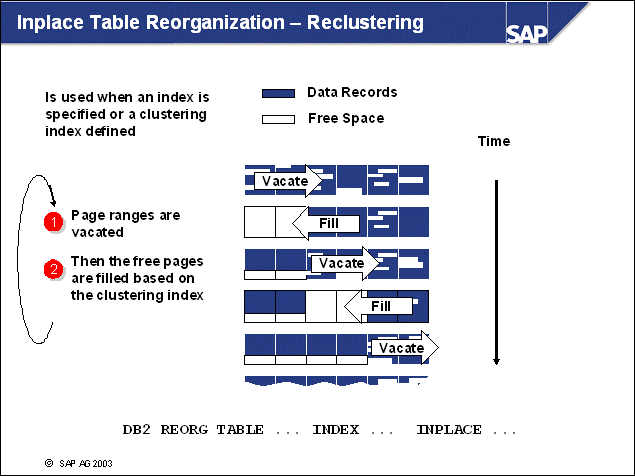
n With DB2 REORG TABLE ... INDEX ... INPLACE an online reorganization is started, which is based on an index. The index is used to sort the data during reorganization to allow for proper reclustering of the table.
n The REORG process includes two phases:
VACATE phase, which moves data out of a page range and inserts the data in other pages.
FILL phase, which moves a certain amount of data back to the vacated range, based on the index specified. The freespace settings of the table are observed.
n Inplace REORG operations are possible only with Type 2 indexes.
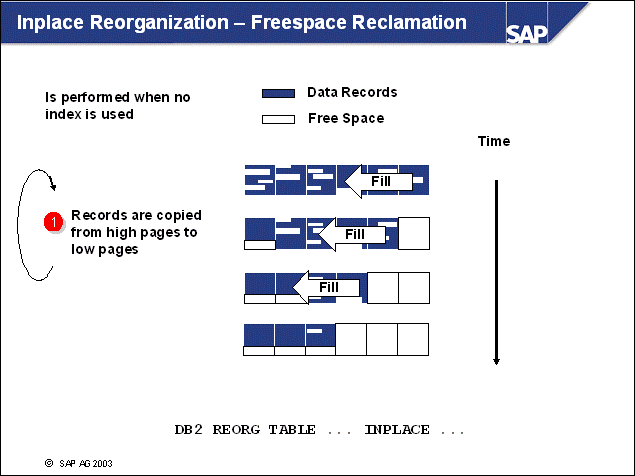
n The freespace reclamation run for compression of table data runs faster than the reclustering reorganization. In this case, a reverse scan of the table is performed, which then removes the overflow records and empties the high pages of a table.
n Freespace reclamation is performed by REORG when no clustering index is provided.

|
|
Unit: Storage Management |
|
|
At the conclusion of this exercise, you will be able to: Monitor and manage the space consumption of DB2 tablespaces Monitor and decide on the necessity to reorganize tables Implement appropriate infrastructure for tablespaces Describe DB2's internal storage allocation mechanisms |
Preparation:
To access your training system and use your training database <Txx>
during the following exercises, please start your Web browser. Use the server
name and port number provided by your instructor and enter the following URL: Error! Hyperlink
reference not valid.>. A graphical desktop will
appear in your browser window. Please enter the password sapdb2 to
access the desktop. From now on, you can use the desktop to open multiple
windows.
You will also be able to reconnect to your desktop in case you close your Web
browser window.
1-1 Monitoring the space consumption of tablespaces.
1-1-1 Check if there are tablespaces that need to be extended in the SAP training system DEV.
1-1-2 Which information, beside the current allocation, should be taken into account?
1-1-3 How could you perform the extension of those tablespaces?
1-1-4 Should PSAPTEMP also be extended? Explain your answer.
Extending tablespace PSAPBTABD in your training database <Txx>.
1-2-1 Add a second container (size 256 pages) to tablespace PSAPBTABD using the DB2 CLP.
1-2-2 How can you validate the above action?
1-2-3 Now extend tablespace PSAPBTABD by a total of 128 pages without adding a new container.
1-2-4 Explain the advantages/disadvantages of the different options used to extend the tablespace.
REORGCHK results.
1-3-1 Are there any tables in the SAP training system DEV that have been flagged by the REORGCHK run?
1-3-2 What are "overflow records"? Why might they have a negative impact on the performance of accesses to a table?
Table reorganization.
1-4-1 Which kind of reorganization would you use in your OLTP system if you did not have any maintenance windows during the next months?
1-4-2 What prerequisite has to be fulfilled in order to be able to use this kind of reorganization?
Optional
exercises
only perform these exercises if you have enough time and are already familiar
with DB2 UDB!
For the following exercises, use the UNIX command time to note timing information.
O-1 DB2 Tablespaces:
O-1-1 Create a new
SMS-based tablespace named ZSAPATAB1 in your training database
<Txx>, based on 4k pages, to be able to import a table called ATAB into
the new tablespace, using the new table name ZATAB1. What is the CPU
consumption of the commands that are used to create the tablespace?
Hint: expect a table size of 100MB.
O-1-2 Now, load the table ATAB into the database, using the import command. You will find help for this command by entering db2 "? import". You will find atab.ixf in /db2/tools. What does "time" say?
O-1-3 Create a new DMS-based tablespace named ZSAPATAB2D and it's corresponding index tablespace in your training database <Txx> based on 8k pages (plan ahead with the needed storage in the tablespace , or be prepared for necessary storage expansion). What is the CPU consumption?
O-1-4 Import ATAB into this tablespace, using the new table name ZATAB2. What does "time" say?
O-1-5 Create table ZATAB3 like ZATAB2 and copy data from ZATAB2, without using the import command. Use the ZSAPATAB2D and ZSAPATAB2I tablespaces according to SAP conventions. What is the CPU consumption?
O-1-6 Create a unique index, ZATAB3_1, on ZATAB3 using (tabname, varkey), and provide timing information.
O-2 Understanding Fragmentation (please use your training database <Txx>)
O-2-1 Run the IBM DB2 Utility REORGCHK on table ZATAB1. What is the number of pages used by the table, and how many of these pages contain data?
O-2-2 Delete all records from table ZATAB1. Run REORGCHK again. Are you able to make a statement about the storage consumption of ZATAB1? If not, what is a solution ?
O-2-3 Run REORGCHK on ZATAB2 and explain why the number of pages allocated to the object is lower than that for ZATAB1, although there were exactly the same number of rows initially.
O-2-4 Update records with dataln < 10 to vardata='0123456789' in table ZATAB2.
O-2-5 Run REORGCHK on ZATAB2 again and explain the reason for the value in column OV.
O-2-6 Run REORGCHK on ZATAB3 and delete all records with dataln <0 in table ZATAB3. Run REORGCHK again and explain the difference between columns NP and FP.
O-3 Reorganization of Tables
O-3-1 Use "time" to receive system utilization information and reorganize ZATAB2 and ZATAB3 offline.
O-3-2 Use REORGCHK to view the new storage consumption of ZATAB2 and ZATAB3.
O-3-3 Drop tables ZATAB2 and ZATAB3 and create both tables again as described in exercise O-1-4 - O-1-6. Then, reorganize ZATAB2 online without a clustering index and reorganize ZATAB3 online using the clustering index ZATAB3_1. What is the runtime of the commands? Why does "time" not help, and what is the correct way to read the runtime of online reorgs? In other words, why is it more complicated to measure the runtime of an online reorg compared to measuring the runtime of offline reorgs?
O-3-4 Provide a performance ranking of the reorg methods and describe why faster does not always mean better.
O-4 DB2 Storage Internals
O-4-1 Use
the following call to db2dart to retrieve the EMPs of ZATAB3:
db2dart <Txx> /TSI 27 /TN ZATAB3 /DEMP
Please describe what you see.
O-4-2 Why is it that you can not use db2dart with the same command to analyze the structure of ZATAB1?
|
|
Unit: Storage Management |
1-1 Monitoring the space consumption of tablespaces.
1-1-1 In transaction ST04, choose Space -> Tablespaces, and sort the table by column Percent Used. Look for tablespaces where Percent Used > 90.
1-1-2 In transaction ST04, choose Space -> History -> Database and Tablespaces. Set Statistics = Week and Object Selection = Tablespaces. Then double-click on the critical tablespaces and check the growth of the last weeks. If the tablespace size was rather static, it might not be necessary to increase the size.
1-1-3 To extend tablespaces, go to transaction ST04, choose Space -> Tablespaces, select the appropriate tablespace, and choose Change. Alternatively, use the DB2 CLP to execute the ALTER TABLESPACE command.
1-1-4 In 1-1-1, you have seen that Percent Used is 100 for PSAPTEMP. But because PSAPTEMP is a SMS tablespace, that does not mean that it needs to be extended. Tablespaces of this type allocate space dynamically when needed.
1-2 Extending tablespace PSAPBTABD in your training database <Txx>.
1-2-1 Use the following
command
db2 "alter tablespace psapbtabd add (file
'/db2/<Txx>/sapdata3/PSAPBTABD.container002' 256)"
1-2-2 Use the
following command
db2 "list tablespaces show detail"
The number of containers of tablespace PSAPBTABD is now 2 and the total
number of pages is 512.
1-2-3 Use the
following command
db2 "alter tablespace PSAPBTABD extend (all 64)"
1-2-4 When adding a new container, the rebalancing process is started and the additional space will be available when the rebalancer has finished. If the second option is used, extending all containers by the same number of pages, no rebalancing takes place.
1-3 REORGCHK results.
1-3-1 In transaction ST04, choose Space -> Tables and Indexes. In the selection dialog box, use flag Display flagged tables only.
1-3-2 Overflow records occur if tables with VARCHAR data fields are updated and an in-place extension of these fields is not possible. An overflow record is then placed in the original location of the row, which contains the RID of the new location holding the extended record. Overflow records might have a negative impact, because they involve two read operations and, in the worst case, they may be out-of extent.
1-4 Table reorganization.
1-4-1 You should consider using INPLACE reorganizations, because they are online.
1-4-2 INPLACE reorganization can only be performed for tables with Type 2 indexes.
Optional exercises:
O-1 DB2 Tablespaces
O-1-1 The creation of tablespaces is described in the DB2 Manual "IBM DB2
Universal Database Command Reference Version 8." You will be able to follow the
documentation to create a tablespace.
Since SAP Tools follow special conventions, it is recommended that you use the
DB2 commands that are generated by ST04 in the SAP training system DEV. For
this, log on to DEV and go to transaction ST04. Go to Space -> Tablespaces and press the Add button but do not execute the action . Now, copy the DB2 command into a
text file and execute it using
time db2 -tf <filename>
It may look as follows:
|
|
CREATE REGULAR TABLESPACE ZSAPATAB1 IN NODEGROUP IBMDEFAULTGROUP PAGESIZE 4 K MANAGED BY SYSTEM USING ( '/db2/<Txx>/sapdata1/NODE0000/ZSAPATAB1.container000' ON NODE ( 0 ) BUFFERPOOL IBMDEFAULTBP OVERHEAD 24.1 TRANSFERRATE 0.9 DROPPED TABLE RECOVERY ON COMMIT WORK GRANT USE OF TABLESPACE ZSAPATAB1 TO PUBLIC COMMIT WORK |
After this, you have created the tablespace ZSAPATAB1.
O-1-2 Now, import the table with the command
time db2 "import from /db2/tools/atab.ixf of ixf create into ZATAB1 in ZSAPATAB1"
The output will look like:
real 12m50.607s
user 0m0.250s
sys 0m0.160s
This means the system took almost 13 minutes to load the table, the program
spend 250 ms to import the data and 160 ms of the elapsed time was spent in
system routines, like I/O.
After this, you have table ZATAB1 residing in tablespace ZSAPATAB1.
You may have to fix various problems on the way to this solution, for example
space allocation in the tablespace and log space problems. Ask your instructor
for help.
O-1-3 With the help of the system DEV, the CREATE TABLESPACE statement
for the DMS tablespace can be retrieved as well (Hint: use 4k page size
to generate the command). Keep in mind that you will need the necessary
infrastructure to accommodate 8k page size. Therefore, before you create a 8k
tablespace, you must create an 8k buffer pool:
db2 "CREATE BUFFERPOOL SAPBP8 IMMEDIATE SIZE 10000 PAGESIZE 8 K"
Then, create the tablespace using the DB2 CLP and the following script:
CREATE REGULAR TABLESPACE ZSAPATAB2D
IN NODEGROUP IBMDEFAULTGROUP
PAGESIZE 8 K
MANAGED BY DATABASE
USING ( FILE
'/db2/<Txx>/sapdata1/NODE0000/ZSAPATAB2D.container000' 30000 )
ON NODE ( 0 )
BUFFERPOOL SAPBP8
OVERHEAD 24.1
TRANSFERRATE 0.9
DROPPED TABLE RECOVERY ON;
GRANT USE OF TABLESPACE ZSAPATAB2D TO PUBLIC;
COMMIT WORK;
Create the index tablespace accordingly:
CREATE REGULAR TABLESPACE ZSAPATAB2I
IN NODEGROUP IBMDEFAULTGROUP
PAGESIZE 8 K
MANAGED BY DATABASE
USING ( FILE
'/db2/<Txx>/sapdata1/NODE0000/ZSAPATAB2I.container000' 10000 )
ON NODE ( 0 )
BUFFERPOOL SAPBP8
OVERHEAD 24.1
TRANSFERRATE 0.9
DROPPED TABLE RECOVERY ON;
GRANT USE OF TABLESPACE ZSAPATAB2I TO PUBLIC;
COMMIT WORK;
Since space is
pre-allocated for DMS tablespaces, it will take longer to create these
tablespaces.
O-1-4 Create the table ZATAB2 using DB2 IMPORT
time db2 "import from /db2/tools/atab.ixf of ixf create into ZATAB2 in ZSAPATAB2D"
Since the method and data volume are approximately the same, the timing
measurements will not differ.
O-1-5 A very efficient method to copy data is to use "insert into .
select.." For this, you must first create the new table
time db2 "create table ZATAB3 like ZATAB2 in ZSAPATAB2D index in
ZSAPATAB2I"
and then use
time db2 "insert into ZATAB3 select * from ZATAB2"
Since the data of ZATAB2 is already in DB2's buffer pool, the loading of data
into ZATAB3 is very fast.
O-1-6 To create the index, enter
time db2 "create unique index ZATAB3_1 on ZATAB3 (tabname,
varkey)"
O-2 Understanding Fragmentation
O-2-1 The REORGCHK
utility needs an existing database connection. For this, enter
db2 "connect to <Txx>"
Then, call REORGCHK on table ZATAB1:
db2 "reorgchk on table db2<txx>.zatab1"
REORGCHK shows 1741 pages used for ZATAB1, and 1741 pages of ZATAB1 contain
data. Therefore there is no unused space in ZATAB1.
O-2-2 Delete all
records using
db2 "delete from ZATAB1"
Call REORGCHK again. Now, REORGCHK shows no data. This is one of the reasons
why SAP's utilities are not calling DB2's REORGCHK utilities directly. To
retrieve the exact information, SAP's utilities will query the DB2 system
catalog. One solution is
db2 "select tabname, npages, fpages from syscat.tables where
tabname='ZATAB1'"
The output shows NPAGES and FPAGES to be 0 and 1741. This means there are no
pages with data, and 1741 pages allocated to ZATAB1.
O-2-3 When calling REORGCHK on ZATAB2, it shows NPAGES, FPAGES (858,858). Table ZATAB2 resides on 8k pages; there are therefore less pages needed to store data.
O-2-4 To update the
records, use
db2 "update zatab2 set vardata='0123456789' where dataln < 10"
O-2-5 After calling REORGCHK, you will see that OV (Overflow Records) is now showing a positive number. The table ZATAB2 now contains overflow records.
O-2-6 When deleting
substantial number of records from ZATAB3, we can expect that the value NPAGES
and FPAGES are different
db2 "delete from ZATAB3 where dataln < 0"
After calling REORGCHK on ZATAB3, we see that NPAGES (number of pages with
data) is much lower that FPAGES (pages allocated to the table).
O-3 Reorganization of Tables
O-3-1 The command to
reorganize ZATAB2 and receive timing data is
time db2 "reorg table zatab2"
The same command should be called for ZATAB3.
O-3-2 When calling REORGCHK on ZATAB2 and ZATAB3, you will see that FPAGES and NPAGES is identical.
O-3-3 To drop the
tables, enter
db2 "drop table ZATAB2"
db2 "drop table ZATAP3"
Then, load the tables again, as described in O-1-4 - O-1-6. Since we will use
REORG, we will also need a temporary tablespace, which can be created like
shown below:
CREATE
temporary TABLESPACE SAPTEMP8K
PAGESIZE 8 K
MANAGED BY DATABASE
USING ( FILE
'/db2/<Txx>/sapdata1/NODE0000/SAPTEMP8K.container000'
30000)
ON NODE ( 0 )
BUFFERPOOL SAPBP8
After this, you will be able to call the online reorg via
time db2 "reorg table zatab2 inplace allow read access"
time db2 "reorg table zatab3 index zatab3_1 allow read access"
Since the online reorganization command is running asynchronously, the timing
information provided with "time" is not accurate enough. You must get the detail information with:
db2 "list history reorg all for <txx>"
O-3-4 With the above measurements, we can see that offline reorg is the fastest method, while online reorg based on a clustering index is the slowest reorg method. But online reorg is preferable, since access to data is not blocked.
O-4 DB2 Storage Internals
O-4-1 To call db2dart, we have to stop the
connection to the database with :
db2 terminate
Then, we can call db2dart:
db2dart <Txx> /TSI 27 /TN ZATAB3 /DEMP
The output is provided in the RPT-File. It shows the EMP-allocation for table
ZATAB3 in ZSAPATAB2D/I.
O-4-2 Since
SMS-based tables have a slightly different storage allocation mechanism,
db2dart cannot be called on ZATAB1.
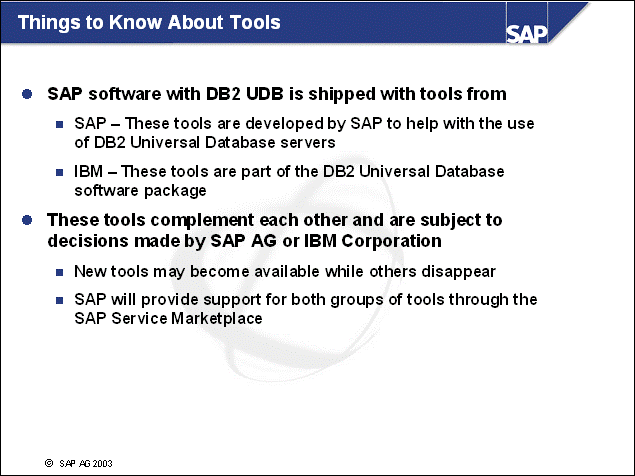
n The tools that are shipped with SAP software on the IBM DB2 Universal Database are grouped into two sets:
SAP tools for DB2 such as brachive, brrestore, dmdb6srp, and dscdb6up
DB2 tools such as db2adutl and db2relocatedb
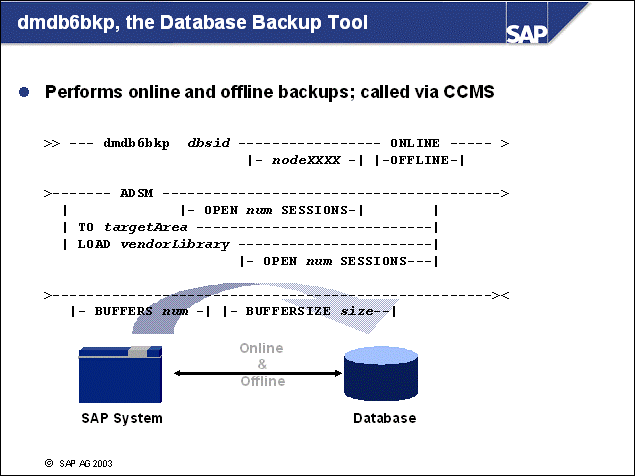
n The SAP tool for database backup, dmdb6bkp, is usually not used from the command line. It is called by the DBA Planning Calendar (from transaction ST04, choose Jobs Planning Calendar (transaction DB13)) to perform DB2 BACKUP.
n Because the DBA planning calendar also provides an option to perform an offline backup, it contains functions for disconnecting all SAP applications from the database (force applications). Immediately after disconnecting all applications, dmdb6bkp will start an offline backup.
n While the SAP applications will try to reconnect to the database on a regular basis, the backup will succeed and the reconnections will be granted.
n There is no technical reason to run an offline backup with DB2 UDB database servers, but you may run offline backups at your own discretion.
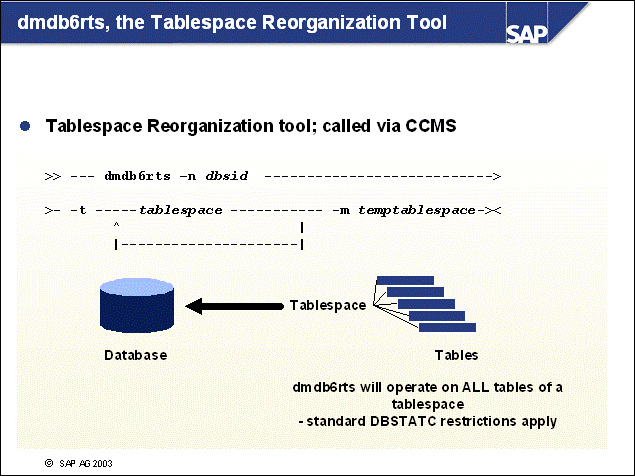
n While DB2 provides a native reorganization tool for tables, it does not provide a reorganization tool for tablespaces. This might not appear to be necessary for normal database operations, however, after substantial delete operations in an SAP database (for example, client delete), it may be reasonable to select all tables in a tablespace for reorganization. Here, CCMS will call the tablespace reorganization tool, dmdb6rts.
n There is no need to call dmdb6rts from the command line because the functions available with DB2's REORG command are sufficient for most cases.
n Make sure that the used temporary tablespace is based on the same page size as the tablespace(s) being reorganized.
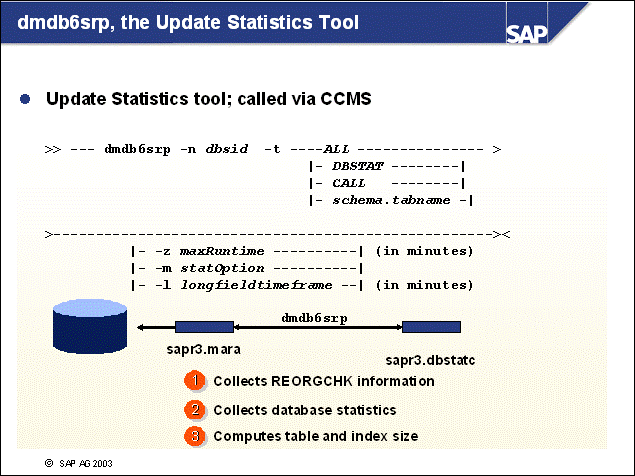
n The statistics collection for DB2 databases is performed in a layered approach. Details are covered in other units of this course. Here we will focus on the options and functions of dmdb6srp.
n Because DB2 does not offer a REORGCHK API, the SAP Update Statistics tool, dmdb6srp, contains the same calculation routines for reorganization recommendations as the original DB2 REORGCHK command. The calculation results will be stored in SAP database tables for further analysis and displayed in CCMS.
n The option -t specifies the set of tables that should receive statistics or reorgchk updates:
ALL - Performs the statistics/reorgchk collection on all SAP tables, except those that are explicitly excluded.
DBSTAT - Performs the statistics/reorgchk collection on the SAP tables that have been marked in table DBSTATC.
CALL - Does not perform the statistics collection, but calculates the reorgchk data based on existing statistics for all tables in the database.
schema.tabname - Performs the statistics/reorgchk collection on a specific table.
n The other options are as follows:
-z (maxRuntime) - Used to specify the maximum runtime of the tool after which it will terminate. Because dmdb6srp uses an LRU strategy to find the tables for statistics/reorgchk collection, this ensures that over time the process will update all tables.
-l (longfieldtimeframe) - Used to specify the maximum time spent to calculate the size of long fields of a table. Because DB2 does not have APIs to provide the total size of a table containing long fields, dmdb6srp reads the size of all long fields of a table to calculate the total size of a table. For very large tables, interpolation may be sufficient. This can be performed with the -l option.
-m (statOption) - Used for detailed statistics.
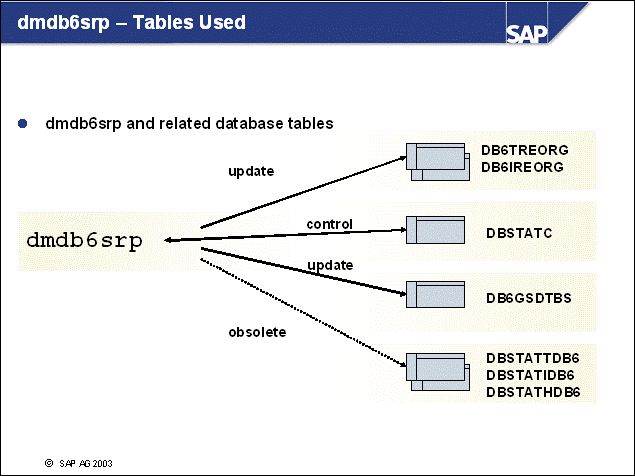
n The update statistics tool, dmdb6srp, uses several tables:
DB6TREORG contains table reorganization information and table size.
DB6IREROG contains index reorganization information and index size.
DBSTATC, the database statistics control table. If the TOBDO column is set to X for a tablename noted in this table, the table is used for statistics updates. The AMETH column contains the method described by the STATS-OPTIONS of dmdb6srp.
n The CCMS job, Check Tables for Statistics Update, performs a DB2 table snapshot and collects
Total_write (insert and updates)
Total_overflow
n If the changes to the table are above a defined threshold, the tablename is written to DBSTATC and the TOBDO flag is set to X.
n After each run of dmdb6srp on a table, the TOBDO flag is reset.
n In previous SAP releases (earlier than 4.6), DBSTATTDB6, DBSTADIDB6, and DBSTATHDB6 were used for the SAP Application Performance Monitor. Starting with 4.6, SAP software retrieves data from DB6GSDTBS.
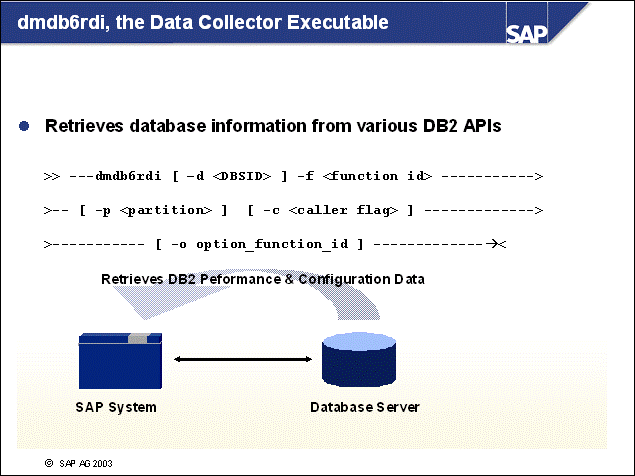
n DB2 Version 7 does not provide database performance data via internal tables, whereas DB2 Version 8 does provide this data. For this reason, SAP ships the data collector executable dmdb6rdi, which calls DB2 APIs, such as snapshots, to retrieve database information to store in SAP tables. SAP monitors read the DB2 information from these tables.
n SAP Note 300828 describes the valid combinations of Basis Support Packages and Data Collector Executable. If you have an executable that does not provide the needed functions for the SAP release or support package level, you will receive an error message. The programs will continue to work.
n The only mandatory parameter is the -f <function id> parameter, which describes the data that should be retrieved. For details, just call the executable manually.
n For multiple versions of a set of data, the -c option offers a caller flag. This single letter is used as a tag for storing DB2 information in the SAP tables.
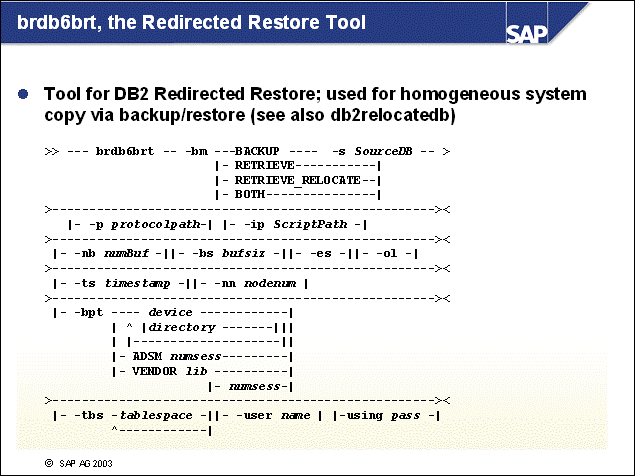
n DB2's Redirected Restore tool, brdb6brt, provides mechanisms to redefine most storage properties of a database through a simple backup/restore cycle. These storage properties include the DB2 container locations, sizes, number of containers of a tablespace, and database name. One notable exception is the page size of the tablespaces. The page size is defined during the creation of a tablespace and cannot be changed later.
n Although you can use brdb6brt for backup, this tool is typically used to create a script, which can be used to restore a backup image.
n The tool also supports the creation of an input script for the database cloning tool db2relocatedb and the database initialization tool db2inidb. For this, use the option RETRIEVE_RELOCATE.
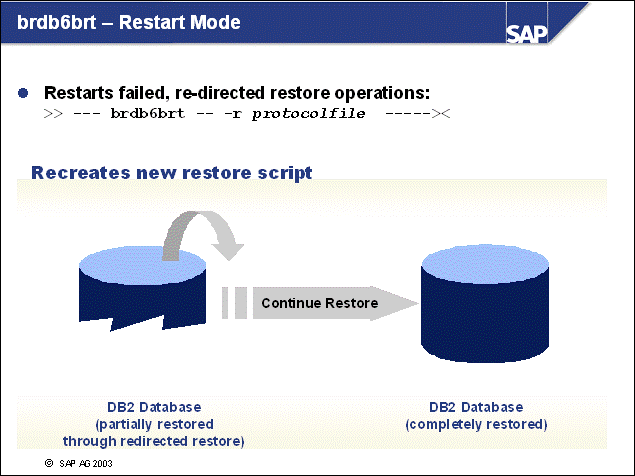
n During the lengthy process of restoring a database, you might encounter an error situation, such as out-of-space or wrong path. In this case, the work already performed is not lost. You may re-create a new restore script based on the log file of the previous restore attempt. Using this script, you will be able to continue the restore operation.
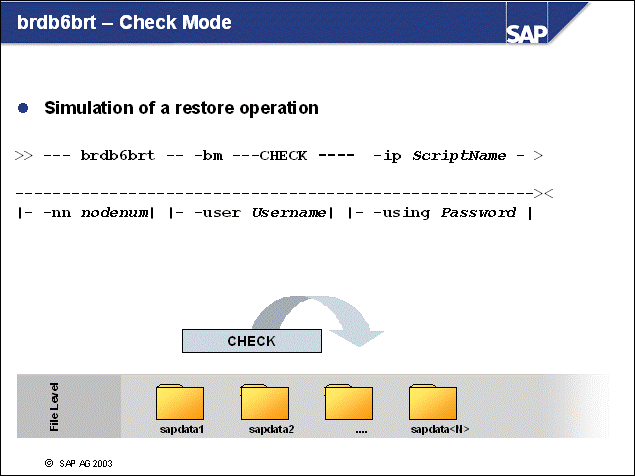
n The check mode of brdb6brt reviews if a restore will be possible with a given restore script.
n The output of the check mode run is written to a protocol file in the current working directory.
n The check mode checks the filenames, paths, and space in the database server. It also checks if files can be created. It does not check if the backup image is accessible or if the hierarchical storage management system allows retrieval of the backup image.
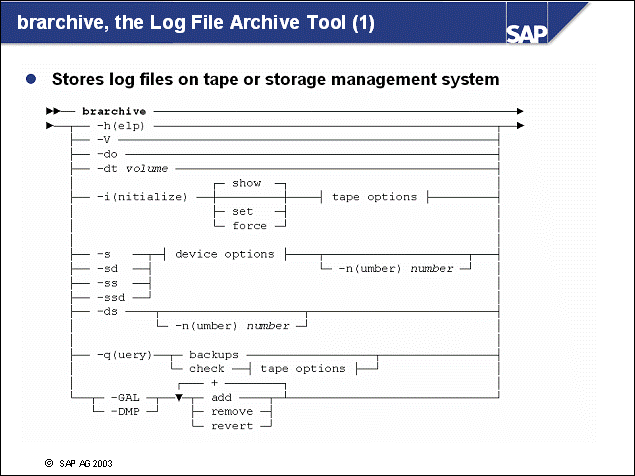
n Using the Log File Archive tool, brarchive, log files can be archived to tape or storage management system with the following options:
-i - Initializes using one of the following options:
show - Displays the volume label, which will be created (default action)
set - Re-initializes the volume label on previously used tapes. This allows for recycling of tapes that have been released for further use. The log files on these tapes are not necessary for the defined backup cycle.
force - Initializes a new tape or re-initialize a tape, which contains ACTIVE log files. Use the FORCE action with caution because you could overwrite a log file that might be necessary for a recovery activity. Only use this option if you have a newer backup or if the log files to be deleted have been backed up on other tapes or media as well.
-s - Stores log files (without deleting)
-sd - Stores and deletes log files
-ss - Stores log files on two tape units in parallel. Log files are not deleted.
-ssd - Stores log files on two tape units in parallel and deletes the stored log files from disk
-ds - Deletes those log files that have been stored on disk
n The -q (query) option provides information about all known backups in the Admin Database (backups) or information about the tape which is in use (check).
n Because brarchive is normally run via CCMS, it does not provide output to the command line unless it is called with the -out option (used in subsequent slide, "brarchive, the Log File Archive Tool (3)").
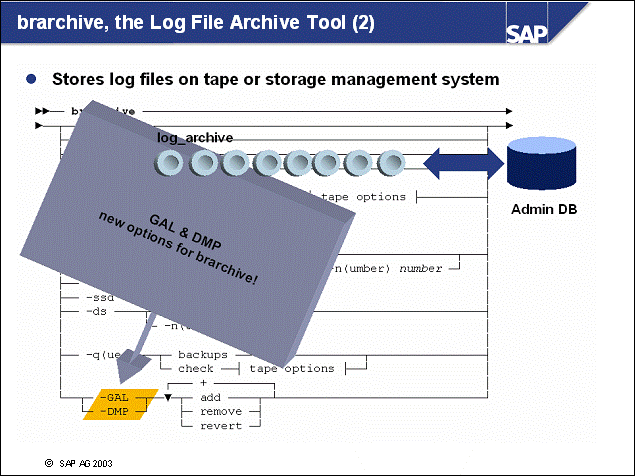
n With GAL or DMP, synchronization of the log file state on disk and the Admin DB information can be performed. DMP performs only a preview of the intended operation, whereas GAL performs the intended operation. It is a good practice to execute a planned operation with DMP first, review the output, and then execute the operation again with GAL.
With option -GAL add, the Admin DB receives entries about all the log files in log_archive, but not in the Admin DB.
With option -GAL remove, the log files that are registered in the Admin DB but missing from log_archive are removed from the Admin DB.
With option -GAL revert, the log files that are marked as archived in the Admin DB will be unmarked and eligible for backup with the next brarchive -s call.
n Under certain circumstances, it will be necessary to synchronize the state of the Admin DB and the actual number and names of the log files in the log_archive directory again. All this is possible using GAL or DMP with brarchive.
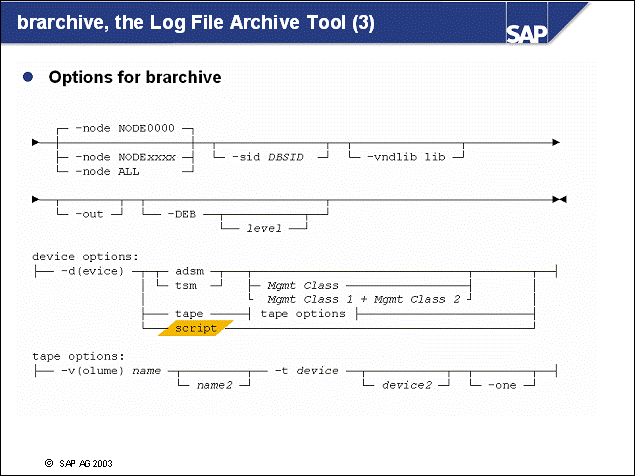
n Additional options for brarchive include the following:
Node specification in partitioned databases (NODE0000 is the default node and is used when -node is omitted)
Vendor library name and path
Debug level information (it is good practice to use init<dbsid>.db6 to set the debug level instead of using -DEB)
Script invocation of brarchive/brrestore backend solutions that are site-specific (please refer to SAP Note 533979) - use 'script' in statement
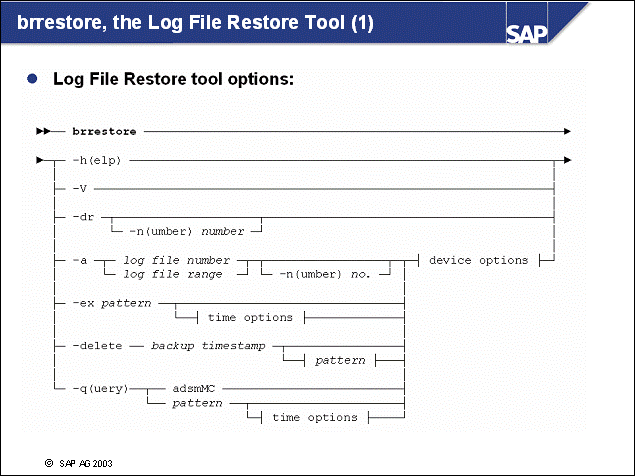
n For retrieval of log files, use the Log File Restore tool, brrestore. This tool ensures that the correct log files are retrieved from tape or from a storage management system.
n The options are used as follows:
-a - Restores log files from an archive.
-a range - Restores a range of log files from an archive. For example, -a 7-42 will restore log files 7 up to 42 from archive, while -a 7 will only restore log file 7.
-ex - If the Admin database (which contains all information about location of log files) is missing, the emergency restore option will retrieve all log files from an archive.
-delete - Deletes all log files that are older than a given backup timestamp. (This works only for TSM servers.) With the pattern option, all matching timestamps, including those that cannot be found in the Admin database, will be deleted.
-dr - Deletes log files from disk.
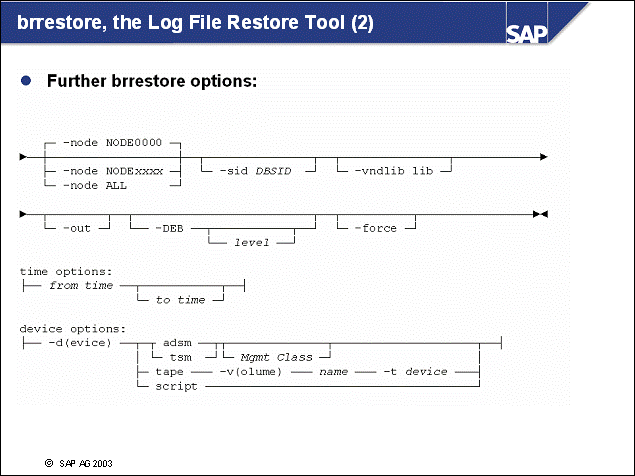
n For retrieval of log files, the SAP Log File Restore tool brrestore uses similar options to those used by brarchive (node information, output, device information, and debugging).
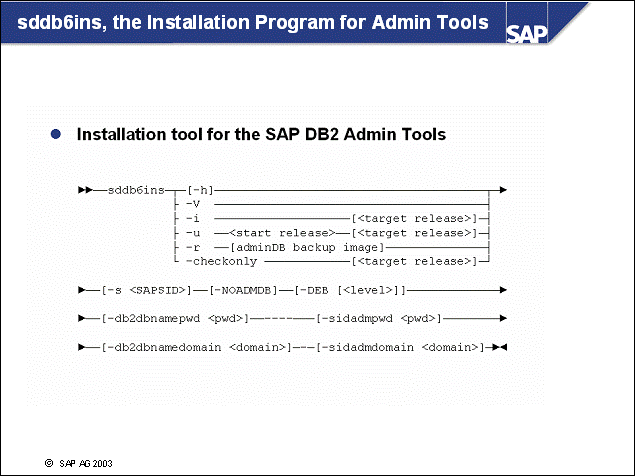
n The installation program for SAP DB2 Admin tools, sddb6ins, is used to install or upgrade the Admin Tools on a database server.
n If you want to install the tool on UNIX servers, you must use the following trick: log on as db2<dbsid> user. Then enter su to root, without the hyphen. After this, you will have the rights of root, but including the environment of the db2<dbsid> user (besides other features).
n Using the parameters gives you the following options:
-i - Use this parameter to install the Admin Tools by specifying the <target release>.
-u - Use this parameter to upgrade from <start release> to <target release>.
-checkonly - Use this parameter to verify the correct installation of the Admin Tools.
-r - Use this parameter to install a backup copy of the Admin DB that was retrieved from an archive using brrestore.
n Note: For Windows-based installation, you must provide the password for the DB2 database administrative user with the -db2dbnamepwd option.
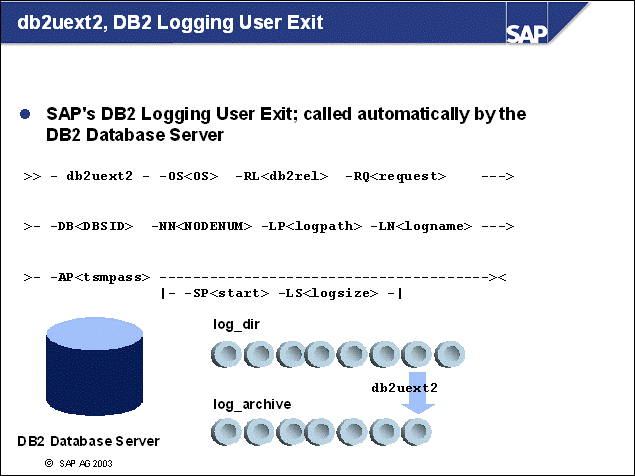
n The DB2 Logging User Exit, db2uext2, is automatically called by the DB2 database whenever (1) a log file becomes full, (2) a log file should be truncated (using the DB2 ARCHIVE LOG command), or (3) an online backup has finished.
n Details on the invocation on your operating system platform can be found in the User Exit Protocol file, db2uext2.log.NODEXXXX. All default parameters can be retrieved from this file.
n TSM support is included as a standard feature of the SAP DB2 logging user exit. If you are using TSM and you are storing the TSM password in the DB2 configuration, the password will be provided to the user exit as well.
n The return codes of the user exit are very important for database operation. In normal situations, the program should return 0; in temporary error situations, it might return 8. This is the case when the offline log directory is full and log files cannot be copied or if a TSM server is temporarily not available.
n You might wish to use a RAW device for logging. In this case, DB2 will use the -SP parameter to specify the offset (in 4K pages) of the log extent to be copied. With the -LS parameter, DB2 will depict the size of the log extent. This is an advanced setup topic and should only be used with detailed advise from a consultant.
n There should not be any spaces between the parameters and the arguments.
n Note: If you ever need to copy a log file from log_dir to log_archive, do not use OS tools, instead use db2uext2 manually.

n The Admin DB Creation and Mirror tool, sddb6mir, available in SAP releases earlier than Basis 6.10, is used to do the following depending on the option:
-c - Create an empty Admin Database
-m - Mirror the Admin Database into the SAP database
-r - Restore the Admin Database from the tables that have been used in the SAP database. Here you need the -p option for the temporary files.
n Note: For SAP Basis releases 6.10 and later, SAP does not use sddb6mir because data will be retrieved from the Admin DB and a backup of the Admin DB is made whenever brarchive is used.
n For details of sddb6ins functionality that replaces the -r option, refer to SAP Note 533979.
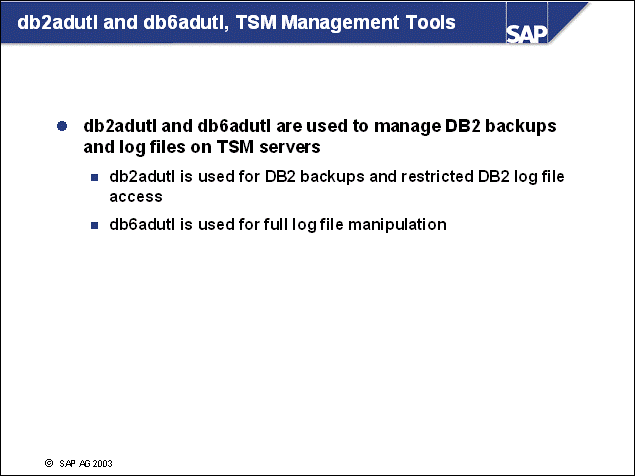
n Whereas the TSM management tool db2adutl is used to manage database images on TSM servers, db6adutl is used to manage log files on TSM. With db2adutl, only log files that have been stored with the (unsupported) sample logging user exit are managed.
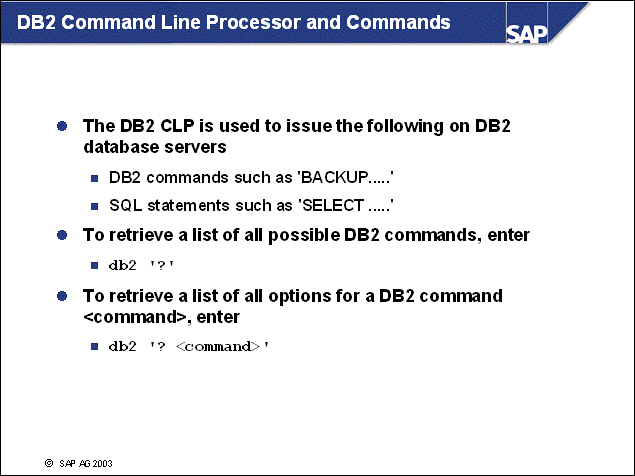
n For details on the DB2 Command Line Processor, please consult the IBM DB2 Universal Database Command Reference V8.
n A few basic recommendations are provided here:
Use the DB2 CLP as a prefix to DB2 commands or SQL statements. Do not call DB2 CLP directly.
Get help from the DB2 CLP directly by using the '?' option.
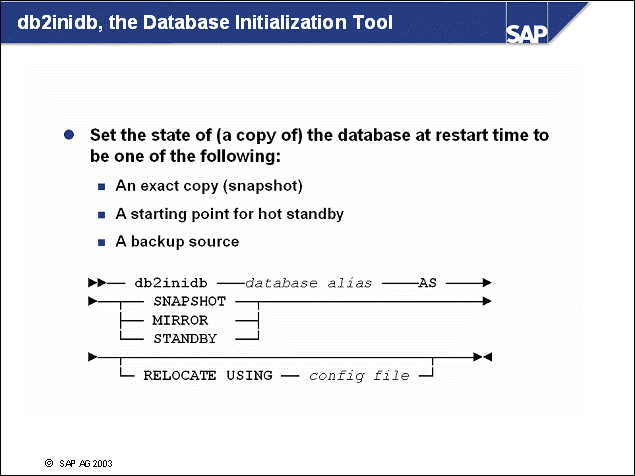
n The database initialization tool db2inidb allows administrators to initialize DB2 databases in several ways. This is always related with the process of copying the database files under /db2/<DBSID> to another directory or probably another server.
n When copying to another server, you will not need to use the RELOCATE option. This option is explained in the next slide.
n In any case, the copy will be able to be used as a
SNAPSHOT - A clone of the original database, consistent and crash-recovered
MIRROR - A copy of the original database, but in rollforward-pending mode. This database will be able to consume the log files from the original database to be available as a hot standby database.
STANDBY - A database, not crash-recovered, not consistent, but accepting DB2 BACKUP connections. This database can be used to create an online backup of the original database.
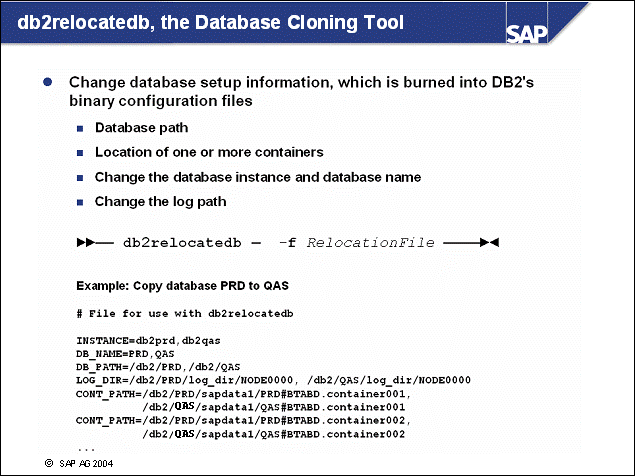
The database cloning tool, db2relocatedb, was introduced in DB2 Version 7.2 with Fixpak 4. This tool is versatile and allows changes to the database, which up to then were possible only with backup-restore cycles.
The tool brdb6brt provides options to generate an input file to db2relocatedb.
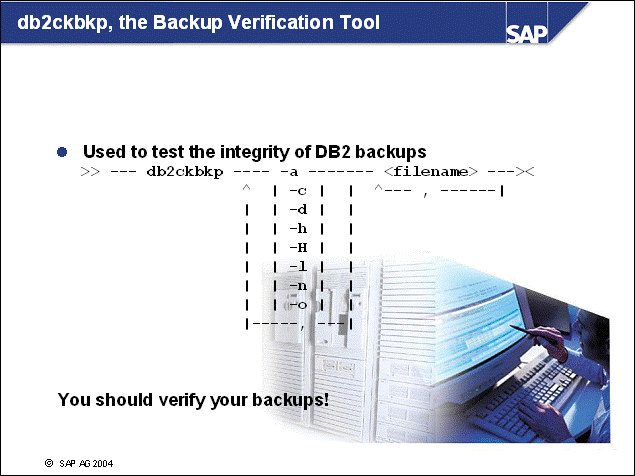
n You can test the integrity of your DB2 backups with the DB2 utility for backup verification, db2ckbkp.
n When using multiple backup images, such as multiple tapes in multiple tape drives or multiple backup files, you must make sure that the first device or file that was written to by backup is also specified first as the filename argument. This is because the first tape or file contains the media header.
n The following arguments have the following effects:
-a - Shows all available information
-c - Shows the checksums
-d - Displays DMS tablespace data headers
-h - Displays the media header information, including the data which is expected by the DB2 RESTORE utility
-H - Displays the media header only (4 K), but does not read the backup for verification
-l - Displays log file header on the backup
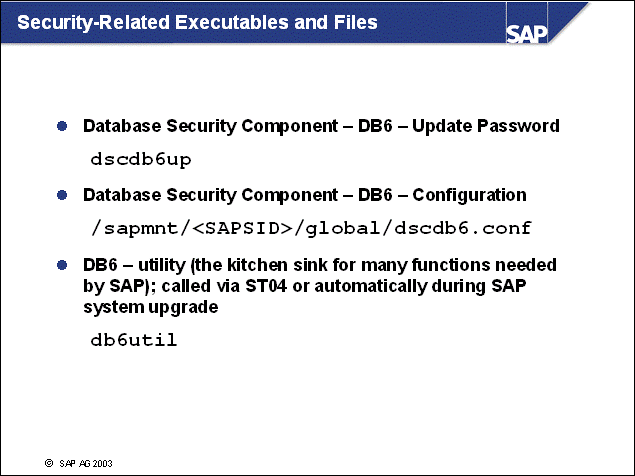
n Use the update password tool, dscdb6up, to set the passwords for the SAP Database Connect User and the <sapsid>adm user on operating system level (using operating system APIs such as passwd()) and in the password configuration file dscdb6.conf.
n The password configuration file dscdb6.conf must exist, otherwise, you should re-create the file with the SAP utility db6util.
n The SAP utility db6util is used mainly during SAP system upgrades. It provides functions for reviewing free space in tablespaces, setting passwords, and reviewing lock situations.
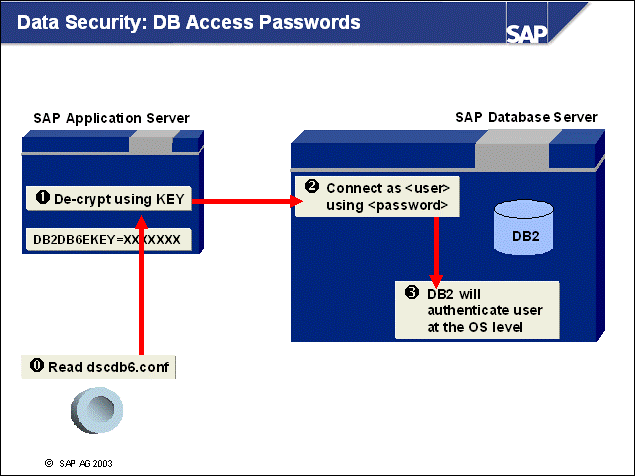
n Any SAP work process that connects to the database retrieves encrypted passwords from the file dscdb6.conf. The work processes, which are started by user <sapsid>adm, use this password to connect to the database as user sap<sapsid> or sapr3, depending on the SAP system configuration and the SAP release. This user is the connect user.
n If the password at the operating system level is changed, the dscdb6.conf file will not be synchronized and the system will not start. To check for this error, execute command R3trans -x from the operating system level as user <sapsid>adm (which will perform only a connect) or R3trans -d (which will connect and retrieve some data).
n To change the password of the connect user and user <sapsid>adm, you can perform the following:
For Unix: As user <sapsid>adm, use
dscdb6up <sapsid>adm <password>
dscdb6up <connect_user> <password>
For Windows: As user <sapsid>adm, use
dscdb6up.exe <sapsid>adm <password>
dscdb6up.exe <connect_user> <password>
For both: Alternatively you can use the SAP DB2 Admin Password management extension in the DB2 Control Center.

|
|
Unit: Tools for DB2 Database Servers |
|
|
At the conclusion of this exercise, you will be able to: Move a tablespace container to another location without performing a redirected restore |
Preparation:
To access your training system and use your training database <Txx>
during the following exercises, please start your Web browser. Use the server
name and port number provided by your instructor and enter the following URL: Error! Hyperlink
reference not valid.>. A graphical desktop will
appear in your browser window. Please enter the password sapdb2 to
access the desktop. From now on, you can use the desktop to open multiple
windows.
You will also be able to reconnect to your desktop in case you close your Web
browser window.
1-1 Please move (relocate) container001 of tablespace PSAPPOOLD of your training database <Txx> into another sapdata directory. Do not use a redirected restore!
Note: Before you
begin, please set the right environment with:
Export DB2DBDFT=<Txx>
|
|
Unit: Tools for DB2 Database Servers |
1-1 Please use the following procedure:
Make sure, that you are in directory /db2/db2<txx>!
Use brdb6brt to generate an appropriate script /brdb6brt -s <Txx> -bm RETRIEVE_RELOCATE
Stop your DB2 training instance <db2txx> with the following command: db2stop
Change the following entry in the relocation script <Txx>_NODE0000.scr
Source:
CONT_PATH= /db2/<Txx>/sapdata6/PSAPPOOLD.container001,
/db2/<Txx>/sapdata6/PSAPPOOLD.container001
Target:
CONT_PATH= /db2/<Txx>/sapdata6/PSAPPOOLD.container001,
/db2/<Txx>/sapdata3/PSAPPOOLD.container001
Move
the container PSAPPOOLD.container001 to /db2/<Txx>/sapdata3
mv /db2/<Txx>/sapdata6/PSAPPOOLD.container001 /db2/<Txx>/sapdata3
Now start your DB2 training instance <db2txx> with the following command: db2start
Finally use the following command to correct the container path into the database configuration: db2relocatedb -f <Txx>_NODE0000.scr
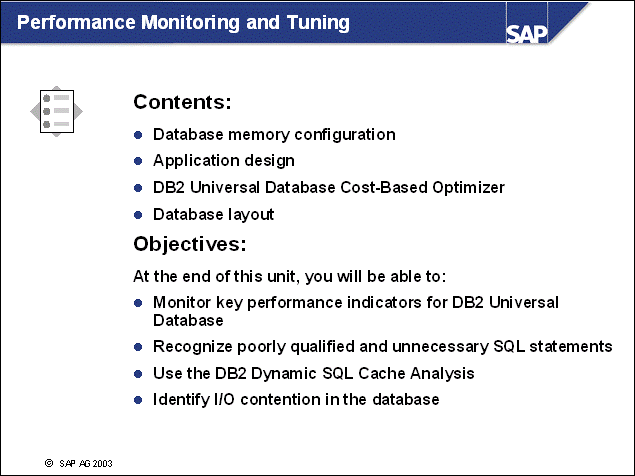
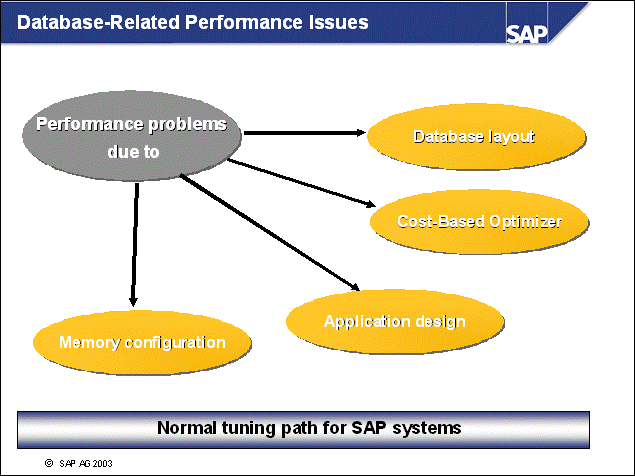
n Database performance problems normally result from poor configuration of the database memory configuration, application design problems, missing or outdated statistics for the Cost-Based Optimizer, or incorrect database layout.
n This unit focuses on the steps you should take to identify and correct performance problems within your SAP system. For normal tuning, consider the following areas:
Check the database configuration.
Use the SAP database tools to verify the efficiency of the application design.
Check that the update statistics strategy is sufficient.
Verify the database layout.
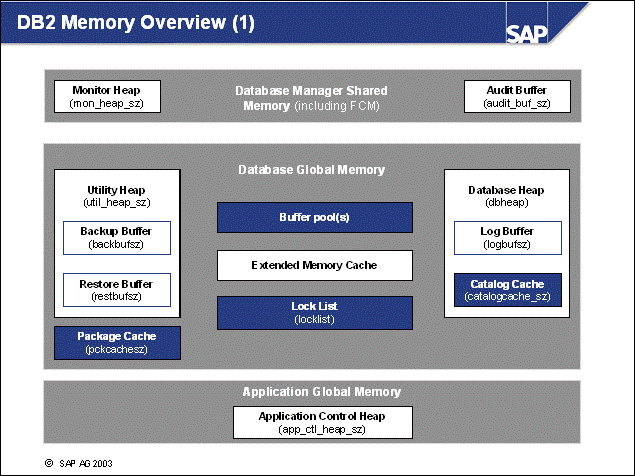
n DB2 allocates memory in the following steps:
Database Manager Shared Memory is allocated when the database manager is started using the db2start command, and remains allocated until the database manager is stopped using db2stop.
Database Global Memory (also known as Database Shared Memory) is allocated for each database when the database is activated using the ACTIVATE DATABASE command or the first application connects to the database. The Database Global Memory remains allocated until the database is deactivated using the DEACTIVATE DATABASE command or the last application disconnects from the database. This memory is used across all applications that might connect to the database.
Application Global Memory (also known as Application Shared Memory) is allocated when an application connects to the database. This allocation occurs only in a partitioned database environment or if parameter INTRA_PARALLEL is enabled. This memory is used by DB2 agents to share data and coordinate activities.
n Most memory heaps are only allocated as required. The following heaps are permanently attached:
Buffer pool(s), lock list, package cache, database heap, utility heap
n As a rule of thumb, use this formula to determine the memory that is allocated as a minimum:
Minimum DB2 memory = Buffer pool(s) + Package cache (PCKCACHESZ 4 KB) + Database heap (DPHEAP 4 KB) + Lock list (LOCKLIST 4 KB) + Utility heap (UTIL_HEAP_SZ 4 KB) + (Number of DB2 agents * 10 MB).
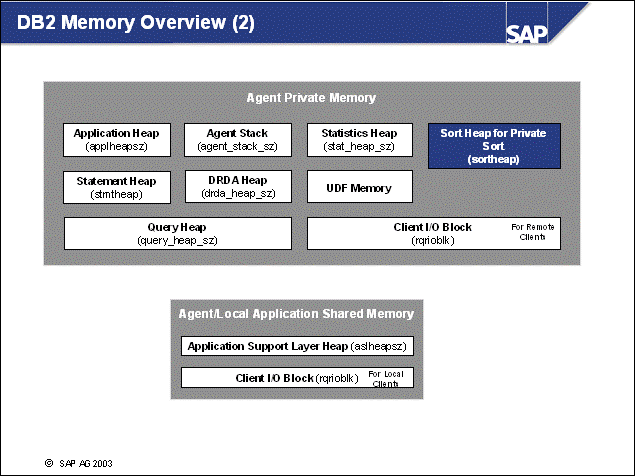
n Agent Private Memory is allocated for an agent when that agent is assigned to work for a particular application. The Agent Private Memory contains memory areas, such as sort heaps and application heaps, which will be used only by this specific agent. This memory remains allocated even after the DB2 agent completes tasks for the application and goes into idle state. However, this behavior can be changed by using the DB2 registry variables DB2MEMDISCLAIM and DB2MEMMAXFREE.
n The Agent/Local Application Shared Memory is used for SQL request and response communications between an agent and its client application.
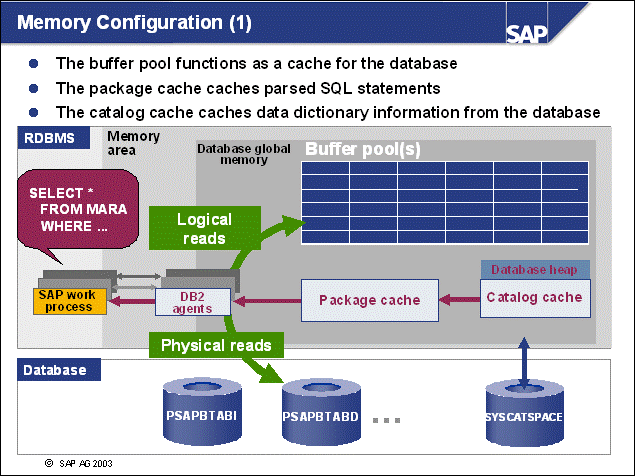
n Buffer pools provide the storage for data and index pages. Buffer pools function as an optimized cache for the database to improve database system performance. Because this cache optimizes its strategy for database use, it is better to use the buffer pools than to use a large file system cache. The goal is to minimize disk accesses (physical reads) and to maximize buffer pool access (logical reads). The size of the buffer pool(s) is controlled by either the DB2 parameter BUFFPAGE or with the CREATE BUFFERPOOL or ALTER BUFFERPOOL statement. There is at least one buffer pool per database. Depending on your performance analysis, you can also define buffer pools at tablespace level.
n After a dynamic SQL statement is compiled and used by a DB2 agent, its access plan (package) is cached in the package cache. Other DB2 agents executing the same statement again use the version already compiled in the package cache, thus avoiding the cost of compilation. This process is also known as preparation.
n The catalog cache stores binary and compressed descriptors for tables, views, and aliases. Each time a dynamic SQL statement is compiled, the system reads queries from system tables to gather information about all tables, views, and aliases. Descriptors are held in the catalog cache to avoid reading from disk.
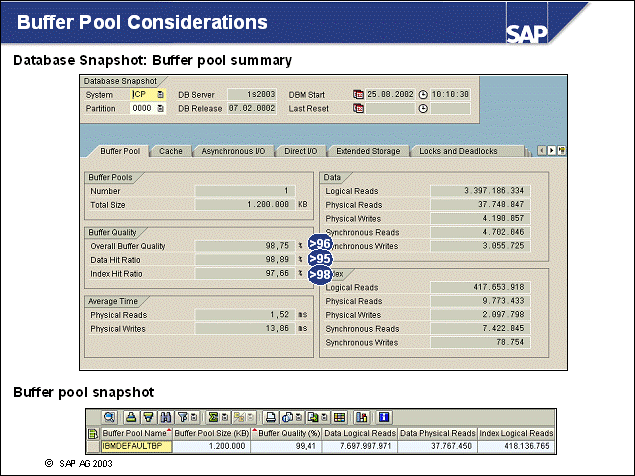
n Transaction ST04 provides important monitoring information.
n To get an overview of the overall buffer pool usage, go to transaction ST04, choose Performance Database section Buffer Pool.
n Buffer Pools Number: Number of buffer pools configured in this system.
n Buffer Pools Total Size: The total size of all configured buffer pools in KB. If more than one buffer pool is used, choose Performance Buffer Pools to get the size and buffer quality for every single buffer pool.
n Overall buffer quality: This represents the ratio of physical reads to logical reads of all buffer pools.
n Data hit ratio: In addition to overall buffer quality, you can use the data hit ratio to monitor the database: (data logical reads - data physical reads) / (data logical reads) * 100%
n Index hit ratio: In addition to overall buffer quality, you can use the index hit ratio to monitor the database: (index logical reads - index physical reads) / (index logical reads) * 100%.
n Data or Index logical reads: The total number of read requests for data or index pages that went through the buffer pool.
n Data or Index physical reads: The total number of read requests that required I/O to place data or index pages in the buffer pool.
n Data synchronous reads or writes: Read or write requests performed by db2agents.
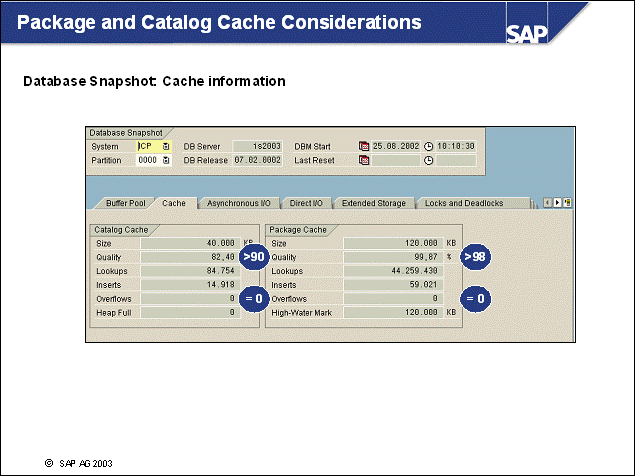
n To get catalog and package cache information, call transaction ST04, choose Performance Database section Cache.
n Catalog cache size: Maximum size of the catalog cache that is used to maintain the most frequently accessed sections of the catalog.
n Catalog cache quality: Ratio of catalog entries (inserts) to reused catalog entries (lookups).
n Catalog cache overflows: Number of times that an insert in the catalog cache failed because the catalog cache was full (increase catalog cache size).
n Heap full (V7 only): Number of times that an insert in the catalog cache failed because of a heap-full condition in the database heap (database heap too small).
n Package cache size: Maximum size of the package cache that is used to maintain the most frequently accessed sections of the package.
n Package cache quality: Ratio of package entries (inserts) to reused package entries (lookups).
n Package cache overflows: Number of times that an insert in the package cache failed because the package cache was full (increase package cache size).
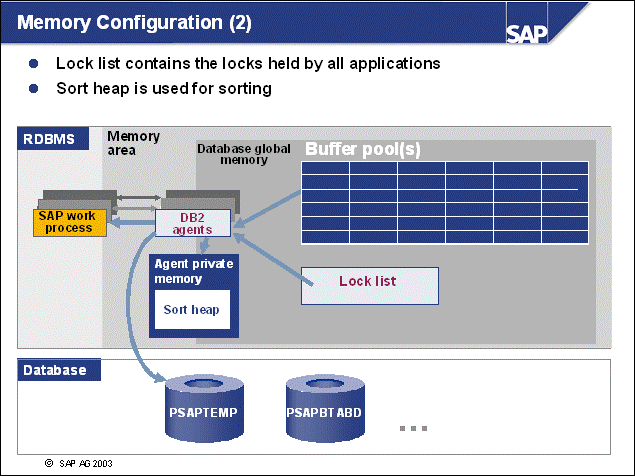
n Lock list: Locking is the mechanism used by the database manager to control concurrent access to data. Both rows and tables can be locked. There is one lock list per database, which contains the locks held by all applications. Its maximum size is 256 MB (for 32-bit systems) and 2 GB (for 64-bit systems).
n Sort heap: The sort heap is used for sorting. Sorting is required for a query, for example, if the order by clause is used in the SQL statement. If the configuration of the sort heap is not adequate for a query, a temporary table in PSAPTEMP is used to handle the sort request.
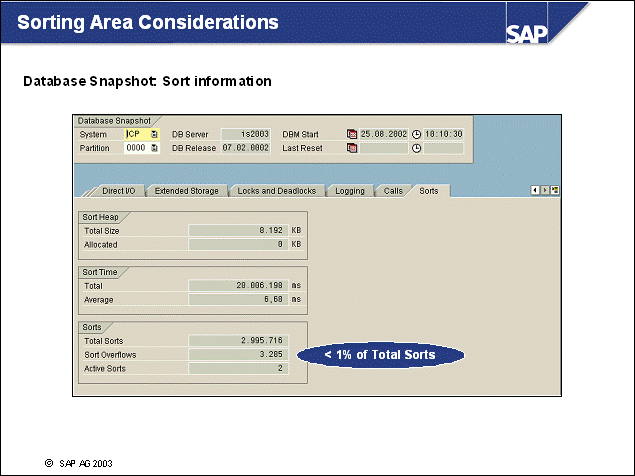
n To monitor the sorting behaviour of your database, go to transaction ST04, choose Performance Database section Sorts.
n Total sort heap size: The maximum size for the sort heap used to sort data indexes or data pages.
n Sort heap allocated: The total number of allocated pages of sort heap space for all sorts at the level chosen and at the time the snapshot was taken.
n Sort overflows: The total number of sorts ran out of sort heap and may have required disk space for temporary storage.
n Monitor the relation between Total sorts and Sort overflows to find out if the sort heap is too small for your system. Sort overflows should not exceed 1% of total sorts.
n Use the Database Manager Snapshot to monitor the piped sorts and the post threshold sorts. To do this, use the command db2 get snapshot for database manager (in transaction ST04, choose Configuration CLP Commands Function Database Manager Snapshot). Monitor the following entries:
Post threshold sorts: Number of sorts that have required heaps after the sort heap threshold has been reached.
Piped sorts requested: Number of piped sorts that have been requested.
Piped sorts accepted: Number of piped sorts that have been accepted.
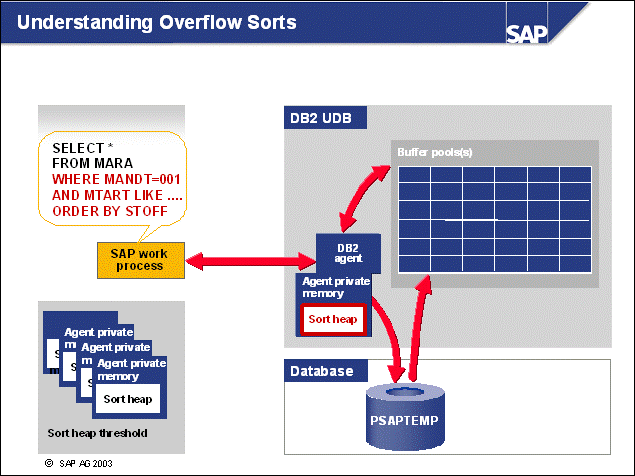
n If the information being sorted is larger than the sort heap that is allocated within the agent private memory, a sort overflow occurs and a temporary table is created. With small buffer pools, this table might even spill over to disk storage of the PSAPTEMP tablespace.
n If the result of a sort cannot return directly, a temporary table is used to store the final sorted data (non piped sort).
n The maximum size of the sort heap is configured in the DB2 parameter SORTHEAP.
n The total amount of memory for sorting available in the DB2 instance is configured in the DB2 instance parameter SHEAPTHRES (sort heap threshold). This parameter represents a soft limit; that is, if this parameter is reached, new sort heap requests will receive only small amounts of memory.
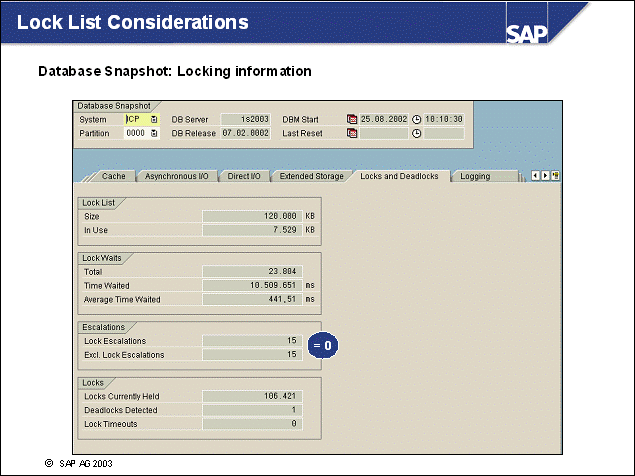
n To monitor the current lock situation, call transaction ST04, choose Performance Database section Locks and Deadlocks.
n Lock list size: This indicates the amount of storage allocated to the lock list. One lock list exists on each database and contains the locks held by all applications concurrently connected to that database.
n Lock list in use: The total amount of lock list memory that is in use.
n Lock escalations: The number of times that locks have been escalated from multiple row locks to a table lock.
n Excl. lock escalation: The number of times that locks have been escalated from multiple exclusive row locks to an exclusive table lock.
n DB CFG parameter MAXLOCKS defines a percentage of the lock list held by an application that must be filled before the database manager performs escalation. In order to prevent the whole lock list being filled by one single application, MAXLOCKS should be set to a value lower than 100 (e.g. 90). Lock escalation also occurs if the lock list runs out of space.
n Deadlocks detected: The total number of deadlocks that have occurred.
n To monitor the previous lock situations, go to transaction ST04 and choose Performance History Database. Check the Deadlocks, Lock escalations and X Lock Escalations rows.
n Note: It is extremely important that your SAP system runs without lock escalations!
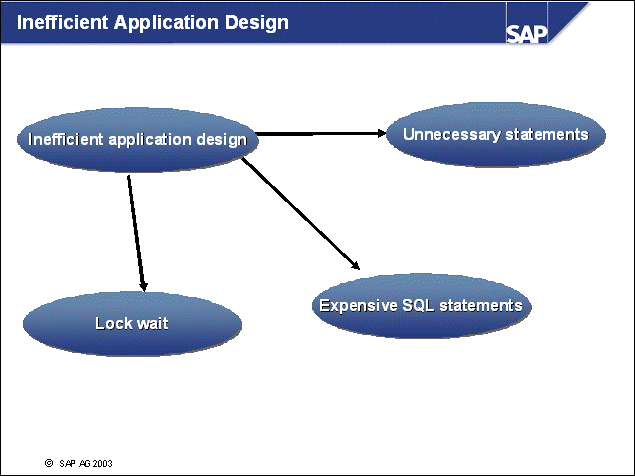
n This section covers inefficient application design and how you can identify the following:
Lock wait situations
Unnecessary SQL statements
Expensive SQL statements, which result in high database load
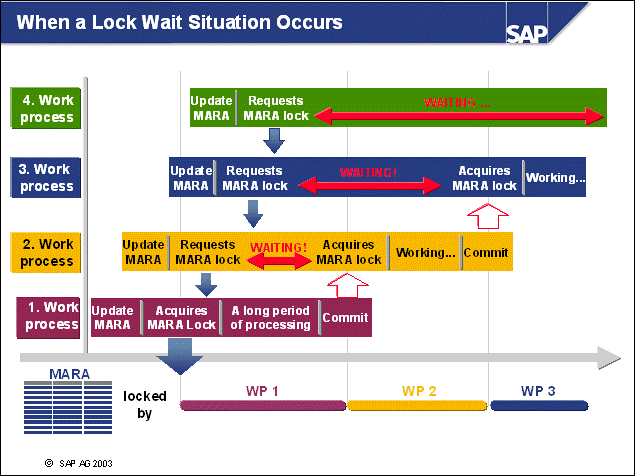
n A lock wait situation occurs when a work process requests a lock on an object that is already locked by another work process. For the database to maintain transactional consistency, the object is locked by the process that requests it first.
n If a user starts a logical unit of work and updates an important object, for example, the most popular material number of the company, all other users who want to update the same material must wait until the first user has committed the changes before they can get the record. The duration of such update transactions is typically very short.
n A user holding a lock occupies an SAP work process. Other users trying to apply the same lock have to wait and at the same time they occupy their own SAP work process. As the number of lock waits increases, fewer and fewer SAP user requests can be processed by available SAP work processes. In the worst case (lock holders and waiters = number of SAP work processes), a small number of users can cause the entire SAP system to freeze.
n With DB2 database servers, several hundred thousands of row locks are transformed into a single table lock if a lock escalation occurs. During update, row level x-locks are set. After the lock escalation, the database will have a single table x-lock (exclusive lock). The concurrency of the SAP system is heavily affected.
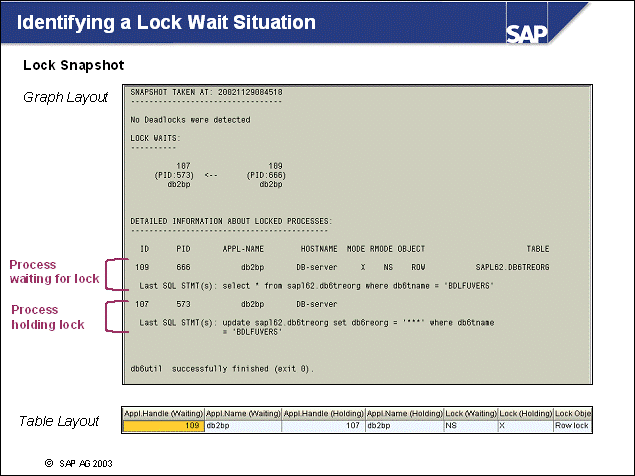
n In this example, the lock wait situation was created manually using the DB2 CLP.
n To identify lock wait situations, use the Lock Wait Monitor (from transaction ST04, choose Performance Lock Waits or use transaction DB01).
n The Lock Wait Monitor provides the following information:
Process IDs of lock holder and waiting processes
SQL statements involved
Lock objects
Lock mode
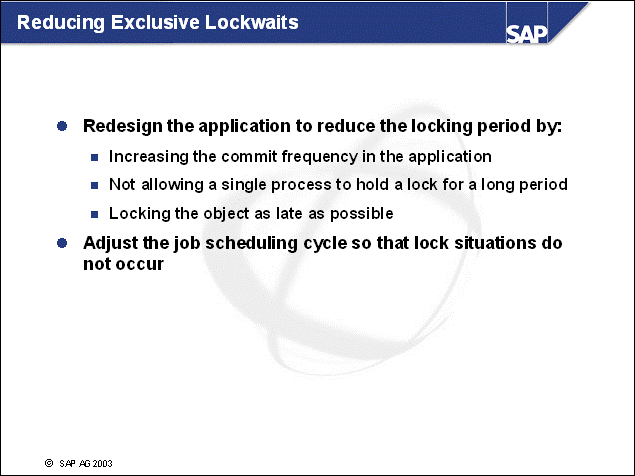
n Exclusive lock waits usually occur because of one of the following situations:
A user holds the lock too long.
For example, a user could be processing large amounts of data in the background. Only explicitly committing the changes on the updated records would enable update access for other users. The solution here would be to analyze the application and determine whether more commits can be safely built into the application.
Many users want the same record in high-volume processing.
For example, in mass loading of FI documents, users could all want to update the same general ledger account. Though each individual lock wait may not take long, the sum of all lock waits can significantly reduce the speed of the mass load. Here, a possible solution would be to sort the data to mix up the accesses to GL accounts.
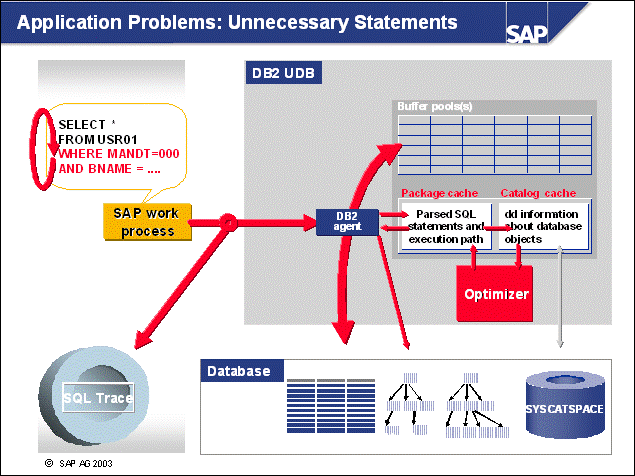
n Unnecessary SQL statements are executed repeatedly with exactly the same WHERE clause.
n To avoid this problem, you can build internal tables to buffer the data whenever possible.
n To identify unnecessary SQL statements, you can use the SQL Trace tool. The SQL Trace tool is part of the database interface and records all commands sent to the database and their results.
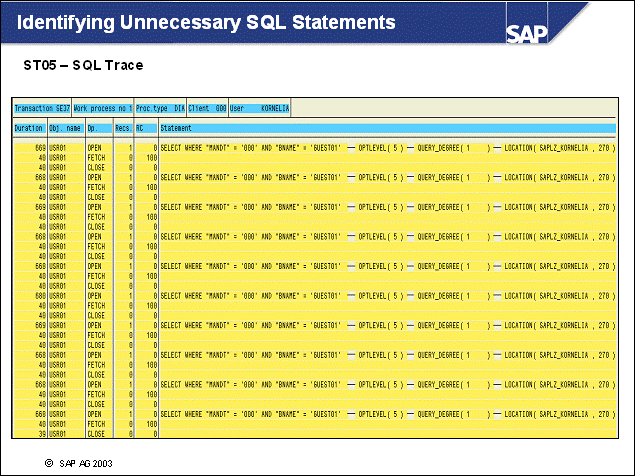
n This example shows SQL Trace output when the same SELECT statement was executed repeatedly.
n The return code 100 ( SQL0100W ) specifies that no data is found.
n The first rows of the result set are transferred to the communication buffer with the OPEN operation.
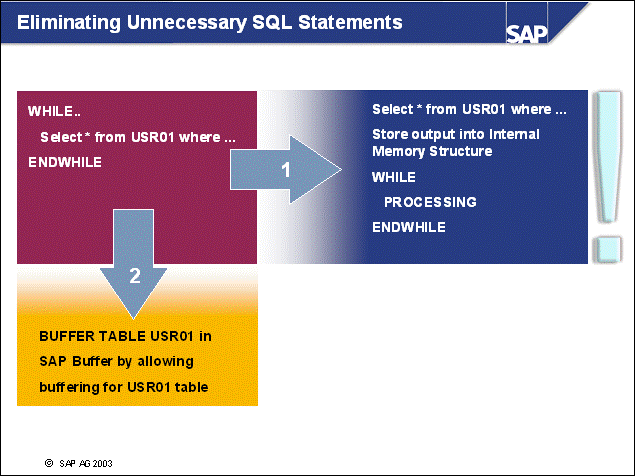
n There are two basic ways to eliminate unnecessary SQL statements:
Change the application program to keep track of the information it has already read in its own program memory (that is, build internal tables)
Use the SAP mechanisms for buffering tables, but you must consider the following:
Table size: Only small tables can be buffered.
Technical settings: Check whether the technical settings allow buffering (use transaction SE12).
Update frequency: Only tables with a small number of updates can be buffered.
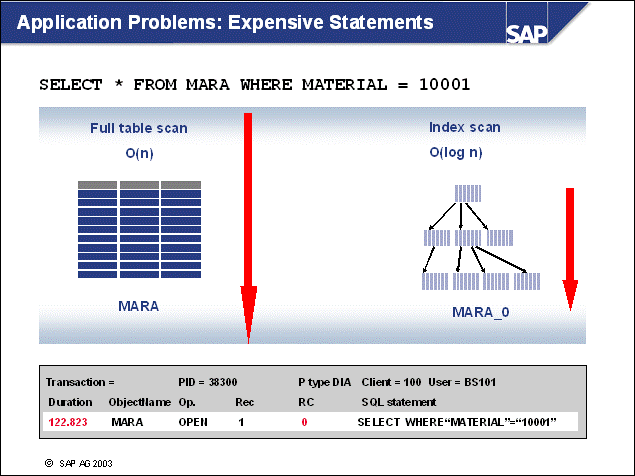
n Expensive statements occur because of the following reasons:
No appropriate index is associated with the table being accessed.
A secondary index is needed for the query being performed.
The wrong index is used.
The index used was defined incorrectly.
An index is used unnecessarily. A full scan is more effective if small tables are accessed or a large number of records is retrieved.
n To avoid poorly qualified statements, try not to use "SELECT * FROM ..." statements wherever possible.
n Do not change the standard SAP index design. But you can create additional indexes with the advise of SAP.
n If a problem is caused by an SAP report, create a customer message on the Service Marketplace at https://service.sap.com.
n For more information about efficient statement coding, run transaction SE30 and choose Tips&Tricks.
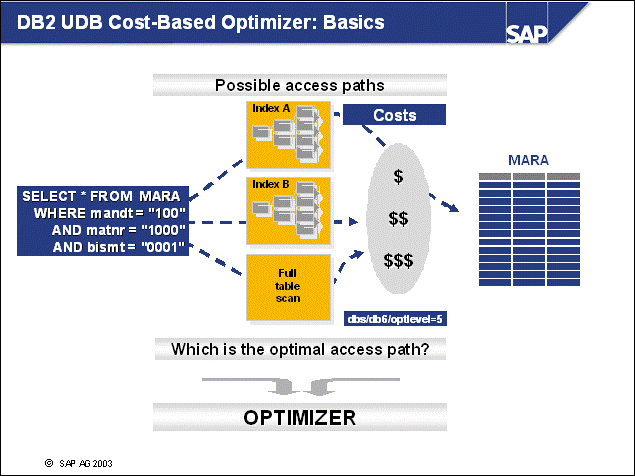
n For each SQL statement, the DB2 Cost-Based Optimizer tries to determine the most effective strategy for retrieving or manipulating database data. The access strategy used depends on many factors such as the following:
Queried table data content (or tables, for a VIEW or JOIN)
Fields specified in the WHERE clause of the SQL statement
Indexes defined for the tables queried
Database statistics
n The Cost-Based Optimizer generates many alternative execution plans, estimates the execution costs of each alternative plan using the statistics for tables, indexes and columns, and chooses the plan with the smallest execution cost. For this, the optimizer requires up-to-date statistical information about the tables and indexes of the database.
n Statistical information for a table or index is stored in the DB2 data dictionary. To collect the statistical information, the DB2 command runstats is executed in a special SAP executable.
n Table and index sizes, and value distributions can change. If the current number of rows of a table differs greatly from the values determined by the last runstats run, the optimizer could choose an ineffective strategy and the database access time becomes longer.
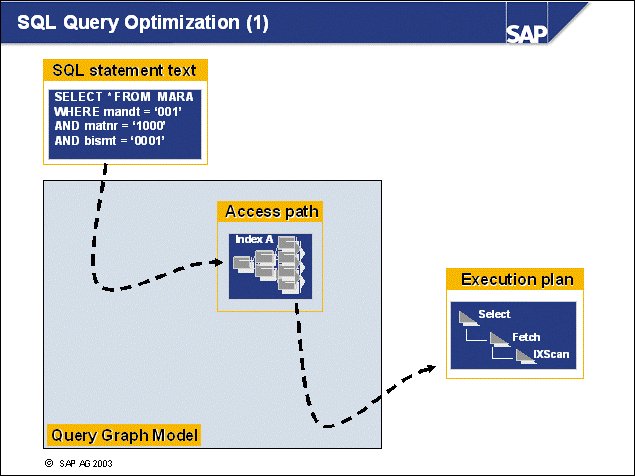
n The access path for a statement results in an execution plan. This execution plan can be displayed in a readable format.
n Once an execution plan is created, DB2 caches it to be able to reuse it and to save the create time for an execution plan (also known as prepare time).
n DB2's Cost-Based Optimizer estimates the most efficient way to retrieve data by doing the following:
Considering data volume and distribution, which are subject to continuous changes
Finding the right balance between CPU-based and I/O-based operations
Searching through the possible execution plans to find the least expensive one
n DB2's Cost-Based Optimizer considers how much time it takes to get the plan.
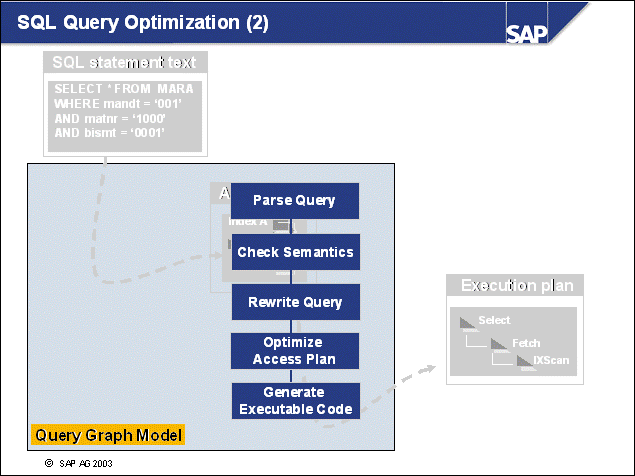
n The Query Graph Model is an internal, in-memory database that represents the query as it is processed in the steps described below:
Parse Query: The Query text is analyzed to validate the syntax. When parsing is completed, an internal representation of the query is created and stored in the Query Graph Model.
Check Semantics: Possible inconsistencies among parts of the statement are detected (for example, the data type of columns specified for scalar functions are checked).
Rewrite Query: The global semantics stored in the Query Graph Model are used to transform the query into a form that can be optimized more easily and the result is stored in the query graph model.
Optimize Access Plan: Many alternative execution plans are generated. To estimate the execution costs of each alternative plan, the optimizer uses the statistics for tables, indexes, columns, functions, the values of some configuration parameters, and so forth. Then the plan with the smallest estimated execution cost is chosen. All relevant information is stored in the DB2 Explain Tables.
Generate Executable Code: The access plan and the Query Graph Model are used to create an executable access plan, or section, for the query.
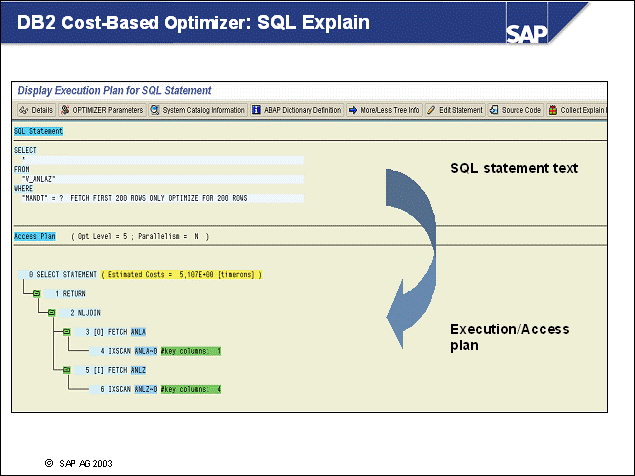
n The execution/access plan contains all the necessary data to be able to reproduce (follow) DB2's access path. All relevant information is stored in DB2's explain tables.
n The Explain function within the SAP system is a comfortable way to display the chosen execution/access plan and all associated information. The Explain function is available in the following transactions and reports:
Transaction ST05
Transaction ST04, choose Performance Applications
Transaction ST04, choose Performance SQL Cache
Reports RSDB6TTE and RSDB6CSTRACE (cumulative DBSL trace)
n The above SQL Explain Function is available as of SAP R/3 3.1H.
n Standalone tools, such as DB2 Visual Explain, are also available. However, it is not easy to retrieve the statements executed by the SAP system using these tools.
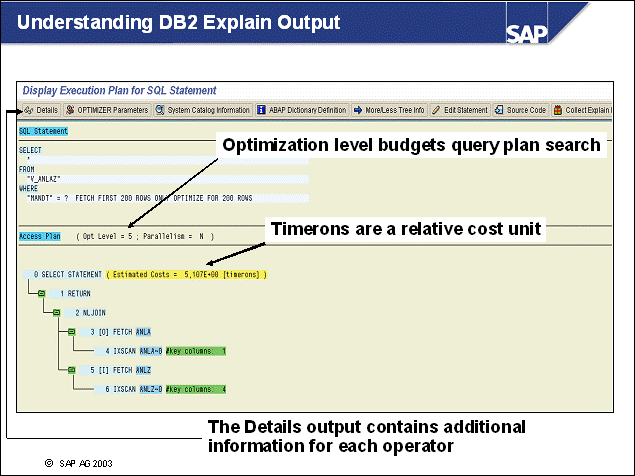
n The optimizer search in DB2 UDB is budgeted by the optimization level selected for a query plan determination. The DB2 Cost-Based Optimizer cost model tries to be accurate but relies on certain assumptions.
n With optimizer level 0, the optimizer does not exploit statistical information to calculate the access plan. Greedy join enumeration is performed with nested loop joins and index scans only. There are only minimal query rewrites and no consideration of non-uniform distribution in statistics. List prefetch and index ANDing are disabled.
n Optimizer level 5 is the default setting in the SAP environment. This enables dynamic programming with optimization effort. Heuristics are used in concert with self-adjusted throttling techniques to selectively apply greedy join enumeration in order to manage the tradeoff between optimization time and plan execution time. The optimizer considers all available statistics, all query rewrite rules, and most access paths. Materialized views and hash join access methods are used with an optimizer level greater than or equal to 5.
n Choose OPTIMIZER Parameters to re-generate an access plan using a different optimizer level.
n Timerons are virtual timing units that are used as a relative measure of time on the same system. If you have two systems that are exactly the same with the same database configuration parameters, you could compare the execution cost of the statements between the systems.
n For each operator used in the access plan, DB2 provides additional information. To display this information, mark an operator and choose Details. For each object in the access plan, you can get detailed information by double-clicking on the object name.
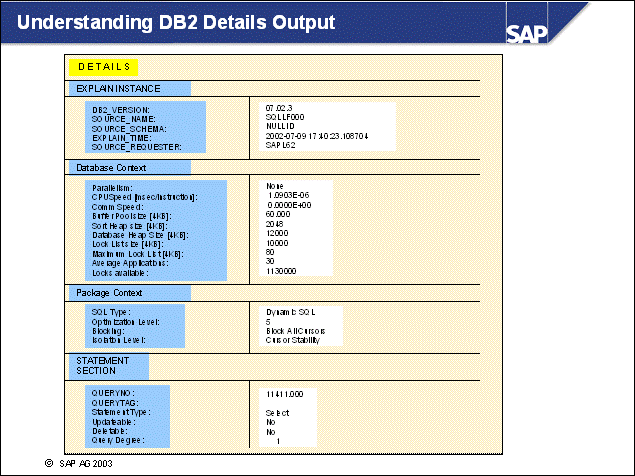
n You can also choose Details without marking an operator to display general information about the SQL statement explained and the environment. The example on the slide shows the first four sections:
EXPLAIN INSTANCE
Contains information about the DB2 version and who performed the Explain at what time
Database Context
Shows if parallel operations are allowed (parallel processing is generally only used in SAP BW systems)
Displays the current setting of Cost-Based Optimizer relevant configuration parameters
Package Context
Contains information about the optimization level used, the blocking type of the cursors (if a cursor is blocked, more than one row is transferred to the client-side communication area to support efficient communication), and the isolation level.
Statement Section
Displays the statement's properties (type, updateable, deletable) and the query degree, which describes the parallelism that has been selected for this statement
n Additional sections contain the original statement and the optimized statement, which is the result of the query rewrite process.
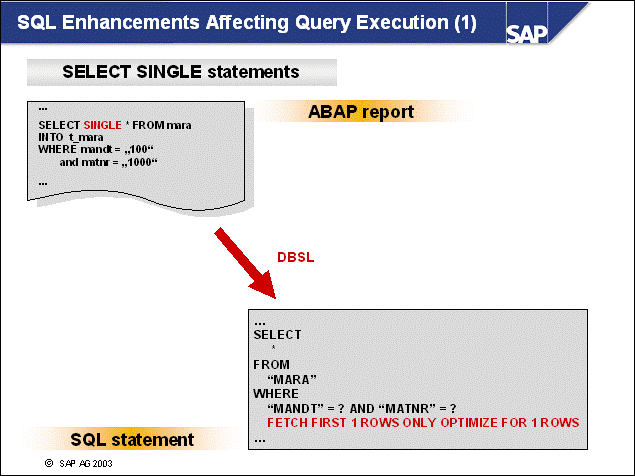
n SAP's open SQL statement SELECT SINGLE * FROM ... is internally transformed to a DB2 SQL statement using DB2's clauses:
FETCH FIRST n ROWS ONLY and OPTIMIZE FOR n ROWS.
n OPTIMIZE FOR N ROWS (OFNR)
Optimizer chooses the quickest way to return a result with n rows.
Optimizer does not limit the result to n rows, but returns all records that match the query.
Changes in the access plan can be nested loop joins instead of mass join techniques. You can get sorted records by using an appropriate index.
n FETCH FIRST N ROWS ONLY (FFNR)
Limits the result to the first n returned rows does not affect Cost-Based Optimizer decisions.
This is not available as a single ABAP hint because it does not affect the decision of the Cost-Based Optimizer.
n For more information, refer to SAP Note 150037.
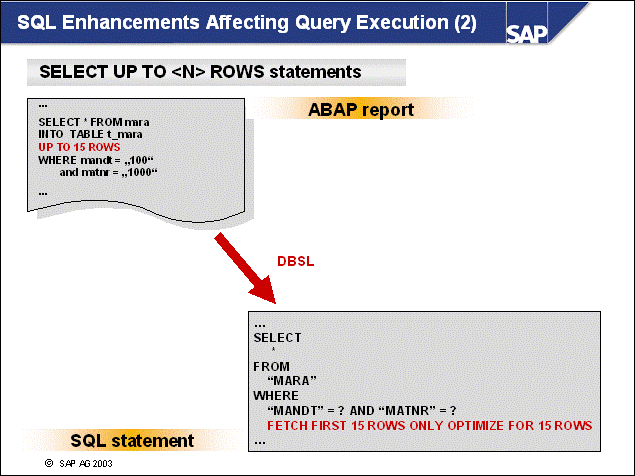
n SAP's open SQL statement ... UP TO <N> ROWS ... is internally transformed to a DB2 SQL statement using DB2's clauses:
FETCH FIRST n ROWS ONLY and OPTIMIZE FOR n ROWS
n An additional option is available: SET CURRENT QUERY OPTIMIZATION <LEVEL>
Changes DB2's search strategy to find the result set.
n As of R/3 Release 4.6A, you can pass hints to the optimizer from ABAP to DB2 Universal Database using:
SELECT *
FROM RESB WHERE MATNR = '200-100' AND WERKS = '1100'
%_HINTS DB6 'OPT_FOR_ROWS 15'.
SELECT * FROM RESB WHERE MATNR = '200-100' AND WERKS = '1100'
%_HINTS DB6 'USE_OPTLEVEL 0'.
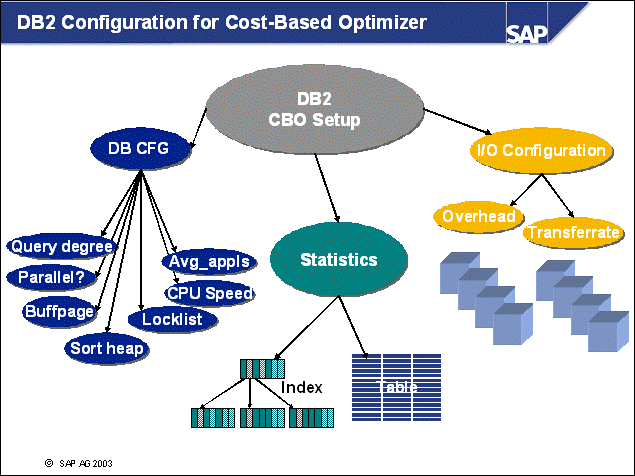
n The following major database configuration settings are observed by the DB2 Cost-Based Optimizer:
BUFFPAGE: Determines the size of the buffer pool
SHEAPTHRES: Specifies maximum soft limit for all sortheaps within a database instance
LOCKLIST: Determines the size of the lock list
CPUSPEED: Determines the speed of the CPU during installation
DFT_DEGREE: Determines the default degree for query operations
AVG_APPLS: Determines the share of the buffer pool per application
n For each table and index accessed by the execution plan, the Cost-Based Optimizer uses statistics collected in the system catalog.
n For each of the disks used for the containers of accessed tables and indexes, the Cost-Based Optimizer uses two attributes specified for the tablespaces at creation time:
OVERHEAD: Specifies the I/O controller overhead and disk seek and latency time
TRANSFERRATE: Specifies the time to read one page into memory
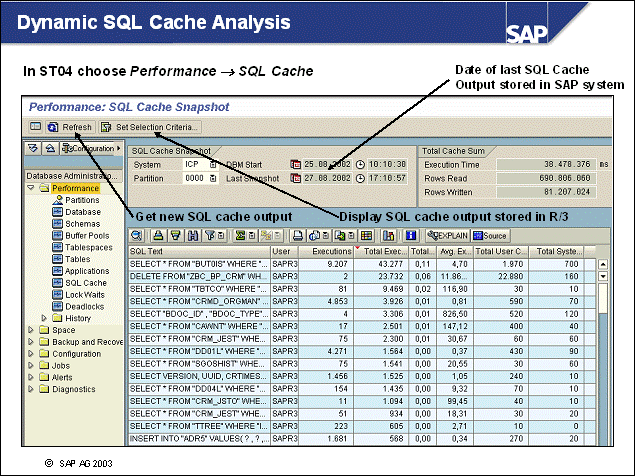
n The Dynamic SQL Cache Analysis contains information about the runtime of all dynamic SQL statements in an SAP system.
n To perform this analysis, call transaction ST04 and choose Performance SQL Cache. Before you display the SQL Cache consider the following input criteria:
Last snapshot: Shows the timestamp of the SQL cache output, which is stored in the SAP system.
Set Selection Criteria: Displays the output of the SQL cache, which is stored in the SAP system. This selection does not get the latest SQL cache from DB2.
Refresh: Displays the latest SQL cache from DB2 and stores this in an SAP table.
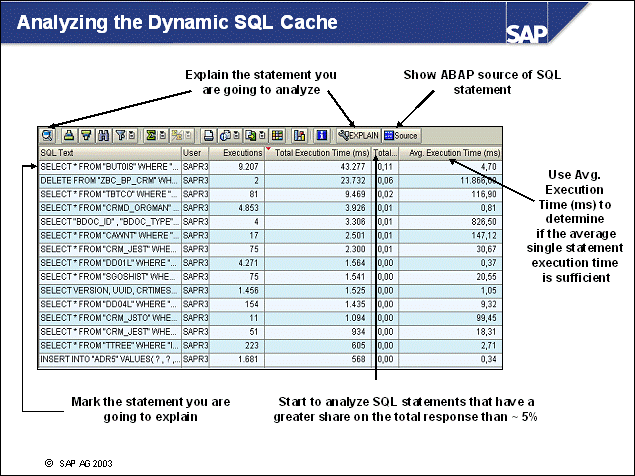
n When analyzing the dynamic SQL cache, consider only the SQL statements that have a greater share on the total response time than 5%.
n Use the Total Execution Time (%) column to determine if the statement has a large share of the Total Execution Time for the following reasons:
The single statement execution is sufficient and the large number of executions are the reason why the share on Total Execution Time is high (possibly an unnecessary statement).
The single execution is not sufficient, but together with the number of executions, this is the reason why the share on Total Execution Time is high (possibly a poorly qualified statement).
n Use Explain SQL statement to display the chosen execution/access plan and all associated information.
n Use Show ABAP source to display the ABAP source code where the SQL statement comes from.
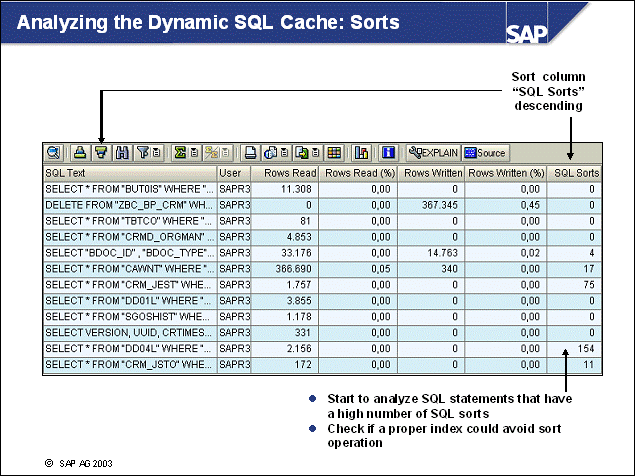
n Sort the SQL Sorts column in descending order. Analyze the statements that have a high number of SQL sorts (as a rule of thumb, check the statements that have more than 5% of the total sorts).
n Use the Explain SQL statement to find out if a proper index design could avoid the sort operations.
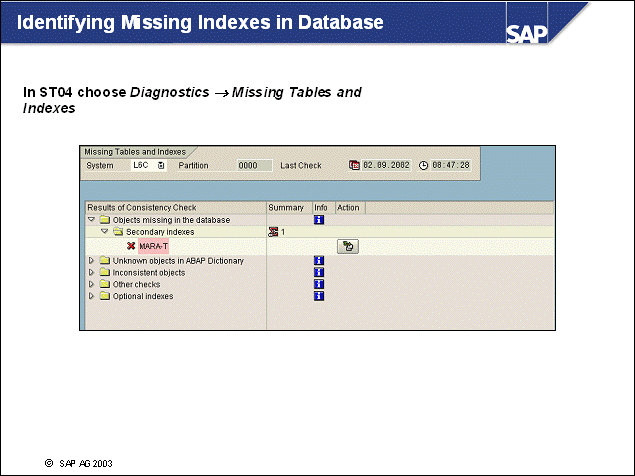
n Poorly qualified SQL statements can be caused when an index is defined in the SAP Data Dictionary but is missing in the database. Missing database indexes can be discovered using transaction ST04, choose Diagnostics Missing Tables and Indexes.
n Common reasons for missing indexes are as follows:
Indexes that are defined in the Data Dictionary but not activated
Indexes that are manually dropped for tests
n The report on missing indexes is created as part of the Performance Collector background job. The check on missing indexes should be performed once a week.
n If necessary, you can also check for the index by querying the DB2 Data Dictionary using the DB2 CLP.
n Indexes can be created, redefined, or dropped.
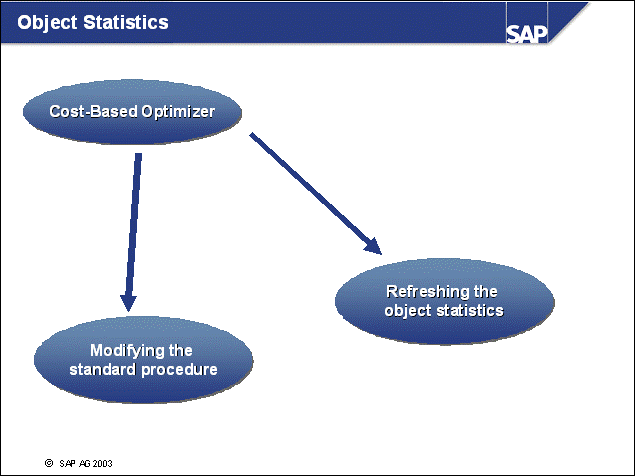
n This section describes how to do the following:
Refresh the statistics used by the Cost-Based Optimizer.
Check if the update statistic jobs finished successful.
Modify the standard procedure used for refreshing the optimizer statistics
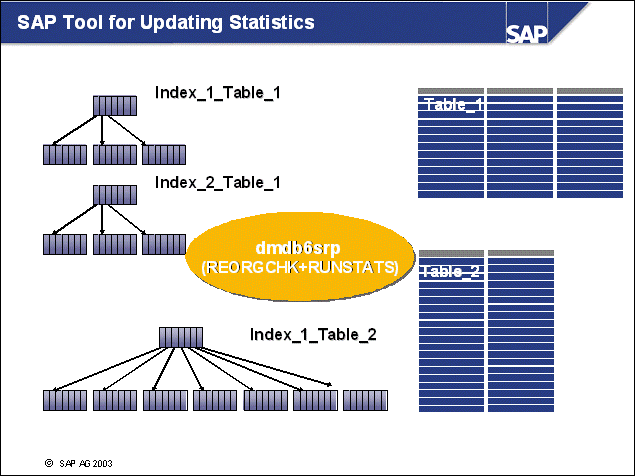
n DB2 RUNSTATS updates the DB2 catalog with statistics information. During RUNSTATS, information about cardinality, number of pages, and record length is collected. If desired, various properties of the indexes are collected as well. The DB2 command REORGCHK is discussed in a later unit.
n The SAP implementation of RUNSTATS is dmdb6srp, which contains an extended set of analysis tools that build on the DB2 RUNSTATS API. The dmdb6srp command updates SAP tables DB6IREORG and DB6TREORG, and the DB2 catalog. The dmdb6srp command uses optimization techniques common to SAP systems (DBSTATC).
n For tables containing long fields, you can specify an execution time limit. After this limit has been reached, the program stops the calculation of the size of the table and estimates the size based on the cardinality and other available data.
n You can also specify the total execution time of dmdb6srp, after which the program will terminate. It will recognize the tables that it has already visited and will start "oldest statistics" first at next invocation.
n Certain tables must not receive new statistics (for example, VB tables) and are not updated during a RUNSTATS called by dmdb6srp. However, the DB2 native RUNSTATS destroys the statistical configuration of these tables. For this reason, do not run DB2 RUNSTATS with SAP systems.
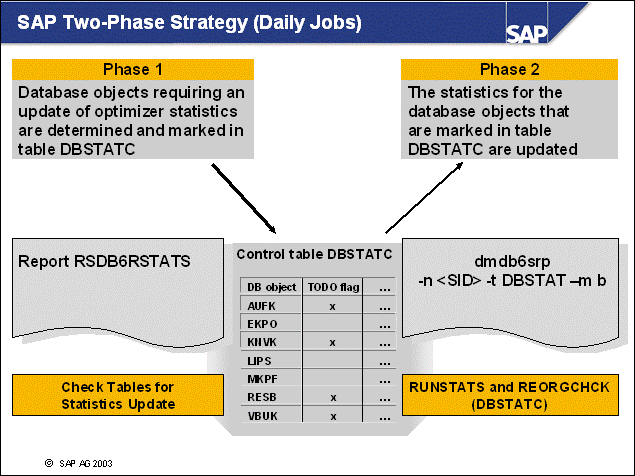
n Only up-to-date statistical information can ensure that DB2's Cost-Based Optimizer chooses the optimal access path. However, gathering optimizer statistics is expensive and reduces system performance.
n To ensure up-to-date statistics for all tables and optimal analysis runtime, SAP has implemented a two-phase strategy:
In the first phase, SAP tools determine which tables require a statistical update. The report RSDB6RSTATS determines which database objects have exceeded an update threshold and modifies the control table DBSTATC accordingly. To do this, schedule the job Check Tables for Statistics Update in the DBA Planning Calendar.
In the second phase, the statistics of the tables marked TODO in the control table DBSTATC are refreshed. To do this, schedule the job RUNSTATS and REORGCHK (DBSTATC) or schedule SAP's executable dmdb6srp at the operating system level.
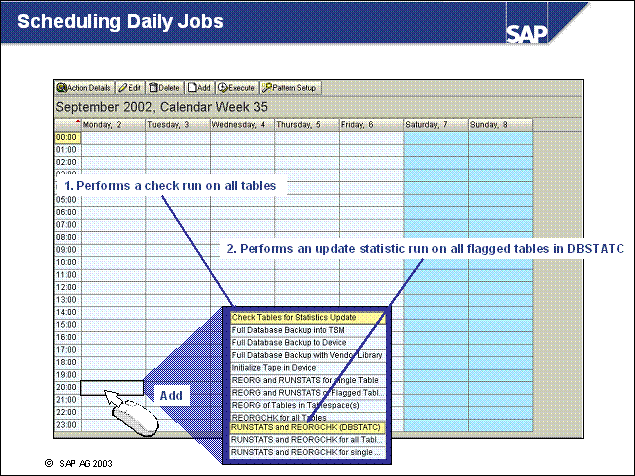
n Use the DBA Planning Calendar (go to transaction ST04 and choose Jobs DBA Planning Calendar) to schedule the check job (Action Check Tables for Statistics Update), followed by the statistics update of flagged tables job (Action RUNSTATS and REORGCHK (DBSTATC)) on a daily basis.
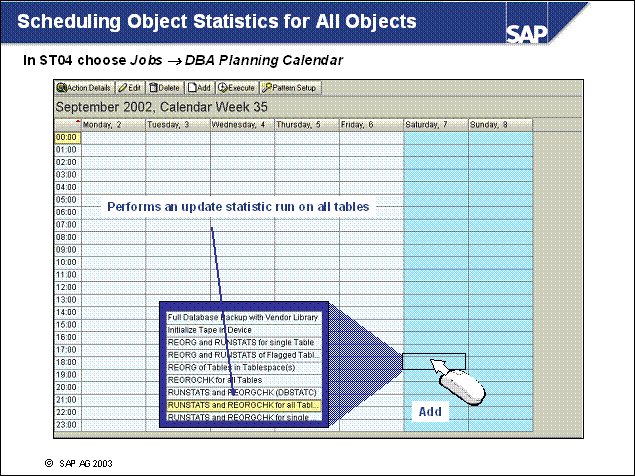
n Full database update statistics should be scheduled as need arises.
n The update of the statistics is performed by the SAP DB2 CCMS, which uses the DB2 runstats API. Do not enter this command directly.
n Use the DBA Planning Calendar (go to transaction ST04 and choose Jobs DBA Planning Calendar) to schedule the statistics update of all tables. You may limit the runtime of the command.
n Use the CCMS Cost-Based Optimizer menu (transaction DB20) to run unscheduled updates immediately.
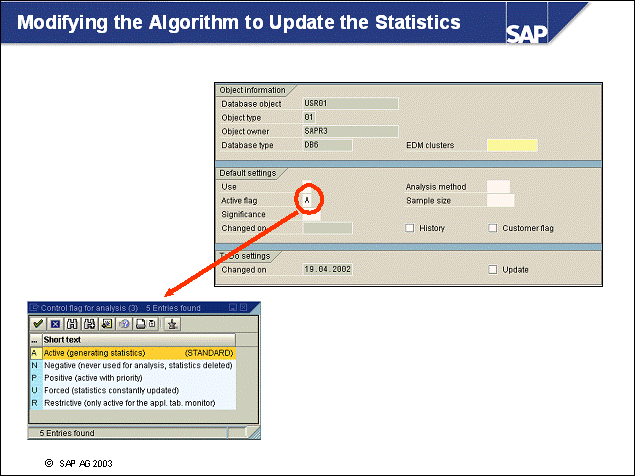
n To modify the standard procedure used by SAP for refreshing the optimizer statistics, you can use the Cost-Based Optimizer control panel (transaction DB21). The following fields are relevant:
Database object = <table name>
Object type = 01 (table)
Database type = DB6
Active flag = N - Table will never be processed by dmdb6srp, generally used for tables of unstable size; the volatile flag is set for these tables by dmdb6srp.
Active flag = R or I - Table will not be processed by the regular statistics jobs, only when explicitly required by the user.
Analysis method = DB6B - Basic table and basic index statistics (default)
Analysis method = DB6T - Basis Statistics for Tables
Analysis method = DB6I - Basis Statistics for Indexes
Analysis method = DB6A - Distribution Frequency for Tables and Indexes
Analysis method = DB6D - Distribution Frequency for Tables
Analysis method = DB6X - Distribution Frequency for Indexes
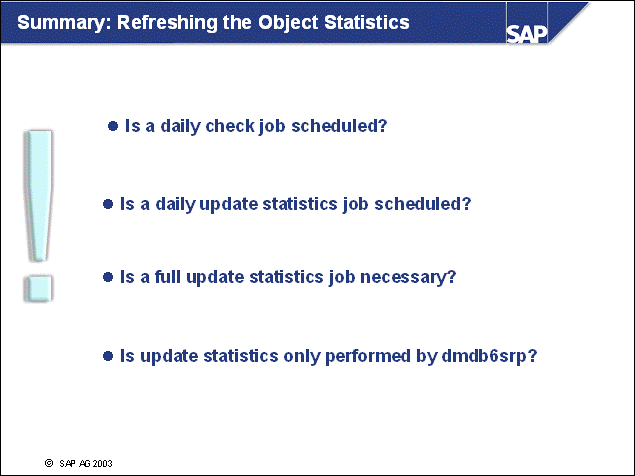
n To ensure that DB2's Cost-Based Optimizer decisions are based upon current statistics, you must schedule the following jobs:
Daily check jobs
Determine which database objects have exceeded an update threshold and set the TODO flag in table DBSTATC
Should be scheduled on a daily basis using the DBA Planning Calendar
Daily update statistic jobs
Update only those tables that have an active TODO flag in control table DBSTATC
Should be scheduled on a daily basis using the DBA Planning Calendar or by scheduling SAP's executable dmdb6srp at the operating system level
Full update statistic jobs
Updates all tables but follows exceptions in the control table DBSTATC
Should be scheduled on an as needed basis using the DBA Planning Calendar or by scheduling SAP's executable dmdb6srp at the operating system level
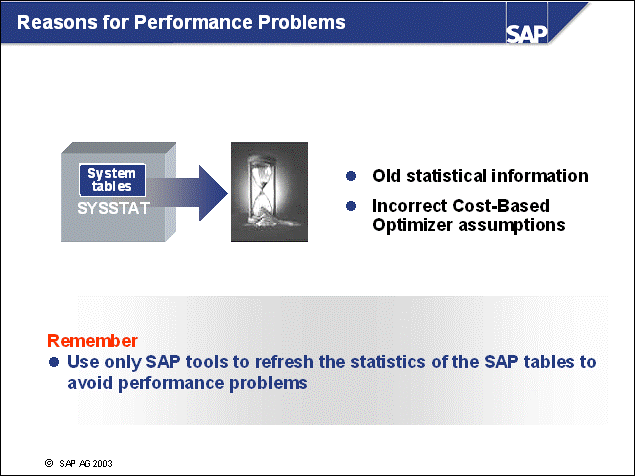
n Severe performance problems can also be caused by the following:
Incorrect statistical information
Incorrect assumptions about the data distribution within the object
n Performance problems regarding incorrect optimizer assumptions are normally fixed by adding additional indexes or changing index definition or SAP access methods to the data (rsdb/...).
n Use only SAP tools to refresh the statistics of the SAP tables. SAP tools ensure that the update is done using the method and option defined for this object in the control table (DBSTATC). Every update of the statistics not done by the SAP tools can create severe performance problems.
n If incorrect Cost-Based Optimizer assumptions are made, open a customer message in SAPNet.
n This section describes how to identify an I/O contention problem caused by the layout of the database.
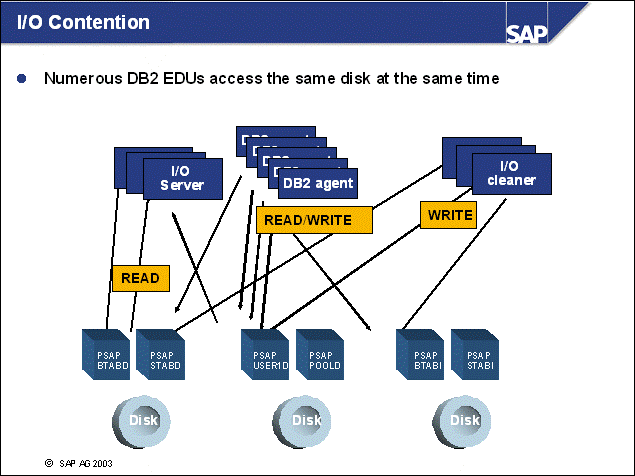
n I/O contention means high I/O wait times for processes accessing the database.
n I/O contention occurs under the following circumstances:
Inefficient application design such as expensive, unnecessary, and poorly qualified statements
Data unevenly distributed across many disk cylinders
Disk not fast enough to handle high I/O activity
Heavily accessed tables or indexes are not distributed or striped across many disks
Incorrect hardware configuration such as many disks on few controllers
n When numerous DB2 engine dispatchable units (EDUs) access the same disks, I/O contention is likely to occur.
n Note: Often I/O contention is caused by application design problems that must be checked first.
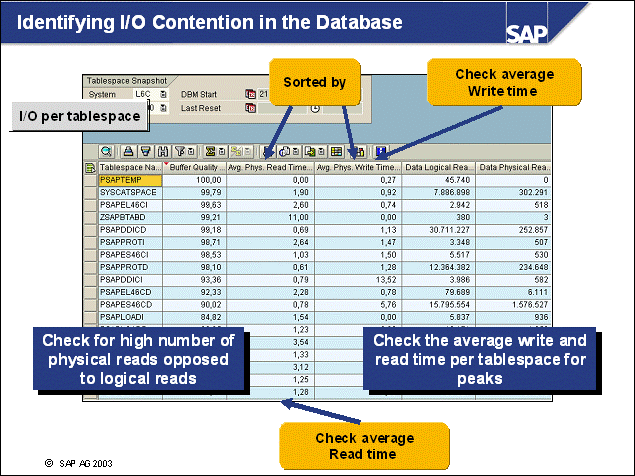
n
To check for I/O contention, use transaction ST04 and
choose Performance Tablespaces. Select Reset
and, after a short period, Since Reset. Sort by Data / Index Physical
reads.
Use the Change Layout button to include the Avg.
Phys. Read Time (ms) and Average Phys. Write Time (ms) columns in
the display.
n Check the Avg. Phys. Read Time (ms) and the Average Phys. Write Time (ms) per tablespace to determine if the average number for a tablespace are significantly higher than for the others. Average numbers could indicate an I/O bottleneck but might not always point to the bottleneck.
n Further analyze the tablespaces with high read or write times. To do this, choose Space Containers in ST04.
n Note: Due to different hardware configurations and disk speeds, the values might vary significantly from system to system. Your hardware vendor can provide more specific numbers.
n Use operating system-specific disk monitoring tools to determine if all file systems and disks that are in use by the most active tablespaces can cope with the workload.
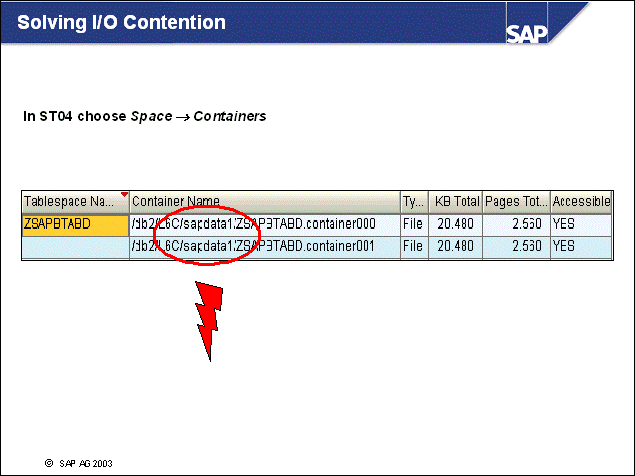
n Once you have identified I/O contention, use the following methods to solve the problem:
Distribute I/O (for example, containers) evenly over the available disks.
Use faster disks.
Move hotspot tables or indexes into own tablespaces on own disks.
Create dedicated buffer pools for specific tablespaces.
n Note: Different hardware platforms could have bottlenecks in disk controller ports, motherboards, and backplanes. Refer to your hardware vendor for I/O distribution guidelines.
n SAP's monitors are limited to check the distribution of the container on the actual available disks. Use operating system commands for further analysis (for example, with AIX, use lspv; on Windows, use Disk Administrator).
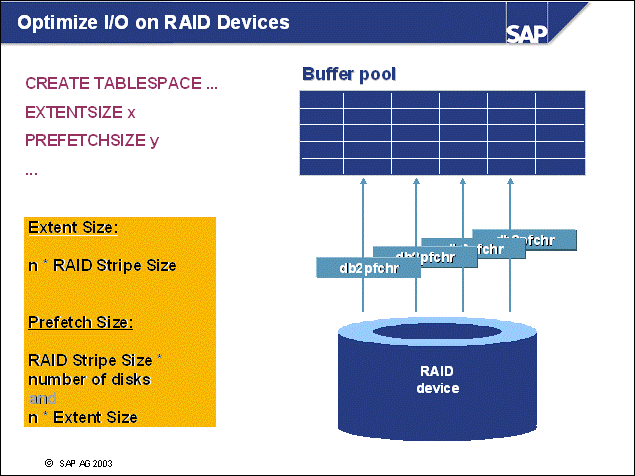
n When data is placed on redundant array of independent disks (RAID) devices, specific tasks must be performed to optimize performance. Perform the following for each tablespace that uses a RAID device:
Define a single container for the table space (using the RAID device).
Make the EXTENTSIZE of the table space equal to (or a multiple of) the RAID stripe size.
Ensure that the PREFETCHSIZE of the tablespace is:
The RAID stripe size multiplied by the number of RAID parallel disk drives (or a whole multiple of this product)
A multiple of the EXTENTSIZE
Use the DB2_PARALLEL_IO registry variable to enable parallel I/O for all table spaces
db2set DB2_PARALLEL_IO=*
With DB2 Version 7, it was also necessary to use the DB2_STRIPED_CONTAINERS registry variable to ensure that extent boundaries are aligned in the table space during tablespace creation:
db2set DB2_STRIPED_CONTAINERS = ON; db2stop; db2start
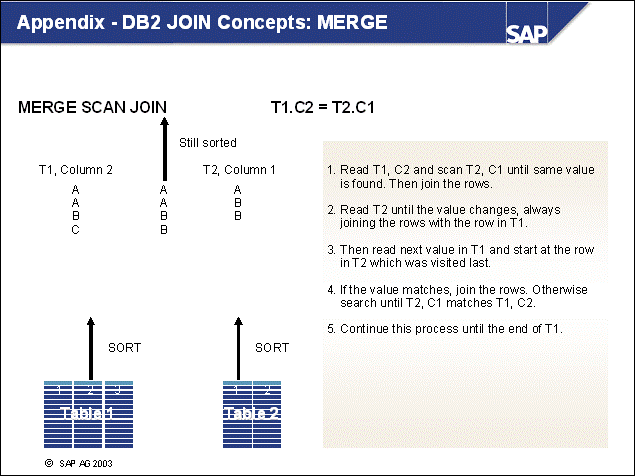
n Merge join (also known as merge scan join or sort merge join) requires that the columns that are to be merged be sorted. This input can come from data that is received through an index or that is sorted through other means (temp table).
n Merge join requires an equality join predicate, such as the predicate "=".
n The merge join provides good performance if T2 (above) is large and sorted. This is the case if the rows of T2 are read from an index. Then the T2 data does not have to fully fit into the buffer pool at once. It can be read through prefetching and does not have to be re-used in the same operation.
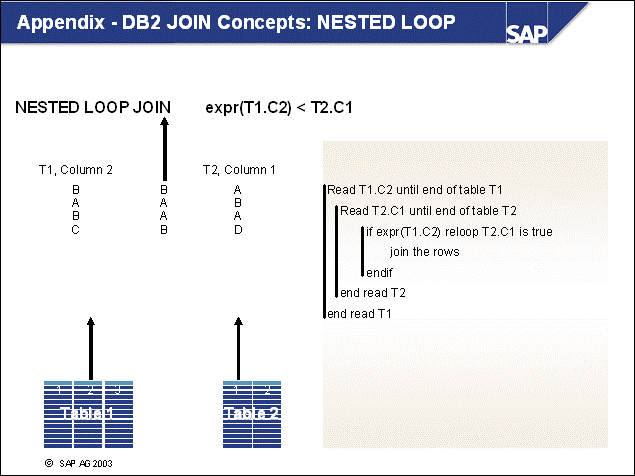
n The nested loop join can be used by the Cost-Based Optimizer when a relational operator (=, <, >, <=, >=) is used. It can also be used with expressions based on columns in the left (outer) table.
n The nested loop join does not need sorted data as input and will not provide a sorted result set. Therefore, it is very efficient.
n But for large tables, T2 (inner) table must be in the buffer pool to allow efficient operation or, as with DB2, the inner table must be sorted before being used.
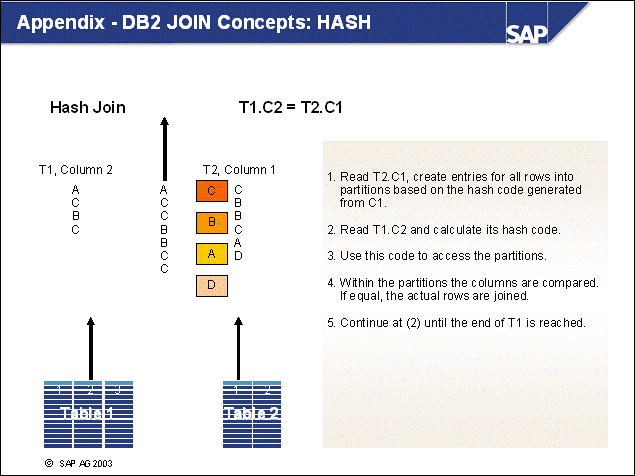
n Hash join is a highly efficient join method. It can be applied only with the equality predicate "=" and if the column data types are the same.
n The Hash Join method uses memory from the sort heap. If the space is not sufficient, it will create temporary tables to hold further hash partitions. These temporary tables reside in the buffer pool, and might spill over into the PSAPTEMP tablespace if they become too large.
n This is the reason why Hash Joins are not good for very large tables. The Cost-Based Optimizer will detect this and will use another join method
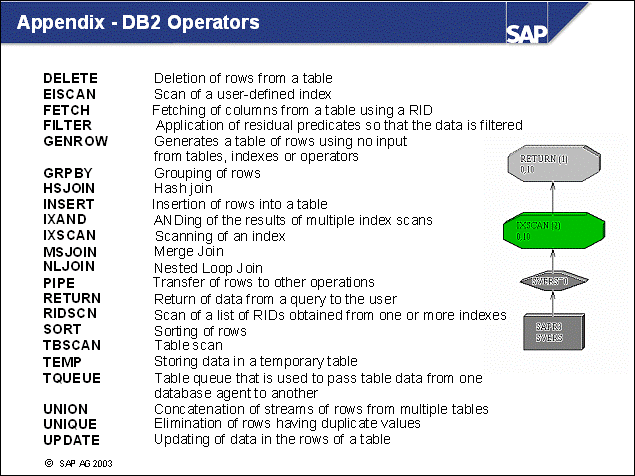
n For more information about DB2 operators used in the Explain output, refer to the IBM Visual Explain Tutorial, Appendix B.
|
|
Unit: Performance Monitoring and Tuning |
|
|
At the conclusion of this exercise, you will be able to: Monitor performance indicators and memory areas using SAP monitoring transactions Use the SQL trace facility and the SQL Cache to identify and analyze expensive SQL statements Verify the correct setup of the update statistics strategy |
1-1 Log on to the SAP training system DEV and review the following:
1-1-1 What is the overall buffer quality of the training system?
1-1-2 What is the buffer quality of the individual buffer pools?
1-2 Check the locking status of the SAP training system DEV:
1-2-1 What is the current size of the lock list?
1-2-2 Check whether (exclusive) lock escalations have occurred since the startup of the database.
1-2-3 Check whether (exclusive) lock escalations have occurred recently.
1-2-4 How can you influence the impact of a lock escalation on the locking behavior of other applications?
1-3 Enable the tracing of your own transactions. Open another mode and call transaction ST04. Stop tracing your own transactions.
Note: If you cannot start the trace because another group already activated it for their transactions, skip exercises 1-3 and 1-4, and proceed with exercise 1-5. Try to perform exercise 1-3 and 1-4 at a later point in time.
1-4 Call DB2 Explain on an arbitrary SQL statement from within the SQL trace you created in exercise 1-3.
1-5 Explain the
following single SQL statement
SELECT * FROM USR01
1-5-1 What is DB2's estimated cost for executing this statement?
1-5-2 What is the access path chosen by the DB2 optimizer?
1-5-3 Which indexes exist for table USR01?
1-6 You are only interested in column BNAME of table USR01. How would you change the statement in 1-5? Call DB2 Explain on the changed statement.
1-7 What is the difference between the old and the new access plans?
1-8 Use the Dynamic SQL Cache to find out:
1-8-1 Which statement has the largest share in the total DB response time?
1-8-2 Which statement has the highest average execution time?
1-9 Verify the access plans of the statements in 1-8.
1-10 What do the original statements in the ABAP source code look like?
1-11 Check if an appropriate strategy for updating the object statistics is in place.
Which tablespace has the highest average physical read time, and how is the data in this tablespace distributed?
|
|
Unit: Performance Monitoring and Tuning |
1-1 Go to transaction ST04.
1-1-1 Look for the Overall Buffer Quality in section Performance > Database --> Buffer Pool.
1-1-2 Look at the values in column Buffer Quality (%) in section Performance ---> Buffer Pools.
1-2 Go to transaction ST04.
1-2-1 Look for the Lock List Size in section Performance -> Database -> Locks and Deadlocks.
1-2-2 To check the (exclusive) lock escalation situation, look at the Escalations information in section Locks and Deadlocks.
1-2-3 To check if (exclusive) lock escalations have occurred recently, check columns Lock Escalations and X Lock Escalations in Performance -> History -> Database.
1-2-4 Setting DB CFG Parameter MAXLOCKS to a value lower than 100 (e.g. 90) forces a lock escalation to occur before the lock list is completely filled by the locks of a single application, thus leaving free space for other applications to register their locks.
1-3 Call
transaction ST05. To enable the SQL trace, choose Activate Trace.
To open another mode
and call transaction ST04, enter /oST04.
To stop the trace, choose Deactivate Trace.
1-4 Choose Display Trace. Select an SQL statement and choose Explain. It is not possible to explain all rows. Operations such as FETCH or CLOSE are not explainable.
1-5 In transaction ST05, choose Enter SQL Statement. Enter the SQL statement and choose Explain.
1-5-1 In the access plan display, you will see the total calculated cost as a number in exponential format and unit "timerons."
1-5-2 In the access plan display, you will see TBSCAN as the chosen access path.
1-5-3 Double-click on the table name in the access plan display.
1-6 Change the
statement to the following
SELECT BNAME FROM USR01
1-7 BNAME is part of index USR01~0. The access is now index-only.
1-8 In order to
start the Dynamic SQL Cache Analysis, call transaction
ST04 and choose Performance -> SQL Cache.
Note: Only use the Refresh button if no statements are displayed.
1-8-1 Sort by column Total Execution Time(ms).
1-8-2 Sort by column Avg. Execution Time(ms).
1-9 To verify the access plans of the statements in 1-8, mark the appropriate statement and choose Explain.
1-10 To display the ABAP source code of the above statements, mark the appropriate statement and choose Source.
1-11 Call transaction ST04 and go to Jobs -> DBA Planning Calendar (or DBA Log). The following jobs should be scheduled on a daily basis:
Action "Check Tables for Statistics Update", job name "Stats_Check"
Action "RUNSTATS and REORGCHK (DBSTATC)", job name "Run_DBSTATC"
Optionally the following job can be scheduled on a weekly basis:
Action "RUNSTATS and REORGCHK for all Tables", job name "Runstat_All"
1-12 Call transaction ST04 and go to section Performance -> Tablespaces.
Add column Avg. Phys. Read Time (ms) to the display (use button Change Layout to do this) and sort by the added column.
Then go to section Space -> Containers and check how many containers exist for the relevant tablespace and in which directories/file systems they reside.
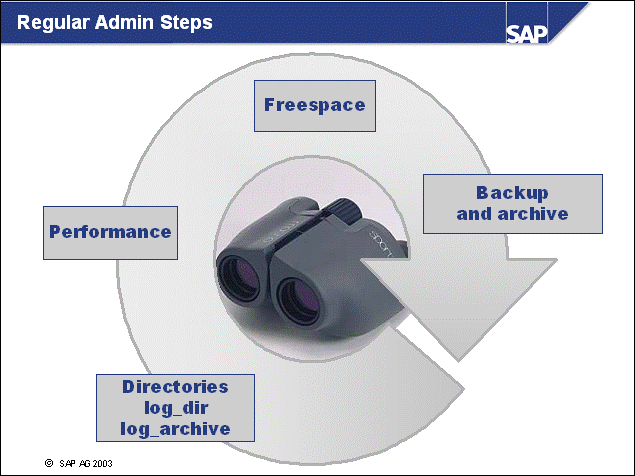
n At the start of each day, you should obtain an overview of the condition of your database in order to:
Recognize current problems or error conditions and resolve them
Solve problems before they become critical
n Include the following areas in your daily monitoring:
Tablespaces: Check if there is enough freespace in each tablespace. Consider the growth of the objects (tables and indexes) in the tablespaces.
Backup and archive: Check if the last backup and archive of offline log files were successful.
Directory log_archive: Check if there is enough freespace in the log_archive directory for offline logs until the next planned archive run.
Performance: Check the settings of performance-related parameters of the database. Good database performance ensures faster response times of the SAP system.
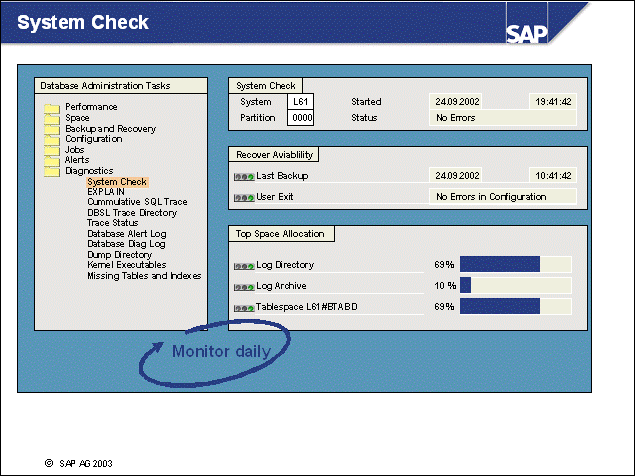
n The System Check overview (from transaction ST04, choose Diagnostics System check) shows the status of your system.
n This screen displays the date of the last backup and the state of user exit, log directory, and log archive directory.
n The tablespace with the lowest freespace is displayed.
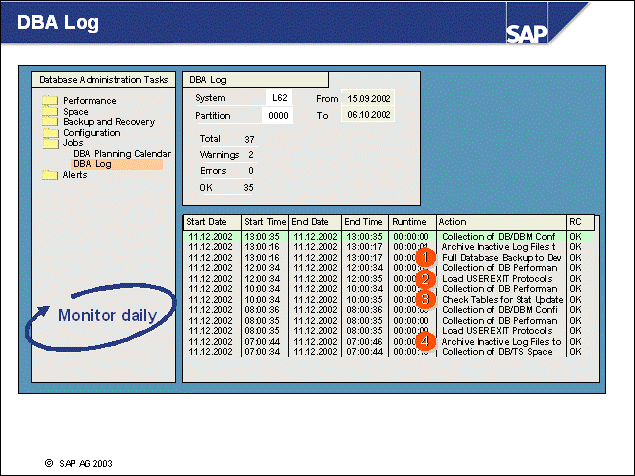
n To get the DBA log information from transaction ST04, choose Jobs DBA Log (or transaction DB24). This is the complete log of all tool activities.
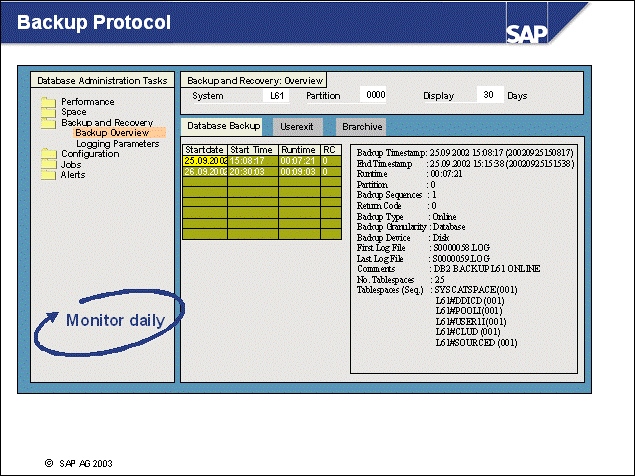
n To view backup information, from transaction ST04, choose Backup and Recovery Backup Overview (transaction DB12). This should be checked daily.
n To check your backup, use the db2chkbkp tool (refer to the "Tools for DB2 Database Servers" unit).
n Note: Do not forget to back up all your operating system files!
n
To get the backup information when the database is down,
enter the following command:
db2 "list backup history all for database
<dbsid>"
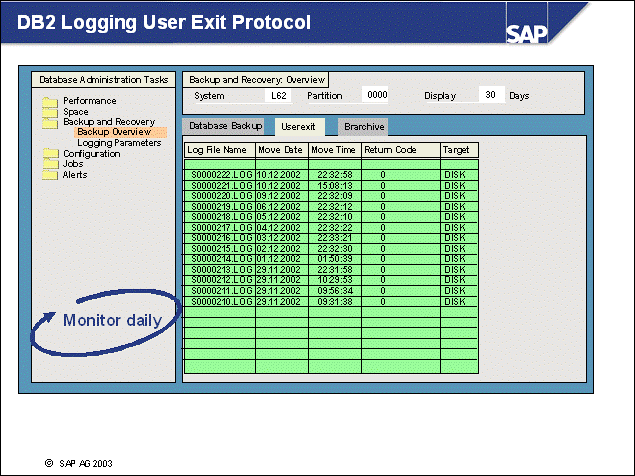
n To get the DB2 Logging User Exit Protocol information, from transaction ST04, choose Backup and Recovery Backup Overview (transaction DB12).
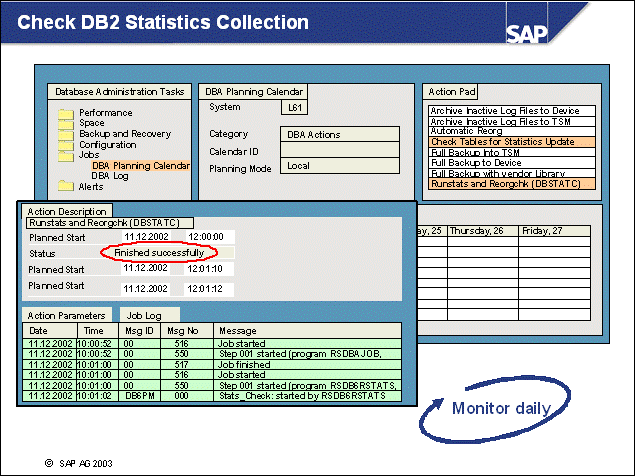
n To check the log of the 'Check Tables for Statistics Update' and 'Runstats and Reorgchk (DBSTATC)' actions, from transaction ST04, choose Jobs DBA Planning Calendar (transaction DB13).
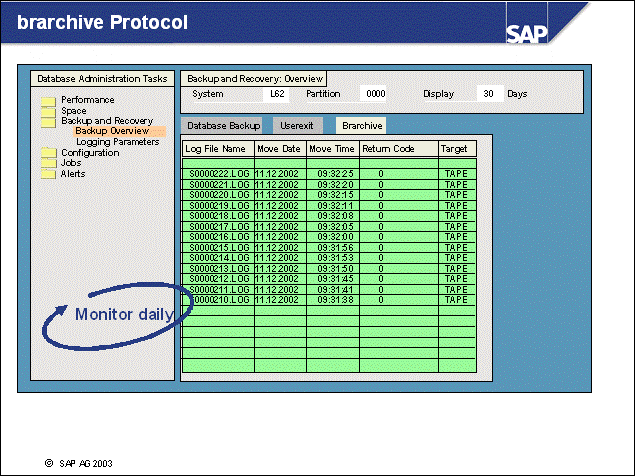
n To get the brarchive log information, from transaction ST04, choose Backup and Recovery Backup Overview (transaction DB12).
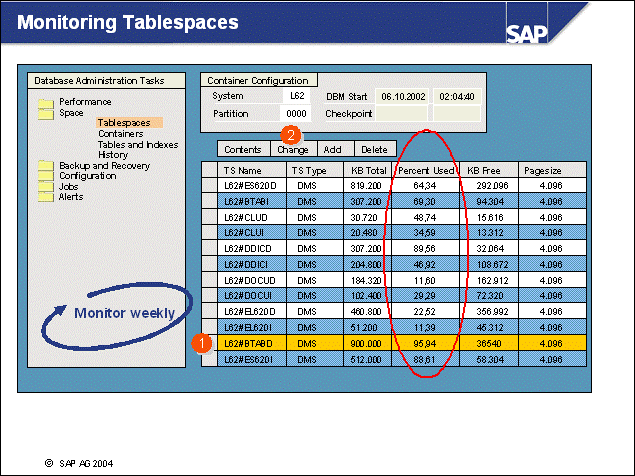
n It is in the nature of a database that it will grow over time. New extents are allocated in tablespaces and sooner or later DB2 will not be able to find free space. To avoid downtime as a result of a tablespace full condition, you should monitor freespace on a weekly basis or when performing actions that are expected to change the space allocation in the database (for example, client copy and batch input). To get the appropriate information, go to transaction ST04, choose Space -> Tablespaces.
n You should (1) check the growth of tablespaces and, if necessary, (2) increase their size.
n Note: You should also check the freespace on the Basis filesystem!
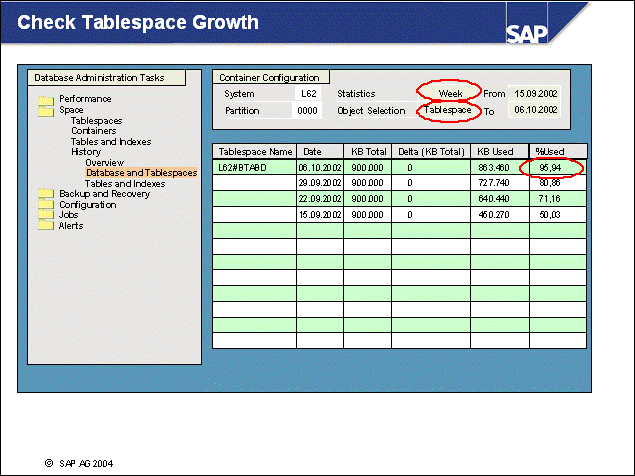
n First you should check the growth of the tablespace. To do this, call transaction ST04, choose Space -> History -> Database and Tablespaces.
n Based on this growth analysis, you are able to decide how many pages (or KB) to add to the tablespace.
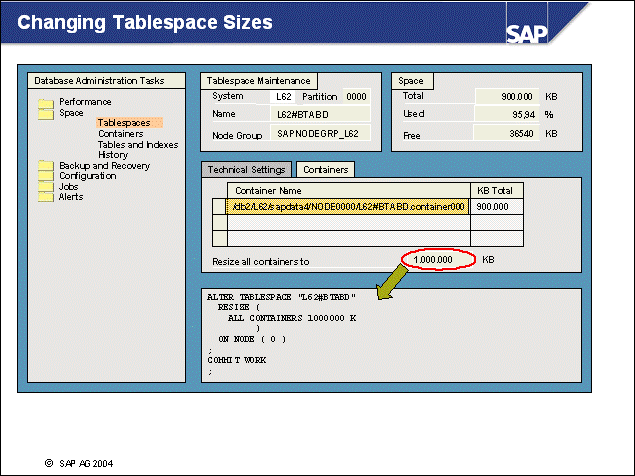
n The second step is to extend the tablespace. To do this in transaction ST04, choose Space Tablespaces
n SAP recommends increasing the size of all containers in one operation to avoid different container sizes.
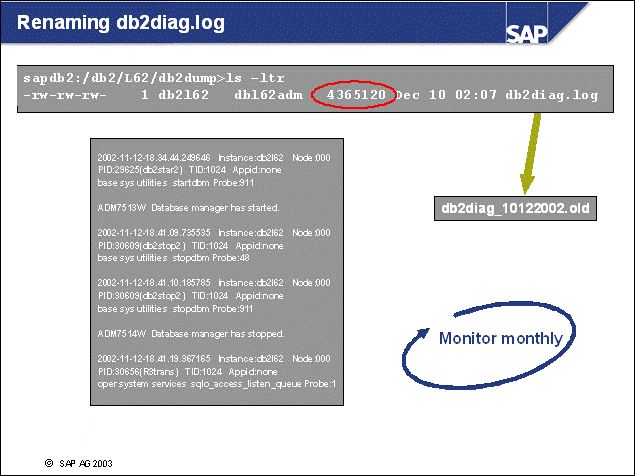
n The db2diag.log file will receive a lot of information. This file might grow very fast. To avoid long access times, it is useful to rename this file on a monthly basis.
n For more information on analysing db2diag.log, refer to the "Problem Analysis" unit
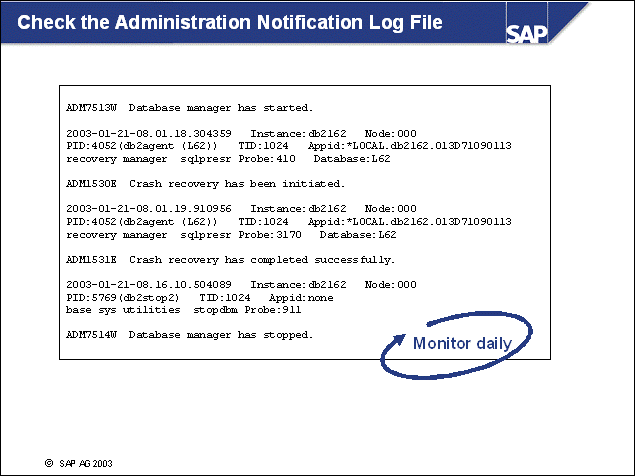
n The Notification Log contains information about events such as db2start, deadlocks, or crash recovery.
n The DBM CFG parameter NOTIFYLEVEL determines the level of detail. Valid values for this parameter are between 0 and 4. Default value is 3.

|
|
Unit: Ongoing Operations |
|
|
At the conclusion of this exercise, you will be able to: Perform the regular monitoring of administrative tasks |
1-1 Which are the daily monitoring tasks for an SAP system on DB2 as discussed in this chapter?
1-1-1 Please execute all necessary steps in the SAP training system DEV.
1-1-2 Assume Direct Archiving is used. Which of the above steps is obsolete?
Monitor the growth of tablespaces.
1-2-1 Where can you find information about the growth of the tablespaces in the SAP training system DEV?
Which options do you have to increase the size of a tablespace?
|
|
Unit: Ongoing Operations |
1-1 Log on to the SAP training system DEV and go to transaction ST04.
1-1-1 In transaction ST04, the following daily monitoring tasks should
be performed
- System Check (State of Backup, User exit, Log directory, Log Archive
Directory is displayed):
ST04 -> Diagnostics ->
System check.
- DBA Log information:
ST04 -> Jobs -> DBA Log.
- Backup, DB2 logging user exit and brarchive protocols:
ST04 -> Backup and Recovery
-> Backup Overview.
- DB2 Statistics Collection:
ST04 -> Jobs -> DBA
Planning Calendar.
1-1-2 You do not need the brarchive protocol information.
1-2 Monitor the growth of tablespaces.
1-2-1 To find information about the current size, go to transaction ST04, choose Space -> Tablespaces. To view the growth of the tablespaces, in transaction ST04, go to Space -> History -> Database and Tablespaces.
1-2-2 It is possible to increase the size of a tablespace in transaction ST04 -> Space -> Tablespaces, or you can use alter tablespace on command line
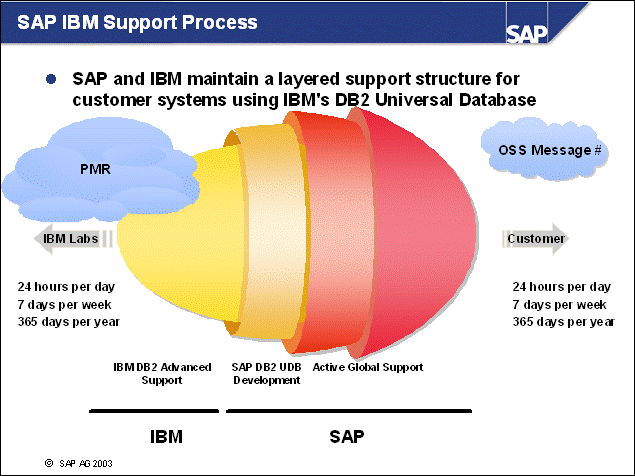
n This figure illustrates the SAP IBM support cooperation.
n The availability is based on severity levels. Critical SAP DB2 system situations (production down) are handled 24 hours by 365 days.
n Problems up to severity high are handled during normal business hours.
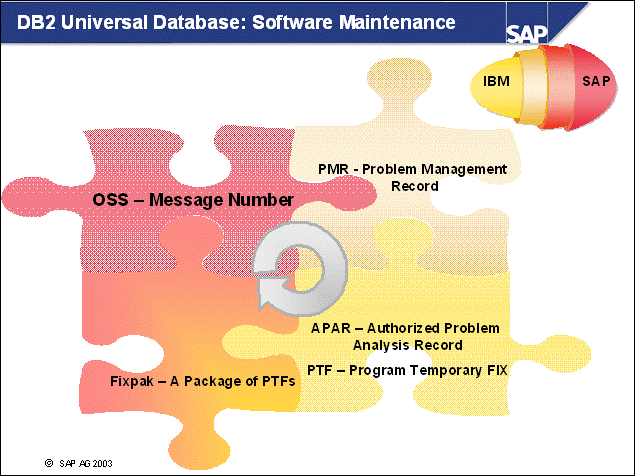
n Each SAP Customer messages sent to SAP receives a message number.
n When a customer case is recognized to be a problem that cannot be solved by SAP Active Global Support, it is transferred to DB2 Support.
n Here a Problem Management Record (PMR) is created in IBM's problem tracking system.
n If a problem is recognized as being a result of a defect, an Authorized Problem Analysis Record (APAR) is created within IBM's problem tracking system. This record then triggers DB2 development to provide a fix to the problem.
n A Program Temporary Fix (PTF) is a fix to a generally released IBM software product. By installing a matching PTF on the system, a customer with a DB2 problem will be able to solve the reported problem.
n A FixPak is a set of PTFs. These sets are cumulations of PTFs up to a predefined level. Applying the latest Fixpak level will help you to further improve the performance and stability of your DB2 database server.
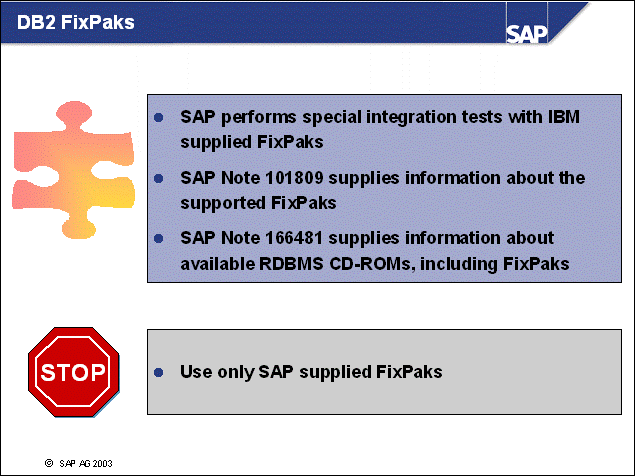
n When IBM releases a new DB2 version or FixPak, SAP performs special tests to ensure compatibility with SAP.
n Every FixPak that was successfully tested is documented in SAP Note 101809 and can be installed by customers.
n For information about how to retrieve the appropriate RDBMS CD-ROM, see SAP Note 166481.
n Ensure you use only RDBMS software (including FixPaks) that was shipped by SAP.
n
To show the current DB2 version and Fixpak level, use
the following command:
db2level
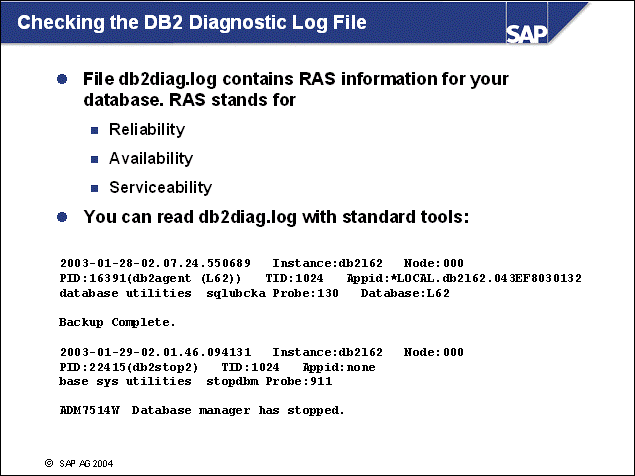
n The DB2 diagnostic log file contains information in ASCII text about problems encountered within DB2. Each entry follows a predefined format. In error situations, hexadecimal error codes are displayed.
n It is helpful to decode the hexadecimal codes to understand the error situation. Because Intel systems and RISC systems differ in the endian-ness, you may have to rearrange the hexadecimal codes to represent a negative number. Values of type 0xFFFFnnnn represent a negative number, values of type 0xnnnnFFFF have to be byte-reversed. For example, 0x0AE6FFFF will become 0xFFFFE60A. To translate this hexadecimal code into a number, you must create the 2s-complement (0x019F6) and translate it to decimal 664 . This SQL code can be looked up in the error messages manual or the DB2 support Web site.
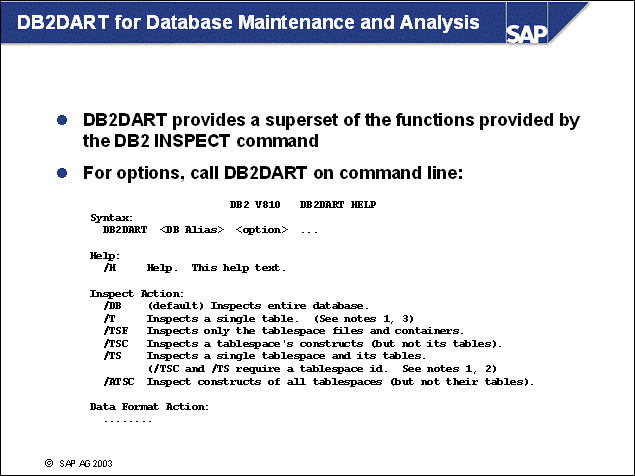
n DB2DART is run from the command line
n It can be used while the database is up and running, but the results may be unpredictable. Therefore, for best accuracy and performance, use DB2DART while the database is stopped.
n A subset of the DB2DART functionality is available with the DB2 command INSPECT, which can be called during normal operations.
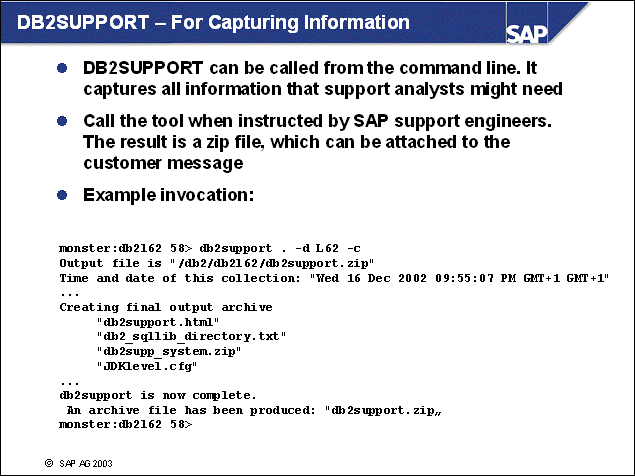
n Details on this tool can be viewed in SAP Note 83819. For Windows systems, refer to SAP Note 88190.
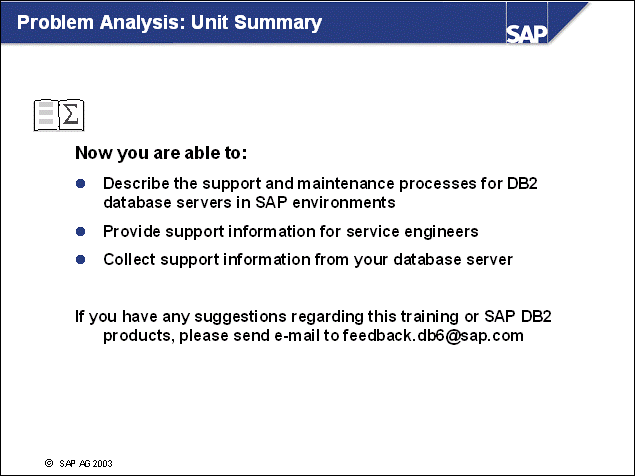

|
|
Unit: Problem Analysis |
|
|
At the conclusion of this exercise, you will be able to: Determine DB2 version and Fixpak level Use tools to collect support information Recognize and analyze database problems |
Preparation:
To access your training system and use your training database <Txx>
during the following exercises, please start your Web browser. Use the server
name and port number provided by your instructor and enter the following URL: Error! Hyperlink
reference not valid.>. A graphical desktop will
appear in your browser window. Please enter the password sapdb2 to
access the desktop. From now on, you can use the desktop to open multiple
windows.
You will also be able to reconnect to your desktop in case you close your Web
browser window.
1-1 Software Release Version and Maintenance Level
1-1-1 How can you quickly find out about the DB2 version installed (think about connecting to the database).
1-1-2 How can you find out about the DB2 Fixpack that is installed on your training system. Is this Fixpack currently supported?
1-2 Where can you find RAS (Reliability, Availability, Serviceability) information for your database?
1-3 With which command can you inspect the constructs of all tablespaces?
In case you have to open a customer message at SAP, which tool can be used in order to collect the necessary information for SAP support engineers?
|
|
Unit: Problem Analysis |
1-1 Software Release Version and Maintenance Level
1-1-1 By connecting to the database
db2 connect to <Txx>
you will be able to retrieve most of the needed information:
Database Connection Information
Database server = DB2/LINUX 8.1.0
SQL authorization ID = DB2Txx
Local database alias = Txx
With the above information, we know that we are connected to a DB2 Version 8
Database Server.
1-1-2 To read the Fixpack information, please enter
db2level
The informational tokens of the db2level output contain the clear text name
of the Fixpack and additional build identification. By checking SAP Note
101809, we can see whether the software level displayed is supported by SAP.
1-2 This information can be found in the db2diag.log file. The path in which the file resides can be configured by the DBM CFG parameter diagpath.
1-3 Please use the following command: db2dart <Txx> /ATSC
The
following command should be used:
db2support <support-file target path> -d <Txx> -c
|