AGOGO-XP & Maestro PCI Installation
1.0 Introduction.
This user guide file contains instructions to install the AGOGO-XP/Maestro PCI audio reference card. Addition documentation and technical documentation can be found in the AGOGO-XP CD software sub-directories.
2.0 Getting Started.
2.1 Package Contents
. 1 AGOGO-XP/Maestro PCI Audio Adapter Card
. 1 CD installation software driver
. 1 Installation guide
2.2 Minimum System requirements:
. Pentium or compatible processor or higher
. MS-DOS 6.0 or higher
. Windows 95 CD
. PCI Bus with one available Busmaster slot
. 16 MB of RAM
. Hard disk drive
. 10 MB free on your hard drive
. CD-ROM and Audio cable
3.0 Installing the PCI Audio Card.
3.1 Installing the adapter card, follow these steps:
1. Perform a system shutdown and turn off the
power to the computer.
2. Holding the edges of the card, insert the AGOGO-XP PCI
adapter card into the PCI expansion slot.
3. Attach the CD-ROM audio cable to the CD AUDIO
connector near the edge of the card.
4. Attach the amplified speaker cable into the LINEOUT jack
at the rear of the card. See Figure 1. The Speaker Out jack
is for non-amplified speakers.
5. Proceed to the AGOGO-XP CD software installation.
Figure 1.0
3.2 Installing the software driver for Windows 95:
1. Turn on the power to the computer.
2. Insert the software driver CD into the CD-ROM drive.
3. When Windows 95 finishes booting, it will inform
you that it has discovered a new PCI device and
will prompt you to install drivers for it.
4. Follow the instructions prompted by Windows 95. The
AGOGO drivers for Windows 95 is located in the root directory of
the CD-ROM. Type in the CD-ROM drive letter, for example D:\,
when prompted to do so. Choose AGOGO.INF if necessary.
5. When installing drivers for the first time, Windows 95 will prompt you
to insert the Windows 95 CD for the necessary files.
6. Reboot your system once Windows 95 has installed the drivers.
Note: It is recommended that the AGOGO-XP/Maestro card and software driver be installed
on a newly installed Windows 95 system.
The installation process installs a AGOGO/Maestro Applet Icon in the System Control Panel. The AGOGO applet displays and sets the AGOGO's various settings. If the AGOGO-XP PCI Audio Adapter contains local RAM, The software driver select local RAM for the Sound Library Source the first time it boots up. If the adapter card does not contain local RAM, system RAM will be selected. You may switch between system and local RAM setting in the AGOGO/Maestro applet.
3.4 The installation process installs the following files into
the hard drive under the Windows 95 directory:
SYSTEM\21019012.IMG
SYSTEM\AGGENUM.VXD
SYSTEM\AGOGO401.DRV
SYSTEM\AGOGO401.VXD
SYSTEM\AGOGOJOY.VXD
SYSTEM\AGOGOMG.VXD
SYSTEM\AGOGOSBP.VXD
SYSTEM\AGOGOXP.DRV
SYSTEM\AGOGOXP.VXD
SYSTEM\PLAT2MEG.DLL
INF\AGOGOWT.INF
For OSR2:
INF\OTHER\PLATFORM.INF
For older version of Windows 95:
INF\OEM?.INF (Where ? is an integer)
This file is in the root directory of the install drive:
\AGOGO.COM
The installation also modifies the following files:
autoexec.bat:
c:\agogo.com
Notes: If you elect not to install drivers here setup will continue,
but the installation will fail. Remove the AGOGO-XP software
driver according to the instruction in Removing the AGOGO-XP
software drivers. Then repeat steps in Installing the AGOGO-XP
CD software driver
4.0 Removing the AGOGO-XP software drivers:
1. Start the Control Panel.
2. Double click System icon to bring up Systems Property.
3. Click the + symbol at the Platform Technologies AGOGO Devices.
4. Select the AGOGO Device Manager.
5. Click the Remove button.
6. Click OK to remove device from the system.
7. Click the Close button.
8. Remove the installed files above.
5.0 The AGOGO Applet.
The AGOGO Applet in the Control Panel sets the various properties for the AGOGO/Maestro PCI sound card.
Sound Library Source.
Local RAM sets the MIDI sound image library to on-board memory.
System RAM sets the MIDI sound image library to system memory.
Reverb Effects Source
Activate Reverb enables/disables the reverb sound effects.
Local RAM enables the effect synthesis in the on-board memory.
System RAM enables the effect synthesis in the system memory.
Chorus Effects Source
Activate Chorus enables/disables the chorus sound effects.
Local RAM enables the effect synthesis in the on-board memory.
System RAM enables the effect synthesis in the system memory.
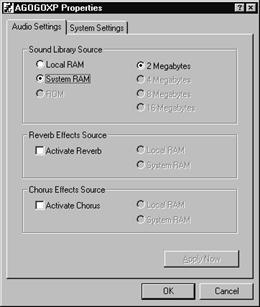
Figure 2.0
System Settings
Real Mode DOS Support enables support for legacy device.
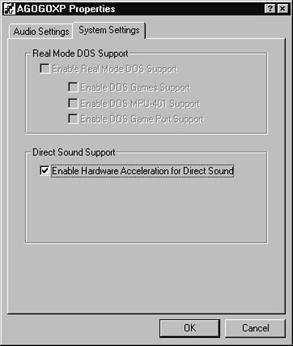
Direct Sound Support enables hardware
acceleration.
Figure 2.1
Note: Some of the selection boxes may be grayed out. This indicate that the feature is not currently supported
6.0 The PCI bridge:
To enable the PCI bridge, remove jumper JP3 3-4 and the onboard RAM. Replace the jumper and the onboard RAM to enable local RAM.
|
