Autodesk Inventor: Investing in Properties
By Neil Munro
One of the methods for associating nongraphical information with Autodesk InventorT files is by using file properties. A series of common property sets are embedded within all Autodesk Inventor files. These property sets include
![]() Summary: General properties and keywords associated with the file.
Summary: General properties and keywords associated with the file.
![]() Project: Properties common to files within a project or other structure.
Project: Properties common to files within a project or other structure.
![]() Status: Design stage and approval properties (also file reservation
information).
Status: Design stage and approval properties (also file reservation
information).
![]() Custom: User-defined properties (Text, Number, Yes/No, and Date formats).
Custom: User-defined properties (Text, Number, Yes/No, and Date formats).
In addition, part and assembly files expose read-only physical properties, including material and mass. You can use property values to automate the placement of information in BOMs, parts lists, balloons, sketched symbols, and title blocks.
In this tutorial, we'll examine methods to manage file properties, and take a look at the ways in which properties can help you document your designs.
Download and Open File
|
Note: The tutorial assembly is a slightly modified version of the engine internals subassembly included in the Autodesk Inventor 4 sample files. |
First download, unzip, and save to a folder on your hard drive the Properties.zip file. The zipped file contains the following: 11411v2116l
![]() Engine Internals.iam
(assembly file)
Engine Internals.iam
(assembly file)
![]() Engine Internals.idv
(design views file)
Engine Internals.idv
(design views file)
![]() Engine Con Rod.ipt
Engine Con Rod.ipt
![]() Engine Crank Shaft.ipt
Engine Crank Shaft.ipt
![]() Engine Piston.ipt
Engine Piston.ipt
![]() Engine Wrist Pin.ipt
Engine Wrist Pin.ipt
![]() Properties.zip (zip -
1025 Kb)
Properties.zip (zip -
1025 Kb)
You can download the files used in this tutorial from here.
To open the file
Extract the files to a folder on your hard drive.
Start Autodesk Inventor software.
Click the Open tool on the Standard toolbar.
Browse to the folder containing the extracted files.
Select Engine Internals.iam.
Click OK.
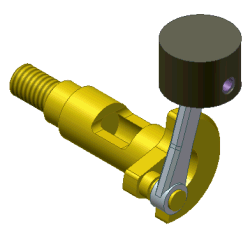
Go ahead-spin the crank!
|
Figure 1: Appearance of assembly on opening. |
Assign Property Values at the Part Level
We'll start by assigning values to some of the standard properties available to all Autodesk Inventor files.
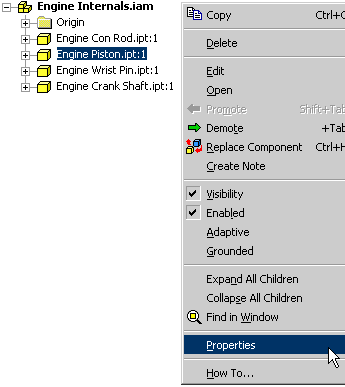
1. In the browser, right-click Engine Piston.ipt and select Properties. (See Figure 2.)
|
Figure 2: Part properties access. |
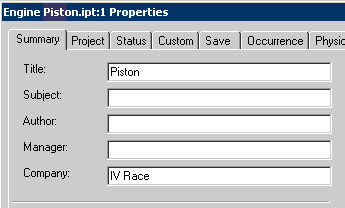
2. On the Summary tab, enter the property values as shown below in Figure 3.
|
Figure 3: Summary properties. |
3. On the Project tab, enter the following property values:
![]() Part Number: CWE 605E
Part Number: CWE 605E
![]() Vendor: Cosworth
Vendor: Cosworth
Add Custom Part Properties
In addition to the standard property sets available, custom properties can be added to a file (part, assembly, or other). If you have added custom properties to a Microsoft Office document, the following should be quite familiar.
1. Click the Custom tab.
2. Enter Race Maintenance in the Name edit box.
3. Enter Replace in the Value edit box.
4. Click Add. The custom property is added to the list.
5. Add a second Custom property as follows.
![]() Name: Replace (Hr)
Name: Replace (Hr)
![]() Type: Select Number from the list.
Type: Select Number from the list.
![]() Value:
Value:
6. Click Add.
7. Click OK to close the Properties dialog box.
To cut down on the drudgery, I've added the same properties with appropriate values to the other parts in the assembly.
It quickly becomes apparent that adding and assigning properties to part and assembly files is something that wants as much automation as you can give it. The first method you should employ is to assign values to common properties in your template files. You may want to create custom templates for individual projects, or base them on other company or design processes. In addition, add common Custom properties to your templates.
Introducing Design Assistant
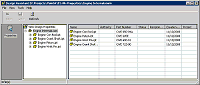
Autodesk Inventor includes Design Assistant. This file management program can also be installed as a stand-alone application, giving other design-team members the ability to view and use data from Autodesk Inventor files-even if they don't have Autodesk Inventor installed on their computer. Design Assistant can perform a number of tasks, but let's examine how it can help us with properties.
First, assign a value to an assembly level property.
1. In the browser, right-click Engine Internals.iam and select Properties.
2. Click the Project tab.
3. Enter Go Fast as the value for the Project property.
|
Note: This does not assign this value to the parts that make up the assembly. Properties are assigned on a document basis, and the assembly file is separate from the components it contains. |
4. Click OK.
Open Design Assistant
1. From the File menu (on the Autodesk Inventor main menu), select Design Assistant.
|
The Design Assistant view should match that shown in Figure 4. Note that the Project property is listed and its value is displayed. 2. Under View Design Properties, expand Engine Internals.iam. The components that comprise the assembly are listed as children of the parent assembly. 3. If required, scroll the right pane so that the Project property is visible. The value is blank for each part. |
|
Share Those Properties
Design Assistant includes the ability to copy properties from a source file to many other files in one action.
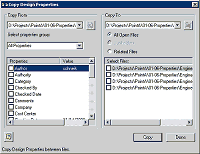
1. In the left pane, right-click Engine Internals.iam and select Copy Design properties (see Figure 6).
|
Figure 6: Copy Design Properties access. |
|
Figure 7: Copy Design Properties dialog box. |
Properties from the selected file are listed on the left side of the dialog box (see Figure 7). A list of files to copy to is on the right side of the dialog box. The selection of files that will receive the copied properties depends on how you access Design Assistant. Since we activated Design Assistant within Autodesk Inventor, the available files are limited to files that are currently open, or files related to the selected file in the Copy To list box. In our case, the part files are related to the assembly file. You can also activate Design Assistant from Windows Explorer via the Context menu for any Autodesk Inventor file.
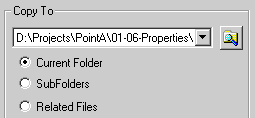
If you run Design Assistant outside Autodesk Inventor, you can copy properties to all files in a folder with the option to include subfolders (see Figure 8). This is just the ticket when 10,000 files need to have the Company property changed after a hostile takeover.
|
Figure 8: Copy To options for external Design Assistant session. |
|
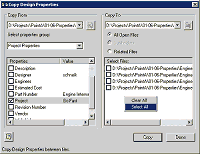
Figure 9: Copy From options for external Design Assistant session. |
2. In the Copy Design Properties dialog box (Figure 9):
Select Project Properties from the Select
properties group list.
Scroll down in the Properties list and place a
check mark next to the Project property.
Right-click in the Select Files list and click
Select All.
Click Copy.
Click Done to close the dialog box.
|
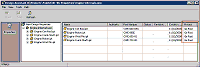
Figure 10: Updated design properties. |
Design Assistant shows the Project property value for the components (see Figure 10).
3. Close Design Assistant.
Making Use of Design Properties in Drawings
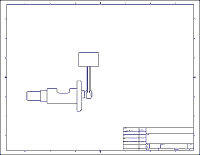
|
Figure 11: Assembly drawing view. |
Let's look at a few ways we can leverage design properties in part and assembly drawings.
1. First, create a new drawing based on the ANSI(in).idw template (English tab).
2. On the Drawing Management panel bar, click
the Create View tool ![]() .
.
3. Ensure that Engine Internals.iam is the file listed as the source for the drawing.
4. Select 4:1 from the Scale list.
5. Click the drawing sheet to place the view, as shown below in Figure 11.
Edit the Title
Block Definition
Title blocks in Autodesk Inventor can include embedded placeholders for drawing
or model properties. It's a different approach, but has similar results, to
using an attributed title block in an AutoCAD® drawing.
|
Figure 12: Title block editing. |
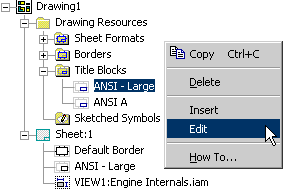
1. In the browser, expand the Drawing Resources folder and then expand the Title Blocks folder.
2. Right-click ANSI - Large and select Edit from the menu (see Figure 12.)
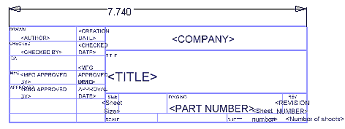
3. Zoom in on the title block sketch. It should match the one shown below in Figure 13.
|
Figure 13: ANSI - Large title block. |
|
Note: There are placeholders for the Title and Company properties, yet we did not see the value of these properties in the drawing's title block. The reason is that the placeholders are linked to the properties for the drawing file, not the model file the drawing is based on. Depending on your design and drawing standards, you may wish to reference the model properties. |
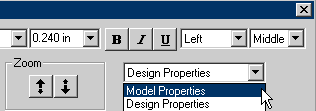
4. Right-click the Title placeholder and select Edit from the menu.
5. In the Format Field Text dialog box, select Model Properties from the source list, as shown below in Figure 14. Design Properties are properties associated with the drawing file itself.
|
Figure 14: Property source selection. |
6. Click OK.
7. Repeat steps 4 through 6 for the Company placeholder. Make sure Company is the property selected from the Properties list (below the source list).
Add a New Model Property to the Title Block
To complete the title block, let's add a reference to the Project property stored in the assembly model.
1. From the Sketch panel bar, click the Property
Field tool ![]() .
.
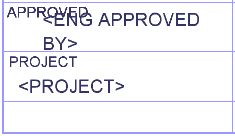
2. Click in the empty title block box below the word Approved (lower-left corner of the title block).
|
Figure 15: Project property and title text. |
|
Figure 16: Updated title block. |
3. In the Format Field Text dialog box.
Enter 0.1
in the text height edit box.
Select Model Properties from the source list.
Select Project from the properties list.
Click OK.
4. From the Sketch panel bar, click the Text
tool ![]() .
.
Add a 0.80-high title for the field (PROJECT), as shown below in Figure 15.
5. Right-click in the graphics area and select Save Title Block.
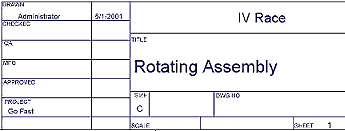
6. Click Yes when asked to save changes. The drawing title block now reflects the properties assigned to the assembly file, as shown in Figure 16.
Autodesk Inventor stores all drawing resources for a drawing in the file. To enable the title block in a new drawing to automatically reflect model dimensions, edit the title block definition in your template files. Unfortunately, custom properties from the model are not available when editing title blocks. (See the end of this tutorial for a solution.)
Parts Lists and Properties
|
Figure 17: Parts list editor. |
Properties are fundamental to parts lists. Most columns in parts lists display the values of model properties associated with the assembly components.
Click the Drawing Management title in the panel bar and select Drawing Annotation.
1. In the Drawing Annotation panel bar, click
the Parts List tool ![]() .
.
2. On the drawing sheet, click the drawing view of the assembly and then click above the title block to place the parts list.
The default parts list contains a column referencing the Part Number property of each part in the assembly. We'll modify the parts list to display additional information.
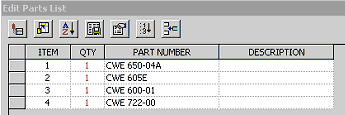
1. Double-click the parts list. The Edit Parts List dialog box should match the view shown in Figure 17.
2. In the Edit Parts List
dialog box, click the Column Chooser tool ![]() .
.
3. In the Selected Properties list, click Description.
4. Click the Remove button.
5. In the Available Properties list, click Title.
6. Click the Add button.
7. Click OK.
The parts list now displays the Title property value for each component.
Adding Custom Properties to a Parts List
|
Figure 18: Parts list editor. |
Unlike title blocks, there is an easy method for adding custom model properties to a parts list.
1. In the Edit Parts List dialog box, click the
Column Chooser tool ![]() .
.
2. Select Custom Properties from the "Select available fields from:" list.
Whoops, there are no custom properties listed. To link a custom property (from either the model files or the drawing file) to the parts list, you have to add that field to the parts list through the New Field tool.
3. Click the New Field tool below the Available Properties list.
4. Enter Race Maintenance in the Name edit box (be careful with the spelling).
5. Click OK.
6. Click OK in the Parts List Column Chooser dialog box.
The parts list now displays the custom Race Maintenance property for each component.
7. Click OK to update the parts list in the drawing.
You can modify the default parts list columns by modifying the parts list settings in the drafting standards (Format > Standards from the menu). Again, save your settings in a template to make the revised parts list the standard for new drawings.
One More Use for Properties
|
Figure 19: Ellipse (left) and Vendor property balloon (right). |
Autodesk Inventor has a number of balloon standards. One of these standards is a custom balloon that can contain one or more property fields. You can define the properties referenced in the custom balloon in the drafting standards dialog box. However, only one custom balloon standard can be defined, and the balloon does not provide a containment box around the properties. You can create your own custom balloons through the use of Sketch Symbols.
1. In the browser, expand Drawing Resources.
2. Right-click Sketch Symbols and select Define New Symbol.
3. From the Sketch panel bar, click the down
arrow next to the Center Point Circle tool and click the Ellipse tool ![]() .
.
4. Draw a small ellipse similar to the one shown in the left-side image of Figure 19.
5. From the Sketch panel bar, click the Property
Field tool ![]() .
.
6. Click on the center point of the ellipse.
7. Change the text justification to
Center - Middle ![]() .
.
8. Highlight <Title> in the text area.
9. Select Model Properties as the source.
10. Select Vendor from the properties list.
11. Click OK.
12. Resize the ellipse (drag the edge) to match the right-side image in Figure 19.
13. Right-click and select Save Sketched Symbol.
14. Enter Vendor Balloon in the Name edit box and click OK.
Using the Custom Balloon
|
Figure 20: Custom balloon callout. |
You can now use this sketch symbol as a custom balloon by placing it with the callout option.
1. In the browser, expand Sketch Symbols.
2. Right-click Vendor Balloon and select Insert Callout.
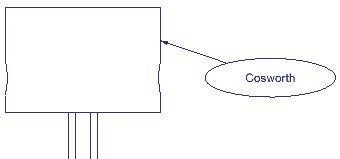
3. Click the edge of the piston as shown below in Figure 20.
4. Click to the right of the piston to define the callout leader.
5. Right-click and select Continue.
6. Right-click and select Done.
A custom balloon shows the Vendor property for the piston.
Conclusion
Understanding and using design properties in Autodesk Inventor can reduce the tedium of text-based tasks in your designs. In addition, the write-once-and-use often methods introduced here can reduce the chance of information being out of date. Investing in properties is sound advice for your Autodesk Inventor future.
|
Custom Model Properties
in Drawing Title Blocks |
|