The Mathcad Add-In for Excel Release Notes
Table of Contents
Introduction
Installing and Uninstalling the Mathcad Add-In
Installing the Mathcad Add-In
Loading the Mathcad Add-In
Unloading the Mathcad Add-In
Uninstalling the Mathcad Add-In
The Mathcad Toolbar
The Mathcad Object Toolbar Group
The 3D Plot Toolbar Group
Using the Mathcad Add-In
Creating Mathcad Objects
Sending Data to and Getting Data From Mathcad Objects
Deleting Mathcad Objects
Saving Mathcad Objects
Creating 3D Plots
Known Problems and Limitations
Add-ins are programs that add optional commands and features to Microsoft Excel. The Mathcad Add-In for Excel provides seamless integration of Mathcad functionality into the Microsoft Excel environment. For the add-in to work you must have Mathcad 2000 or higher and Excel 97 or higher installed on your computer. Sample files showing usage of the Mathcad Add-In are installed in the Library\Mathcad subfolder located in the Excel application installation path.
To install the Mathcad Add-In for Excel, double-click on the icon for the file setup.exe located on the installation media. (If you are accessing the Mathcad Add-In for Excel from the Web, double-click on the Packaged For The Web executable that you have downloaded.) This will launch the InstallShield Wizard that will guide you through the installation process. If you do not have Excel 97 or higher and Mathcad 2000 or higher installed on your computer the installation process will terminate. If you are running multiple versions of Mathcad on your computer, make sure Mathcad 2000 or higher is the active Mathcad application prior to starting the installation. To make Mathcad 2000 or higher the active Mathcad application, simply start and then quit the proper Mathcad application.
The installation process places the file Mathcad.xla in the Library subfolder in the Excel installation path. A dynamically linked library (DLL) used to implement the modeless Mathcad Object Properties dialog and some example files are placed in the Library\Mathcad subfolder. Other files required for proper operation are installed in the Windows System folder.
Before you can use the add-in you must load it in Microsoft Excel. Loading an add-in makes the feature available in Microsoft Excel and adds any associated commands to the appropriate menus. To load the Mathcad Add-In for Excel follow these steps:
Start Microsoft Excel 97 (or higher) on your computer.
Create a new worksheet if one does not already exist.
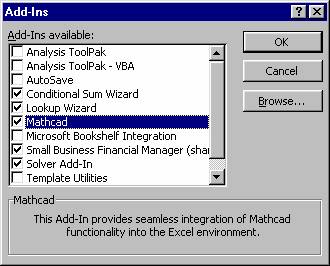
From the Tools menu, select Add-Ins. The Add-Ins dialog shown below appears.
Check the check box next to the name Mathcad in the list of available add-ins. Then click OK to close the dialog.
To unload the Mathcad Add-In from Excel follow these steps:
Start Microsoft Excel 97 (or higher) on your computer.
Create a new worksheet if one does not already exist.
From the Tools menu, select Add-Ins. The Add-Ins dialog shown below appears.

Uncheck the check box next to the name Mathcad in the list of available add-ins. Then click OK to close the dialog.
To completely remove the Mathcad Add-In from your computer follow these steps:
Open the Control Panel and double-click on the "Add/Remove Programs" icon.
On the "Install/Uninstall" tab select "Mathcad Add-In for Excel" from the list of software that can automatically be removed by Windows and then click the Add/Remove button.
When prompted to confirm software removal select "Yes." The UnInstallShield will then automatically remove all unshared Mathcad Add-In files from your system.
If prompted to remove a shared file that is no longer used by any application it is safest to select "No."
If you are running multiple versions of Mathcad, remember that Mathcad 2000 or higher must be the active Mathcad application for the add-in to work. To make Mathcad 2000 or higher the active Mathcad application, simply start and then quit the proper Mathcad application.
After loading the Mathcad Add-In into Excel, you will notice the Mathcad toolbar shown to the right docked, by default, on the right hand side of the Excel application window. The Mathcad toolbar can be undocked and moved to any location.
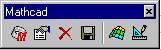
The toolbar buttons are separated into two groups that provide different functionality and are from top down as follows:
The Add Mathcad Object button allows you to easily add either new blank Mathcad objects or objects from existing files.
The Set Mathcad Object Properties button allows you to map inputs and outputs of Mathcad objects to ranges in the Excel workbook.
The Delete Mathcad Object button allows you to easily select and delete Mathcad objects and the worksheets they are contained in if desired.
The Save Mathcad Object button allows you to save the contents of a Mathcad object to a file.
The Insert 3D Plot Control button allows you to quickly generate a surface plot of valid array range data.
The Design Mode toggle button is a duplicate of a built-in Excel toolbar button and is provided on the Mathcad toolbar to allow you to easily enter and exit design mode to position and resize 3D plot objects.
If no Mathcad objects are present in a workbook, you are only allowed to insert a Mathcad object. Clicking on the Add Mathcad Object toolbar button will display the Add Mathcad Object dialog shown below.
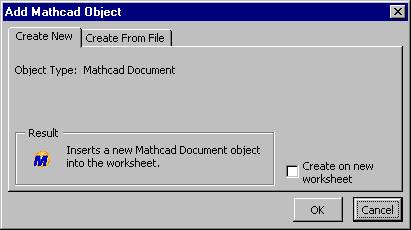
You may create new blank Mathcad objects and Mathcad objects from existing files, either on the active worksheet or on a new worksheet. If you create from an existing Mathcad file you can browse for the file. Clicking OK will add a Mathcad object at the current selected cell location. If the "Create on new worksheet" check box is checked, the Mathcad object will be added to the upper left corner of a new worksheet.
Once an object is inserted you can double-click on it to in-place activate it and edit its contents. If you are adding a Mathcad object from file, the object is activated and deactivated to load the contents of the file into the object. You should only resize a Mathcad object when it is in-place activated. You can add as many Mathcad objects to a workbook as you need.
Each Mathcad object supports an Automation interface having ten inputs and ten outputs labeled in0, in1.in9 and out0, out1.out9, respectively. The inputs and outputs can be scalar or array values, however, they must be real, numeric values. Although the Mathcad inputs and outputs can pass complex data, only their real parts are used in this add-in. Non-numeric data passed to a Mathcad object is assigned a value of zero.
To use input data in a Mathcad object you must first assign Excel range values to them. If the inputs are not assigned, they have a default value of zero. To get output data from a Mathcad object you must assign values to them in the Mathcad worksheet. The content of the Mathcad object worksheet depends on the calculations you want to perform.
Clicking the Mathcad Properties toolbar button will display the Mathcad Object Properties dialog. Each Mathcad object in the workbook will have a unique number assigned to it and will have a tab on the Properties dialog. When the Properties dialog is visible, the Mathcad object corresponding to the selected tab is placed into view and highlighted in blue as a visual aid.
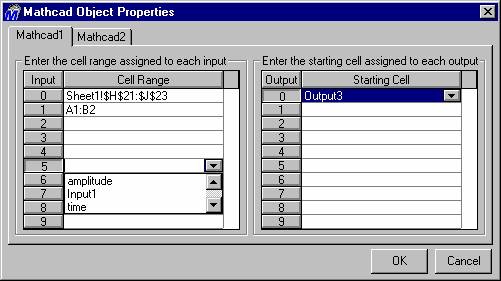
Input data to a Mathcad object is specified by selecting a single cell (for scalar data) or a range of cells (for array or matrix data) in the workbook. A cell with no value passes zero to the Mathcad object. Only the starting cell needs to be specified for an output since the range it occupies depends on the size of the data passed to the Excel worksheet. If a range of cells is specified for an output, only the upper left cell is used to determine the starting point for placement of the data.
Ranges may be specified in several ways. You can specify a range in the A1 style by typing it in the DataTable cell. If a sheet name is not specified, the range is assumed to be on the same sheet as the associated Mathcad object. When manually typing in the range you must do either of the following to make the edit stick:
hit the enter key,
click out of the cell, or
hit an up or down arrow.
You can use ranges you have named in the workbook and select these named ranges from the drop down lists on the Properties page. A named range that has been assigned to an input is removed from the list of available ranges to assign to an output. This is to prevent overwriting input data. There is nothing that prevents you from typing in the same range for an input and an output so you must be careful not to overwrite data. Finally, you can click on a cell in the Input or Output DataTable to make it the active cell and then drag select a range on any worksheet in the Excel workbook. The contents of the active cell will automatically be updated when the left mouse button is released.
When you click OK on the Properties dialog, all Mathcad objects are recalculated. Additionally, any time a cell is changed on a worksheet in the active Excel workbook all Mathcad objects are recalculated and the output data is sent to their assigned starting cells.
Although Mathcad objects can be removed from the worksheet by simply selecting and cutting them, it is preferable to use the Delete Mathcad Object toolbar button. Clicking on this button will display the dialog shown below.
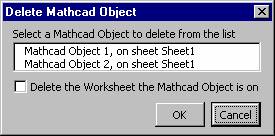
Selecting a Mathcad object in the list will display the object with a red border as a visual aid in deciding if it is the correct object to delete. If the checkbox is checked, the worksheet containing the object will also be removed. You will be presented with an Excel dialog warning you that you are about to delete the worksheet. Clicking Cancel takes no action. Clicking OK deletes the Mathcad object (and the worksheet it is on if selected).
You should never cut and then paste a Mathcad Object. If you must move the Mathcad object to a different worksheet in the workbook first save the object contents to a file and then create a new Mathcad object from this file.
Clicking the Save Mathcad Object toolbar button will display the dialog shown below. Selecting a Mathcad object from the list will place the object into view and highlight its border in green. When you have selected the Mathcad object you want to save, click OK. You are then presented with the standard Windows Save As dialog.
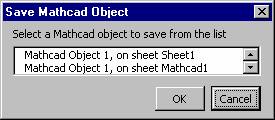
Either type in a file name, including the full path, or browse to the desired folder and select an existing file name or type a new file name to save the Mathcad object contents to, then click the Save button. If you are overwriting an existing file you are prompted to confirm the file overwrite. If you click Cancel the object is not saved.
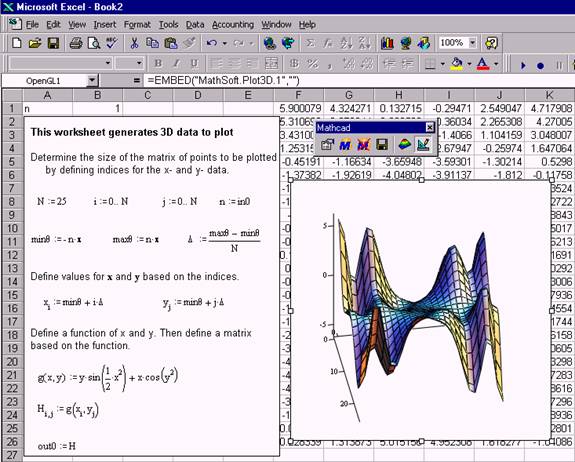
The Insert 3D Plot Control button on the Mathcad toolbar allows rapid display of a 3D surface plot in the worksheet. First you must select the data you want to plot and then click the Insert 3D Plot Control button. If array data is selected, i.e. the data has more than one row or column, a Mathcad 3D plot control is inserted into the active worksheet and displays the selected data. The data is assumed to represent the z values, or magnitudes, at the particular row/column data points. An example showing a 3D plot control inserted in an Excel worksheet is shown below.
The Design Mode toggle button is provided to allow resizing and repositioning of the 3D plot after it is created. If you are not in design mode and you create a 3D plot, Excel is placed in design mode. If you are already in design mode and create a 3D plot, you will remain in design mode.
If you are not in design mode, the 3D plot works as it does in Mathcad. You can interactively rotate and zoom the plot using the mouse. Right-clicking on the plot will show its context menu from which you can set various properties of the plot. For more information see the Mathcad documentation and on-line help on 3D plots.
Please report any errors and problems you find and the circumstances of how to duplicate the error to [email protected] so that the problem may be logged and fixed in future releases of the add-in.
If you are using Microsoft Office 97 or Microsoft Excel 97, you need to apply the Microsoft Office Service Release 1 (or higher) before using the Mathcad Add-in for Excel. You can obtain this SR1 from Microsoft's Web site.
If an unexpected error occurs and it appears that all input/output mapping information has been lost, simply deactivate and then activate the workbook. This is easily accomplished by switching to another workbook and then back to the one you were working on. This will reset the data structures used by the add-in.
If you are running multiple versions of Mathcad on your computer, make sure Mathcad 2000 or higher is the active Mathcad application, i.e. the one that you used last, prior to starting Excel. To set Mathcad 2000 as the active Mathcad application, start Mathcad 2000 and then exit.
|
