Objective |
This chapter introduces:
Sketcher Tools
Sketcher Tips
Unregenerate |
The Unregenerate command is used to undo the changes incorporated by the previous regeneration. This is helpful when regeneration of a sketch does not give the desired results. Choose Unregenerate immediately after regeneration to return the sketch to its original state and begin troubleshooting to determine why it would not regenerate.
Modify |
The Sketcher MOD SKETCH menu, shown in Figure 1-1, contains options for making dimension modifications. Using the Mod Entity option, you can specify values for dimensions, and then update the section by choosing Regenerate. The Scale option enables you to modify one dimension and have the entire section update proportionally. Additional options allow the user to modify dimensions and update the section in real time. These options are Drag Dim Val, Drag Entity, and Drag Vertex. Examples of each option are covered in the exercises to follow.
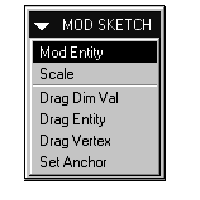
Figure 1-
The following Geom Tools options provide enhanced Sketcher tools for creating or modifying sketches:
Offset Edge
Use Edge
Replace
Offset Edge |
The Offset Edge command creates Sketcher entities offset from existing part geometry. In Figure 1-2, a protrusion similar in shape to the existing part is desired. The entire edge of the part can be selected for use with Offset Edge to create the extruded protrusion shown in Figure 1-3.
|
Offset Edge used to create sketch |
|
Figure 1-
|
End Result |
|
Figure 1-
Use the following steps to create an Offset Edge entity:
Choose Geom Tools, Offset Edge.
Select the part geometry edges to offset.
Enter an offset value with respect to the direction arrow. A negative number drives the offset in the opposite direction.
|
Additional sketched entities can be added to the section when Offset Edge is used. |
Edges can be selected using Sel Loop, Sel Chain, or Sel Edge as shown in Figure 1-4, Figure 1-5, and Figure 1-6, respectively.
|
If more than one loop or chain is available when using Sel Loop or Sel Chain, a menu appears allowing you to switch between the available selections. Dark blue indicates the active selection. |
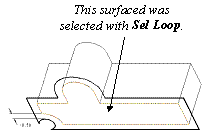
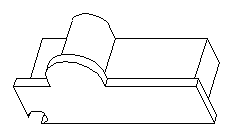
Figure 1-
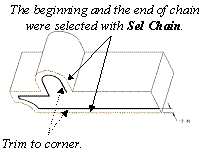
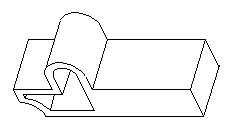
Figure 1-
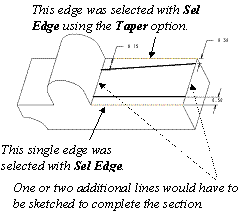
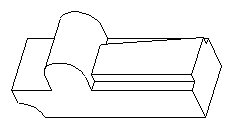
Figure 1-
Use Edge |
The Use Edge command duplicates selected part geometry without offsets. In Figure 1-7, a protrusion is created by selecting existing part edges. Trimming with additional sketched entities completes the section. Sel Loop, Sel Chain or Sel Edge can also be used to select edges for the Use Edge command.
|
Edges are automatically aligned when using Use Edge; no dimensions are required for the entities. |
|
|
|
Figure 1-
Use the following steps to create a Use Edge entity:
Choose Geom Tools, Use Edge.
Select the part geometry edges.
|
Additional sketched entities can be added to the section when Offset Edge and Use Edge are used. |
Offset Edge or Use Edge can be used to project selected entities to the sketching plane. In Figure 1-8, the sketching plane was created at an angle to the part and the Use Edge entities were projected onto the sketching plane.
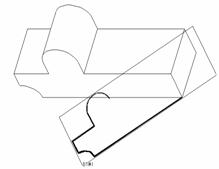
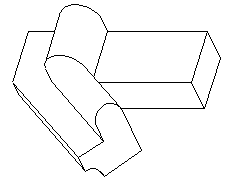
Figure 1-
Replace |
The Replace command swaps a new entity with an old entity during a section redefinition. All references to the old entity are automatically rerouted to the new entity. In Table 1-1, the design intent of the original part has changed such that the "top" of the part is to be redefined to have a slight radius.
Table 1-
|
Original |
New Design |
|
|
|
Redefining the base protrusion to delete the top horizontal line gives a warning message stating that the entity is referenced by subsequent features. Proceeding to delete the line and add the arc in its place causes a feature regeneration failure, because the reference edge of the round no longer exists. If the Replace command were used to swap the horizontal line with the arc, no failure would occur. The system recognizes that the round is a child of the line and the reference automatically reroutes to the arc.
Use the following steps with the Replace option:
Sketch the new entity that replaces the existing entity.
Choose Geom Tools, Replace.
Select the new entity that replaces the existing entity.
Select the entity to be replaced.
Figure 1-9 shows the Sec Tools Menu. It contains a variety of options that enable you to manipulate the sketch and the sketching environment.

Figure 1-
Place Section |
The Place Section command retrieves a previously saved sketch into the current section. If a particular shape is to be used in a variety of features, the section can be saved and reused in other sketches.
|
A sketch is independent of the feature type. Any sketch can be saved while in Sketcher mode using File, Save or File, Save As. |
Use the following steps with Place Section:
Choose Sec Tools, Place Section.
Enter the name of the sketch or select it from the Open dialog box. The sketch appears in a sub-window.
Enter a rotating angle.
Select a scaling origin on the section in the sub-window.
Select a drag point origin on the section in the sub-window.
Enter a scaling factor.
Place the section by moving the mouse into the main window. Press the left mouse button to place the section.
Section Environment |
The Sec Environ menu (shown in Figure 1-10) can be used to change the Sketcher environment. Table 1-2 describes its options.
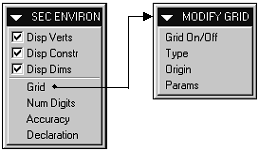
Figure
Table
|
Option |
Description |
|
|
Disp Verts |
Toggles the display of vertex markers on and off. The default vertex marker is a yellow dot. The default setting is on. |
|
|
Disp Constr |
Toggles the display of Sketcher constraints on and off. The default setting is on. |
|
|
Disp Dims |
Toggles the display of dimensions on and off. The default setting is on. |
|
|
Grid |
Makes changes to the Sketcher grid. |
|
|
Grid On/Off |
Toggles the Sketcher grid on and off. |
|
|
Type |
Toggles between Cartesian and Polar grids. |
|
|
Origin |
Selects a new origin for the Sketcher grid. |
|
|
Params |
Modifies the angle and spacing of gridlines. |
|
|
Num Digits |
Changes the number of decimal places for section dimensions. |
|
|
Accuracy |
Changes relative accuracy of sketch. |
|
|
Declaration |
Declares dimensions for Layout Mode. |
|
Section Info |
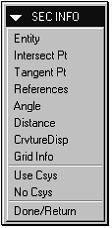
The Sec Info menu (shown in Figure 1-11) enables you to get information about section entities. Table 1-3 discusses its options.
Figure
Table
|
Option |
Description |
|
Entity |
Shows information such as entity type, radius, length, slope, and curvature. |
|
Intersect Pt |
Shows information about the intersection of two entities such as angle of slope and curvature of the intersecting entities. |
|
Tangent Pt |
Shows information about an entity at the point of tangency such as angle of tangency and curvature of the intersecting entities. |
|
References |
Identifies all geometry referenced by the section. Surfaces are highlighted in yellow, edges are highlighted in blue, and datum features are highlighted in red. |
|
Angle |
Measures the angle between two lines. |
|
Distance |
Measures the distance between two parallel lines, between two points, and between a point and a line. |
|
CrvtureDisp |
Displays the curvature of a spline. |
|
Grid Info |
Displays parameters of the grid such as grid angle, X spacing, and Y spacing. |
|
Use Csys |
Gives measurements relative to a coordinate system entity. |
|
No Csys |
Does not give measurements relative to a coordinate system entity. |
Figure 1-12 shows the ADV GEOMETRY menu. It contains options that enable you to sketch more complex geometry.
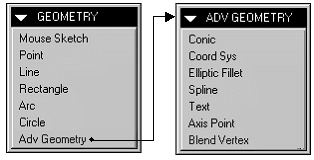
Figure 1-
Conic |
The Conic option is used to sketch conic splines. Conics are sketched similar to three-point arcs. Select a start point, an endpoint, and then drag the mouse into the desired position to complete the geometry.
Figure 1-13 shows a fully dimensioned conic. Both endpoints have an angular dimension and a rho dimension. The endpoints are located with respect to the part.
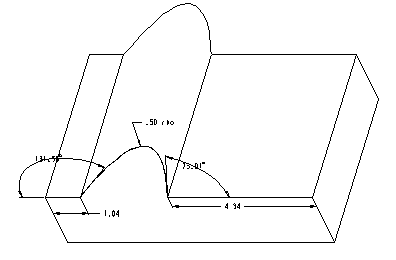
Figure 1-
The rho dimension is created using the following steps:
1. Select the conic entity.
2. Place the dimension.
The angle dimensions at the endpoints are created using the following steps:
Select the conic.
Select an endpoint.
Select the adjacent edge or entity.
Place the dimension.
Coord Systems |
Coordinate systems in Sketcher Mode are sketched using Adv Geometry, Coord Sys, and are local to the sketch only. Coordinate systems can be used as references for dimensions, certain blend features, and Sec Info options.
Elliptic Fillet |
Elliptical fillets are created in the same manner as arc fillets; however, they require two dimensions: an X radius and a Y radius. In Figure 1-14, an elliptical fillet is created between two intersecting lines. Two dimensions are shown for the fillet.
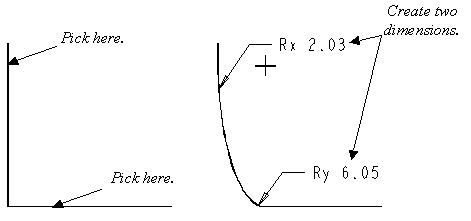
Figure 1-
Splines |
Splines are curves that pass through a number of user defined points. They are sketched by clicking the left mouse button at various locations. Click the middle button to complete the spline. Dimensions are required to locate the two endpoints with respect to the part. Figure 1-15 shows a sketched cut feature that contains a spline in its section.
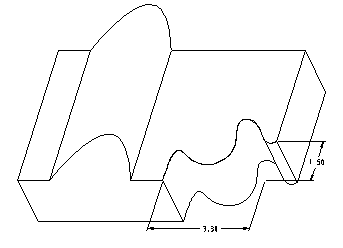
Figure 1-
Text |
The Text option is used to create text as a feature. This option can be used with a cut or a protrusion. Use the following steps with the Text option:
Choose Adv Geometry, Text.
Type the text and press <Enter>.
Drag a text box to define the extent of the text.
Type another line of text or press <Enter> to finish.
Dimension the text with respect to the part.
Figure 1-16 shows an extruded protrusion whose sketched section contains text.

Figure 1-
Axis Point |
The Axis Point option creates a point that will define an axis for an extruded feature. When the feature is extruded, an axis will be created through the point and normal to the sketching plane. The axis is not a separate feature but belongs to the extruded feature with which it was created.
Blend Vertex |
Blend Vertex is covered in "Chapter 3 Blends".
The following tips provide suggestions on creating successful sketches and troubleshooting unsuccessful sketches.
Simplicity |
Keep sketches simple. Do not add too much geometry to any one feature. Additional features can be added to the model later.
Sketch Portions |
If a sketch has to be complex, Sketch a portion of it, and then Dimension and Regenerate. Continue sketching additional portions after the previous portion has been regenerated successfully. Keeping the portions small makes troubleshooting regeneration problems easier.
Modify after Regeneration |
Modify dimensions only after a successful regeneration. Modifying before a successful regeneration can further complicate troubleshooting. When dimensions are modified before regeneration, it is difficult to determine whether a failure was due to the sketch or to the dimension changes. After a sketch has regenerated successfully, the dimension symbols change to values that are safe to modify.
Unregenerate |
When the regeneration of a sketch gives an undesired result, the Unregenerate command reverts the sketch back to the previous state.
Exaggerate |
Pro/ENGINEER may not regenerate entities that are small relative to the entire section. If a section contains small entities, exaggerate the size when sketching these entities and apply a proper dimensioning scheme that makes it easy to modify them after successful regeneration.
Zooming |
Zooming in and out takes advantage of the relative size of entities compared to the size of the viewing area. Pro/ENGINEER sees what you see.
Zoom In
If entities are too small to regenerate, zoom in on them progressively so they appear larger, and retry regeneration. Pro/ENGINEER now sees the sketch in this zoomed state also. Be aware that the section may now fail for other reasons. Just as zooming in increased the relative size of the entities in question, it also increases the relative size of gaps between entities. These entities may appear big enough that Pro/ENGINEER does not make assumptions about them.
Zoom Out
If a corner is not sketched close enough to 90°, zoom out to minimize Pro/ENGINEER's ability to see the sketching inaccuracy. Keep in mind that Pro/ENGINEER may then find entities that are too small to regenerate.
Sketcher grid |
Use the grid as an aid when creating sketched entities (e.g., horizontal lines, 90° arcs). Sec Environ can be used to change the value of the grid spacing.
Unalign |
Use the Unalign command as a method for verifying alignment. Choose Alignment, Unalign, and all aligned entities are highlighted in green. To abort the Unalign without affecting the sketch, choose Quit.
Auto Dim |
Use the Auto Dim command to automatically dimension sketches to help ensure successful regeneration. The dimensions that Pro/ENGINEER places on the feature are not necessarily the dimensions required by the user; therefore, it might be necessary to delete and recreate these dimensions to achieve the appropriate dimension scheme.
You should have a sound understanding of dimensioning before using this option.
Exercise 1a Sketcher Tools |
Objective |
After you complete this exercise, you will be able to:
Use Unregenerate
Use the Modify Options
Use Place Section
Use Offset Edge / Use Edge
Manipulate the Sketcher Environment
Open the section called advanced.sec.
Select the ![]() button from the tool bar.
button from the tool bar.
Select advanced.sec in the File Open dialog
box and select the ![]() button.
button.
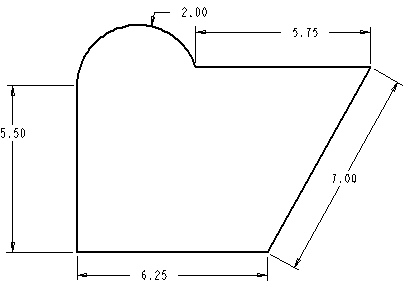
Figure 1-
Modify the radius of the arc.
Enter [8] as the new value for the arc.
Regenerate the section. Did the section regenerate as expected?
Unregenerate to return it to its previous state.
Choose Unregenerate.
Modify the arc to its original value of [2] or delete the arc dimension and place it again to get the current value.
Regenerate the section.
Modify the entire section by Scale.
Choose Modify, Scale.
Select the radius dimension of the arc.
Enter [1]. All dimensions should now be half their original values.
Use the Drag Dim Value option to modify dimensions.
Choose Modify, Drag Dim Val from the MOD SKETCH menu.
Select up to five dimensions for modification. Choose Done Sel.
Click on a dimension value in the slider bar and drag the mouse to change the value. Click the dimension again to complete the change. All dimensions can be changed at once using the Scale slider bar.
To accept the modified dimension values and close the thermometer menu, click in the box just below the Modify Dims title bar, as shown in Figure 1-18. The middle button aborts changes.
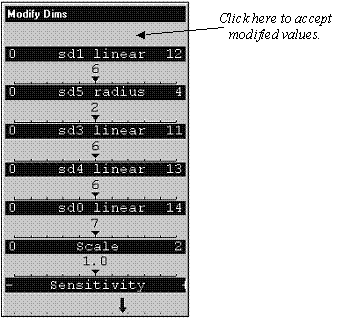
Figure 1-
Change the anchor position and modify values.
The sketch anchor is the large blue dot positioned at a vertex. The anchor pins down a vertex during modifications.
Choose Set Anchor.
Select a new vertex for the anchor.
Choose Drag Dim Val and modify values as done in the previous task. Notice the difference with the new anchor.
Use the Drag Entity option to modify dimensions.
This option drags an entity to modify a dimension.
Position the anchor in the top left corner of the section as shown in Figure 1-19.
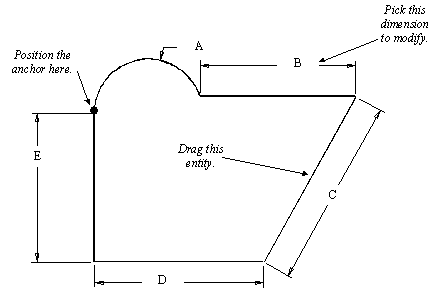
Figure 1-
Choose Drag Entity.
Select the dimension for the top horizontal line as shown in Figure 1-19.
Select the entity on the right side of the horizontal line as shown in Figure 1-19.
Drag the mouse to modify the dimension.
Click the left mouse button to complete or middle mouse button to abort.
Use the Drag Vertex option to modify dimensions.
This option drags a vertex to modify the adjacent dimensions.
Position the anchor on the vertex shown in Figure 1-20.
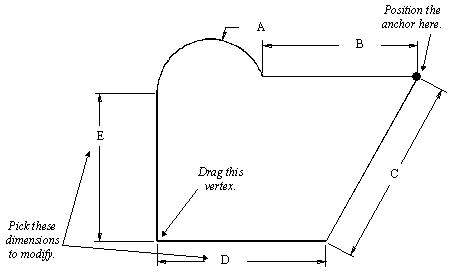
Figure 1-
Choose Drag Vertex.
Select the linear dimensions on the left vertical line and the bottom horizontal line as shown in Figure 1-20.
Select and drag the bottom left vertex as shown in Figure 1-20.
Click the left mouse button to complete the modification or the middle mouse button to abort.
Regenerate the section.
Remove the Sketcher assumption symbols.
Choose Sec Tools, Sec Environ. Remove the check mark from the box adjacent to Disp Constr. Notice the symbols on the sketch indicating the assumptions that Pro/ENGINEER made to regenerate the sketch are no longer visible.
Remove the checkmark in the box adjacent to Disp Verts to turn off the display of the vertices.
Erase the sketch.
The sketch is to be used in the next task. Erasing without first saving removes the modified file from RAM, allowing the original sketch to be retrieved from the system disk. Simply closing the window would keep the modified sketch in RAM and it would be retrieved for the next task.
Choose File, Erase, Current from the menu bar.
Select the ![]() button from the Erase Confirm Window.
button from the Erase Confirm Window.
Create a new part.
Create a new part called placesketch.
Create default datum planes.
Create the L shaped base feature shown in Figure 1-21.

Figure 1-
Create the second protrusion using Place Section.
Choose Feature, Create, Protrusion.
Select the appropriate sketching and reference planes to create the second protrusion shown in Figure 1-22.

Figure 1-
In Sketcher Mode, choose Sec Tools, Place Section.
Select
advanced.sec in the Open dialog box and select the ![]() button.
button.
Enter [90] for the rotation angle. This causes the section to be oriented at 90° counter-clockwise when it is placed.
Select any vertex in the sub-window to use as the scaling origin.
Select a different vertex in the sub-window to use as the drag origin.
Enter [.5] to reduce the section to half size.
Read the Message Window. The sketch is now attached to the mouse. Drag the mouse to the desired location and press left button to place it.
Dimension the sketch to locate it to the part.
Regenerate and complete the feature.
Sketch a cut using Offset Edge.
Choose Feature, Create, Cut.
Select the appropriate sketching and reference planes to create the cut shown in Figure 1-23.
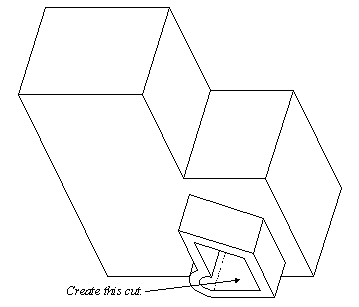
Figure 1-
Choose Geom Tools, Offset Edge.
Choose Sel Loop, and select the second protrusion's front surface.
Enter [-0.5] for the offset distance.
Regenerate the section.
Specify the depth as Thru All to complete the feature.
In the next task, you will create a round on the part, as shown in Figure 1-24, and then you will make a design change to the base feature using the Replace command.
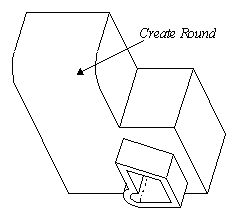
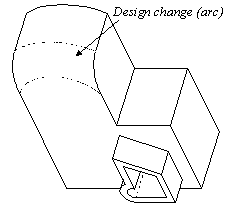
Figure 1-
Create a round feature.
Create a round on the part as shown in Figure 1-24. Specify a radius of [1.0].
Redefine the base feature without using Replace.
Redefine the section of the base feature.
Delete the top edge and sketch an arc in its place. When the delete warning appears in the Message Window, enter [Y].
When the redefine is complete, a feature regeneration failure occurs because the system is unable to place the round feature. Choose Undo Changes from the RESOLVE FEAT menu to undo the changes that caused the failure.
Redefine the base feature using Replace.
Redefine the section of the base feature.
Sketch and dimension an arc in the proper location. Do not delete the line and do not Regenerate the section.
Choose Geom Tools, Replace.
Read the Message Window and select the arc.
Read the Message Window and select the line.
Use Geom Tools options to complete the sketch.
Dimension the radius of the arc, and Regenerate.
Modify the radius of the arc to [4.5].
After a successful regeneration, choose Done from the SKETCHER menu to complete the redefinition.
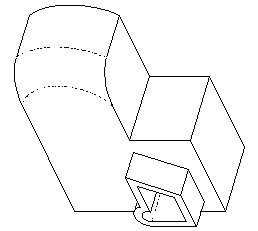
Figure 1-
|
Feature failure resolution will be discussed further in Chapter 2 . |
If the part still fails to regenerate, look in the Failure Diagnostics Window to see which feature failed. It may be the second protrusion or the cut. If you selected the surface that was just replaced as the reference plane for either or both of these features, they will fail because that surface no longer exists. If so, choose Quick Fix, Redefine to redefine the reference plane. You may need to do this twice. This shows one example of why it is often good to select default datum planes as references for features.
Save the part and Erase it from memory.
This page intentionally left blank.
Exercise 1b Advanced Geometry |
Objective |
After you complete this exercise, you will be able to:
Sketch Conics
Sketch Splines
Sketch Text
|
For additional exercises on the topics covered in Chapter 1, see Appendix B, Exercises B1 and B2. |
Create a new part with an extruded base feature containing a conic.
Create a new part called conic.
Create default datum planes.
Create an extruded protrusion using DTM3 as the sketching plane and DTM2 as the Top reference plane.
Sketch the section shown in Figure 1-26.
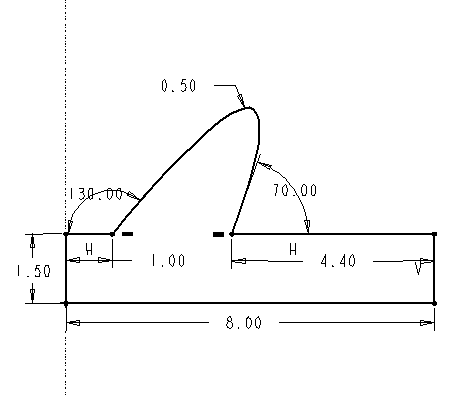
Figure 1-
Choose Sketch, Adv Geom, Conic to sketch the conic.
To dimension rho, select the conic, then place the dimension.
To dimension the angles:
Select the conic.
Select an endpoint.
Select the adjacent line.
Place the dimension.
Specify a depth of [5] for the protrusion.
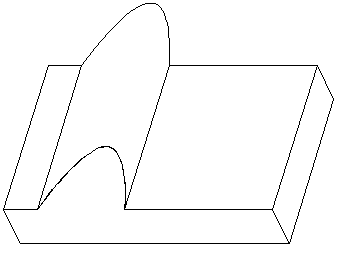
Figure 1-
Create an extruded cut with a section containing a spline.
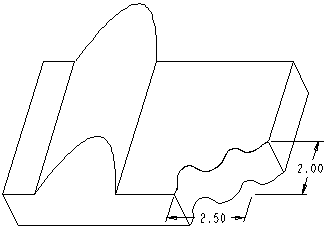
Figure 1-
Create an extruded cut (as shown in Figure 1-28) using an appropriate sketching and reference plane.
To sketch the spline, choose Sketch, Adv Geom, Spline.
Continually click the left mouse button (to bend the spline) as you drag the mouse. Use the middle mouse button to complete the spline.
Dimension and Align the endpoints.
Create an extruded protrusion with a section containing text.

Figure 1-
Create an extruded protrusion (as shown in Figure 1-29) using an appropriate sketching and reference plane.
Choose Sketch, Adv Geom, Text.
Enter any text.
Drag a box to define the extent of the text box.
Additional text can be input or press <Enter> to finish.
Dimension the text by selecting the text, selecting a part reference, and then placing the dimension.
This page intentionally left blank.
|