ALTE DOCUMENTE
|
||||||||||
Objective |
This chapter introduces:
Assembly Placement Constraints
Assembly Interface
Just as features are added to one another to create a part, parts can be assembled to one another to create an assembly. The parts can be assembled individually or as a member of a subassembly to create a higher level assembly. The parts and subassemblies are referred to as components.
Placement Constraints |
Constraints are specified to locate components parametrically with respect to existing components and features. Similar to the interdependencies between features in a part, parent-child relationships also exist in assemblies. Any references made to other components when assembling a new component create parent-child relationships. The placement constraint options shown in Table 5-1 can be used.
Table
|
Option |
Description |
|
Mate |
Selected planar surfaces face the opposite direction, and are coplanar. |
|
Mate Offset |
Selected planar surfaces face the opposite direction with a user-defined offset distance between them. |
|
Align |
Selected planar surfaces face the same direction, and are coplanar. Selected revolved surfaces or axes are coaxial. The system changes this to the equivalent Insert constraint. |
|
Align Offset |
Selected surfaces face the same direction, with a user defined offset distance between them. |
|
Insert |
Selected cylindrical surfaces are coaxial. |
|
Orient |
Selected planar surfaces are parallel, and face the same direction. |
|
Coord Sys |
Selected coordinate syste 818u207i ms are aligned at their origins. |
|
Tangent |
Selected surfaces are tangent. |
|
Pnt On Srf |
A point or vertex is constrained to be in contact with a surface. |
|
Edge On Srf |
A straight edge is constrained to be in contact with a planar surface or datum plane. |
|
Default |
The system-default coordinate syste 818u207i m of the component is aligned to the system default coordinate syste 818u207i m of the assembly. |
The examples on the following pages illustrate the use of constraints to place components in an assembly.
Example 1 (Mate and Align):
|
|
|
Figure 5-
Table 5-
|
Constraint |
References |
|
Mate |
surfaces 7 and H |
|
Align |
surfaces 5 and A |
|
Align |
surfaces 4 and B |

Figure 5-
Example 2 (Mate Offset and Align):
|
|
|
Figure 5-
Table 5-
|
Constraint |
References |
|
Mate Offset |
surfaces 7 and H |
|
Align |
surfaces 5 and A |
|
Align |
surfaces 4 and B |

Figure 5-
Example 3 (Mate and Align):
|
|
|
Figure 5-
Table 5-
|
Constraint |
References |
|
Align |
surfaces 7 and H |
|
Align |
surfaces 5 and B |
|
Mate |
surfaces 1 and A |

Figure 5-
Example 4 (Align Offset, Align, and Mate):
|
|
|
Figure 5-
Table 5-
|
Constraint |
References |
|
Align Offset |
surfaces 5 and B |
|
Align |
surfaces 7 and H |
|
Mate |
surfaces 1 and A |

Figure 5-
Example 5 (Insert and Mate):
|
Mate inner surface of the bolt head to
surface A. Select cylindrical surfaces for Insert. |
|
Figure 5-
Table 5-
|
Constraint |
References |
|
Insert |
the cylindrical surface of the bolt and the cylindrical surface created by the hole |
|
Mate |
the inner surface of the bolt head and surface A |

Figure 5-
Example 6 (Insert, Orient, and Mate):
|
|
|
Figure 5-
Table 5-
|
Constraint |
References |
|
Insert |
the cylindrical surface of the bolt and cylindrical surface created by the hole |
|
Mate |
the inner surface of the bolt head and surface A |
|
Orient |
surface X of the bolt and surface B |

Figure 5-
The first two constraints fully define the placement; however, Orient is used as an additional constraint to define the orientation of the bolt.
Example 7 (Tangent, Align, and Orient):
|
|
|
Figure 5-
Table 5-
|
Constraint |
References |
|
Tangent |
surfaces G and 4 |
|
Orient |
surfaces B and 2 |
|
Align |
surfaces A and 1 |
|
Tangent |
surfaces H and 4 |

Figure 5-
Example 8 (Edge On Srf, Tangent, Align, Orient):
|
|
|
Figure 5-
Table 5-
|
Constraint |
References |
|
Edge On Surface |
surface H and edge 4-2 |
|
Tangent |
surfaces G and 4 |
|
Align |
surfaces A and 1 |
|
Orient |
surfaces G and 5 |

Figure 5-
Example 9 (Coord Sys):
As illustrated in the previous examples, a combination of the constraints must be used to fully define how components are to be assembled. The Coord Sys constraint can be used alone.
|
|
|
Figure 5-

Figure 5-
When constraining components in an assembly, the Component Window and the Component Placement dialog box appear as shown in Figure 5-19.
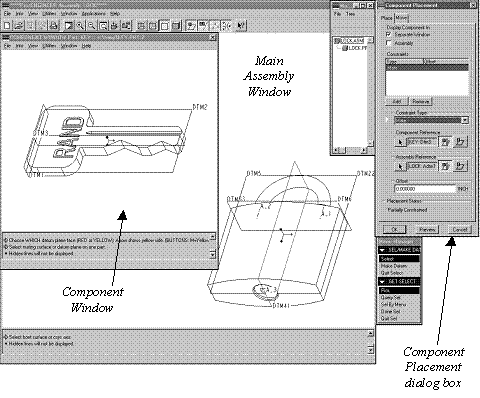
Figure
Component Placement Dialog Box |
The Component Placement dialog box, shown in Figure 5-20, is the control center for the assembly process. It appears every time you choose to assemble a new component or redefine the placement of an existing component.
|
The Separate Window option does not add an additional window to the window list. You may have to move the main window to access the component window. |
At the top of the Component Placement dialog box, you are given the choice of two tabs: Place and Move. This training course discusses the options for the Place tab only. The Move tab contains options for placing components nonparametrically and is discussed in the advanced assembly courses.
At the top of the Place tab, there is the Display Component In section; this contains the options Separate Window and Assembly. These options control the location of the new component as you are defining constraints to assemble it. Selecting Separate Window locates the new component in the Component Window as shown in Figure 5-19. Selecting Assembly locates the component in the main window with the assembly. As a new user, you may find it helpful to select the Separate Window option.
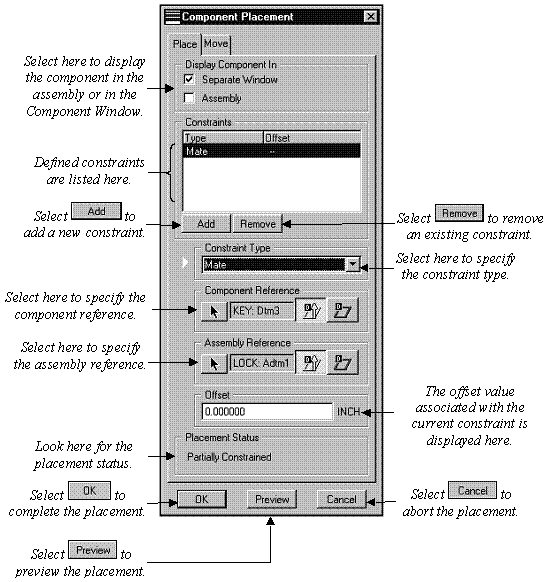
Figure 5-
The
Constraints section of the dialog box shows a list of the currently defined
constraints. If there is an offset
distance associated with the constraint, it is also displayed here. You can remove an existing constraint at any
time by selecting it and then selecting the ![]() button. Selecting the
button. Selecting the ![]() button allows you to add a new constraint.
button allows you to add a new constraint.
The Constraint Type section contains a pull-down menu from which you select the type of constraint you are adding. As constraints are added, the number of options available on the menu reduces to list only the possible constraints. For example, after adding a Mate constraint, Coord Sys is no longer available.
The
Component Reference and Assembly Reference sections are used to select the
component constraint reference and the assembly constraint reference,
respectively. Upon selecting the
appropriate ![]() button, you can select the reference on the
component in the Component Window or the reference on the assembly in the Main
Window. The name or type of reference
appears adjacent to the
button, you can select the reference on the
component in the Component Window or the reference on the assembly in the Main
Window. The name or type of reference
appears adjacent to the ![]() button.
button.
The Offset section of the Component Placement dialog box displays the value you enter for the Mate Offset and Align Offset constraints.
The Placement Status section gives you the status of the component being placed. Possible messages include the following:
No Constraints
Partially Constrained
Constraints Invalid
Fully Constrained
The three buttons shown in Table 5-10 appear at the bottom of the Component Placement Window.
Table 5-
|
Button |
Description |
|
|
Place the component with the current settings. |
|
|
Preview the placement of the component with the current constraints. |
|
|
Cancel the component assembly. |
Redefining Placement |
The placement of a component can be redefined by choosing Component, Redefine, and selecting the component. The Component Placement dialog box appears and displays all the constraints used to originally place the component. The constraint type, component references, and assembly references can be changed. Figure 5-21 shows the possible selections when redefining a component placement. As each constraint is selected in the Constraints section of the dialog box, the corresponding assembly and component references highlight on the model for easy identification.
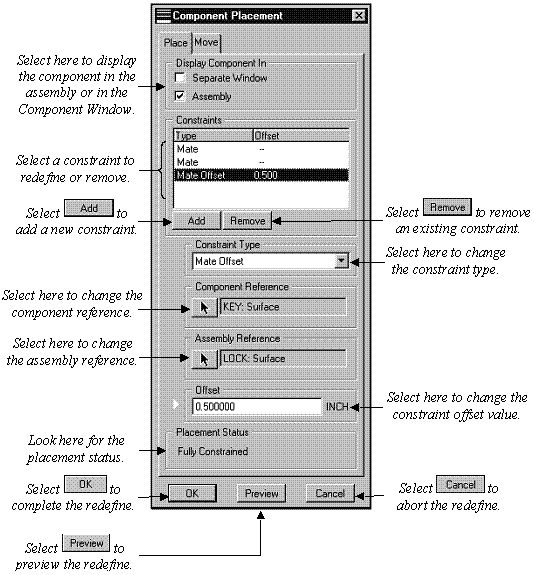
Figure 5-
Model Tree |
The Model Tree lists all the parts and subassemblies that make up an assembly. Selections can be made directly from the Model Tree for commands such as Modify, Delete, and Suppress.
To expand the tree and view the components of a subassembly, simply click on the + symbol beside the assembly name. To compress the expanded section, click on the - symbol. See Figure 5-22.
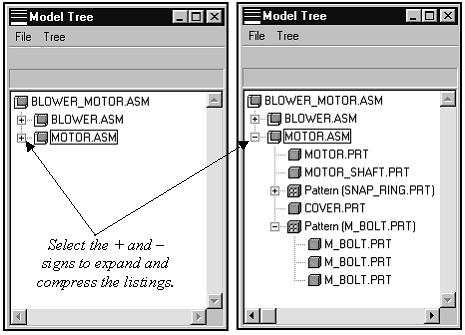
Figure 5-
Exercise 5a Assembly Basics I |
Objective |
After you complete this exercise, you will be able to:
Create Assemblies
Modify Assemblies
Redefine Assemblies
Create a new assembly.
Choose File, New.
Select Assembly in the New dialog box.
Enter [practice] as the name.
Select the ![]() button.
button.
Select a part to add as the base component in the assembly.
Choose Component, Assemble and select ablock.prt in the Open dialog box.
Select the ![]() button.
button.
The part ablock.prt is automatically assembled and displayed in the Main Window.
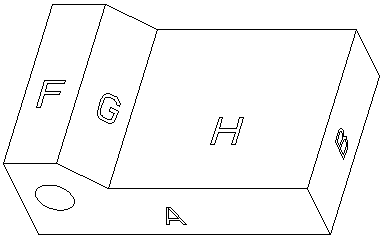
Figure 5-
Assemble the part called bblock.prt.
Choose Assemble and select bblock.prt. The Component Placement dialog box appears.
Initially, the new component appears in the Main Window because Assembly is selected in the Display Component In section of the Component Placement dialog box. Unselect Assembly and select Separate Window as shown in Figure 5-24. The new component should now appear in the Component Window.
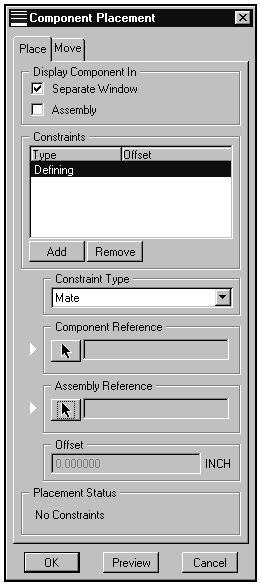
Figure 5-
Define the first constraint.
The first constraint mates surface 6 on bblock.prt and surface H on ablock.prt. See Figure 5-25.
Select Mate from the Constraint Type pull-down menu.
Select the
![]() button in the Component Reference section.
button in the Component Reference section.
Read the information in the Message Window. Select surface 6 on bblock.prt in the Component Window. Use Query Select if necessary.
Select the
![]() button in the Assembly Reference section.
button in the Assembly Reference section.
Read the information in the Message Window. Select surface H on ablock.prt in the Main Window. Use Query Select if necessary.
The Component Window goes to the background when a selection is made in the Main Window. Move the main Window and select the title bar of the Component Window to bring it forward.
Look at the Component Placement dialog box. The Placement Status now says, "Partially Constrained". The first constraint has been added and the second can now be defined.
Define the second constraint.
The second constraint aligns surface 3 on bblock.prt and surface B on ablock.prt. See Figure 5-25.
Bring the Component Window forward before making any selections. This makes it easier to select the constraint references.
Select Align from the Constraint Type pull-down menu.
Select the
![]() button in the Component Reference section.
button in the Component Reference section.
Read the information in the Message Window. Select surface 3 on bblock.prt in the Component Window. Use Query Select if necessary.
Select the
![]() button in the Assembly Reference section.
button in the Assembly Reference section.
Read the information in the Message Window. Select surface B on ablock.prt in the Main Window. Use Query Select if necessary.
Look at the Component Placement window. The Placement Status still says, "Partially Constrained". With the current constraints, bblock.prt can still lie anywhere on surface H while aligned to surface B. A third constraint is required to fully constrain it.
Define the third constraint.
The third constraint aligns surface 1 on bblock.prt and surface A on ablock.prt. See Figure 5-25.
Bring the Component Window forward before making any selections. This makes it easier to select the constraint references.
Align from the Constraint Type pull-down menu.
Select the
![]() button in the Component Reference section.
button in the Component Reference section.
Read the information in the Message Window. Select surface 1 on bblock.prt in the Component Window. Use Query Select if necessary.
Select the
![]() button in the Assembly Reference section.
button in the Assembly Reference section.
Read the information in the Message Window. Select surface A on ablock.prt in the Main Window. Use Query Select if necessary.
Look at the Component Placement window. The Placement Status now says, "Fully Constrained".
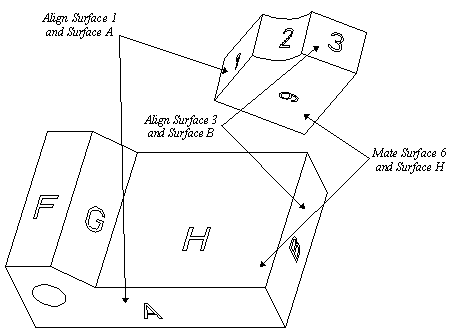
Figure 5-
Preview the placement of the component in the assembly.
Select the
![]() button to see the placement of bblock.prt in
the assembly. It should be as shown in Figure 5-26.
button to see the placement of bblock.prt in
the assembly. It should be as shown in Figure 5-26.
If the
component is not where expected, select the ![]() button, and repeat the previous steps.
button, and repeat the previous steps.
If the
placement is correct, select the ![]() button.
button.
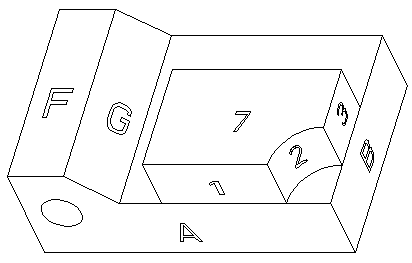
Figure 5-
Assemble bblock.prt a second time.
Assemble bblock.prt again as shown in Figure 5-27.
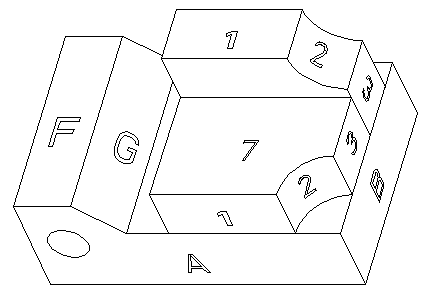
Figure 5-
Choose Component, Assemble and select bblock.prt.
Mate surfaces 4 and H. See Figure 5-28.
Mate surfaces 6 and 4 (of the assembled bblock). See Figure 5-28.
Mate surfaces 3 and B. See Figure 5-28.
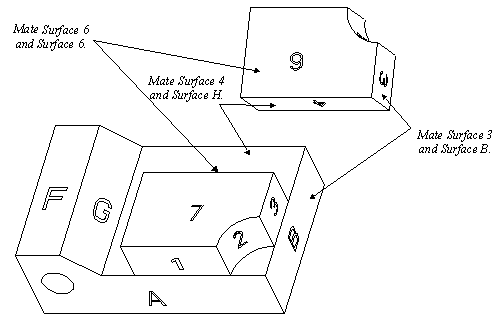
Figure 5-
Read the
Placement Status in the Component Placement dialog box. Why are the constraints invalid? Select the ![]() button; do not select the
button; do not select the ![]() button. The Message Window also indicates that the component placement
constraints are invalid.
button. The Message Window also indicates that the component placement
constraints are invalid.
Bring forward both sub windows. Review the constraints that were used by selecting each constraint listed in the Constraints section of the Component Placement dialog box. Note that as each constraint is selected, the references used on both the component and the assembly are highlighted.
Select the third constraint. Choose Align from the Constraint Type pull-down menu.
Select the
![]() button. The assembly should now appear as shown in Figure 5-27.
button. The assembly should now appear as shown in Figure 5-27.
Select the
![]() button to complete the component action.
button to complete the component action.
Assemble the part called pin.prt.
Choose Component, Assemble and select pin.prt.
Assemble the component as shown in Figure 5-29. The final assembly should appear as shown in Figure 5-30.
|
If Orient is your third constraint, you
may have to select the |
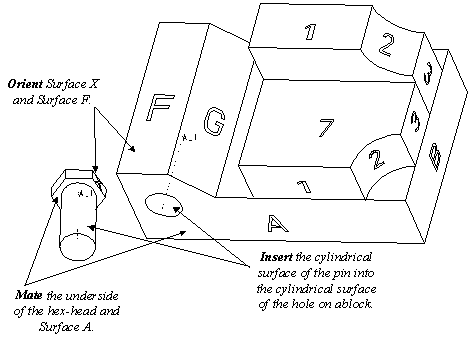
Figure 5-
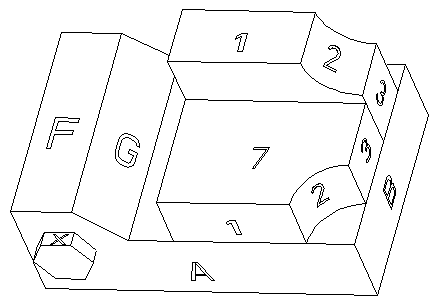
Figure 5-
Assemble additional instances of ablock.prt and bblock.prt.
Assemble ablock.prt and bblock.prt. Attempt to assemble them using the Assembly option in the Display Component In section of the Component Placement dialog box.
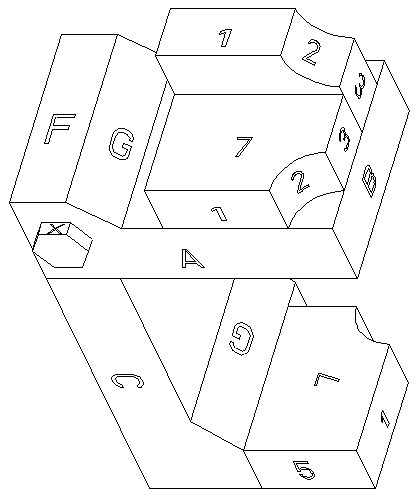
Figure 5-
Redefine the placement of the second instance of ablock.prt in the assembly.
From the top level ASSEMBLY menu, choose Component, Redefine and select the second instance of ablock.prt in the assembly.
In the
Component Placement dialog box, delete the first Align constraint by selecting it in the Constraints section and
then selecting the ![]() button. Do the same for the second Align
constraint.
button. Do the same for the second Align
constraint.
Using the ![]() button, add new constraints that position the
component as shown in Figure
5-32.
button, add new constraints that position the
component as shown in Figure
5-32.

Figure 5-
Obtain information on how a component was assembled.
Choose Info, Component from the menu bar.
Select pin.prt. The Component Constraints dialog box appears as shown in Figure 5-33 (the order of the constraints depends upon the order in which you added them).
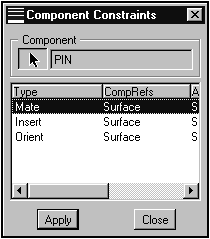
Figure 5-
Select each of the constraints listed in the dialog box. As you do, notice that it highlights the reference surfaces on the model.
Select the
![]() button. An Information Window opens with additional information about the
component. The information is written to
a text file called pin.memb, which is stored in the current working directory.
button. An Information Window opens with additional information about the
component. The information is written to
a text file called pin.memb, which is stored in the current working directory.
Select the
![]() buttons on the Information Window and the
Component Constraints dialog box.
buttons on the Information Window and the
Component Constraints dialog box.
Delete all the components except for the base component.
Choose Component, Delete from the ASSEMBLY menu and select all components except the first instance of ablock.prt. Remember that parent-child relationships exist.
Assemble bblock.prt using Align Offset.
Assemble bblock.prt using Align offset as one of the constraints. Align Offset surfaces 6 and A by a value of [-1.0]. A negative number is used because the offset arrow that appears indicates the positive direction. The assembly should appear as shown in Figure 5-34.

Figure 5-
Modify the offset value of bblock.prt.
|
Mod Dim brings up part dimensions as well as assembly dimensions allowing part dimensions to be modified while in Assembly Mode. |
Choose Modify from the ASSEMBLY menu. The default option on the ASSEM MOD menu is Mod Dim.
Select the base feature of bblock.prt (not the circular cut); all the dimensions for the feature appear as well as the offset dimension.
Select the offset dimension and enter 2.
Choose Done/Return, Regenerate, Automatic.
Modify the offset value again using the Mod Assem command.
|
Using Mod Assem to modify makes it easier to locate assembly dimensions because the part dimensions do not appear. |
Choose Modify in the ASSEMBLY menu.
Choose Mod Assem.
Select bblock.prt. Only assembly dimensions (the offset value) appear this time.
Select the offset dimension and enter [0.5].
Choose Done/Return, Regenerate, Automatic.
Save the assembly and Erase it from memory.
This page intentionally left blank.
Exercise 5b Assembly Basics II |
Objective |
After you complete this exercise, you will be able to:
Create Multi-Component Assemblies
Create a new assembly.
Create the assembly shown in Figure 5-35 using the components ablock.prt, bblock.prt, and rocker.prt.
|
|
|
|
"Top View" |
|
|
|
|
|
"Front View" |
Figure 5-
This page intentionally left blank.
|