Objective |
This chapter introduces:
Parallel Blends
A blend is a feature form that has multiple cross sections specified over its entire length. Figure 4-1 shows a blended protrusion that consists of three individual sections.
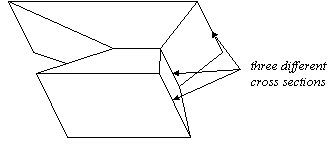
Figure 4-
The sections of a parallel blended feature are created in one sketching session, regardless of the number of cross sections. The minimum number of sections is two. Figure 4-2 shows the three sections used to create the blended protrusion in Figure 4-1.
|
Before starting a new subsection, 14214y2424o Toggle until all other subsections are gray. Do not sketch new geometry while other subsections are still blue. |
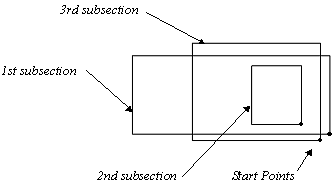
Figure 4-
After the first section is sketched, dimensioned, and successfully regenerated, choose Sec Tools, Toggle. The first section changes from blue to gray, indicating that the second section is ready to sketch.
The second section must be sketched and located with respect to first section (or datum, part edge, etc.). Locating it with respect to the first section can reduce the number of parent-child relationships. After the second section has been successfully regenerated, toggle again until both sections are gray and sketch the third section. Continue sketching all the desired cross sections. After all the cross sections have been sketched, choose Done to complete the sketch. The system then prompts for the distances between each section.
Options |
Blends can be Straight or Smooth as shown in Table 4-1.
Table 4-
|
Straight |
Smooth |
|
|
|
Start Points |
A start point (indicated by a bold dot) is located at the first vertex sketched for each section. Pro/ENGINEER blends the feature by connecting the start points for each section, and then every other vertex in a clockwise manner, as shown in Figure 4-3. Choosing Sec Tools, Start Point, can move the start point.
|
|
|
Figure 4-
Geometry |
Each section may contain geometry of any shape; though, each section must have an equal number of entities. For example, to blend a circle with a square, the circle must be broken into four arcs, as shown in Figure 4-4. Each section has four entities. Geom Tools options can be used to split the circle into four individual arcs.
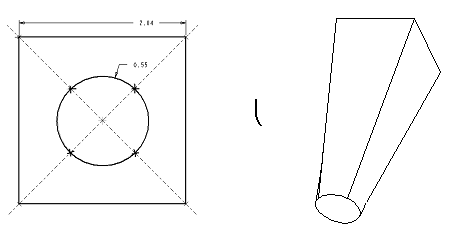
Figure 4-
Blend Vertex |
If the design intent calls for unequal numbers of vertices per section, the Blend Vertex option in the ADV GEOMETRY menu can be used. Figure 4-5 shows a square section being blended with a triangular section. A Blend Vertex is placed on a vertex of the triangle. This allows the extra surface created from the square to blend into this point.
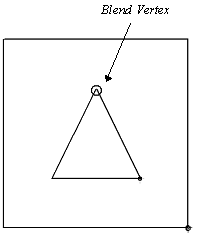
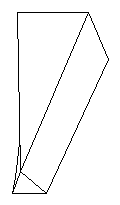
Figure 4-
Blend Vertex is
accessed in Sketcher by choosing Sketch,
Adv Geometry, Blend Vertex.
This page intentionally left blank.
Exercise 4a Blends |
Objective |
After you complete this exercise, you will be able to:
Create Blended Features
Redefine Blended Features
Modify Blended Features
Create a new part.
Create a new part called block2.
Create default datum planes.
Create the rectangular, extruded protrusion shown in Figure 4-6.
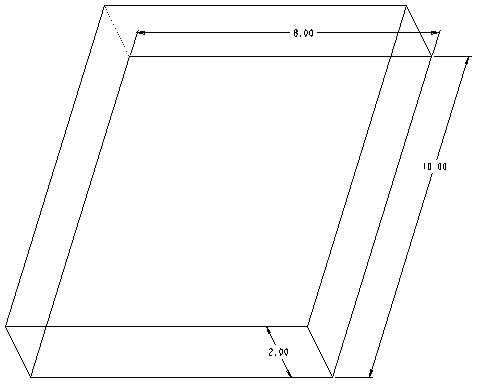
Figure 4-
Create a blended protrusion.
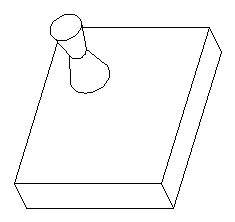
Figure 4-
Choose Feature, Create, Protrusion, Blend, Done.
Choose Done to accept the default blend options.
Choose Straight, Done.
Select a sketch plane.
Select a feature direction and then a reference plane.
Sketch, Dimension, and Regenerate the first section (a circle).
Choose Sec Tools, Toggle. The first section should be gray.
Sketch, Dimension and Regenerate the second section (a smaller circle). If the circle is sketched on the same center, there is no need to locate it.
Choose Sec Tools, Toggle until both sections are gray.
Sketch, Dimension and Regenerate the final section (a circle).
Choose Done.
Choose Blind and enter values for distances between the sections.
Redefine the straight blend to a smooth blend.
Choose Feature, Redefine and select the blend.
Double click on the Attributes element in the dialog box.
Choose Smooth, Done.
Select ![]() and
and ![]() .
.
Create a blended cut.
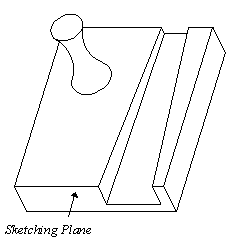
Figure 4-
Choose Feature, Create, Cut, Blend, Done.
Choose Done for blend option defaults.
Choose Straight, Done.
Select the end surface as the sketching plane.
Select a feature direction and then a reference plane.
Sketch, Dimension, Align, and Regenerate the first section.
Choose Sec Tools, Toggle.
Sketch, Dimension, Align, and Regenerate the second section.
Choose Done.
Specify the area to be removed.
Choose Thru All, Done.
Select ![]() and
and ![]() .
.
Save the part and Erase it from memory.
This page intentionally left blank.
Exercise 4b Blended Features |
Objective |
After you complete this exercise, you will be able to:
Create Base Features Using Blended Features
|
For additional practice on the topics covered in Chapter 4, see Appendix B, Exercise B6. |
Create the parts shown in Figure 4-9, Figure 4-10, and Figure 4-11.
Create the following parts using blended protrusions. In all cases, remember to use default datum planes.
|
Figure 4- |
Figure 4- |
|
Figure 4- |
Create the part shown in Figure 4-12
Create the following part. Remember to use default datum planes.
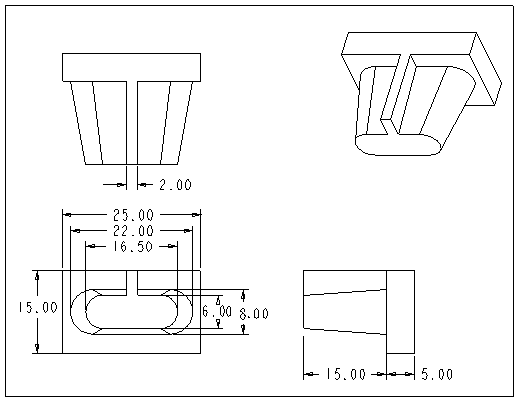
Figure 4-
|