The purpose of course work of manufacturing engineering is to test, to deepen one's knowledge and to specialize to all knowledge in practice.
In this project student deal with manufacturing engineering tasks, creatively using all theoretical knowledge attained in lectures. Student should learn to use literature: directories, standards, tables and catalogues.
The course works tasks are to precisely study assembly drawings, its parts and define service function (to draw necessary parts). Decide the type and production and manufacturing method, select the blank making process for all parts, and to develop process route for every of them. Assign machining allowance and plan one machining operation for every part. Fill in process chart forms. In procedure all process planning steps should be described. All decisions should be motivated and explained. Calculations should be complete.
Procedure:
Drawings:
1. Study the assembly drawings and define service function of the joint.
Our joint is called bearing box. It is used as bridge for transferring rotation and velocities. One shafts end is driven by proper rotation, than transferred to another end of the shaft.
Construction contains such details:
2. Study the parts drawings and define service function of the parts and purpose of different surfaces.
Shaft is used for carrying rotating machines elements and secures its constant position. In our bearing box we have transferring shaft- it always rotates and transfers moment of rotation.
Surface roughness is different on proper surface of the shaft. So it has different purposes and detail to be attached on it.
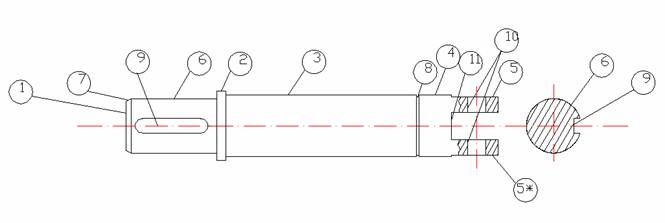
|
Surface |
Purpose | |
|
(surface nr. 1) |
end surface of the shaft | |
|
(surface nr. 2) |
nick for holding the hub. | |
|
(surface nr. 3) |
part for translation rotation, hub are attached on it. | |
|
(surface nr. 4) |
nick for not letting detail to get out | |
|
(surface nr. 5, 5*) |
surface for attachment detail, that need to be rotated | |
|
(surface nr. 6) |
part that needs the rotation to be transmissed is attached. | |
|
(surface nr. 7) |
face for easier attachment of the detail | |
|
(surface nr. 8) |
nick for the ring | |
|
(surface nr. 9) |
the wedge is putted, for good transmission of rotation. | |
|
(surface nr. 10) |
used for screw and other devices for better attachment of the part for rotation | |
|
(surface nr. 11) |
for inserting detail for rotation |
Bush is used for support the metal tube 5.
This fixing bush serves to fix inner part (shaft).

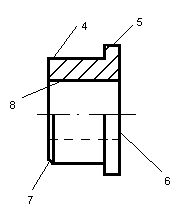
|
Surface |
Purpose |
|
Surface 1. |
Keeps the tube from the flank |
|
Surface 2. |
Round face surface |
|
Surface 3. |
Chamfer |
|
Sjurface 4. |
Supports the tube |
|
Surface 5. |
Top surface |
|
Surface 6. |
Round back surface |
|
Surface 7. |
Chamfer |
|
Surface 8. |
Surface of joining together with shaft |
Chock - a piece of wood or other material put next to cargo to prevent it from shifting. In our case it is made according to standards GOST 23360-78. It is of dimensions 8x7x40 . Chock no. 7 is put in proper gap in the shaft. It prevents of the shaft hole from slipping out in the thrust direction.
Chock "Inzinerinės mechanikos zinynas" 270page
|
Chock dimensions |
Notch dimensions |
||||
|
B x h |
Face s |
lenght |
Depth |
Face s1 |
|
|
8 x 7 |
4.0 (t1) |
3.3 (t2) | |||
Edge is used for holding bearing box, which consists of shaft, 2 hubs, pipe, wedge and ring, and it is directly attached to beam (denoted by 5) by welding according to standards T1-Δ3-15/30, with 7th surface of edge's. Height of edge is 64mm and length 130mm.
Edge is also attached to the plate (foundation of all bearing box) number 3 by welding according to standards T1-Δ3-15/30 with surface 1st in length 130mm.
It is also necessary to mention that 2 edges are used in bearing box, attached at the ends of beam no 5.
Surfaces of the edge do not play important role in bearing box - it is used for welding it to plate no3, and beam no6. So edge's roughness of surfaces is big Rz80, it is enough to cut it from sheet.
It is used as foundation for all the bearing box. It supports such details like 2 edges, shaft, 2 hubs, pipe, wedge and ring. 2 edges stand of the machine on it. Plate and 2 edges are welded by standard T1-∆3-15/30.
In our bearing box we have 1 plate. It is quadrant and its dimensions are 130x130mm. It has 4 holes of diameter 9mm. Clear plate's scheme is added to course works drawings.
Surface of the plate does not take important role in bearing box- just used for welding of 2 edges, so it roughness is big.
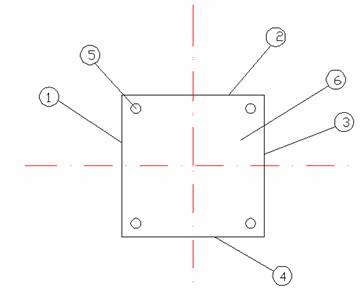
|
Surface |
Purpose | |
|
(surface nr. 1,2,3,4) |
end surface(edges) of the plate- the foundation of all the box | |
|
(surface nr. 5) |
holes for attaching box to the foundation it will stay | |
|
(surface nr. 6) |
upper surface of the plate |
Pipe
In bearing box we have 1 pipe of length 95mm. outher diameter is 60mm, inner 53.6mm, thickness of wall is 3.2mm. Pipe is the outer detail of the machine - housing. It is attached on the 2 hubs. Pipe does not let hubs to move. It is welded with hubs by standard T1-∆3-15/30.
Ring
Retaining spring flat concentric rings for shafts. It is of diameter of 34mm. It is put in proper gap in the shaft. It prevents of the shaft hole from slipping out in the thrust direction.
Bush
3. Check-up drawings: materials, dimensions, accuracy, thermal, treatment, surface roughness, and technical requirements
Shaft
For shaft used steel is 35 GOST 1050-74. It is carbonic good quality constructional steel. Marks number 35 shows mean quantity in percent hundredth part of carbon. This steel is used for thermally processed, which needs hard and strong surface. Such details surface during tempering is heated fastly by high frequency electric current (ADES) or by the flame of gas and then cooled. Standarts 35 GOST 1050 is compared with mark EN 86-70C36. The chemical composition is strictly regulated, and the damaging impurities are less than in simple steel. That's why in all cases the such mechanical properties like hardness and strength is stable. The normal magnetic properties of this type of steel will be accepted.
The chemical analyses for the product and heat analyses shall tall within the following ranges (%):
Carbon (C) 0,05 min - 0,12 max
Manganese (Mn) 0,35 min - 0,65 max
Silicon (Si) 0,17 min - 0,37 max
Chromium (Cr) - 0,10 max
Phosphorus (P) - 0,035 max
Nickel (Ni) - 0,25 max
Copper (Cu) - 0,25 max
Arsenic (As) - 0,08 max
The steel shall conform to the following minimum mechanical requirements:
Tensile strength (smax) - 330 MPa
Yield strength (s - 230 MPa
![]()
Elongation to failure (A5) - 27 %
The dimensions are represented on the fallowing picture.

|
Surface |
Dimensions |
Technical characteristic |
|
Roughness |
||
|
(surface nr. 1) |
and surface diameter Ø30-0,021 |
Rz40 |
|
(surface nr. 2) |
Length 5mm, Ø38. |
Rz80 |
|
(surface nr. 3) |
diameter Ø |
Rz20 |
|
(surface nr. 4) |
diameter Ø |
Rz20 |
|
(surface nr. 5, 5*) |
length of 26mm. |
Rz40 |
|
(surface nr. 6) |
Length 50mm, Ø30-0,021. |
Ra2.5 |
|
(surface nr. 7) |
face 1 |
Rz40 |
|
(surface nr. 8) |
depth of 0.9mm,
width |
Rz20 |
|
(surface nr. 9) |
length of 40mm,
depth |
Rz20 |
|
(surface nr. 10) |
diameter Ø |
Rz20 |
|
(surface nr. 11) |
lenght of 26mm,
width |
Rz40 |
Bush
Bush mterial is textolite PTK 20 GOST 5-72. The length of part is 20 mm. Textolite is a layered leaf electrotechnics material with a cotton base and binding thermosetting material manufactured due to pressing sopping binding material of the cotton texture, which base is formed by phenol formaldehyde resin. Becsause of its specific consist this plastic is very rigid, strike resistant and have an excellent insulating properties. The plates and sticks is compression resistant, simple drilling, cutting, punching. Textolite is wide used in the manufacture of parts, which are strongly acted by electrical or mechanical charges and friction. Textolite is simply machined by all mechanical machining methods. This material is used in the manufacture of different mechanical parts, bushing, rollers, pump rotor plates, insulating plates and so on. Parts of textolite secure low work, significantly long working time, comparatively less weight to compare with metal ones. It can be used in work with transformer oil and in the environment with temperature from
۫C to +105 ۫C.
Length of bush is 20 mm, width and height are 60 mm, so it is a small part of the joint.
Because of tolerance H11 it has enough high accuracy. It means that spread of deflections in respect to a nominal dimension is very small.
Roughness of an outer and inner surfaces is 20 and 40 correspondingly. It means, that these surfaces are not very high manufactured.
|
Surface |
Dimensions |
Technical characteristics |
|
Roughness |
||
|
Surface 1. |
Ø60 mm |
Rz20 |
|
Surface 2. |
Ø 53,6H9 mm |
Rz20 |
|
Surface 3. |
1x45ْ |
Rz20 |
|
Surface 4. |
Ø53,6H9 mm, 15 mm |
Rz20 |
|
Surface 5. |
Ø60, 5 mm |
Rz20 |
|
Surface 6. |
Ø60 mm |
Rz80 |
|
Surface 7. |
1x45ْ |
Rz20 |
|
Surface 8. |
Ø34H11 mm, 20mm |
Rz40 |
Edge
The material of the detail (edge) is used steel 4GOST 19903 - 74 / Cm3 GOST 14637 - 89.
It is carbonic simple constructional steel. Cm - is the mark of steel and it shows steels tension, how strong steel is (in our case it is 240 MPa). It is used for important part of machine elements: roller, gearings, some parts of machines of agriculture. Also welded or riveted from sheets and other profile metal, not important rollers, axles, split chucks, gears, screws, levers and other, commonly thermally not processed details, are maid from steel Cm.
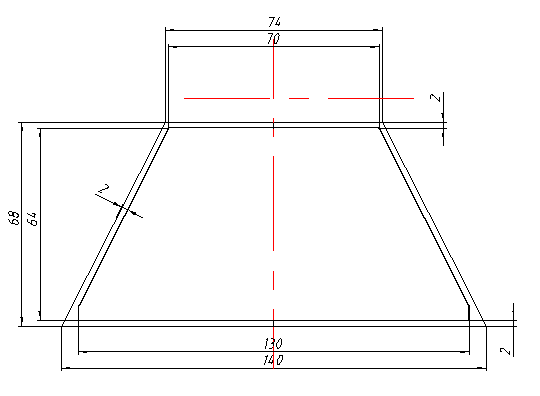
All detail dimensions and surface roughness are shown in the drawing. In our case surface roughness is Rz80 for all surfaces and it belongs to 3rd class of roughness. It means that surface is rough and does not need additional work to do, during the procedure of manufacturing of edge. Number 4 shows the thickness of the sheet, it is also denoted in the drawing by S4. Overall mass of the edge is 0.25 kg. Detail has trapezium shape, and is rigid for mechanical manufacturing. Edge is simple to manufacture because all surfaces are easily processed and it's accuracy class is not high (do not need extra operations). During all manufacturing process we use universal tools. Detail is connected to others by welding according to standards T1-Δ3-15/30. 2 edges should be made to complete assembly and annual output should be 600. We manufacture a little bit more due to failures.
The chemical composition of simple constructive steels. Quantities are given in %.
|
C |
Mn |
Si |
Cr |
Ni |
S |
P |
Cu |
As |
N |
|
< |
< |
< |
< |
< |
< |
< |
Due to standards there may be some chemical composition deviations.
Sheets are made using hot rolling method.
Mechanical properties of steel (GOST 14637 - 89):
|
limit of strenght Rm, N/mm2 |
Relative extand |
Yield point Rch, N/mm2 |
Plate
For plate used steel is ![]() .
.
It is carbonic simple
constructional steel. ![]() - is the mark of steel and it shows steels tension, how
strong steel is. It is used for important part of machine elements: roller,
gearings, some parts of machines of agriculture. Also welded or riveted from
sheets and other profile metal, not important rollers, axles, split chucks,
gears, screws, levers and other, commonly thermally not processed details, are
maid from steel
- is the mark of steel and it shows steels tension, how
strong steel is. It is used for important part of machine elements: roller,
gearings, some parts of machines of agriculture. Also welded or riveted from
sheets and other profile metal, not important rollers, axles, split chucks,
gears, screws, levers and other, commonly thermally not processed details, are
maid from steel![]() .
.
Number 6 shows the thickness of sheet.
Chemical composition %
|
C |
Mn |
Si |
Cr |
Ni |
S |
P |
Cu |
As |
N |
|
< |
< |
< |
< |
< |
< |
< |
Due to standart there may be some chemical compositions devation.
Mechanical properties:
|
limit of strenght Rm, N/mm2 |
Relative extand |
Yield point Rch, N/mm2 |
The roughness of plate is ![]() for all the surface.
It means that surface is rough and does not need additional procedures during
the production of plate.
for all the surface.
It means that surface is rough and does not need additional procedures during
the production of plate.
The dimensions are represented on the fallowing picture.
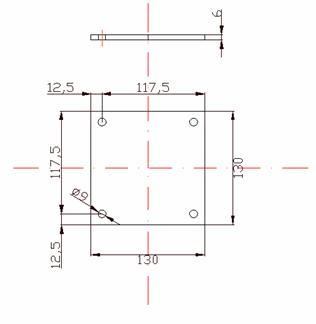
|
Surface |
Dimensions |
Technical characteristic |
|
Roughness |
||
|
(surface nr. 1,2,3,4) |
all edges are of 130mm lenght |
Rz80 |
|
(surface nr. 5) |
diameter Ø9mm |
Rz80 |
|
(surface nr. 6) |
130x130mm |
Rz80 |
Pipe
For pipe used steel is DIN59410. This standard applies to seamless or welded hot formed steel, used primarily for structural steel engineerng.
The outer pipes surface roughness is not important, so we take it Rz80. it is rough and no additional processing is needed. Inner surface roughness is Rz20. It is enough rough.
Ring
The material used for ring is A34 GOST 13940-86
There are represented dimentions of the ring.
|
Conditional D of the ring (D of the shaft) |
Ring | ||||||||||
|
|
|
s |
b |
l |
|
m H13 |
h, no less than |
Permissible axial load, kN |
|||
|
Nominal |
Limitary deviation |
Nominal |
Limitary deviation |
||||||||
4.Analyze the assembly and part drawings for corresponding the manufacturing requirements (design for manufacture or productivity).
As was mentioned previously our bearing box is used as bridge for transferring rotation and velocities. One shafts end is driven by proper rotation, than transferred to another end of the shaft. In order to improve the rotation bearing may be used. They should be attached to the shaft and in the hub. Then no additional lubrication will be needed, as they are needed in this construction of project now.
5. Decide the type of production and manufacturing method.
We need to make 300 pieces of bearing box. There are needed 2 details
like edge and hub in the bearing box. So we need to make twice of them ![]() pieces. 600 pieces are
referred to the medium-lot production.
pieces. 600 pieces are
referred to the medium-lot production.
300 bearing boxes are refered to the small-lot production. Small-lot production makes use of universal equipment, universal tooling and measurement means.
Bearing box mass is:
![]()
|
quantity to produce, units |
mass of product, kg |
type of production |
|
small lot production |
6. Select the blank making process for all parts.
Shaft
The sold bars of 35 GOST1050-74 are sold of such parameters:
|
diameter, mm |
max length, mm |
Need to mention, that bars can be sold in needed length.
The needed deviations are:
deviation
for the end milling is 2.5mm so - ![]()
deviation for the saw is 2.5mm
the deviation for last detail attachment is 40mm
So first and subsequent blanks parameter are: 205mm+5mm=210mm
The lasts blanks parameters are: 205mm+5mm+40mm=245
The blanks of the shaft example:

Calculation of 14 bars length:
![]()
So lost metals length is:
![]()
The number of needed bars of length of 3000mm is:
![]()
We take 21 bar length of 3000mm, so we get ![]() . It is not enough (we need 6more detais), so we take one
more bar length of
. It is not enough (we need 6more detais), so we take one
more bar length of
![]()
During economical calculations the decision is to take:
21bars of length 3000mm
1 bar of length 1300mm
Bush
|
Diameter, mm |
Max length, mm |
After each manufactured part we cutting it off, so the length of all blank, attached in chuck of the lathe, becomes smaller by the length of the machined part (20)+allowance (1)+ cutter edge length (3)= 24 (mm).
Drawings of the blank
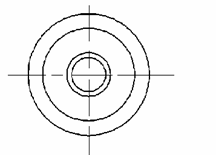
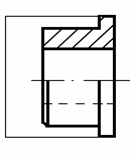
Edge
Edge 771.13 - 1.5 - 04 blank making process.
Detail's (edge) material - steel Cm3GOST14637, thickness of the edge is 4mm. Choosing standard hot rolled steel sheet B4GOST19903/Cm3GOST14637 of dimensions 710 x 2000 mm. Specimen should be cut of the sheet using plasma cutting device. From 1 sheet it is possible to make 160 details, 10 x 16 = 160 details/sheet. So we need to buy 4 sheets of this kind. The output will be 640 details, 40 details leaves due to possible failures.

Core
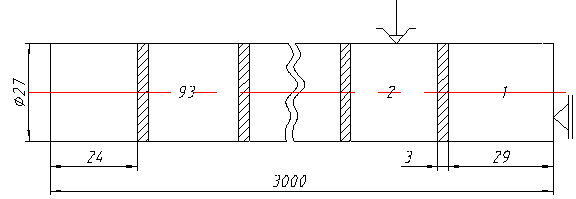
Core's material is steel Cm3GOST380. Detail's maximum diameter is M24x1. For core manufacturing choosing standard hot rolled beam B27GOST2590/Cm5GOST380 of dimensions: in length 3000 and diameter 27 mm. Detail (core) will be simply made just from beam using turning turret machine, this method is efficient and cheap because we do not need high accuracy of surfaces (all surfaces should be Ra6.3). From 1 beam it is possible to make 93 details, so we will need 4 beams.
Plate
The sold sheets of ![]() are sold of such parameters:
are sold of such parameters:
|
Thickness of sheet, mm |
length of sheet, mm |
width of sheet, mm |
Need to mention, that sheets can be sold in needed length and width.
Chosen deviation for processing (p. 44):
|
diameter of worksheet, mm |
deviation |
inpendicularities of axis of endings |
cutting method |
|
guillotine scissors |
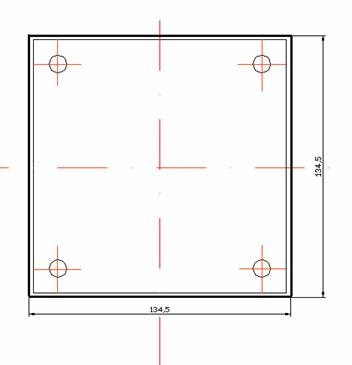
The blank and dimensions are represented on the fallowing picture.
7. Develop part process route for every part.
Shaft
Detail shaft 771.13-1.5-01 is made by medium-lot production, from steel 35GOST 1050-74.
Shaft technological way
|
operation nr. |
operation |
machine |
device |
tool |
|
Cutting long bars of 3000mm and 1300mm into length of 210mm. Rods diameters Ø40mm |
knife- machine 872 |
on bolster and clamped with catch |
cutting saw 2800-0034 GOST 6645-86 |
|
|
Rough milling off 2.5mm from every end (surface nr. 1) Rz40. from 210mm till 205mm by 2 pass Centering hole length of 6.3mm on shaft blank endings (surface nr. 1) |
milling centering semiautomatic 4815 |
Catch |
mill 2214-0001 GOST 24359-80 centering drill 2317-0108 GOST 14952-75 |
|
|
Rough turning off 1mm (surface 2) Rz80. from Ø40mm till Ø38mm by 1 pass. L=205mm Rough and smooth turning off 2mm (surface 3, 4) Rz20 Rought from Ø38mm till Ø35mm Smooth from Ø35mm till Ø34mm L=150mm Turning off 4mm (surface 6) Rough turning from Ø38mm till Ø31mm (2pass) Smooth turning from Ø31mm till Ø30mm (1pass); L=50mm Turning of 2x45° chamfer (surface nr. 7) Rz40 Smooth turning groove (surface 8) Rz20 from Ø34mm till Ø32.2mm by 2pass |
lathe 16K40 |
2 centers and the collet is used |
knife 2102-0056 T15K6 GOST 18877-73 knife2101-0052 T5K10 GOST 18879-73 JVGR/L100F |
|
|
wash | ||||
|
control |
ШЦ-3-250-0,05 GOST 166-89 | |||
|
Milling groove off 4mm depth (surface 9) Rz20 by 2pass, L=40 keeping diameter Ø30mm. |
vertical contilever milling machine 6T11 |
basing with prism and with pneumatic clamps |
pirstine freza 2220-0445 GOST 17025-71 |
|
|
Milling off 0.9mm from sides (surface no.5) Rz40 by 1pass. Rotating detail by angle of 180º and milling again 0.9mm by 1 pass. L=17.6mm (surface no. 5*) Drilling hole diameter Ø10mm (surface no. 10) Rz40 L= 32.2mm |
vertical contilever milling machine 6T11 |
basing with prism and with pneumatic clamps |
Freza 2200-0131 GOST3752-71 PSL 190 10 1GOST 4010-77 |
|
|
Milling of gap (surface no. 11) Rz40 L=17.6, width 15mm |
6T82Г |
basing with prism and with pneumatic clamps |
Discal mill 2240-0210 Js7D8 GOST 3577-78 |
|
|
Polishing to get Rz20 off drilled hole (surface nr. 10) Polishing to get milling gaps width 15 (to take away 0.5mm from every side) Rz 40 (surface nr. 11) |
Inner surface polishing machine 3K225B |
pneumatic clamps |
lap 1A401-K lap 1A50CM2-K |
|
|
wash | ||||
|
control |
Calliper ШЦ-2-250-0,05 GOST 166-89 Calliper ШЦ-3-250-0,05 GOST 166-89 |
Bush
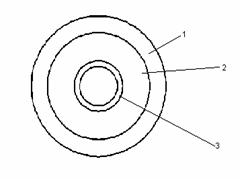

|
Operation NR. |
Operation |
Equipment |
Device |
Tool |
|
Centering d=5 mm, L=5 mm; Drilling hole 8 to d=32 mm, L=21 mm; Boring hole 8 from d=32 mm to d=34 H11 mm, L=21 mm, Rz=40; Turning surface 4 from d=60 mm to d= L=15, Rz20; Chamfer 7 and 3, 1x45 ; ْ Cutting off the part L=20 mm |
Lathe 1M63 |
chuck |
Auger ГОСТ 10903-77 (d=32mm) Boring cutter ГО Cutter for turning surfaces step-by-step ГОСТ 18879-73 Cutter for remove chamfers Cutter ГОСТ 18884-73 a 3-8 mm |
|
|
Chamfer 3` 1x45 ۫ |
Lathe 1M63 |
chuck |
Cutter for remove chamfers |
|
|
Washing | ||||
|
Technical control |
Plate
Detail plate 771.13-1.5-03 is made by medium-lot production, from sheets![]() .
.
Plate technological way
|
operation nr. |
operation |
machine |
device |
tool |
|
cutting sheet into quadrates of dimensions 134.5mm (surface nr. 1,2,3,4) Rz80 |
guillotine scissors DHGM 3020 |
pneumatiniais spaustuvais |
scissors |
|
|
milling edges off 2.25mm of the blank by 2 pass (surface no. 1,2,) Rz80 milling edges off 2.25mm of the blank by 2 pass (surface no. 3,4) Rz80 |
6T11 |
pneumatiniais spaustuvais | ||
|
010- drilling 4 holes diameter Ø9mm (surface no. 5) Rz40 |
2H135-1 |
pneumatiniais spaustuvais |
9 1 GOST 4010-77 |
|
|
| ||||
|
Control |
Edge
Edge 771.13-1.5-04
|
Operation No. |
Operation |
Machine |
Device |
Used instrument |
|
Blank making of dimensions 74±1, 68±1, 140±1 |
PLS-6001/20P | |||
|
Milling Milling surface 1, in length 140 in high from 68 to 66. Milling surface 2, in high 5 in length from 140 to 135. Milling surface 3 in depth 2, in length 68. |
Programmable vertical milling machine M-230 |
Pneumatic press |
End mill Ø63-P18 GOST 17026-71 |
|
|
Milling Mill surface 4 in high from 66 to 64 in length 72. Mill surface 5 in depth 2 & length 66. Mill surface 6 in high 5, length from 135 to 130. |
Programmable vertical milling machine M-230 |
Pneumatic press |
End mill Ø63-P18 GOST 17026-71 |
|
|
Mill surface 7 R30, in high 74. |
Vertical milling machine 6P10 |
Pneumatic press |
Mill F60 GOST 16231 |
|
|
Washing | ||||
|
Technical control of dimensions |
Digital measu- ring device | |||
|
Covering surface of edge by anticorrosion layer |
Core
Core 1.25.00.07
|
Operation no. |
Operation |
Machine |
Device |
Used instrument |
|
Turning Surface 0, cutting end of detail. Turning surface 1 (M24x1) from Ø27 to Ø26 in length 30. Turning surface 2 (Ø15) 5times from Ø26 to Ø16 in length 13. Turning surface 3 (Ø8.5) 4times, from Ø16 to Ø9 in length 2. Turning chamfer 6, 3x45º Smooth turning Turning surface 0, smoothly turning chamfer 45º. Smoothly turning surface 3 (Ø8.5) from Ø9 to Ø8.5 in length 2. Smoothly turning surface 2 (Ø15) from Ø16 to Ø15 in length 13. Smoothly turning chamfer 6, 3x45º. Smoothly turning surface 1 from Ø26 to Ø25 (2 times) in length 12. Centering hole Ø6. Drilling 5th hole Ø6 in length 30. Smoothly turning inside chamfer 45º. |
Turning turret -machine 1A340 |
Spring - liner. |
Knife T15K6 GOST18880 Smooth turning knife T15K68-10 GOST 18881 Knife T15K6 GOST18879 Inclined turning knife T15K6 GOST18875 Centring drill P9M6 Ø6- Ø3.15 Drill Ø6-P18 |
|
|
Turning Turning surface 0'. Turning surface 4 from Ø26 to Ø23 in length 2.5. Smoothly turning surface 0'. Smoothly turning surface 4 from Ø23 to Ø22 (2times) in length 2.5. Threading M24x1 surface 1 from Ø25 to Ø23.9 Turning hole 7 from Ø12 to Ø11 in length 6. Turning chamfer 8th 1x45º. Turning surface 10, 3 chamfers 0.5x45º. Smoothly turning hole 7 from Ø11 to Ø12 in length 6. Smoothly turning 8 chamfer. Smoothly turning 10th surface 3 chamfer 0.5 x 45º. |
Turning turret - machine 1A340 Turning threading machine 1A616 |
Spring - liner. Pneumatic press GOST5410 |
T15K6 GOST18880 T15K6 GOST18879 Smooth turning knife T15K68 GOST 18879 T15K6 GOST18884 Thread chaser M24x1-P18 GOST9740 |
|
|
Technical control | ||||
|
Milling notch surface 9, width 6 in length 2. |
Vertical milling machine 6P10 |
Pneumatic press GOST14904 |
End mill Ø6- P18 GOST17025 |
|
|
Washing | ||||
|
Technical Control |
Universal digital measuring device | |||
|
Covering by anticorrosion layer Zn 12mkm. |
8. Assign machining allowances for every part
|
Operation |
Initial dimension, mm |
Final dimension, mm |
Allowance, mm |
Accuracy, mm |
Roughness µm |
|
010-end milling 2.5mm (surface no. 1) 1pass- rough 2pass-rough |
Rz80 Rz40 |
||||
|
015-turning(surface no.2) 1pass-rough |
Rz80 |
||||
|
015- turning(surface no. 3 and 4) 1pass- rough 2pass-smooth |
Rz80 Rz20 |
||||
|
015- turning (surface no. 6) 1pass- rough 2pass- rough 3pass-smooth |
Rz80 Rz80 Rz15(Ra2.5) |
||||
|
015- turning 45º angle (surface no. 7) 1pass-rough |
Rz40 |
||||
|
015 turning groove (surface no.8) 1pass- smooth 1pass- smooth |
Rz20 Rz20 |
||||
|
030-milling (surface no.9) 1pass- rough 3pass- smooth |
Rz40 Rz20 |
||||
|
030- rough milling (surface no.5, 5*) 1pass- rough |
Rz40 |
Bush
|
Operation |
Initial dimension, mm |
Final dimension, mm |
Allowance, mm |
Accuracy |
Roughness, µm |
|
005 centering 5 mm | |||||
|
drilling hole 2 x pass 1-rough |
Rz80 |
||||
|
boring hole 2-smooth |
Rz20 |
||||
|
turning surface 4 2 x pass 1-rough |
Rz20 |
||||
|
Turning surface 4 2-smooth |
Ø |
Rz20 |
Turning cutters provide the necessary roughnesses of surfaces such as Rz20 and Rz40. Therefore it does no require additional treatments to be made.
Because of good properties of textolite blank material and lack of importance surfaces 1,2,5,6 it do not require any treatment to be made.
Cutter ГОСТ 18884-73 has width a=3-8 mm,we can take a=3 to provide less losses of material during manufacture. It means that we will loss 3 mm of material with each finished bush during the cutting off from the blank.
Plate
|
Operation |
Initial dimension, mm |
Final dimension, mm |
Allowance, mm |
Accuracy, mm |
Roughness µm |
|
milling (surface no. 1,2) and (surface no. 3,4) 1pass- milling 2pass- milling |
IT16 IT16 |
Rz80 Rz80 |
|||
|
010- drilling holes diameter Ø9mm (surface no. 5) |
IT12 |
Rz40 |
Edge
Allowances for edge 771.13-1.5-04
|
Surface |
Initial |
Final |
Allowance |
Accuracy |
Roughness |
|
Milling Milling Milling |
h14 h14 h14 |
Rz80 Rz80 Rz80 |
Core
|
Surface |
Initial |
Final |
Allowance |
Accuracy |
roughness |
|
M24x1 (1) Turning Smooth turning Turning Smooth turning Smooth turning Smooth turning (5) Centering drilling Turning Smooth turning 9 surface Milling |
h14 h14 h14 h14 h14 h14 H14 H14 H14 H14 H14 |
Plan one machining operation for every part.
OPERATION NR. 10
Milling operation
Machine - centering milling semiautomatics 4815
Device - the workpiece is on bolsters and clamped with catch
Tool for milling is end pull-on mill 2214-0001 GOST 24359-80, diameter D=100mm, number of teeth z=8
Rought milling from every end depth of 2.5mm
Calculation of minutely feed mm/min:
![]()
![]()
here s- feed for one mills revolution, mm/rev;
n- frequency of a mill rotation, rev/min:
![]()
![]() rev/min
rev/min
Cutting speed [m/min] for milling is found according to this formula:
![]()
![]()
![]() - coefficient,
evaluating:
- coefficient,
evaluating:
![]() - influence of workpiece material
- influence of workpiece material
![]() - influence of surface
state
- influence of surface
state
![]() - influence of tool
material
- influence of tool
material
![]() - coeficient depending on milling material and processing
conditions
- coeficient depending on milling material and processing
conditions
D - milling diameter
T- average stability of tool of normal gradual working =180min, when mills diameter=100mm
t - depth of cut
![]() - pass for 1 tooth
- pass for 1 tooth
B - milling width
z - teeth number of mill
q,m,x,y,u,p- - degree index
![]()
q=0.25
x=0.1
y=0.2
u=0.15
p=0
m=0.2
B=40
D=100
![]() m/min
m/min
![]()
Coefficients ![]() calculations
calculations
![]()
![]() =
= 
![]() - coefficient depending on tool material and egual to 1.0,
because chosen tool is knife 2102-0056 T15K6 GOST 18877-73, and it inserts are
of hard-alloy.
- coefficient depending on tool material and egual to 1.0,
because chosen tool is knife 2102-0056 T15K6 GOST 18877-73, and it inserts are
of hard-alloy.
![]() - degree index =1.0
- degree index =1.0
![]()
![]()
![]() , because no skin is on workpiece
, because no skin is on workpiece
![]() =1.0, because tool T15K6 is of constructional steel
=1.0, because tool T15K6 is of constructional steel
![]()
Rought milling from every end depth of 0.5mm
Calculation of minutely feed mm/min:
![]()
![]()
here s- feed for one mills revolution, mm/rev;
n- frequency of a mill rotation, rev/min:
![]()
![]() rev/min
rev/min
Cutting speed [m/min] for milling is found according to this formula:
![]()
![]()
![]() - coefficient,
evaluating:
- coefficient,
evaluating:
![]() - influence of workpiece material
- influence of workpiece material
![]() - influence of surface
state
- influence of surface
state
![]() - influence of tool
material
- influence of tool
material
![]() - coeficient depending on milling material and processing
conditions
- coeficient depending on milling material and processing
conditions
D - milling diameter
T- average stability of tool of normal gradual working =180min, when mills diameter=100mm
t - depth of cut
![]() - pass for 1 tooth
- pass for 1 tooth
B - milling width
z - teeth number of mill
q,m,x,y,u,p- - degree index
![]()
q=0.25
x=0.1
y=0.2
u=0.15
p=0
m=0.2
B=40
D=100
![]() m/min
m/min
![]()
Coefficients ![]() calculations
calculations
![]()
![]() =
= 
![]() - coefficient depending on tool material and egual to 1.0, because
chosen tool is knife 2102-0056 T15K6 GOST 18877-73, and it inserts are of hard-alloy.
- coefficient depending on tool material and egual to 1.0, because
chosen tool is knife 2102-0056 T15K6 GOST 18877-73, and it inserts are of hard-alloy.
![]() - degree index =1.0
- degree index =1.0
![]()
![]()
![]() , because no skin is on workpiece
, because no skin is on workpiece
![]() =1.0, because tool T15K6 is of constructional steel
=1.0, because tool T15K6 is of constructional steel
![]()
Centering operation
Machine - centering milling semiautomatics 4815
Device - the workpiece is on bolsters and clamped with catch
Tool for centering is chosen drill 2317-0108 GOST 14952-75
Centering both ends:
Cutting speed [m/min] for drilling is found according to this formula:
![]()
![]()
q=0.4
x=0.2
y=0.5
m=0.2
s=0.1
T=8min
D=5
![]()
Cutting depth :
![]()
![]()
![]()
OPERATION NR. 15
Machine - lathe 16K40
Device- the workpiece is between 2 centers
Tool- hooked turning knife with a hard-alloy plates T15K6,GOST 18877-73, cross-section of the stem 25x16, the length of tool L=140mm
Rough turning of the surface 2:
Surface 2, L=205mm from 40mm to 38mm
Cutting depth:
![]()
here d- diameter of the blank after machining
D-diameter of the blank before machining
Calculation of minutely feed mm/min:
![]()
here s- feed for one revolution, mm/rev;
n- frequency of a blank, rev/min:
![]()
Calculation of a cutting velocity for turning, m/min:
![]()
here:
![]() - coefficient, depending on path
- coefficient, depending on path
T - average stability of tool of normal gradual working, =60min
m, x, y - degree index, x=0.15; m=0.20; y- depend path
t - depth of cut
s - path
![]() - coefficient,
evaluating:
- coefficient,
evaluating:
![]() - influence of workpiece material
- influence of workpiece material
![]() - influence of surface
state
- influence of surface
state
![]() - influence of tool
material
- influence of tool
material
Coefficients ![]() calculations
calculations
![]()
![]() =
= 
![]() - coefficient depending on tool material and egual to 1.0,
because chosen tool is knife 2102-0056 T15K6 GOST 18877-73, and it inserts are
of hard-alloy.
- coefficient depending on tool material and egual to 1.0,
because chosen tool is knife 2102-0056 T15K6 GOST 18877-73, and it inserts are
of hard-alloy.
![]() - degree index =1.0
- degree index =1.0
![]()
![]()
![]() , because no skin is on workpiece
, because no skin is on workpiece
![]() =1.0, because tool T15K6 is of constructional steel
=1.0, because tool T15K6 is of constructional steel
![]()
![]() m/min
m/min
Coefficient and indexes selected from the tables:
t = 1.0mm
s= 0.5mm/rev
![]() =350
=350
y = 0.35
Rough turning of the surface 3 and 4:
Surface 3and 4, L=122.6mm from 38mm to 35mm
Cutting depth:
![]()
here d- diameter of the blank after machining
D-diameter of the blank before machining
Calculation of minutely feed mm/min:
![]()
here s- feed for one revolution, mm/rev;
n- frequency of a blank, rev/min:
![]()
Calculation of a cutting velocity for turning, m/min:
![]()
here:
![]() - coefficient, depending on path
- coefficient, depending on path
T - average stability of tool of normal gradual working, =60min
m, x, y - degree index, x=0.15; m=0.20; y- depend path
t - depth of cut
s - path
![]() - coefficient, evaluating:
- coefficient, evaluating:
![]() - influence of workpiece material
- influence of workpiece material
![]() - influence of surface
state
- influence of surface
state
![]() - influence of tool
material
- influence of tool
material
Coefficients ![]() calculations
calculations
![]()
![]() =
= 
![]() - coefficient depending on tool material and egual to 1.0,
because chosen tool is knife2101-0052 T5K10 GOST 18879-73, and it inserts are
of hard-alloy.
- coefficient depending on tool material and egual to 1.0,
because chosen tool is knife2101-0052 T5K10 GOST 18879-73, and it inserts are
of hard-alloy.
![]() - degree index =1.0
- degree index =1.0
![]()
![]()
![]() , because no skin is on workpiece
, because no skin is on workpiece
![]() =0.65, because tool T5K10 is of constructional steel
=0.65, because tool T5K10 is of constructional steel
![]()
![]() m/min
m/min
Coefficient and indexes selected from the tables:
t = 1.5mm
s= 0.5mm/rev
![]() =350
=350
y = 0.35
Smooth turning of the surface 3 and 4:
Surface 3and 4, L=122.6mm from 35mm to 34mm
Cutting depth:
![]()
here d- diameter of the blank after machining
D-diameter of the blank before machining
Calculation of minutely feed mm/min:
![]()
here s- feed for one revolution, mm/rev;
n- frequency of a blank, rev/min:
![]()
Calculation of a cutting velocity for turning, m/min:
![]()
here:
![]() - coefficient, depending on path
- coefficient, depending on path
T - average stability of tool of normal gradual working, =60min
m, x, y - degree index, x=0.15; m=0.20; y- depend path
t - depth of cut
s - path
![]() - coefficient,
evaluating:
- coefficient,
evaluating:
![]() - influence of workpiece material
- influence of workpiece material
![]() - influence of surface
state
- influence of surface
state
![]() - influence of tool
material
- influence of tool
material
Coefficients ![]() calculations
calculations
![]()
![]() =
= 
![]() - coefficient depending on tool material and egual to 1.0,
because chosen tool is knife2101-0052 T5K10 GOST 18879-73, and it inserts are
of hard-alloy.
- coefficient depending on tool material and egual to 1.0,
because chosen tool is knife2101-0052 T5K10 GOST 18879-73, and it inserts are
of hard-alloy.
![]() - degree index =1.0
- degree index =1.0
![]()
![]()
![]() , because no skin is on workpiece
, because no skin is on workpiece
![]() =0.65, because tool T5K10 is of constructional steel
=0.65, because tool T5K10 is of constructional steel
![]()
![]() m/min
m/min
Coefficient and indexes selected from the tables:
t = 0.5mm
s= 0.5mm/rev
![]() =350
=350
y = 0.35
Rough turning of the surface 6:
Surface 6, L=50mm from 38mm to 34mm
Cutting depth:
![]()
here d- diameter of the blank after machining
D-diameter of the blank before machining
Calculation of minutely feed mm/min:
![]()
here s- feed for one revolution, mm/rev;
n- frequency of a blank, rev/min:
![]()
Calculation of a cutting velocity for turning, m/min:
![]()
here:
![]() - coefficient, depending on path
- coefficient, depending on path
T - average stability of tool of normal gradual working, =60min
m, x, y - degree index, x=0.15; m=0.20; y- depend path
t - depth of cut
s - path
![]() - coefficient,
evaluating:
- coefficient,
evaluating:
![]() - influence of workpiece material
- influence of workpiece material
![]() - influence of surface
state
- influence of surface
state
![]() - influence of tool
material
- influence of tool
material
Coefficients ![]() calculations
calculations
![]()
![]() =
= 
![]() - coefficient depending on tool material and egual to 1.0,
because chosen tool is knife2101-0052 T5K10 GOST 18879-73, and it inserts are
of hard-alloy.
- coefficient depending on tool material and egual to 1.0,
because chosen tool is knife2101-0052 T5K10 GOST 18879-73, and it inserts are
of hard-alloy.
![]() - degree index =1.0
- degree index =1.0
![]()
![]()
![]() , because no skin is on workpiece
, because no skin is on workpiece
![]() =0.65, because tool T5K10 is of constructional steel
=0.65, because tool T5K10 is of constructional steel
![]()
![]() m/min
m/min
Coefficient and indexes selected from the tables:
t = 2.0mm
s= 0.5mm/rev
![]() =350
=350
y = 0.35
Rough turning of the surface 6:
Surface 6, L=50mm from 34mm to 31mm
Cutting depth:
![]()
here d- diameter of the blank after machining
D-diameter of the blank before machining
Calculation of minutely feed mm/min:
![]()
here s- feed for one revolution, mm/rev;
n- frequency of a blank, rev/min:
![]()
Calculation of a cutting velocity for turning, m/min:
![]()
here:
![]() - coefficient, depending on path
- coefficient, depending on path
T - average stability of tool of normal gradual working, =60min
m, x, y - degree index, x=0.15; m=0.20; y- depend path
t - depth of cut
s - path
![]() - coefficient,
evaluating:
- coefficient,
evaluating:
![]() - influence of workpiece material
- influence of workpiece material
![]() - influence of surface
state
- influence of surface
state
![]() - influence of tool
material
- influence of tool
material
Coefficients ![]() calculations
calculations
![]()
![]() =
= 
![]() - coefficient depending on tool material and egual to 1.0,
because chosen tool is knife2101-0052 T5K10 GOST 18879-73, and it inserts are
of hard-alloy.
- coefficient depending on tool material and egual to 1.0,
because chosen tool is knife2101-0052 T5K10 GOST 18879-73, and it inserts are
of hard-alloy.
![]() - degree index =1.0
- degree index =1.0
![]()
![]()
![]() , because no skin is on workpiece
, because no skin is on workpiece
![]() =0.65, because tool T5K10 is of constructional steel
=0.65, because tool T5K10 is of constructional steel
![]()
![]() m/min
m/min
Coefficient and indexes selected from the tables:
t = 1.5mm
s= 0.5mm/rev
![]() =350
=350
y = 0.35
Smooth turning of the surface 6:
Surface 6, L=50mm from 31mm to 30mm
Cutting depth:
![]()
here d- diameter of the blank after machining
D-diameter of the blank before machining
Calculation of minutely feed mm/min:
![]()
here s- feed for one revolution, mm/rev;
n- frequency of a blank, rev/min:
![]()
Calculation of a cutting velocity for turning, m/min:
![]()
here:
![]() - coefficient, depending on path
- coefficient, depending on path
T - average stability of tool of normal gradual working, =60min
m, x, y - degree index, x=0.15; m=0.20; y- depend path
t - depth of cut
s - path
![]() - coefficient,
evaluating:
- coefficient,
evaluating:
![]() - influence of workpiece material
- influence of workpiece material
![]() - influence of surface
state
- influence of surface
state
![]() - influence of tool
material
- influence of tool
material
Coefficients ![]() calculations
calculations
![]()
![]() =
= 
![]() - coefficient depending on tool material and egual to 1.0,
because chosen tool is knife2101-0052 T5K10 GOST 18879-73, and it inserts are
of hard-alloy.
- coefficient depending on tool material and egual to 1.0,
because chosen tool is knife2101-0052 T5K10 GOST 18879-73, and it inserts are
of hard-alloy.
![]() - degree index =1.0
- degree index =1.0
![]()
![]()
![]() , because no skin is on workpiece
, because no skin is on workpiece
![]() =0.65, because tool T5K10 is of constructional steel
=0.65, because tool T5K10 is of constructional steel
![]()
![]() m/min
m/min
Coefficient and indexes selected from the tables:
t = 0.5mm
s= 0.5mm/rev
![]() =350
=350
y = 0.35
Rough turning of the surface 7:
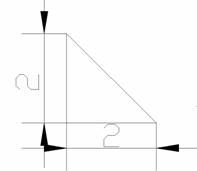
Surface 7, L=2, from 30mm to 28mm
Cutting depth:
![]()
here d- diameter of the blank after machining
D-diameter of the blank before machining
Calculation of minutely feed mm/min:
![]()
here s- feed for one revolution, mm/rev;
n- frequency of a blank, rev/min:
![]()
Calculation of a cutting velocity for turning, m/min:
![]()
here:
![]() - coefficient, depending on path
- coefficient, depending on path
T - average stability of tool of normal gradual working, =60min
m, x, y - degree index, x=0.15; m=0.20; y- depend path
t - depth of cut
s - path
![]() - coefficient,
evaluating:
- coefficient,
evaluating:
![]() - influence of workpiece material
- influence of workpiece material
![]() - influence of surface
state
- influence of surface
state
![]() - influence of tool
material
- influence of tool
material
Coefficients ![]() calculations
calculations
![]()
![]() =
= 
![]() - coefficient depending on tool material and egual to 1.0,
because chosen tool is knife 2101-0052 T5K10 GOST 18879-73, and it inserts are
of hard-alloy.
- coefficient depending on tool material and egual to 1.0,
because chosen tool is knife 2101-0052 T5K10 GOST 18879-73, and it inserts are
of hard-alloy.
![]() - degree index =1.0
- degree index =1.0
![]()
![]()
![]() , because no skin is on workpiece
, because no skin is on workpiece
![]() =0.65, because tool T5K10 is of constructional steel
=0.65, because tool T5K10 is of constructional steel
![]()
![]() m/min
m/min
Coefficient and indexes selected from the tables:
t = 1.0mm
s= 0.5mm/rev
![]() =350
=350
y = 0.35
Smooth turning of the surface 8:
Surface 8, L=50mm from 34mm to 33.1mm
Cutting depth:
![]()
here d- diameter of the blank after machining
D-diameter of the blank before machining
Calculation of minutely feed mm/min:
![]()
here s- feed for one revolution, mm/rev;
n- frequency of a blank, rev/min:
![]()
Calculation of a cutting velocity for turning, m/min:
![]()
here:
![]() - coefficient, depending on path
- coefficient, depending on path
T - average stability of tool of normal gradual working, =60min
m, x, y - degree index, x=0.15; m=0.20; y- depend path
t - depth of cut
s - path
![]() - coefficient,
evaluating:
- coefficient,
evaluating:
![]() - influence of workpiece material
- influence of workpiece material
![]() - influence of surface
state
- influence of surface
state
![]() - influence of tool
material
- influence of tool
material
Coefficients ![]() calculations
calculations
![]()
![]() =
= 
![]() - coefficient depending on tool material and egual to 1.0,
because chosen tool is knife2101-0052 T5K10 GOST 18879-73, and it inserts are
of hard-alloy.
- coefficient depending on tool material and egual to 1.0,
because chosen tool is knife2101-0052 T5K10 GOST 18879-73, and it inserts are
of hard-alloy.
![]() - degree index =1.0
- degree index =1.0
![]()
![]()
![]() , because no skin is on workpiece
, because no skin is on workpiece
![]() =0.65, because tool T5K10 is of constructional steel
=0.65, because tool T5K10 is of constructional steel
![]()
![]() m/min
m/min
Coefficient and indexes selected from the tables:
t = 0.9mm
s= 0.5mm/rev
![]() =350
=350
y = 0.35
Smooth turning of the surface 8:
Surface 8, L=50mm from 33.1mm to 32.2mm
Cutting depth:
![]()
here d- diameter of the blank after machining
D-diameter of the blank before machining
Calculation of minutely feed mm/min:
![]()
here s- feed for one revolution, mm/rev;
n- frequency of a blank, rev/min:
![]()
Calculation of a cutting velocity for turning, m/min:
![]()
here:
![]() - coefficient, depending on path
- coefficient, depending on path
T - average stability of tool of normal gradual working, =60min
m, x, y - degree index, x=0.15; m=0.20; y- depend path
t - depth of cut
s - path
![]() - coefficient,
evaluating:
- coefficient,
evaluating:
![]() - influence of workpiece material
- influence of workpiece material
![]() - influence of surface
state
- influence of surface
state
![]() - influence of tool
material
- influence of tool
material
Coefficients ![]() calculations
calculations
![]()
![]() =
= 
![]() - coefficient depending on tool material and egual to 1.0,
because chosen tool is knife2101-0052 T5K10 GOST 18879-73, and it inserts are
of hard-alloy.
- coefficient depending on tool material and egual to 1.0,
because chosen tool is knife2101-0052 T5K10 GOST 18879-73, and it inserts are
of hard-alloy.
![]() - degree index =1.0
- degree index =1.0
![]()
![]()
![]() , because no skin is on workpiece
, because no skin is on workpiece
![]() =0.65, because tool T15K6 is of constructional steel
=0.65, because tool T15K6 is of constructional steel
![]()
![]() m/min
m/min
Coefficient and indexes selected from the tables:
t = 0.9mm
s= 0.5mm/rev
![]() =350
=350
y = 0.35
TIME CALCULATIONS:
Rough turning of the surface 2: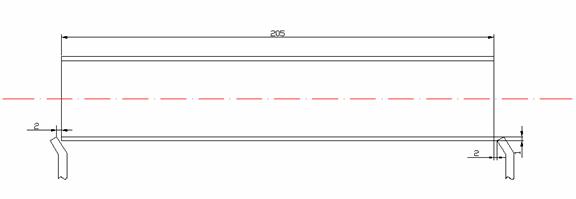
![]()
L= 205+2+2+1=210mm
Rough turning of the surface 3,4:
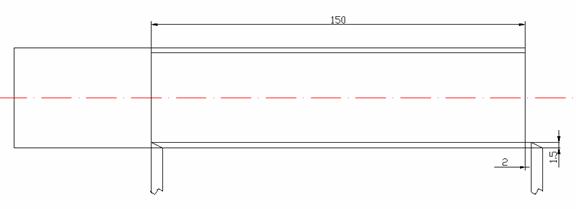
![]()
L=150+2+1.5=153.5
Smooth turning of the surface 3,4:
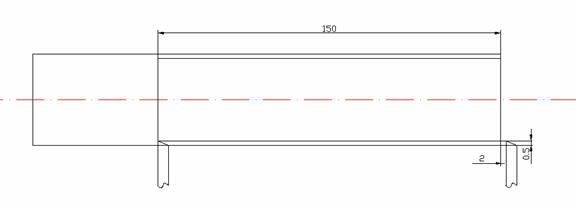
![]()
L=150+2+0.5=152.5
Rough turning of the surface 6:
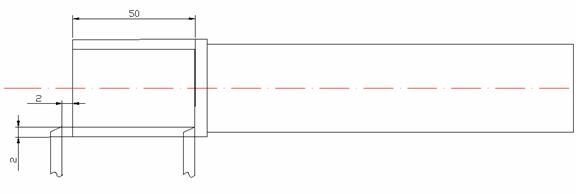
![]()
L=50+2+2=54mm
Rough turning of the surface 6:

![]()
L=50+2+1.5=53.5
Smooth turning of the surface 6:

![]()
L=50+2+0.5=52.5mm
Rough turning of the surface 7:

![]()
L=1+2+1=4
Smooth turning of the surface 8:

![]()
L=1.4+0.9=2.3
Smooth turning of the surface 8:

![]()
L=1.4+0.9=2.3
All ![]()
Edge
|
Operation No. |
i |
Depth t |
Sz mm/rev |
n rev/min |
V m/min |
L mm |
l1 mm |
To min |
Tvnt |
|
1 Surface 2 Surface 3 Surface | |||||||||
|
4 Surface 5 Surface 6 Surface | |||||||||
|
7 Surface |
End Mill 63-P18 GOST 17026
Z=8
Vertical programable milling machine M-230
Nmachine=10kW
Spindle's motor 2hp/3hp.
Cutting depth t=2mm.
Sz=0.1 mm/tooth
Determening cutting velocity:
![]()
![]()
Choosing nmachine=400rots/min
Calculating Vmachine
![]()
![]()
![]()
Calculating T operational time for every necessary operation
010 operation
![]()
015 operation
![]()
020 operation
![]()
Calculation of Tunit time.
![]()
Calculating Tp
![]()
Tp1- time for setting or removing tool;
Tp2- time for machine operation;
Tp3- time for measurements;
Mass=0.35

(Tapt+Tasm)=(1.135+0.65)*0.06=0.12min
Calculating Tvnt
![]()
Calculation of Tp.p

Develope assembly process
|
Plate |
|

|
Edge |
|
Welding
|
Tube |
|
|
Bush |
|
Inserted
|
Shaft |
|
|
Bush |
|
|
Girdle |
|
Pressed
|
Wedge |
|
|
Wedge |
|
Mounted
|