Documente online.
Zona de administrare documente. Fisierele tale
Am uitat parola x Creaza cont nou
 HomeExploreaza
upload
Upload


3D Nuts! Tutorials - Modeling a Car Rim

technical


3D Nuts! Tutorials - Modeling a Car Rim


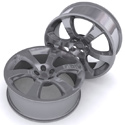
In this detailed tutorial you will learn how to create rims for a sports car by using the Bridge feature for an Editable Poly. This new feature was introduced in 3D Studio MAX version 7 and can save a modeler a lot of work. Not only will you be able to create the wheel in shown in the screenshots on the left, by using the techniques in this tutorial it will be a piece of cake to create your own original wheels. Apart from that, many of the common modeling techniques (Extrude Bevel Chamfer Bridge Soft Selection) are used in this tutorial, so it can serve as an excellent way to learn some new selection methods and basic poly-modeling skills.

This tutorial is aimed at the beginner and every step is outlined and displayed in detail. If you are absolutely new to 3D Studio Max , you may want to start with our Chess Pawn modeling tutorial first.

Note: Click on the thumbnail in each step for a larger screenshot that includes the viewports and the relevant portion of the user interface. Some thumbnails lead to more detailed instructions on how to perform certain selections and other tasks.

Page 1
| Page 2 > | Page 3 >

Step 1

Create a Cylinder on the Top viewport with the following attributes:                             
Radius: 40
Height: 30
Height Segments: 4
Cap Segments: 2
Sides: 30

Step 2

Left-click the Snaps Toggle button on the main toolbar and then right-click it to open the Grid and Snap Setting dialog box. Click the Clear All button and then enable the Pivot option. Close the dialog box.

Enabling the Snaps option will allow you to allign the following object correctly.

Step 3

Create a Tube on the Top viewport with the following attributes. Start creating the tube from the center (pivot) of the cylinder you created in step 1.

Radius 1: 90
Radius 2: 105
Height: 80
Height Segments: 5
Cap Segments: 2
Sides: 60

Step 4

Right-click the Snaps Toggle button to disable it. Move up the cylinder on the Front or Left viewport as shown in the screenshot.

Step 5

Select the Top viewport and click the Maximize Viewport Toggle button on the bottom right of the screen.

Select the tube and rotate it -3 degrees on the Z-axis so it lines up as show in the screenshot.

Step 6

Convert the tube to an editable poly by right-clicking Tube on the Modify tab and selecting Editable Poly below Convert To

Select the cylinder and use the same steps to convert the it also to an
Editable Poly

Step 7

While the cylinder is still selected, click the Attach button on the Modify tab in the Edit Geometry section and click the tube to attach it.

You should now have a single
Editable Poly object called Cylinder01. Click the Attach button again to disable it.

Step 8

Press the F3 key (to see the shaded model), press the F4 key (to see the edges on the shaded model), and press the J key (to get rid of the selection bracket). Click the Arc Rotate SubObject button and rotate up a bit. 10210w2223k

Go to
Edge sub-object level and select an edge on the upper inner side of the tube and click the Loop button.

Step 9

Move down the row of edges half way the top row of the polygons and scale it up as shown in the screenshot.

Click the
Maximize Viewport Toggle button on the bottom right of the screen again.

Step 10

Go to Polygon sub-object level and select the polygons as shown in the screenshots. Make sure you select them on all sides, meaning the inner side of the tube element and the outer side of the cylinder element. These will be the ends of the six spokes we will create for the rim in the next step.

Continue with the second part of this tutorial on the following page.

Step 11

Click the small square button on the right of the Bridge button in the Edit Polygons section on the Modify tab to open the Bridge dialog box.

Change the number of
Segments to 7.
Change the
Taper value to: -1.3

(Play around a bit with the
Taper and Bias setting to get an idea of how easy it is to create different spokes).

Click the
OK button to close the Bridge dialog box.

Step 12

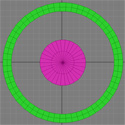
Select the Top viewport and click the Maximize Viewport Toggle button.

Click the
Select Object button and click the Circular Selection Region button:

Click the thumbnail on the right for detailed instructions on how to select the polygons displayed in the screenshot.

Step 13

Click the Maximize Viewport Toggle button to show all the viewports again.

Enable the
Use Soft Selection option in the Soft Selection section of the Modify tab and on the Front or Left viewport move the polygons a bit upwards.

Step 14

Disable the Use Soft Selection option. Click the Select Object button and change back to rectangular selection by clicking the Rectangular Selection Region button.


Select all the top polygons. Click the thumbnail on the right for detailed instructions on how to select them.

Step 15

Click the small square button on the right of the Bevel button in the Edit Polygons section on the Modify tab to open the Bevel Polygons dialog box.

Change the
Height setting to 0.4
Change the
Outline Amount setting to -0.4

Click
OK to close the dialog box.

Step 16

Click the thumbnail again for detailed instructions on how to select the following group of polygons.

After selecting the polygons, repeat step 15 for those polygons. In other words, bevel those polygons with
Height setting 0.4 and Outline Amount setting -0.4.

Step 17

Press the F3 key and press the G key. Rotate the Front viewport down a bit.

Go to
Edge sub-object level and select the edges as shown in the screenshot. Click the thumbnail for more information.

After selecting the edges scale them down as shown in the screenshot.

Step 18

Press the F key on your keyboard to switch back to the Front viewport.

Go to
Polygon sub-object level and select the polygons as shown in the screenshot. Scale the selected polygons up on the Y-axis. Click the thumbnail for more information.

Step 19

Click the small square button on the right of the Extrude button in the Edit Polygons section on the Modify tab to open the Extrude Polygons dialog box.

Select the
Local Normal option and change the Extrusion Height setting to -3.0

Click
Apply. And then click OK to extrude the polygons inwards again.

Step 20

Go to Edge sub-object level and select the edges as shown in the screenshot. Scale down the selected rows of edges to make the inside of the rim flat again. Click the thumbnail for more information. 

Continue with the third section of this tutorial on page 3.

Step 21

Select the row of edges as shown in the screenshot (select one and press the Loop button).

Move it a bit towards the inside of the rim and scale it up. This is basically the same as step 9 in which you performed this task for the other side of the model.

Step 22

Before we continue with the final part of the rim, the center with its screw holes, let's take a look at our progress so far and see how it looks 'smoothed'.

Select the
TurboSmooth modifier from the Modifier List on the Modify tab. Change the Iterations value to 2 and enable the Isoline option.

As you can see, the side of the spokes are a bit too curved toward the inside, let's change that in the next step.

Step 23

Go to Edge sub-object level and select the edges as shown in the screenshot. (Use the same selection method as you did in step 17 in which you performed this task for a row of edges one row lower than this one.)

When you selected the loop of edges on both sides of all of the spokes, scale the edges down just a bit so the side of the spokes are slight curved towards the outside.

Step 24

Go to Polygon sub-object level and select the polygons as shown in the screenshot. Enable Soft Selection and scale the selected polygons down on the X and Y axis. Click the thumbnail for more detailed information.

Step 25

Disable the Use Soft Selection option. Click the Select Object button on the main toolbar.

Go to
Edge sub-object level and select the row of edges and chamfer them as detailed in the screenshots. Click the thumbnail for more detailed information.

Step 26

Go to Vertex sub-object level and align the vertexes as explained in the screenshots. Click the thumbnail for more detailed information. 


Step 27

Go to Polygon sub-object level and select and bridge the polygons as shown in the screenshots. Click the thumbnail for more detailed information. 


Step 28

Repeat the same step for the other holes. Click the thumbnail for their exact locations.

Step 29

Go to Edge sub-object level and select the rows of edges as displayed in the screenshot and move them up. Click the thumbnail for more detailed information. 

Step 30

Go to Polygon sub-object level and select the polygons as shown in the screenshot. Enable Soft Selection and move down the polygons. Click the thumbnail for more detailed information. 


Step 31

This last step concludes this tutorial. While in Polygon sub-object level, press CTRL-A to select all polygons. In the Polygons Properties section of the Modify tab, click the Clear All button and than the button.

Click
TurboSmooth on the Modify tab to see the results.

Assign a shiny chrome metal material to your rim and render it.

For some variation, try using different Taper and Bias values when using the Bridge option to create the spokes, or start out with different segment values when creating the cylinder and tube. Using the techniques from this tutorial, you should be to create typical rim for almost any car brand. Using a reference photo of a real rim on the background will allow you to get the dimension and scale right.


Document Info


Accesari: 1819
Apreciat: hand-up

Comenteaza documentul:

Nu esti inregistrat
Trebuie sa fii utilizator inregistrat pentru a putea comenta


Creaza cont nou

A fost util?

Daca documentul a fost util si crezi ca merita
sa adaugi un link catre el la tine in site


in pagina web a site-ului tau.


eCoduri.com - coduri postale, contabile, CAEN sau bancare

Politica de confidentialitate | Termenii si conditii de utilizare


Copyright © Contact (SCRIGROUP Int. 2024 )