Digital Satellite Finder
Operator¡¯s Manual
950-2150MHz
Please read this manual carefully before using it for the first time.
The technical specifications and operating methods included in this manual are subject to changes without notice. In case of any inquires after a period of usage, please consult the manufacturer.
Charge the battery before using it for the first time. (Recommended time is 5 hours)
Chapter One, Introduction of the Digital Satellite Finder
Chapter Two, Introduction of the Digital Satellite Finder¡¯s Function.
(2) Satellite Finding Function.
(3) Spectrum Measurement Function.
(4) Manual Setting Satellite¡¯s Parameters.
Chapter Three, FinderMaster software operation manual
Chapter Four, User case example.
Chapter Seven, Technical Data.
Chapter One, Introduction of the Digital Satellite Finder
Digital satellite finder is a simple and convenient instrument for setting and aligning a satellite dish. According to parameters of the satellite, you can set and align a satellite dish very accurately and conveniently.
Features as follows:
1. Graphic user int 12512t199m erface, which is easy to use.
2. Easy to use, even for the beginner. It can calculate Azimuth, Elevation and Polarization automatically according to local longitude and latitude and show this in a graphic way.
3. It can communicate with PC through the serial port and you can update new satellite parameters conveniently.
4. Large memory capacity which can pre-store 80 satellite¡¯s parameters and 80 measurement records.
Chapter Two, Introduction of the Digital Satellite Finder¡¯s Function
1. Panel Function

Fig. 2-1
(1) RF INPUT:
It can be changed to BNC or F type as required by the user.
(2) LCD Graphic Display:
It can display various measured parameters for the function you have selected. It has an LED background light which the user can freely turn on or turn off.
(3) Function key:
There are four function keys, F1 -- F4 , they have different functions in different interfaces.
(4) Direction key-Navi Key: Press [ ],[ ],[ ],[ ] keys to select items in menus.
(5) Number keys:
Number keys are made up of 0-9, and keys so you can type in data conveniently.
(6) POWER key
(7) ENTER key
(8) C/S key:
Delete what you type in.
(9) LOAD key:
Load the record of measurement or configuration
(10) SET key
Press it to enter ¡®CONFIGURATION¡¯ item.
(11) FINDING key: press it to show the list of Satellites or entries in list format. Enter this item directly at any interface.
(12) A port for download data
(13) Charger port
(14) Charge indicator
2. Quick Manual
Easy Finder function is designed for a finder that has already setup the local longitude and latitude and the satellite¡¯s name and parameters have been saved into the finder. It is suitable for beginner users and makes the satellite finding easy, fast and convenient.
(1) Press POWER] key to switch on power, then it will enter main menu automatically.
(2) Press the [FINDING] key to enter the ¡°Load Satellite¡± item, as shown in figure 2-2.
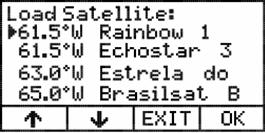
Fig. 2-2
(3) Press [F1],[F2] to select a record one by one or press [¡ø],[¨<] navi key to select a satellite you want to align to by page.
(4) Press [F4] or [ENTER]
to enter the ¡°Orientation¡± item, as shown in
figure 2-3. AZ means Azimuth EL
means Elevation
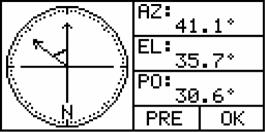
Fig. 2-3
(5) Press [F4] or [ENTER] to enter the ¡°Spectrum¡± item, as shown in figure 2-4.
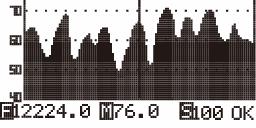
Fig. 2-4
(6)Press [F4] or [ENTER] to enter the ¡°Aim¡± item, as shown in figure 2-5. You can press F2 to turn on/turn off beep sound. Align the dish to get the maximum values of audible sound and signal level strength and quality. Press F2 to switch on/off beep sound.
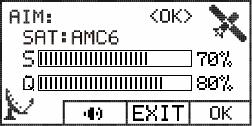
Fig.
(7) Press [F4] or [ENTER] to enter the ¡°Search¡± item, as shown in figure 2-6. If the dish is aligned correctly, there will be ¡°OK¡± displayed on the top right corner of the screen. Or else adjust the DiSEqC motor or dish slightly to make it lock.
Fig. 2-6
(8)You can save a record, if you need to. Refer to step five of example one .
3. Detailed Operation Guide
(1) Main Menu
Main menu is shown as Fig. 2-7
Fig. 2-7
There are five function icons on the top of the screen. They are Finding, Spectrum, Configuration, Load and Config Meter.
F1 - F4 function key explanation There are four function icons on the bottom of the screen. [F1] [F2] [F3] [F4] keys are their corresponding keys. Their function is shown as follows:
F1 : move to left;
[F2]: move to right;
[F3]: turn on/off background light;
[F4]: enter.
Press [F1] and [F2] key to select one of five icons ([¡ø] and [¨<] or [◄] and [►] keys which are on the Circular pad and have the same functions) and then press [F4] or [ENTER] to confirm and enter the function.
(2) Satellite Finding Function
Under main menu press [F1 ,[F2] or direction keys [◄],[►] to select ¡®Finding¡¯ icon, as shown in Fig. 2-8.
Fig. 2-8
Press [F4] or [ENTER] to enter ¡®Finding¡¯ item. You can align a dish from this section as well as the finding button. The Finding function includes three parts, as shown in Fig. 2-9.
Fig. 2-9
a. ¡®Search¡¯ Item
Search function works for signal level measurement, bit error rate, carrier noise ratio and will tell you whether the satellite¡¯s signal has been found. (Value of measurement above is only for reference. Measurement precision is only for reference but that will not affect the results of accurate satellite finding).
Under ¡®FINDING¡¯ item, press [F1],[F2] or [¡ø],[¨<] to select ¡®Search¡¯ item, and press [F4] or [ENTER] to enter ¡®SEARCH¡¯ item, as shown in figure 2-10.
Explanation:
Bar code indicates signal intensity. The bar is longer, the signal is stronger.
¡®FREQ¡¯ is downstream frequency of a certain satellite¡¯s channel.
¡®LEVEL¡¯ is signal level of current frequency.
¡®BER¡¯ is bit error rate of current frequency.
¡®C/N¡¯ is carrier noise ratio of current frequency.
¡®Save¡¯ function allows to save the current result for future records.
Note: It will make a ¡°beep¡± sound when satellite has been found. There will be an <OK> icon in the top right corner of the screen. This means the satellite has been found correctly and then ¡®BER¡¯ and ¡®C/N¡¯ will display on the screen.
Press [F1],[F2] or direction keys [¡ø],[¨<] to move the arrow to point to ¡®Freq¡¯, press[F4] or [ENTER] to enter ¡®FREQ¡¯ item, there will be an underline under the number. Press [¡ø],[¨<] to adjust the frequency by 0.5MHz . This is a convenient way to adjust the frequency, and then press [F4] or [ENTER] to exit then the underline disappears.
Fig. 2-10
When you have finished the measurement, you can save it as a measurement result record. Press [F1],[F2] or [¡ø],[¨<] to move the arrow to point to ¡®Save¡¯ icon, as shown in figure 2-11. Press [F4] or [ENTER] to enter ¡®Save¡¯ item, as shown in figure 2-12.
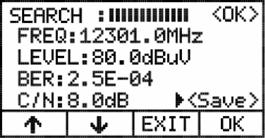
Fig. 2-11
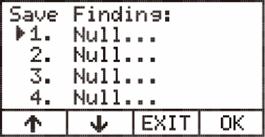
Fig. 2-12
Press [F1],[F2] to select a record one by one or press direction keys [¡ø],[¨<] to change pages. Press [F4] to select a record, press [F4] or [ENTER] to type in record name. To search conveniently the name can be numbers or letters but no more than 12 characters, as shown in figure 2-13.
Method of typing
Type in a ¡°1¡± with [1] key;
Type in a ¡°A B C a b c 2¡± with [2];
Type in a ¡°D E F d e f 3¡± with [3];
Type in a ¡°G H I g h i 4¡± with [4];
Type in a ¡°J K L j k l 5¡± with [5];
Type in a ¡°M N O m n o 6¡± with [6];
Type in a ¡°P Q R S p q r s 7¡± with [7];
Type in a ¡°T U V t u v 8¡± with [8];
Type in a ¡°W X Y Z w x y z 9¡± with [9];
Type in a ¡°0¡±with [0];
Type in a ¡°.¡± or ¡°space¡± with [¡¤].
When you have finished typing in one character, press [F4],[ENTER] or [►] to move the underline to next character.
For example Type in record name as ¡®OK3¡¯
l Select a position where you want to type it in. Press [F4] or [ENTER] to enter typing mode.
l Press [6] three times to type in ¡®O¡¯.
l Press [F4],[ENTER] or [►]to move the underline to next character.
l Press [5] twice to type in ¡®K¡¯.
l Press [F4],[ENTER] or [►]to move the underline to next character.
l Press [3] seven times to type in¡®3¡¯.
l Press [F4],[ENTER] or [►]to move the underline to next character.
l Finish.
When you have finished typing, press [F4],[ENTER] or [►]to save it, as shown in figure 2-14. After saving the Data is shown as figure 2-15.
Press [F3] to exit from this item, or press [C/S] to go back to main menu.
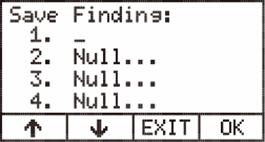
Fig. 2-13
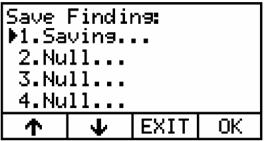
Fig. 2-14
Fig. 2-15
b. ¡®Aim¡¯ Item
¡®Aim¡¯ function works for the satellite¡¯s signal level strength. It helps you to recognize satellite¡¯s signal level quickly and visually.
Under ¡®FINDING¡¯ item, press [F1],[F2] or direction keys [¡ø],[¨<] to move arrow to point to ¡®Aim¡¯ item, as shown in figure 2-16.

Fig. 2-16
Press [F4] or [ENTER] to enter ¡®Aim¡¯ item, as shown in figure 2-17. In this mode, you can easily find the maximum value of the satellite¡¯s signal level through watching the indication bar¡¯s length and speaker¡¯s tone. When the indication bar is longer and the speaker¡¯s tone is higher, the signal level is stronger. You will see displayed two indication bars, signal strength and signal quality. For Digital reception you must have the maximum quality possible. You can press F2 to turn on/turn off beep sound. Press [F3] to exit from this item. Press [F4] or [ENTER] to enter ¡®Search¡¯ item.
Fig. 2-17
c. ¡®Orientation¡¯ Item
¡®Orientation¡¯ function works for calculating three important parameters of the satellite dish according to user¡¯s local position automatically. Three parameters are azimuth, elevation and polarization of LNB. According to these parameters, you can complete elementary settings of a satellite dish very easily and speed up satellite finding.
Under ¡®FINDING¡¯ item, press [F1],[F2] or direction keys [¡ø],[¨<] to move arrow to point to ¡®Orientation¡¯ item, as shown in figure 2-18.

Fig. 2-18
Press [F4] or [ENTER] to enter the ¡®Orientation¡¯ item, as shown in figure 2-19.
Fig. 2-19
There is a circle on the left of the screen. It is for compass reference only. N means north, the opposite arrow points to south. If your location is in north half of the earth, Letter will be N. The arrow must point to south when you align satellite dish. If your location is in south half of the earth, letter will be S. The arrow must point to north when you align satellite dish.
AZ is Azimuth.
EL is Elevation.
Before you set the satellite dish, you should configure all above parameters for satellite and LNB.
Press [F3] to exit this item, press [F4] or [ENTER] to enter ¡®Spectrum¡¯ item.
(3) Spectrum Measurement Function
Under main menu, press [F1],[F2] or direction keys [◄],[►] to select the ¡®Spectrum¡¯ icon, as shown in figure 2-20.
Fig. 2-20
Press [F4] or [ENTER] to confirm and enter ¡®Spectrum¡¯ item, as shown in figure 2-21. ¡°F¡± is frequency. ¡°M¡± is the signal level value. ¡°S¡± is bandwidth. Adjust the satellite dish until the spectrum waveform is the same as the prestored spectrum and the get the best satellite signal status. When the satellite signal is locked there will be ¡°OK¡± displayed in the bottom right corner of the screen. Press [F3] to exit spectrum measurement function.
Fig. 2-21
Press [F1] to switch ¡°S¡± between 50,100,200,500. Press [F2] to enter ¡°Save Spec Photo¡± mode, as shown in figure 2-22.
Fig. 2-22
Press [F1],[F2] to select a record one by one or press direction keys [¡ø],[¨<] to change pages. Press [F4] to select a record, press [F4] or [ENTER] to type in record name. To search conveniently the name can be numbers or letters but no more than 12 characters, as shown in figure 2-23.
Method of typing
Type in a ¡°1¡± with [1] key;
Type in a ¡°A B C a b c 2¡± with [2];
Type in a ¡°D E F d e f 3¡± with [3];
Type in a ¡°G H I g h i 4¡± with [4];
Type in a ¡°J K L j k l 5¡± with [5];
Type in a ¡°M N O m n o 6¡± with [6];
Type in a ¡°P Q R S p q r s 7¡± with [7];
Type in a ¡°T U V t u v 8¡± with [8];
Type in a ¡°W X Y Z w x y z 9¡± with [9];
Type in a ¡°0¡±with [0];
Type in a ¡°.¡± or ¡°space¡± with [¡¤].
When you have finished typing in one character, press [F4],[ENTER] or [►] to move the underline to next character.
When you have finished typing, press [F4],[ENTER] or [►]to save it, as shown in figure 2-24. After saving the Data is shown as figure 2-25.
Fig. 2-23
Fig. 2-24
Fig. 2-25
(4) Manual Setting Satellite¡¯s Parameters.
When a satellite¡¯s name which you need or satellite¡¯s parameters has been changed, with this function you can type in a channel¡¯s parameters or the satellite detail which you need. You can go to www.lyngsat.com website to check out the newest parameters.
Under main menu, press [F1 F2 or direction keys [◄],[►] to select the ¡®Configuration¡¯ icon. Press F4 or [ENTER] to confirm and enter ¡®Configuration¡¯ item, as shown in figure 2-26. After pressing F4 or [ENTER] button to confirm you will be in the manual satellite parameter configuration menu (as shown in figure 2-27) At this moment the pointer is pointing on ¡®Save¡¯ if you don¡¯t need to change the satellite¡¯s parameters you can press F4 directly to enter ¡®Spectrum¡¯ function then press F4] to enter ¡®Aim¡¯ direct satellite seeker by pressing F4 again you will be able to reach the ¡®Search¡¯ menu.
You can select an item by press [F1] or [F2] or [¡ø][¨<][◄] [►] and then press [F4] or [ENTER] to confirm and enter the function.
Fig. 2-26

Fig. 2-27
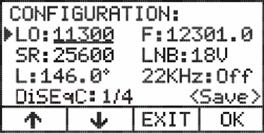
Fig. 2-28
a. ¡®LO¡¯ local Oscillation Frequency (MHz)
Press [F1],[F2] or [¡ø][¨<][◄][►] to move the arrow to point to ¡®LO¡¯. Press [F4] or [ENTER] to confirm and enter the ¡®LO¡¯ item. There will be an underline under the current number. Press the number keys to type in LO frequency. Its unit is MHz. Then press [F4] or [ENTER] to confirm then underline disappears, as shown in figure 2-28. (the range of local oscillation frequency should be in 0MHz, 4500-5500MHz or 9500-11500MHz)
b. ¡®F¡¯ downstream frequency (MHz)
¡®F¡¯ downstream frequency is the frequency which is used for sending signal to earth from satellite. (Unit: MHz
Press [F1],[F2] or [¡ø][¨<][◄][►] to move arrow to point to ¡®F¡¯ press[F4] or [ENTER] to confirm and enter ¡®F¡¯ item. There will be an underline under the current number. Press the number keys to type in ¡®F¡¯ frequency. Then press [F4] or [ENTER] to confirm then underline disappears, as shown in figure 2-29. (Absolute value of the difference between ¡®F¡¯ downstream frequency and ¡®LO¡¯ frequency should be in the range of 950-2150MHz.)
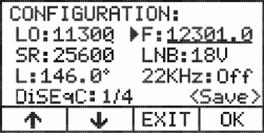
Fig. 2-29
c. ¡®SR¡¯ Symbol Rate
¡®SR¡¯ Symbol Rate means the speed of the data transmission. It is the bit rate of the signal and parameter of the channel. ¡®SR¡¯ unit is Mb/s.
Press [F1],[F2] or [¡ø][¨<][◄][►] to move the arrow to point to ¡®SR¡¯. Press [F4] or [ENTER] to confirm and enter the ¡®SR¡¯ item. There will be an underline under the current number. Press the number keys to type in ¡®SR¡¯. Then press [F4] or [ENTER] to confirm then the underline disappears, as shown in figure 2-30. (The range of ¡®SR¡¯ should be in 1000-45000.)
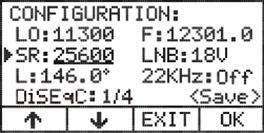
Fig. 2-30
d. ¡®LNB¡¯ Power Supply
You can select power supply voltage in the ¡®LNB¡¯ item.
Press [F1],[F2] or [¡ø][¨<][◄][►] to move the arrow to point to ¡®LNB¡¯. Press [F4] or [ENTER] to confirm and enter the ¡®LNB¡¯ item, press [F4] or [ENTER] to switch among 0V 13V(V R) and 18V(H L), as shown in figure 2-31.
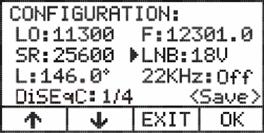
Fig. 2-31
e. ¡®L¡¯ Satellite Longitude
Satellite longitude is the position of the satellite over the earth. Press [F1],[F2] or [¡ø][¨<][◄][►] to move the arrow to point to ¡®L¡¯. Press [F4] or [ENTER] to confirm and enter the ¡®L¡¯ item. There will be an underline under the current number. Press the number keys to type in ¡®L¡¯. And then press [F4] or [ENTER] to confirm then underline disappears, as shown in figure 2-32. (the range of the satellite longitude is in -180¡ã~ +180¡ãeast longitude is positive west longitude is negative)
Fig. 2-32
f. ¡®22KHz¡¯ Status Switch
The ¡®22KHz¡¯ status switch is if high band switching is to be used. Refer to the transponders detail to see if this should be switched on.
Press [F1],[F2] or [¡ø][¨<][◄][►] to move the arrow to point to ¡®22KHz¡¯. Press [F4] or [ENTER] to confirm and enter the ¡®22KHz¡¯ item. Press [F4] or [ENTER] to change it to on or off, as shown in figure 2-33.
Fig. 2-33
g. ¡®DiSEqC¡¯ Digital Satellite Equipment Control
The meter support ¡®DiSEqC¡¯ digital satellite equipment control function.
Press [F1],[F2] or [¡ø][¨<][◄][►] to move the arrow to point to ¡®DiSEqC¡¯. Press [F4] or [ENTER] to confirm and enter the ¡®DiSEqC¡¯ item. Press [ENTER] to change between 1/4, 2/4, 3/4, 4/4, 1/2, 2/2 or OFF, as shown in Fig. 2-34.
Fig. 2-34
h. ¡®SAVE¡¯
When finish above configuration, you can save it as a configuration record. Press [F1],[F2] or [¡ø][¨<][◄][►]to move the arrow to point to ¡®Save¡¯ item, as shown in figure 2-35.
Fig. 2-35
Press [F4] or [ENTER] to enter the ¡®Spectrum¡¯ function and starts to seek the satellite. Press [F4] or [ENTER] to enter the ¡®Aim¡¯ function. Press [F3] and choose ¡®Save¡¯, to save the parameters, as shown in figure 2-36.
Fig. 2-36
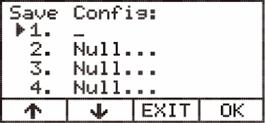
Fig. 2-37
Press [F1],[F2] to select record one by one or press direction keys [¡ø],[¨<] to change page. After selecting a record, press [F4] or [ENTER] to type in a record name no more than 12 characters. The record name can be letters or numbers ( as shown in figure 2-37 ).
Method of typing
Type in a ¡°1¡± with [1],
Type in a ¡°A B C a b c 2¡± with [2]
Type in a ¡°D E F d e f 3¡± with [3]
Type in a ¡°G H I g h i 4¡± with [4]
Type in a ¡°J K L j k l 5¡± with [5]
Type in a ¡°M N O m n o 6¡± with [6]
Type in a ¡°P Q R S p q r s 7¡± with [7]
Type in a ¡°T U V t u v 8¡± with [8]
Type in a ¡°W X Y Z w x y z 9¡± with [9]
Type in a ¡°0¡±with [0]
Type in a ¡°.¡± or ¡°space¡± with [ ]
When finished typing in one character, press [F4],[ENTER] or [►] to move the underline to next character.
For example Type in record name as ¡®SC2¡¯
l Select position where you want to type in. Press [F4] or [ENTER] to enter typing status.
l Press [7] four times to type in ¡®S¡¯.
l Press [F4],[ENTER] or [►]to move the underline to next character.
l Press [2] thrice to type in ¡®C¡¯.
l Press [F4],[ENTER] or [►]to move the underline to next character.
l Press [2] seven times to type in ¡®2¡¯.
l Press [F4],[ENTER] or [►]to move the underline to next character.
l Finish.
When finish typing, press [F4],[ENTER] or [►]to save it, as shown in figure 2-38. After saving the interface is shown as figure 2-39.
Press [F3] to exit this item or press [C/S] to go back to the main menu.
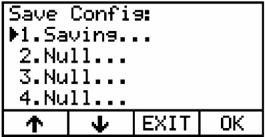
Fig. 2-38
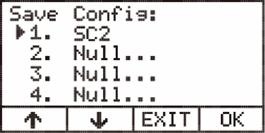
Fig. 2-39
(5) ¡®Load¡¯
Under the main menu, press [F1 , F2] or [◄],[►] to select the ¡®Load¡¯ icon, as shown in figure 2-40.
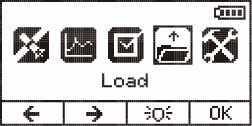
Fig. 2-40
Press [F4] or [ENTER] to confirm and enter ¡®Load¡¯ item, as shown in figure 2-41. There are two submenus under the ¡®Load¡¯ item. You can load a pre configured record or a measured record from here. Configuration function is for editing the configurations of recorded entries pre-stored in the instrument. Finding function is for checking measurement records that were saved before.
Fig. 2-41
a. Select Name of Satellite
This function allows you to select the name of satellite which has been pre-stored in the instrument. There are two methods of viewing the list of stored satellites first is to see it according to the number of degrees as they are in the sky (as shown in figure 2-42); Or to see them arranged in alphabetical order as shown in figure 2-43
By pressing the [Set] key, you will be able to switch between the alphabetical order and the number of degree arrangement to help you select the name of the satellite.
Press [F1],[F2] or direction keys [¡ø],[¨<] to move arrow to point to ¡®Configuration¡¯. Then press [F4] or [ENTER] to enter the ¡®Configuration¡¯ item, as shown in figure 2-41.
According to the method of number or degree arrangement:
Press [F1],[F2] or press [¡ø],[¨<] to change pages, when the arrow is pointing to the name of the satellite that you would like to select, press [F4] or [ENTER] key to confirm and check the parameters of this satellite.(as shown in figure 2-42)
According to the method of alphabetical order arrangement:
You can type in a letter or number here ![]() to select a
satellite¡¯s name directly. For example, to select ¡®Intelsat5¡¯
satellite, firstly type in letter ¡®i¡¯, and then press [F4], [ENTER] or [►] to display
as all names with initial ¡®I¡¯. And then press [F1],[F2] or [¡ø],[¨<] to select the
¡®Intelsat5¡¯ record. Press [F4],[ENTER] or [►] to load the parameters of this
satellite.
to select a
satellite¡¯s name directly. For example, to select ¡®Intelsat5¡¯
satellite, firstly type in letter ¡®i¡¯, and then press [F4], [ENTER] or [►] to display
as all names with initial ¡®I¡¯. And then press [F1],[F2] or [¡ø],[¨<] to select the
¡®Intelsat5¡¯ record. Press [F4],[ENTER] or [►] to load the parameters of this
satellite.
After the record loads, as shown in figure 2-44, you can press [F4] or [ENTER] again to change this configuration as the current configuration for satellite finding. Press [F3] to exit back to main menu. 80 configurations can be pre-stored in the instrument.
Fig. 2-42
Fig. 2-43
Fig. 2-44
b. Load Measurement Record
The ¡®Finding¡¯ function is for checking measurement records that were saved before.
Press [F1],[F2] or direction key [¡ø],[¨<] to move arrow to point to ¡®Finding¡¯, as shown in figure 2-45.
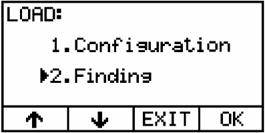
Fig. 2-45
Press [F4] or [ENTER] to enter the ¡®Finding¡¯ item, as shown in 2-46. Press [F1] or [F2] to select one by one or press direction keys [¡ø],[¨<] to change page. When the arrow points to the record which you want to choose, press [F4] or [ENTER] to confirm and view this record.
You can type in a letter or number here as well. After you have typed it in, press [F4] or [ENTER] to confirm and view this record.
80 measurement records can be pre-stored in the instrument.
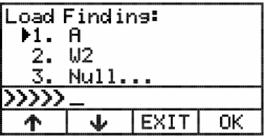
Fig. 2-46
(6) Config Meter
Under the main menu, press [F1 , F2] or [◄],[►] to select the ¡®Config Meter¡¯ icon, as shown in figure 2-47.
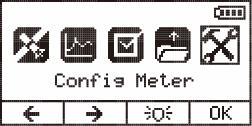
Fig. 2-47
Press [F4] or [ENTER] to confirm and enter the ¡®Config Meter¡¯ item, as shown in figure 2-48. You can check the power that remains in the battery, set the time to automatically turn off the power, change unit of the measurement and set local longitude and latitude, download satellite parameters from computer, and delete configuration.
a . ¡®Download¡¯
Under the ¡®Config Meter¡¯ menu, press [F1 ,[F2] or [¡ø],[¨<] to select the ¡®Download¡¯ , as shown in figure 2-48.
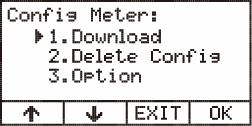
Fig. 2-48
Press [F4] or [ENTER] to confirm and enter the ¡®download¡¯ item, as shown in figure 2-49. Download function is to download satellite channel data to instrument.

Fig. 2-49
After entering this item, plug in the data cable which we provided into the instrument. Through the attached software ¡°FinderMaster¡± you can download the data of satellite finding conveniently, as shown in figure 2-50. (See details in the ¡°FinderMaster¡± software operation manual) After downloading press F3 to exit.
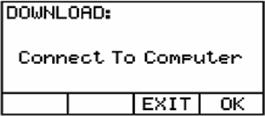
Fig. 2-50
b . ¡®Delete Configuration¡¯
Under ¡®Config Meter¡¯ mode press [F1], [F2] or direction keys [¡ø],[¨<] to select the ¡®Delete Config¡¯ item. Then press [F4] or [ENTER] to enter, as shown in figure 2-51. Press [F1 ,[F2] to select a record one by one or press direction keys [¡ø],[¨<] to change pages, as shown in figure 2-52. After selecting one record, press [F4] or [ENTER] to delete the current record, as shown in figure 2-53. After deleting press F3 to exit.
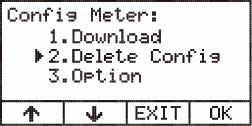
Fig. 2-51
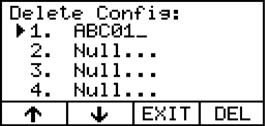
Fig. 2-52
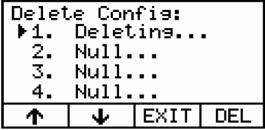
Fig. 2-53
c. ¡®Option¡¯
Under ¡®Config Meter¡¯ mode press [F1], [F2] or direction keys [¡ø],[¨<] to select the ¡®Option¡¯ item (as shown in figure 2-54). Then press [F4] or [ENTER] to enter, as shown in figure 2-55.
Fig. 2-54

Fig. 2-55
The top right corner shows the battery voltage.
a. ¡®Unit¡¯
¡®Unit¡¯ shows the current unit. Press [F1],[F2] or [¡ø],[¨<] to move the arrow to point to ¡®Unit¡¯. Press [F4] or [ENTER] to change the unit to dBm, dBuV or dBmV, as shown in figure 2-56.
Fig. 2-56
b . Longitude and Latitude¡¯ can be found easily by internet search.
¡®Longitude¡¯ and ¡®Latitude¡¯ is your location coordinates. You can check it out in the CD-ROM that we provided. Press [F1], [F2] or [¡ø],[¨<] to move the arrow to point to ¡®Longitude¡¯. Press [F4] or [ENTER] to confirm and enter the ¡®Longitude¡¯ item. There will be an underline under the current number. Press the number keys to type in the longitude. Then press [F4] or [ENTER] to confirm then underline disappears, as shown in figure 2-57. (the range of the longitude is in -180 ~ +180 , east longitude is positive, west longitude is negative)
Fig. 2-57
Press [F4] or [ENTER] to confirm and enter the ¡®Latitude¡¯ item. There will be an underline under the current number. Press the number keys to type in the latitude. Then press [F4] or [ENTER] to confirm then underline disappears, as shown in figure 2-58. (the range of the latitude is in -180 ~ +180 north latitude is positive south latitude is negative)
Fig. 2-58
c . Shutdown
¡®Shutdown¡¯ shows the current time of shutdown. Press [F1], [F2] or [¡ø],[¨<] to move the arrow to point to ¡®Shutdown¡¯. Press [F4] or [ENTER] to confirm and enter the ¡®Shutdown¡¯ item. Press [F4] or [ENTER] to change it to 3m 10m 30m or always on, as shown in figure 2-59.
Fig. 2-59
Chapter Three, FinderMaster software operation manual
(1) Install Findermaster on PC
a. Insert CD-ROM
b. Double click ¡°setup¡± that is in the [Findermaster] folder, there will be an interface of installation, as shown in figure 3-1.
c. Press the [Browse] button, choose from the file menu where you would like to save the program or use the pre-selected destination (see Fig. 3-1-1).
If the file menu you are trying to save the program on doesn¡¯t exist, it will be automatically created before the installation.
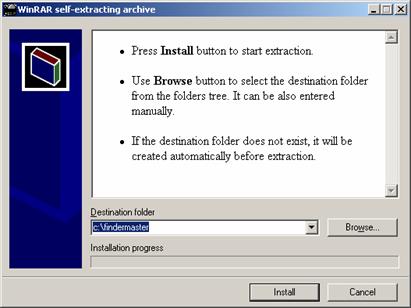
Fig. 3-1
![]()

Fig. 3-1-1
![]()

Fig. 3-1-2
d. After installation is completed, there will be an icon on the desktop of PC, as shown in figure 3-2.

Fig. 3-2
Double click Windows desktop icon ¡°Findermaster¡± to run the software, as shown in figure 3-3.
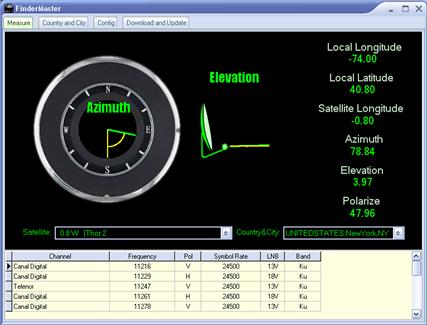
Fig. 3-3
l [Measure]
Under the [Measure] item, you can query parameters of setting satellite, such as local longitude and latitude, satellite longitude, azimuth of satellite dish, elevation of satellite dish, and polarization of LNB.
l [Country and City]
Under the [Country and City] item, you can query, add or delete longitude and latitude of country & city.
l [Config]
Under the [Config] item, you can query, add or delete satellite and channel.
l [Download and Update]
Under the [Download and Update] item, you can download satellite channel to satellite finder and update the data package through our website.
The detail information will be talked as follows:
Click [Measure] menu to enter [Measure] item, as shown in figure 3-4.
![]()

Under [Measure] item
You can select a country and city from the [Country & City] drop-down box on the right side of the screen and select satellite from the [satellite] drop-down box on the left side of the screen, as shown in figure 3-5.
![]()
![]()
![]()
Fig. 3-5
After selecting, this program will calculate parameters of adjusting the satellite dish automatically. Those parameters include azimuth, elevation and polarize. They will be displayed in a graphic model and a table model.
Graphic Model: Fig. 3-6
Azimuth shows azimuth angle of satellite dish;
Elevation shows elevation angle of satellite dish.
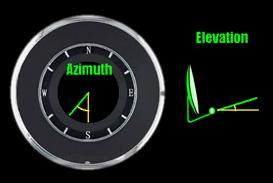
Fig. 3-6
Table Model: Fig. 3-7
Local Longitude shows local longitude of the satellite dish location;
Local Latitude shows local latitude of the satellite dish latitude;
Satellite Longitude shows satellite longitude;
Azimuth shows azimuth angle of the satellite dish;
Elevation shows elevation angle of the satellite dish;
Polarize shows polarization angle of LNB.
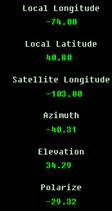
Fig. 3-7
The current satellite¡¯s entire channel displays in the table under the screen, as shown in figure 3-8.
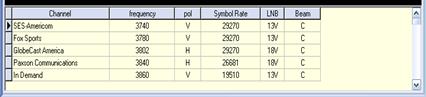
Fig. 3-8
Double click any channel on this table, ¡°Add to download list¡± dialog box will appear, as shown in figure 3-9. Click [OK] to confirm and add this channel to the download list.
![]()
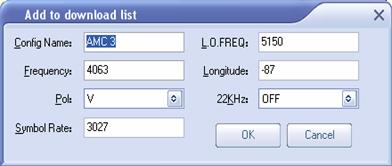
Fig. 3-9
Click the [Country and City] menu to enter the [Country and City] item, as shown in figure 3-10.
![]()

Fig. 3-10
Under this item, you can manually add or delete information of longitude and latitude of country & city.
Type in the English name of the country and city in the ¡°Country & City¡± input box, as shown in figure 3-10-1.
![]()

Fig. 3-10-1
![]()
![]()

Fig. 3-10-2
![]()
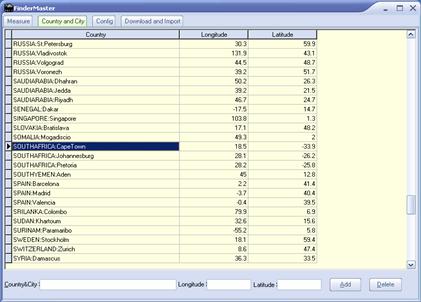
Fig. 3-10-3
![]()
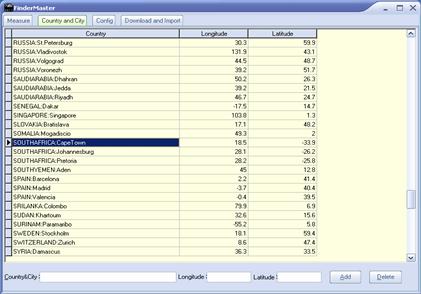
Fig. 3-10-4
Type in the longitude and latitude in the ¡°Longitude¡± input box and ¡°Latitude¡± input box, as shown in figure 3-10-2.
Then click the [Add] button to add the data into the data list, as shown in figure 3-10-3.
Click [Delete] to delete the current selecting data, as shown in figure 3-10-4.
Click the [Config] menu to enter the [Config] item, as shown in figure 3-11.
![]()
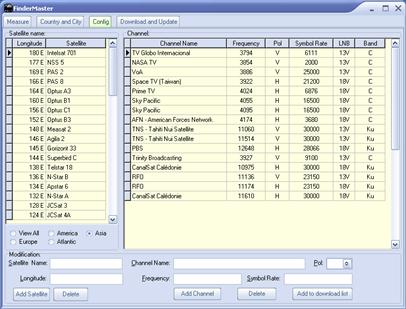
Fig. 3-11
On the left side of the ¡°Satellite Name¡± table, you can add or delete the name and longitude of the satellite.
Type in the name of the satellite in the ¡°Satellite Name¡± input-box, as shown in figure 3-11-1.
![]()

Fig. 3-11-1
![]()
Fig. 3-11-2
Type in the longitude in the ¡°Longitude¡± input-box, as shown in figure 3-11-2.
Then click the [Add Satellite] button to add data into the satellite list, as shown in figure 3-11-3.
![]()

Fig. 3-11-3
Click the [Delete] button to delete the current selecting data of the satellite, as shown in figure 3-11-4.
The left satellite list box, only displays satellites which can be received locally by default. If you want to display all, please click the [View All] button, as shown in figure 3-11-5.
![]()

Fig. 3-11-4
![]()

Fig. 3-11-5
After selecting a name and longitude of the satellite, all of the channel data of the current satellite will be displayed on the right ¡°Channel¡± list. You can add or delete parameters of this channel.
Type in the name of the channel in the ¡°Channel Name¡± input-box, as shown in figure 3-11-6.
![]()
Fig. 3-11-6
Select the direction of polarization angle in the ¡°Pol¡± drop-down box (H or V) , as shown in figure 3-11-7.
Type in the downstream frequency in the ¡°Frequency¡± input-box, as shown in figure 3-11-8.
![]()

Fig. 3-11-7
![]()

Fig. 3-11-8
![]()

Fig. 3-11-9
![]()

Fig.
Type in the symbol rate in the ¡°Symbol Rate¡± input-box, as shown in figure 3-11-9.
Click the [Add
Channel] button to add data into the channel list, as shown in figure
Clicking the [Delete]
button will delete the current selected channel data, as shown in figure
![]()

Fig.
Click any data in the Channel list, the [Add to download list] menu will appear, as shown in figure 3-12. Click it and an ¡°Add to download list¡± dialog box will appear. Click the [OK] button to add this data into the download list, as shown in figure 3-13.
After selecting a record, click the [Add to download list] button at the bottom right corner of the screen or double click any piece of data and an ¡°Add to download list¡± dialog box will appear as well. To add data follow the way mentioned above.
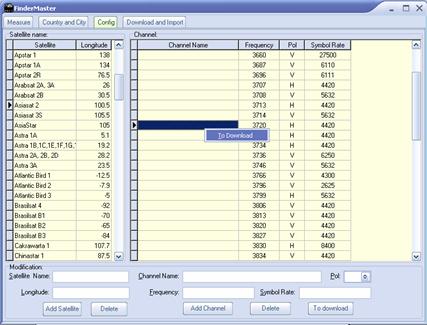
Fig. 3-12
![]()
Fig. 3-13
Click the [Download and Update] menu to enter the [Download and Update] item, as shown in figure 3-14.
![]()

Fig. 3-14
![]()

Fig. 3-14-1
Select location in the ¡°Country & City¡± drop-down box, as shown in figure 3-14-1.
Select the start number in the ¡°Start Number¡± drop-down box, as shown in figure 3-14-2. (The start number is the configuration record serial number of the satellite finder. That means to input data from which number unit).
![]()
Fig. 3-14-2
Select the serial port in the ¡°Port¡± drop-down box , as shown in figure 3-14-3(it should be the serial port which connect with the PC).
Click the [Start Download] button to start the download, as shown in figure 3-14-4.
![]()
Fig. 3-14-3
![]()

Fig. 3-14-4
![]()

Fig. 3-14-5
![]()
Fig. 3-14-6
Click the [Delete] button to delete the current selecting data, as shown in figure 3-14-5.
Click the [Delete all] button to delete all of the data in the download list, as shown in figure 3-14-6.
Click on [Export] to save the listed data. (as shown in figure in 3-14-7)
![]()

Fig. 3-14-7
Clicking on [Import] will take the saved data (suffix with .dl) into the download data. (as shown in figure 3-14-8)
![]()
Fig. 3-14-8
When you click the [Update] button as shown in figure 3-14-9, selecting document dialog box will appear. Select update data package (*.fm) and click the [Open] button to input the new document into the library automatically.
After finishing the update, the update number of the country & city, satellite and channel will be displayed on the right of screen.
![]()

Fig. 3-14-9
Chapter Four, User case example
There are some user case examples which are in different conditions to help you understand the usage and function of finder better.
User case example 1: Assume the meter has stored the satellite¡¯s name and relative parameters
Location
Satellite¡¯s Name Astra 28.2
Step one: Press the power key to open finder.
Step two: Setup the local longitude and latitude. We provide two methods in this situation.
Method one: Assume local longitude and latitude has been known.
1. In main menu, press the [F2] key to select the ¡°Config Meter¡± icon, as shown in figure 4-1.
Fig. 4-1
2. Press the [F4] or [ENTER] key to enter the ¡°Config Meter¡± item.
3. Press the [F2] key to move point to the ¡°Option¡± item.( as shown in figure 4-2)
Fig. 4-2
4. Press the [F4] or [ENTER] key to enter the ¡°Option¡± item. ( as shown in figure 4-3)
Fig. 4-3
3. Press the [F2] key to move point to the ¡°Longitude¡± item.( as shown in figure 4-4 )
Fig. 4-4
4. Press the [F4] or [ENTER] key to confirm. There will be an underline under the current number. And then you can type in the local longitude, as shown in figure 4-5.
Fig. 4-5
5. Press the number keys to type in the longitude directly. And then press [F4] or [ENTER] to confirm, then underline disappears.
6. Press the [F2] key to move the to point to ¡°Latitude¡± item.
7. Press the [F4] or [ENTER] key to confirm. There will be an underline under the current number. And then you can type in the local latitude, as shown in figure 4-6.
Fig. 4-6
8. Press the number keys to type in the latitude directly. And then press the [F4] or [ENTER] key to confirm, then underline disappears.
9. Press [F3] return to the main menu.
Method two: Assume local longitude and latitude has not been known. You can run ¡°FinderMaster¡± which is software in the CD-ROM we provided. The detailed usage is shown as follows:
1. Install ¡°Findermaster¡± on the PC.
a. Insert the CD-ROM.
b. Double click ¡°setup¡± in the [Findermaster] folder, there will be an interface of installation, as shown in 4-7.


Fig. 4-7
c. Click the [Install] button to start installation, as shown in 4-7.
d. After installation is completed, there will be an icon on the desktop of the PC, as shown in figure 4-8.

Fig. 4-8
2. Enter into system
Double click the [Findermaster] icon on the desktop of the PC to enter into the information system, as shown in figure 4-9.
Fig. 4-9
3. Select location
Select United States: New York, NY in the drop-down box on the bottom right corner as shown in figure 4-10.
![]()
Fig. 4-10
The
Fig. 4-11
Then you can type in the local longitude and latitude by following method one.
Assume that there are no local parameters in FinderMaster, please check it on our website. Then you can type in the local longitude and latitude by following method one.
Step three: Select satellite¡¯s name and parameters.
1. Press [F2] key to select the ¡°Load¡± icon, as shown in figure 4-12.
Fig. 4-12
2. Press [F4] or [ENTER] key to enter the ¡°Load¡± item, as shown in 4-13.

Fig. 4-13
3. Press [F4] or [ENTER] key to enter the ¡°Configuration¡± item, as shown in figure 4-14.

Fig. 4-14
4. Select the satellite¡¯s name.
Press [F1],[F2] or [ ] to select ¡°Intelsat 5 , as shown in figure 4-15.

Fig. 4-15
5. Press [F4] or [ENTER] key to confirm. Its parameters will be displayed on the screen, as shown in figure 4-16.
Fig. 4-16
6. Press [F4] or [ENTER] key to return to the main menu.
Step four: Align and measure
1. Select the ¡°Finding¡± item in the main menu as shown in figure 4-17
Fig. 4-17
2. Press [F4] or [ENTER] key to enter the ¡°Finding¡± item, as shown in figure 4-18.
Fig. 4-18
3. Press [F2] to move point to the ¡°Orientation¡± item, press [F4] or [ENTER] key to enter, as shown in figure 4-19. AZ means Azimuth EL means Elevation and PO means Polarize. According to those parameters shown here, you can setup the satellite dish.
Fig. 4-19
4. Press [F4] or [ENTER] key to enter ¡°Spectrum¡± item directly, as shown in figure 4-20.
Fig. 4-20
5. From here press [F4] or [ENTER] key to enter ¡°Aim¡± item directly, as shown in figure 4-21. You can press F2 to turn on/turn off beep sound. Align the dish to get a maximum value of sound and ¡®S¡¯ , ¡®Q¡¯ indication bar.
Fig. 4-21
6. Press [F4] or [ENTER] key to enter the ¡°Search¡± item, as shown in figure 4-22. If the dish has already been aimed to the satellite, it will display ¡°OK¡± and make a beep sound to confirm.

Fig. 4-22
Step five: Save record of measurement result
1. Press [F2] key to move point to the ¡°Save¡± item and press [F4] or [ENTER] key to confirm, as shown in figure 4-23.
Fig. 4-23
2. Press [F1],[F2] to select the record one by one or press [ ] to browse. After selecting a record, press [F4] or [ENTER] to confirm. Then type in a name for the record that is less than 12 characters. When finishing the steps above, press [F4],[ENTER] or [ ] key twice to confirm, as shown in figure 4-24.
Fig. 4-24
User case example two: assume the finder has not setup the satellite¡¯s parameters and name.
Location
Satellite¡¯s
name Intelsat
Step one: Press [power] key to open the finder.
Step two: Setup the local longitude and latitude. (Refer to example one)
Step three: Setup the satellite¡¯s parameters. We provide two methods for this situation.
Method one: You can run FinderMaster which is software in the CD-ROM we provided. The detailed usage is shown as follow:
1. Install Findermaster on PC
a. Insert CD-ROM.
b. Double click ¡°setup¡± which is in the [Findermaster] folder, there will be an interface of installation, as shown in 4-25.
![]()
Fig. 4-25
c. Click [Install] button to start installation.
d. After installation is completed, there will be an icon on the desktop of the PC, as shown in figure 4-26.
Fig. 4-26
2. Enter into the system
Double click the [Findermaster] icon on the desktop of the PC to enter into the information system, as shown in figure 4-27.
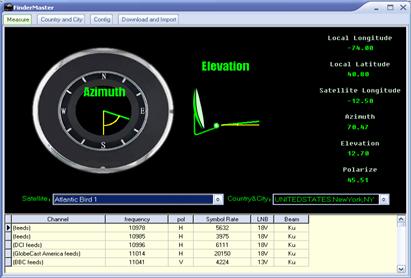
Fig. 4-27
3. Select location
Select ¡°United States: New York,NY¡± in the ¡°Country & City¡± drop-down box on the bottom right corner as shown in figure 4-28.
![]()
Fig. 4-28
4. Select name of satellite
Select ¡°Intelsat 605¡± in the Satellite drop-down box on the bottom left corner, as shown in figure 4-29.
![]()
Fig. 4-29
5. Select channel for the satellite that you want to align
After selecting a satellite there will be a channel list under the screen. Double click on any channel that is listed on the table, the [Add to download list] dialog box will display on the screen, as shown in figure 4-30.
![]()
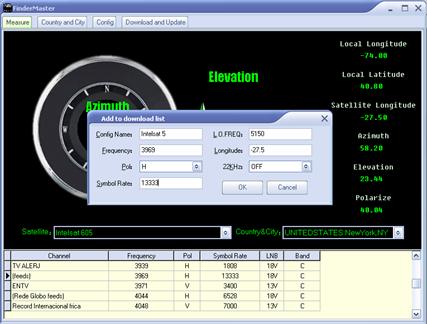
Fig. 4-30
6. Press [OK] to confirm and finish adding in a record, as shown in figure 4-30.
7. Download
a. Click the [Download and Update] menu, as shown in figure 4-31.
![]()
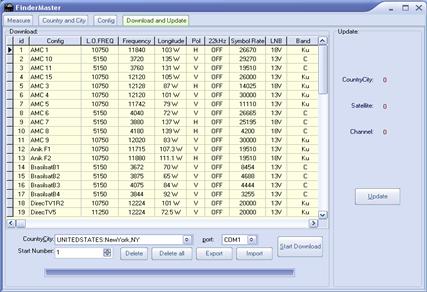
Fig. 4-31
![]()

Fig. 4-32
b. Select the COM port that is used for connecting with PC. Click the [Port] drop-down box to select the correct one, as shown in figure 4-32.
c.
Connect the PC with a data cable, as shown in
figure 4-33. 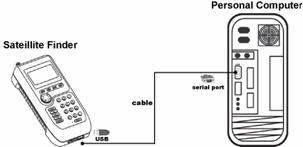
Fig. 4-33
d. Press [POWER] to turn on the finder, press [F2] to select ¡°Config Meter¡±, as shown in figure 4-34.
Fig. 4-34
e. Press [F4] to enter ¡°Config Meter¡± item, as shown in figure 4-35.
Fig. 4-35
f. Press [F4] to enter ¡°Download¡± item, as shown in figure 4-36.
Fig. 4-36
g. Press F4 to enter the data download menu. (as shown in figure 4-37)
Fig. 4-37
h. Click [Start Download] on the PC screen to start. When the Complete! box appears it means that the downloading process is finished, as shown in figure 4-38. Then click [OK] to confirm. On the satellite finder press [F3] to return to the main menu.

Fig. 4-38
Method two: assuming we already know the satellite¡¯s parameters.
1. Press [F2] to select ¡°Configuration¡±, as shown in figure 4-39.
Fig. 4-39
2. Press [F4] or [ENTER] to enter the ¡°Configuration¡± item, as shown in figure 4-40.
Fig. 4-40
3. Move to point to ¡°LO¡±, press [F4] or [ENTER] to confirm. There will be an underline under the number, then press the number keys to type 11300 for local oscillation frequency. Then press [F4] or [ENTER] to confirm and then underline disappears, as shown in figure 4-41.
Fig. 4-41
4. Move [►] to point to ¡°F¡±, then press [F4] or [ENTER] to confirm. There will be an underline under the number. Press the number keys to type 12301.0 for the downstream frequency, and then press [F4] or [ENTER] to confirm and then underline disappears, as shown in figure 4-42.
Fig. 4-42
5. Move [►] to point to ¡°SR¡±, then press [F4] or [ENTER] to confirm. There will be an underline under the number. Press the number keys to type 25600 for the symbol rate and then press [F4] or [ENTER] to confirm and then underline disappears, as shown in figure 4-43.
Fig. 4-43
6 Move [►] to point to ¡°LNB¡±, then press [F4] or [ENTER] to switch to 18V (horizontal polarization), as shown in figure 4-44.
Fig. 4-44
7. Move [►] to point to ¡°L¡±, press [F4] or [ENTER] to confirm. There will be an underline under the number, then press the number keys to type 146.0 º for the satellite longitude degree. Then press [F4] or [ENTER] to confirm and then underline disappears, as shown in figure 4-45.
Fig. 4-45
8. Move [►] to point to ¡°22KHz¡±, then press [F4] or [ENTER] to switch it to ¡°Off¡±, as shown in figure 4-46.

Fig. 4-46
9. Move [►] to point to ¡°DiSEqC¡±, then press [F4] or [ENTER] to switch between 1/4, 2/4, 3/4, 4/4, 1/2, 2/2 or OFF, as shown in figure 4-47.
Fig. 4-47
Press [►] key, when the arrow is pointing at ¡®Save¡¯, by pressing F4 can take you to the ¡®Spectrum¡¯ function, then press F4 to enter ¡®Aim¡¯ function menu see Fig. 4-48 4-49 4-50 then you will be directly get onto step five.

Fig. 4-48
Fig. 4-49
Fig. 4-50
Step four: Select satellite name and parameters.( Refer to step three of example one )
Step five: Align and measure. ( refer to step four of example one
Step six: Save the record of measurement result. ( refer to step five of example one )
Chapter Five, FAQ
1. Q: After the Digital Satellite finder is plugged in DiSEqC Switch while the survey why isn¡¯t there any signal
A: Make sure to do the survey before you plug the Digital Satellite Finder in the DiSEqC Switch
Measurement Location Satellite Finder Output Input Satellite Dish
2. Q: How does the Digital Satellite Finder can receive the Universal dual LNB ability to do a survey?
A: Please switch the ability of the Universal dual LNB under the Configuration function.
3. Q: What can I do when the Digital Satellite finder¡¯s parameter data has mistakes in it?
A: Because a satellite¡¯s channel data is updated every year, there is always a possibility that there are mistakes in it. Please visit the www.easysatfinder.com site upload and download the newest FinderMaster software update package, download it in the Digital Satellite Finder after updating, or go on www.lyngsat.com site find out the newest channel data and update them manually directly on your Digital Satellite Finder.
Chapter Six, Power supply
A piece of high performance built-in battery (8.4V MH-Ni battery) supplies the power to this instrument. The power supply adapter can also supply the power. We however recommend this for emergency use for short periods of time. This instrument can be used 4 hours continuously if fully charged.
Note
1. The instrument has an automatic saving power unit. When there is no operation on the keyboard close to the time which it was set for an automatic turning off, the instrument will make three ¡°beep¡± sounds. If beyond that time it will make another three ¡°beep¡± sounds and then automatically shut off the instrument.
2. The instrument has an automatic battery voltage test function. Users can estimate the consumption of battery voltage by checking the ¡°Utility¡± item also. It also has a lack of voltage alarm function. When the voltage of the battery is below 7.7V 0.2, it will make a ¡°beep¡± sound. That could tell user needs to charge battery in time. Or else, it¡¯ll automatically turn off.
3. Please charge the battery as soon as possible with the special power supply adapter that we provided. When you use the power supply adapter, please insert its direct current plug into the DC socket which is at the bottom of the instrument and insert its other alternating current plug into the power-outlet. When the red light is on, that means the instrument is connected with the power supply adapter and is charging.
4. The instrument should be turned off while charging for the protection of the battery and instrument. The time to fully charge the battery is approximately 4 hours and no more than 5 hours while turned off. When you charge the battery for the first three times, we recommend 5 hours. When fully charged, please pull out the power supply plug and store it carefully for the next time use.
5. The instrument can support working and charging at the same time. But we don¡¯t recommend it that way. It¡¯s only for urgent matters and working time should not pass 10 minutes.
Since the battery is specially customized for our instrument, please ensure to use it only for charging. The company will not be responsible for the repairs and will not compensate for any loss or damage caused by using other power supply adapters.
Chapter Seven, Technical Data
1. Input Frequency
Frequency range: 950~2150MHz
2. Signal Measure
Level range: -65dBm ~ -25dBm
Input resistance: 75¦¸
Symbol rate: 2Msps ~ 45 Msps
3. Other
Dimension: 250¡Á120¡Á60(mm)
Net weight: 0.8Kg
Gross weight: 1.6Kg
Working temperature:0 ~ +40
Display: 128¡Á64 wide-range temperature liquid crystal display.
Audio output: build-in speaker
Port: USB (default)
Switch: 22 KHz support
4. Power Supply
LNB power supply: ¡®H¡¯ +18V,¡Ü500mA;¡®V¡¯ +13V ¡Ü500mA
DC power supply: DC8.4V chargeable battery
Power adapter input: AC110V/60Hz/220V/50Hz¡À10%
Power adapter output: 9.6 V DC 800mA
Working time: working hours 3~4 hours (full charge)
Charging time: more than 4 hours less than 5 hours.
5. Accessories
Common power supply adapter or Cigarette lighter adapter 1 piece (Note: Adapter is optional.)
RF input connector GMHF-L3/8-JK 1 piece
Instrument bag 1 piece
Operator¡¯s manual 1 piece
CD-ROM 1piece
Data cable 1piece
|
Attachment 1 CHANNEL PLAN OF
|
||||||
|
Satellite name |
Channel name |
F |
SR |
LO |
||
|
E |
Intelsat 4 |
|
H |
|
|
|
|
E |
Eutelsat W5 |
|
V |
|
|
|
|
E |
Intelsat |
Multichoice |
|
H |
|
|
|
Intelsat 10 |
Manasat |
|
V |
|
|
|
|
E |
Intelsat 704 |
CFI |
|
V |
|
|
|
E |
Intelsat 906 |
UBC TV |
|
V |
|
|
|
E |
Intelsat 902 |
IRIB |
|
V |
|
|
|
E |
Intelsat 904 |
Bashkir TV |
|
V |
|
|
|
E |
NSS 703 |
STAR TV |
|
V |
|
|
|
E |
Bonum 1 |
|
V |
|
|
|
|
E |
Insat 3E |
DD Hissar |
|
V |
|
|
|
E |
Intelsat 702 |
@SatGate |
|
V |
|
|
|
E |
Express AM 22 |
Ukrkosmos |
|
V |
|
|
|
E |
Yamal 202 |
|
L |
|
|
|
|
E |
Intelsat 12 |
Telly Track |
|
H |
|
|
|
E |
T rksat 1C |
BRT 1 |
|
V |
|
|
|
T¨¹rksat 2A |
DigiTurk |
|
V |
|
|
|
|
E |
Express AM 1 |
PlanetSky |
|
H |
|
|
|
E |
|
|
H |
|
|
|
|
E |
Paksat 1 |
Virtual University |
|
H |
|
|
|
E |
Eutelsat Sesat |
CaspioNet |
|
H |
|
|
|
Eutelsat W4 |
Poverkhnost |
|
L |
|
|
|
|
E |
Eurobird 3 |
@ TEUS |
|
H |
|
|
|
E |
Intelsat 802 |
Kenyan mux |
|
H |
|
|
|
E |
Optus A3 |
SES-Astra |
|
H |
|
|
|
E |
Arabsat 2B |
|
|
V |
|
|
|
E |
Eurobird 1 |
Sky Digital |
|
H |
|
|
|
E |
Astra 2A |
Sky Digital |
|
H |
|
|
|
Astra 2B |
Sky Digital |
|
V |
|
|
|
|
Astra 2D |
Sky Digital |
|
H |
|
|
|
|
E |
Badr C |
Iqraa |
|
H |
|
|
|
E |
Badr 3 |
Arabsat |
|
V |
|
|
|
Badr 4 |
MBC |
|
H |
|
|
|
|
E |
Eurobird 2 |
Site 1 Network |
|
H |
|
|
|
E |
Astra 1D |
@AstraNet |
|
H |
|
|
|
Astra 3A |
Bund TV |
|
H |
|
|
|
|
E |
Eutelsat W6 |
CFI Peco Pro |
|
V |
|
|
|
E |
Astra |
Premiere |
|
H |
|
|
|
Astra |
MTV Networks |
|
V |
|
|
|
|
Astra 1H |
ARD Digital |
|
H |
|
|
|
|
Astra 1KR |
Bibel TV |
|
H |
|
|
|
|
Astra 2C |
SES-Astra |
|
V |
|
|
|
|
E |
Eutelsat W2 |
DigitAlb |
|
V |
|
|
|
E |
Hot Bird 2 |
British Telecom |
|
V |
|
|
|
Hot Bird 6 |
TPS |
|
V |
|
|
|
|
Hot Bird 7A |
TPS |
|
V |
|
|
|
|
Hot Bird 8 |
IRIB |
|
H |
|
|
|
|
E |
Eutelsat W1 |
APTN |
|
V |
|
|
|
E |
Eutelsat W3A |
TVP |
|
V |
|
|
|
E |
Sirius 3 |
Viasat |
|
V |
|
|
|
E |
Sirius 2 |
Pro TV |
|
H |
|
|
|
E |
Astra 1C |
SES-Astra |
|
V |
|
|
|
Attachment CHANNEL PLAN OF |
||||||
|
Satellite name |
Channel name |
F |
SR |
LO |
||
|
E |
Intelsat 701 |
CanalSat Caledonie |
|
H |
|
|
|
W |
NSS 5 |
AFN-America |
|
H |
|
|
|
E |
Intelsat 2 |
Telstra |
|
V |
|
|
|
E |
Intelsat 8 |
SelecTV |
|
H |
|
|
|
E |
Optus D1 |
Sky TV |
|
H |
|
|
|
E |
Optus C1 |
Austar |
|
H |
|
|
|
E |
JCSAT 2A |
|
H |
|
|
|
|
E |
Optus B3 |
Optus Communications |
|
V |
|
|
|
E |
JCSAT R |
World Mate |
|
H |
|
|
|
E |
Measat 2 |
A-Sky-Net |
|
H |
|
|
|
E |
Agila 2 |
Dream Satellite TV |
|
H |
|
|
|
E |
Superbird C |
Sound Planet |
|
V |
|
|
|
E |
Express AM 3 |
NVK Sakha |
|
V |
|
|
|
E |
Telstar 18 |
D-Sky |
|
V |
|
|
|
E |
N-Star B |
@ Mega Wave Pro |
|
V |
|
|
|
E |
Apstar 6 |
Nei Monggol TV |
|
H |
|
|
|
E |
JCSAT 3A |
Sky PerfecTV |
|
V |
|
|
|
E |
JCSAT 4A |
JC-HITS |
|
V |
|
|
|
E |
AsiaSat 4 |
Skywave TV |
|
R |
|
|
|
E |
Thaicom 1A |
CTN ( |
|
V |
|
|
|
E |
Koreasat 3 |
SkyLife |
|
L |
|
|
|
E |
Palapa C2 |
Global TV( |
|
H |
|
|
|
Koreasat 5 |
ETN-TV 2 |
|
H |
|
|
|
|
E |
Sinosat 1 |
CBTV Sat |
|
V |
|
|
|
E |
N-Sat 110 |
Sky PerfecTV 110 |
|
R |
|
|
|
BSAT 2A |
BS Digital |
|
V |
|
|
|
|
E |
AAP 1 |
SuperSun |
|
V |
|
|
|
E |
Telkom 1 |
TelkomVision |
|
H |
|
|
|
E |
AsiaSat 3S |
Shaanxi TV |
|
V |
|
|
|
E |
Express A2 |
Perviy kanal SNG |
|
V |
|
|
|
E |
AsiaSat 2 |
Reuters World News Service |
|
H |
|
|
|
E |
NSS 6 |
Dish TV |
|
H |
|
|
|
E |
Insat 3A |
DD Shimla |
|
V |
|
|
|
E |
Measat 1 |
|
V |
|
|
|
|
Measat 3 |
RTM 1 |
|
V |
|
|
|
|
E |
Yamal 201 |
Oblastnoj Kanal |
|
V |
|
|
|
E |
ST 1 |
Chungwa Telecom |
|
H |
|
|
|
E |
ChinaStar 1 |
Myawady TV |
|
H |
|
|
|
E |
Insat 2E |
|
V |
|
|
|
|
Insat 3B |
Mana TV |
|
V |
|
|
|
|
Insat 4A |
Sangeet Bangla |
|
H |
|
|
|
|
E |
Express AM 2 |
Enisey Region |
|
V |
|
|
|
E |
Thaicom 5 |
|
|
V |
|
|
|
Thaicom 2 |
Thai TV Color Channel 3 |
|
H |
|
|
|
|
E |
Telstar 10 |
C-Sky-Net |
|
V |
|
|
|
E |
ABS 1 |
GeoTelecom Satellite Services |
|
V |
|
|
|
E |
Insat 3C |
Doordarshan |
|
H |
|
|
|
Edusat |
|
|
H |
|
|
|
|
Attachment CHANNEL PLAN OF |
||||||
|
Satellite name |
Channel name |
F |
SR |
LO |
||
|
W |
Thor 3 |
Focus Sat |
|
V |
|
|
|
Thor 2 |
Canal Digital |
|
V |
|
|
|
|
W |
Intelsat 10-02 |
@ AMS |
|
H |
|
|
|
W |
Amos 2 |
Yes |
|
V |
|
|
|
Amos 1 |
Yes |
|
V |
|
|
|
|
W |
Atlantic Bird 3 |
|
|
V |
|
|
|
W |
Nilesat 102 |
Alkawthar |
|
H |
|
|
|
Nilesat 101 |
ERTU |
|
V |
|
|
|
|
W |
Atlantic Bird 4 |
Nilesat |
|
H |
|
|
|
W |
Atlantic Bird 2 |
KabelKiosk |
|
V |
|
|
|
W |
Express A3 |
RSCC |
|
R |
|
|
|
W |
Atlantic Bird 1 |
NTV Hayat |
|
H |
|
|
|
W |
Telstar 12 |
DMC |
|
H |
|
|
|
W |
Intelsat 901 |
NBA TV |
|
V |
|
|
|
W |
NSS 7 |
CanalSat Horizons |
|
V |
|
|
|
W |
Intelsat 905 |
AlArabiya |
|
V |
|
|
|
W |
Intelsat 907 |
Five |
|
V |
|
|
|
W |
Hispasat 1D |
Retevisi n |
|
V |
|
|
|
Hispasat 1C |
Retevisi n |
|
H |
|
|
|
|
W |
Intelsat 801 |
CanalSat Caraïbes |
|
H |
|
|
|
W |
Intelsat 903 |
MCA |
|
H |
|
|
|
W |
Telstar 11 |
Maharishi Open University |
|
H |
|
|
|
AMC 12 |
Unitel |
|
V |
|
|
|
|
W |
NSS 806 |
@ EasyBand |
|
H |
|
|
|
W |
Intelsat 6B |
Sky |
|
V |
|
|
|
W |
Intelsat 3R |
Televisa Networks |
|
V |
|
|
|
W |
Intelsat 1R |
@ Divona |
|
V |
|
|
|
W |
Intelsat 705 |
|
V |
|
|
|
|
W |
Intelsat 707 |
TV Senado ( |
|
V |
|
|
|
W |
Intelsat 805 |
XHTVL - Canal 9 ( |
|
H |
|
|
|
W |
Intelsat 9 |
British Telecom |
|
H |
|
|
|
W |
Amazonas |
|
H |
|
|
|
|
Attachment CHANNEL PLAN OF |
||||||
|
Satellite Name |
Channel name |
F |
SR |
LO |
||
|
61.5¡ãW |
EchoStar 3 |
DISH Network |
|
L |
|
|
|
Rainbow 1 |
DISH Network |
|
R |
|
|
|
|
63.0¡ãW |
Estrela do Sul 1 |
CPC |
|
H |
|
|
|
65.0¡ãW |
Brasilsat B2 |
TV Tibagi |
|
V |
|
|
|
70.0¡ãW |
Brasilsat B4 |
TV Alterosa |
|
V |
|
|
|
71.8¡ãW |
Nahuel 1 |
Red Intercable |
|
V |
|
|
|
72.0¡ãW |
AMC 6 |
NASA TV |
|
V |
|
|
|
72.5¡ãW |
DirecTV 1 |
DirecTV |
|
H |
|
|
|
74.0¡ãW |
SBS 6 |
|
|
H |
|
|
|
79.0¡ãW |
AMC 5 |
|
|
V |
|
|
|
82.0¡ãW |
Nimiq 2 |
|
|
R |
|
|
|
83.0¡ãW |
AMC 9 |
|
V |
|
|
|
|
84.0¡ãW |
Brasilsat B3 |
CNT Rede |
|
V |
|
|
|
87.0¡ãW |
AMC 3 |
PBS |
|
H |
|
|
|
89.0¡ãW |
Galaxy 28 |
TecSat |
|
H |
|
|
|
91.0¡ãW |
Galaxy 11 |
Primedia Workplace Learning |
|
V |
|
|
|
Nimiq 1 |
|
|
R |
|
|
|
|
92.0¡ãW |
Brasilsat B4 |
TV |
|
V |
|
|
|
93.0¡ãW |
Galaxy 26 |
Azteca |
|
V |
|
|
|
95.0¡ãW |
Galaxy 3C |
DirecTV Brazil |
|
L |
|
|
|
97.0¡ãW |
Galaxy 25 |
GlobeCast World TV |
|
V |
|
|
|
99.0¡ãW |
Galaxy 16 |
HITS |
|
V |
|
|
|
101.0¡ãW |
DirecTV 1R/4S |
DirecTV |
|
R |
|
|
|
AMC 4 |
|
V |
|
|
||
|
103.0¡ãW |
AMC 1 |
NBC |
|
H |
|
|
|
105.0¡ãW |
AMC 15 |
DISH Network |
|
V |
|
|
|
107.3¡ãW |
Anik F1R |
Star Choice |
|
V |
|
|
|
109.8¡ãW |
DirecTV 5 |
DirecTV USA |
|
H |
|
|
|
110.0¡ãW |
EchoStar 8 |
DISH Network |
|
R |
|
|
|
110.0¡ãW |
EchoStar 10 |
DISH Network |
|
L |
|
|
|
111.1¡ãW |
Anik F2 |
Star Choice |
|
H |
|
|
|
113.0¡ãW |
SatMex 6 |
TV Azteca Noreste |
|
H |
|
|
|
114.9¡ãW |
Solidaridad 2 |
Edusat |
|
V |
|
|
|
116.8¡ãW |
SatMex 5 |
Televisa Networks |
|
H |
|
|
|
118.8¡ãW |
AMC16 |
DISH Network |
|
V |
|
|
|
119.0¡ãW |
EchoStar 7 |
DISH Network |
|
R |
|
|
|
DirecTV 7S |
DirecTV |
|
L |
|
|
|
|
121.0¡ãW |
EchoStar 9/ Galaxy 23 |
TVW |
|
H |
|
|
|
123.0¡ãW |
Galaxy 10R |
Equity Broadcasting |
|
V |
|
|
|
125.0¡ãW |
Galaxy 14 |
Music Choice |
|
V |
|
|
|
127.0¡ãW |
Galaxy 13/Horizons 1 |
Pi TV |
|
H |
|
|
|
129.0¡ãW |
EchoStar 5 |
DISH Network |
|
V |
|
|
|
Galaxy 27 |
StarBand |
|
H |
|
|
|
|
131.0¡ãW |
AMC 11 |
In Demand |
|
V |
|
|
|
133.0¡ãW |
Galaxy 15 |
HBO The Works |
|
V |
|
|
|
135.0¡ãW |
AMC 10 |
Scripps |
|
V |
|
|
|
137.0¡ãW |
AMC 7 |
|
|
H |
|
|
|
139.0¡ãW |
AMC 8 |
ARCS |
|
H |
|
|
|
148.0¡ãW |
EchoStar 1 |
DISH Network |
|
R |
|
|
|
EchoStar 2 |
DISH Network |
|
L |
|
|
|
Note: The channel plan will be updated any time and is only for reference. If you want the latest channel plan please refer to www.easysatfinder.com.
|
