ENGINEERING GRAPHICS - INTRODUCTION
|
T |
he engineering thinking and creation combines spatial imagination, spatial situations analysis and synthesis, with the engineering "art" and with an own "language" of communication.
The representation of a real or an imaginary object, of an idea that exist in the mind of the engineer or designer before becoming reality, executed either on a classical support (paper), or on a modern one (computer's screen), is realized in a graphic way. Although different languages are spoken throughout the World, an universal language existed from ancient times, "the graphic language". This natural, elementary mean of idea communication is limitless both in space and time.
The engineering graphics, on which designing, project making and manufacturing are based, is one of the most important study disciplines in superior technical education. Every student in this field must know how to create and how to read technical drawings. The subject is essential for all engineering forms and it must be understood by all those involved or interested in technical areas.
Projects and manufacturing processes are prepared and achieved by specialists, professionals of graphic language, but even those who did not take part to these activities, should understand and professionally i 515e41f nterpret them. The educational effort in graphic engineering is essentially important for an engineer, or an engineer to become, because he's the one who must fulfill the requests shown in the drawing, and for this he must be able to completely and correctly interpret every detail.
It is well known and acknowledged today, that engineering graphics is a communication language. Even though when we think of all its components, mainly of the descriptive geometry, of the graphic solutions, the engineering graphics is more than a language, it is a whole conception of space and of the spatial object representation; it is the solutions source of the spatial problems and situations. That's why the engineering graphics is a science. The components of this science are:
Descriptive geometry
Technical drawing
Computer graphics (computer aided drafting).
1.1 GRAPHIC LANGUAGE
|
T |
he importance of the graphic language can be pointed out only by comparing it to the existing languages. Trying its "translation" into a natural language, we notice that this is inadequate for describing size, shape, and aspect of a physical object. Thus, the description of objects that the collocutor does not see, is incomplete, inaccurate through the use of a natural language. Even accompanied by gestures, the words do not have sufficient resources to get a quick and accurate communication of the shape, size, and position of the component parts.
The engineering drawings are made up only from points, lines, circle arcs, etc., in many projections, arranged in a logical order of the system of projections we use. In these projections there are added quotas (dimensions), tolerances, deviations, and roughness, special notes regarding the operations of manufacturing, and other indications. This is the language used in the engineering graphics, and the conclusion is: a drawing is much more efficient than words.
BASIC STANDARDS USED IN ENGINEERING GRAPHICS
|
T |
he wish of getting an uniform graphic language, uniform rules and conventions is materialized by abiding some known established standards, international standards with national correspondence. Thus, there are ISO (International Standards Organization) standards which are adopted by the Romanian Standards SR ISO (Romanian Standards aligned to ISO). The process of revising the old standards STAS (State Standards) is still in progress, so at the present time, there coexist SR ISO and STAS standards.
The most used standards, called also basic standards, having an engineering graphics applications, refer to the dimensions of the drawings support (paper, the limits of a PC screen), the types of the used lines, the writing (lettering) accompanying the drawings, the title block and the parts list, usable scales. We shall not reproduce these standards, but we shall present their essential aspects for training of a student.
1.2.1 SHEETS (FORMATS) SR ISO 5457-94 (STAS 1-84). The support of the drawings is rectangular and it has dimensions conforming to table 1.1. The sheet can be set vertically (table - Fig. 1.1-a), or horizontally, meaning on the long side (fig. 1.1-b), their indexing being done as in the presented examples:


![]()
A.(a b) A.(b a)
a). b).
Fig. 1.1
Table 1.1
|
Preferred sheets |
Exceptional sheets |
||
|
Forms of lettering |
a b |
Forms of lettering |
a b |
|
A0 |
A0 |
1189 |
|
|
A1 |
841 |
A1 | |
|
A2 |
594 |
A2 | |
|
A3 |
420 |
A2 | |
|
A4 |
297 |
A2 | |
|
Special sheets |
A3 | ||
|
Forms of lettering |
a b |
A3 | |
|
A3 |
891 |
A3 | |
|
A3 |
A4 | ||
|
A4 |
630 |
A4 | |
|
A4 |
841 |
A4 | |
|
A4 |
A4 | ||
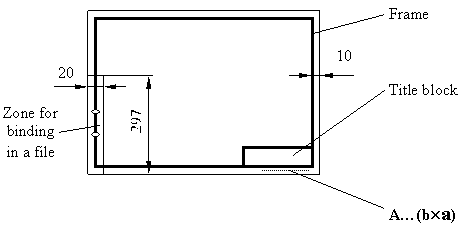
Any format will have a frame (border line) that is drawn with a thick, continuous line ( 1.2.2) and a title block ( 1.2.4), placed on the lower-right corner, stuck to the frame (fig. 1.2). The frame is drawn at 10mm from the edge of the format, all around it, and on the lower-left side, at 20mm, on 297mm height (the height of the smallest format, A4, or of an A3, format when is set on the long side). On the lower-right corner, under the title block, the format size is to be written like: A.(basis x height).
![]()
Fig. 1.2
1.2.2 LINES STAS 103-84. Taking into account the destination, there are two thicknesses of lines that can be used:
![]() Thick or heavy (thickness=b);
Thick or heavy (thickness=b);
thin or fine (b/3 or b/2).
The line thickness depends on the dimensions and complexity of the parts to be drawn, as well on the purpose and size of the drawing. For "b" there are given the values: 0,18; 0,25, 0,35; 0,5; 0,7; 1; 1,4; 2; 2,5; 3,5; 5.
The following types of lines are used as they are needed:
 continuous line
wavy line
zigzag line
dashed line
![]() dash dot line
dash dot line
heavy open dash dot line
![]() two dots dash line
two dots dash line
1.2.3 LETTERING SR ISO 3098/1-93 (STAS 186-86). The character of lines and the lettering gives the drawing what is known as "technique", a phase of drafting which is too often neglected. Inscriptions accompanying the drawing should be made in clear and pleasing letters and figures. The height of the capitals or of the figures (numbers), defines the size of the lettering by "h": 2,5; 3,5; 5; 7; 10; 14; 20. It is permitted the use like slant the vertical writing or the inclined writing at 75o, and like shape, a normal one (10/10h - the height of capitals, and the thickness of the writing line - h/10), or a longed one (14/14h, the thickness of the writing line h/14).
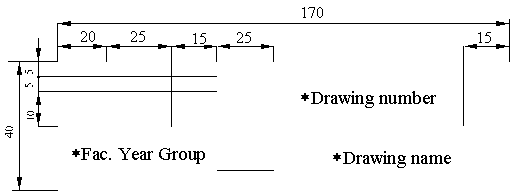
TITLE BLOCK (INDICATOR) SR ISO 7200-94 (STAS 282-87). The title block gives some information about the drawing (what it represents), about the institution and those who design, draw, verify, check, approve, that drawing. The alignment to the ISO international system, allows any user to create his own title block, the component sections being recommended and the horizontal dimension being limited at 190mm. The title block must contain:
the identification zone - the registration number or
identification of the drawing;
- the name of the drawing;
- the name of the legal owner of the
drawing.
the zone of supplementary information: - indicative;
- technical;
- administrative.
A thematic set of drawings (project), requests a numbering which has the same number of identification, furthermore, it is indicate to be used as fraction: at the numerator, the proper order number of the drawing, and at the denominator, the total number of drawings (p/t).
|
|
Name |
Sign. |
Student number |
|||
|
Student |
(Material)) | |||||
|
Professor | ||||||
|
(Mass) | ||||||
|
(Scale) | ||||||
|
(Scale) (Date) |
Fig. 1.3
An example of title block with didactic purpose is the one in Fig. 1.3.
1.3 GENERAL NOTIONS ABOUT
GRAPHIC REPRESENTATIONS
|
A |
result of the visual perception, the representations of the reality have known a various range of solutions in trying to present them under a coherent and convincing form. The graphic representations can be perceived and analyzed by a multitude of geometric parameters, which, through their ways of being arranged, ordinate and placed, make up spatial geometric structures, which are studied by the geometry. The simple presence of a geometric structure or of a purely formal geometry, cannot solve the problems of representations. In the modern representations, besides geometry, there are to be encountered a series of other disciplines, in connection with the field in which the representation is made.
1.3.1 METHODS OF REPRESENTATIONS. In the technical field the drawing (graphic representation), is used as means of communication. The basic of this drawing concerns in geometrical structures, structures made up from different geometric elements that are found in certain position from one another.
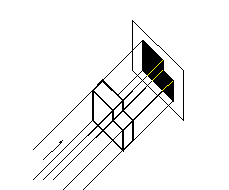
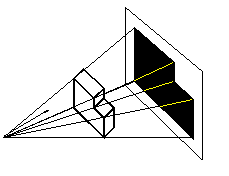
The shape is best described through projection, a procedure of getting an image by rays of observation or of sight. The rays are sent in a certain direction, from the object to be projected, to the projection plane. The direction of the rays can be parallel (when the observer is located at an infinite distance from the object), or conic (if the distance is a finite one), leading to get parallel projections, or central (perspective)projections (Fig. 1.4 - a and b).
![]()
![]()

A classification of plane projections can be seen in Fig. 1.5:
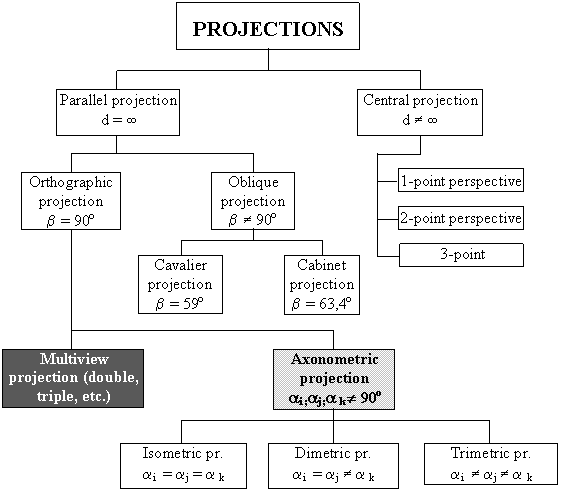
Fig. 1.5
The graphic representations used in technique, impose a very good knowledge of elementary geometry (plane and spatial), of the descriptive geometry, and of the technical drawing.
Descriptive Geometry establishes laws which are to enable the representation of spatial objects and of spatial situations. These laws (rules) are coming directly from the elementary geometry.
Technical drawing relies on orthogonal (orthographic) projection, which supplies the best conditions for describing shape of an object, and it is best fitted to make dimensioning, which is the second function of a technical drawing.
Suggesting the tri-dimension condition, as a request of the modern design with the aid of the computer, imposed a large use of the axonometric projection, this, unlike the orthogonal one, allows an easier understanding, even by the non-specialists, of the spatial shapes.
1.3.2 COMPUTER GRAPHICS. The graphic tools have evaluated from the first attempts of communications of the people through graphic representations. As the engineering theory and practice have known a continuous evolution, the specific tools developed and brought to a perfect stage so as the engineers and the designers to keep up with the requirements of the progress. Today, there is a relatively new tool, indispensable in projecting: the computer and the graphic stations. One simple fact that is frequently overlooked is that computers are not new. Charles Babbage, an English mathematician, developed the idea of a mechanical digital computer in the 1830s, and many of the principles used in Babbage's design are the basis of today's computers. The computer appears to be a mysterious machine, but it is nothing more than a tool that just happens to be a highly sophisticated electronic device. It is capable of data storage, basic logical functions, and mathematical calculations. Computer applications have expanded human capabilities to such an extent that virtually every type of business and industry utilizes a computer, directly or indirectly.
The first demonstration with
a computer, as a tool of drawing and design, was made at the "
Starting from the mathematicians' interest in visualizing the graphics of some functions, as well as from the engineers' and physicists' wish of getting information presented as drawings and diagrams from the computer, the graphics obtained by the means of computer become not only a discipline of informatics, but also of the visual arts, of the industrial design and of the projecting.
The CAD (Computer Aided Design or Drafting) techniques, using specialized programs led to the increase of the "quality" of realism contained in the drawing realized by means of computer.
Yet, we cannot state that in the future all the drawings will be realized by the computer and the engineers, designers and drafters will not be necessary any more. The computer is able to do many things, very quickly, but it is still an electronic equipment, without brains, at least for the moment. It cannot think and cannot do anything more or anything less than what it was "told" to do. A CAD system is not creative, but it can help a lot the user to become more productive, earn time. The creator is "the man" with his so-called "limit of his incompetence".
|