MIND-iPhonEX
Eclipse IDE Manual
November 30, 2003

MIND-iPhonEX
Eclipse - environment configuration
December 08, 2003
MIND CTI Ltd. shall bear no responsibility or liability to a client or to other person or entity with respect to liability, loss or damage caused or alleged to be caused directly or indirectly by MIND-iPhonEX®. This includes but is not limited to any interruption of service, loss of business or anticipatory profits or consequential damage resulting from the use or operation of MIND-iPhonEX®.
Information in this document is subject to change without notice. Companies, names, and data used in examples herein are fictitious unless otherwise noted. No part of this document maybe reproduced or transmitted in any form or by any means, electronic or mechanical, for any purpose without the express written permission of MIND CTI Ltd.
Windows, as used in this manual, shall refer to the Microsoft implementation of a Windows system.
Rev 01
PN - IPX50040-COM
2002 MIND CTI Ltd. All rights Reserved.
Document Modification Track Changes
|
Author |
Version |
Date |
Comments |
|
Yoni Roit |
1.0 |
08/12/03 |
First version |
Eclipse installation
Eclipse platform
Eclipse launcher
Plug-ins
Plug-ins
JAD
Workspaces and launcher
Workspaces
Configuring launcher
Configuring Eclipse
Importing a settings file
Defining installed JREs
Configuring plug-ins
Jalopy plug-in
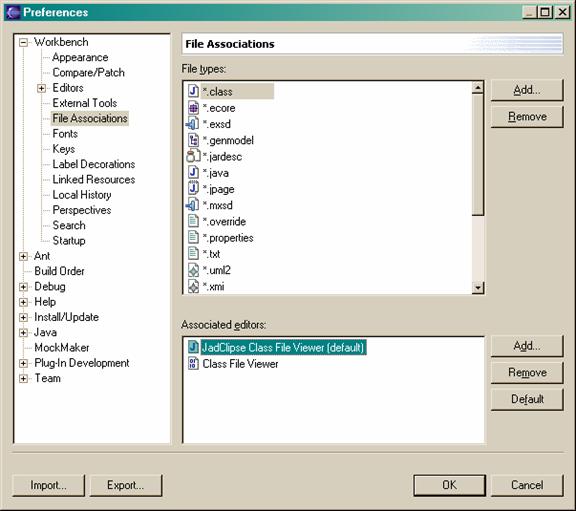
JADClipse
Creating a MIND project
Preparations
Project concept and source structure
Adding a project to a workspace
Project properties
First you need to install the Eclipse platform. Unzip
k:\Dev Soft\Eclipse2.1\Eclipse-SDK-2.1.2-win32.zip to a Program Files folder on your hard drive. Program Files\Eclipse will be the root of your Eclipse platform.
Now we need to set up a launcher. Launcher will allow you to start your Eclipse in different workspaces without having to deal with complex startup options. Unzip k:\Dev Soft\Eclipse2.1\plugins\eclauncher-1.0-build1-redist.zip into any folder on your hard drive. Create a shortcut to Eclipse-Launcher.exe on your desktop or quick-launch bar.
In K:\Dev Soft\Eclipse2.1\plugins you will find installation packages of the plugins that we need. Installation is simple, all you should do is just unzip the file. Some of the files should be unzipped to Eclipse root directory, and some must be unzipped into Eclipse/plugins directory. Please unzip all the files from the following table into corresponding directories
|
Plugin name |
File name |
Where to unzip |
|
Visual Editor |
VE-SDK-0.5.0RC1.zip |
Eclipse root |
|
UML plugin |
uml2_200311181555.zip |
Eclipse root |
|
Jalopy |
jalopy-eclipse-0.2.6.zip |
Eclipse/plugins |
|
JADClipse |
jadclipse_b206.zip |
Eclipse/plugins |
|
GEF plugin |
GEF-runtime-I20031015.zip |
Eclipse root |
|
EMF plugin |
emf_1.1.1_20031020_1612WL.zip |
Eclipse root |
|
Implementators |
dk.kamstruplinnet.implementors-0.0.9.zip |
Eclipse root |
JAD stands for Java Decompiler. It can decompile Java class files into a java source files. Jad.exe is located in k:\dev soft\eclipse2.1\plugins. Please copy it into any folder on your hard drive.
Workspace is a folder on your hard-drive under which all your projects and sources will reside. We will have a separate workspace for each iPhonEX version. Eclipse Launcher will be used to start Eclipse in different workspaces. Dedicate a folder for a version which we will work on now(for example, d:\jw\mb53).
Configuring Launcher. Start Eclipse Launcher (EclipseLauncher.exe).
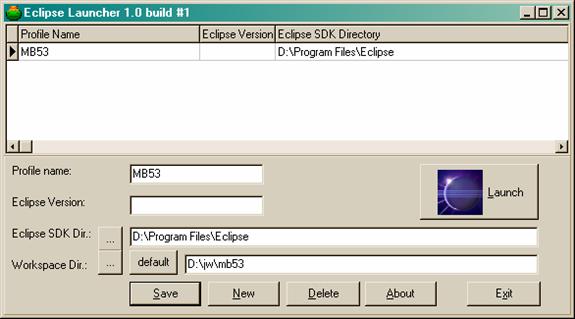
|
Field name |
Value |
|
Profile name |
Name for a launch configuration |
|
Eclipse version |
Version - can be omitted |
|
Eclipse SDK Dir |
Eclipse root dir |
|
Workspace dir |
A directory for your workspace |
Click 'Save' to save this configuration for future uses. You will need to define a configuration for each source version.
All the actions in this chapter must be performed once in each workspace which you will be using.
Start Eclipse ('Launch' button in Eclipse Launcher). Open Window menu->Preferences, and click on the import button (at the bottom of a dialog). This will import a predefined workspace configuration file. You will need to do it for each source version you defined. The configuration file is called eclipse-workspace-settings.epf and it is located in k:\dev soft\Eclipse2.1\settings
Open Window->Preferences
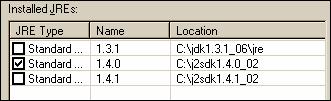
Java->Installed JREs
JDK 1.3.1 is installed by default. To add another, click "Add", browse for JDK's home directory, and it will be automatically discovered
In Installed JRE's list, one of the JREs will be checked. This JRE will be used by default in your projects. You will be able to change a JRE for a project to a non-default, in project properties.
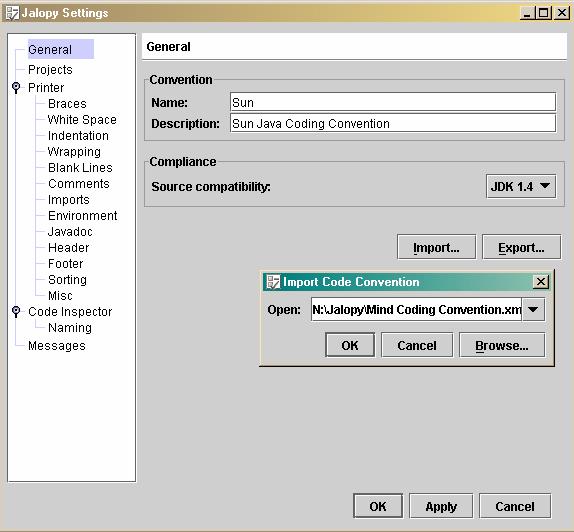
open Window->Jalopy Preferences menu.
Click an 'Import' button in 'General' section and specify the path to MIND jalopy preferences file: n:\jalopy\Mind Coding Conventions.xml
Launch Eclipse. We assume that all the steps described before (configuring launcher, setting up workspace directories, importing settings file) have already been done.
A settings file that you've imported contain classpath variables that point to different libraries that you use in project definition. You can change values of these variables by opening Window->Preferences, Java->Classpath variables
Please verify that the following variables point to the correct files/folders on your hard drive:
|
ORACLE_JDBC_817 |
Should point directly to classes12.zip file of your <ORACLE_HOME>/jdbc/lib folder |
|
V500_LIB |
Should specify the lib folder of your 5.00 source version |
|
V501_LIB |
Should specify the lib folder of your 5.01 source version |
|
V520_LIB |
Should specify the lib folder of your 5.20 source version |
|
V530_LIB |
Should specify the lib folder of your 5.30 source version |

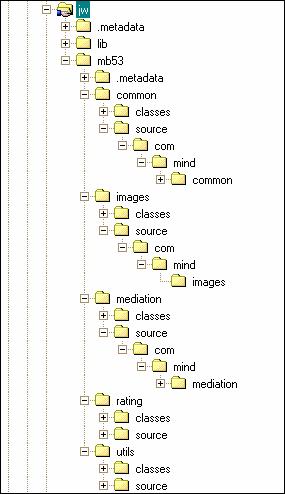
Here is the directory structure for version 5.30 as it can be seen in Windows Explorer.
First time you start Eclipse in a new workspace, it still has no projects defined. If you took a latest version from StarTeam, then you must have project folders along with project description files (.classpath and .project) in each project directory. What you need now is to add them to your workspace. Open a context menu in either Navigator view or Package Explorer, select New->Project->Java Project. In 'project name' field type folder name of the project you define (you will have to define projects for 'images', 'utils', 'common' and all the other modules you use). After you've typed the name of folder, you can click 'Finish'. Eclipse will find the project folder, read the project description files, discover all sources and add the project, ready to be compiled, to the workspace. That's all you have to do to define a project using Eclipse.

In case there is a problem in project definition, or you're just curious, here is the description of project definition that you should pay attention to.
You can open project properties using project's context menu or by selecting Project->Properties from the main menu.

The most valuable section of project properties is 'Java Build Path'. It defines all directories, classpath and project import definitions.
In the 'Source' tab you should have a source folder definition. This is the folder which is a root for a 'com' folder of your source. You can define an exclusion filter (in case you don't want to include specific folder(s) in your project source definition). For more info, see Eclipse manual.
At the bottom of Java Build Path section you have a definition for default output classes folder.
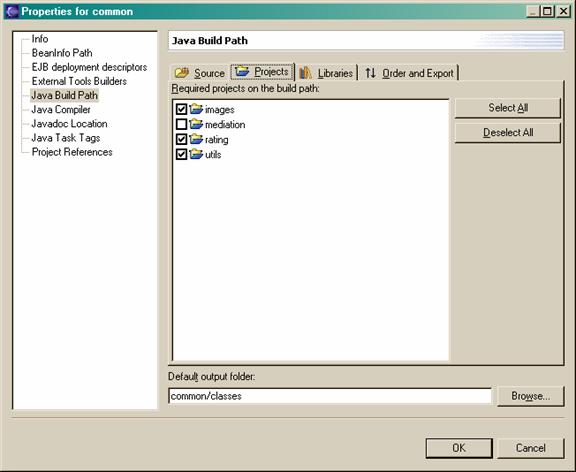
In the 'Projects' tab you can select all the other projects in the workspace, that your project will import. By default, 'Common' imports images, rating and utils.
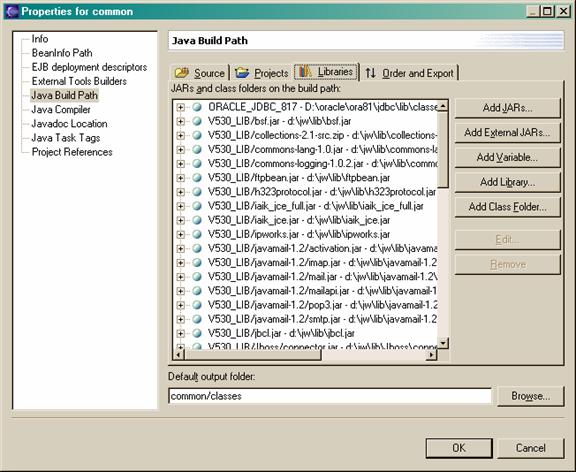
In the libraries tab you will be able to define all the classpath libraries. All our standard libraries (jw/lib, oracle) are imported relative to corresponding classpath variables. Project descriptions which are using those variables are stored in StarTeam. In section 6.1 (Preparations) you've set the values of these variables on your local hard drive once and for all, so your project libararies definition should point to the correct sources.
If you need to add an additional JAR which is not a part of our jw/lib folder, use 'Add External JARs' button. Select a needed JAR file(s) and they will be added to your project, relative to your hard drive root (and not relative to a MIND classpath variable. This means that you will not be able to check in the project definition in StarTeam, since other programmers will not be able to use it. Classpath variables are highly recommended).
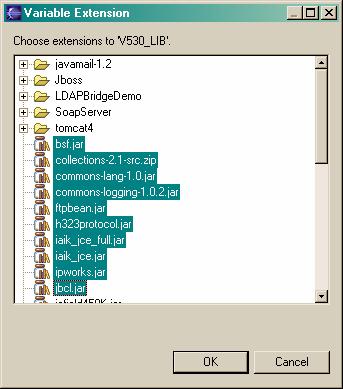
If you want to add JAR(s) relative to classpath variable, use 'Add Variable' button. If your variable points to a folder (like in case with V5xx_LIB variables), you can click on 'Extend' button to multi-select all the JARs under the given folder.

In the 'Order and Export' tab you can define an order in which the imported projects will be built.
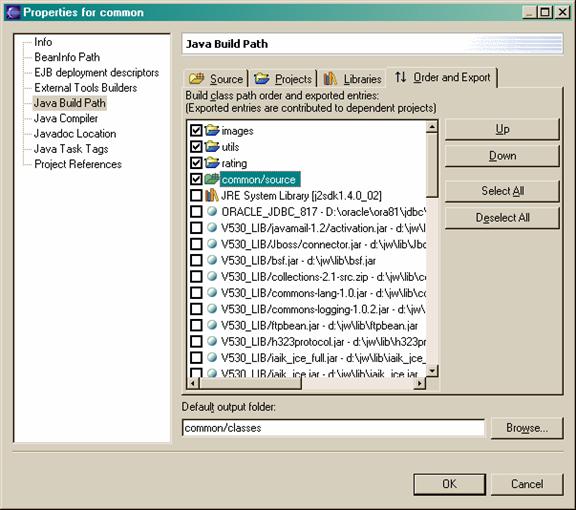
In addition, you can "export" imported projects and resources to dependant projects, by selecting the checkmark near the project/resource name. For example: If project Common exports Images, Utils and Rating, then project Mediation, which imports project Common, can import project Common only, and not Common, Images, Utils and Rating all together.
Another interesting section in project properties is 'Java compiler' section which defines different compiler-related preferences per project. This section overrides the global compiler preferences, specified in Window->Preferences, Java->Compilter. For more info, see Eclipse manual document.
|
