![]() Electronic (breakerless) ignition systems
Electronic (breakerless) ignition systems
Contents
5C.1
Distributor - overhaul . . . . . . . . . . . . . . . . . . . . . . . . . . . . . . . . . . . . . .4
Distributor - removal and refitting . . . . . . . . . . . . . . . . . . . . . . . . . . . . .3
General information . . . . . . . . . . . . . . . . . . . . . . . . . . . . . . . . . . . . . . .1
Ignition HT coil - removal, testing and refitting . . . . . . . . . . . . . . . . . . .6
Degrees of difficulty
Ignition module (control unit) - removal and refitting . . . . . . . . . . . . . .7
Ignition system check . . . . . . . . . . . . . . . . . . . . . . . . . . .See Chapter 1
Ignition system - testing . . . . . . . . . . . . . . . . . . . . . . . . . . . . . . . . . . . .2
Ignition timing - adjustment . . . . . . . . . . . . . . . . . . . . . . . . . . . . . . . . .5
Easy suitable for novice with little experience
Fairly easy suitable for beginner with some experience

![]()
![]()
![]()
![]()
![]()
![]()
![]()
![]()
![]()
![]()
![]()
![]()
![]()
![]()
![]()
![]()
![]()
![]()
![]()
![]()
![]()
![]()
![]()
![]()
![]()
![]()
![]()
![]()
![]()
![]()
![]()
![]()
![]()
![]()
![]()
![]()
![]()
![]()
![]()
![]()
![]()
![]()
![]()
![]()
![]()
![]()
![]()
![]()
![]()
![]()
![]()
![]()
![]()
![]()
![]()
![]()
![]()
![]()
![]()
![]()
![]()
![]()
![]()
![]()
![]()
![]()
![]()
![]()
![]()
![]()
![]()
![]()
![]()
![]()
![]()
![]()
![]()
![]()
![]()
![]()
![]()
![]()
![]()
![]()
![]()
![]()
![]()
![]()
![]()
![]()
![]()
![]()
![]()
![]()
![]()
![]()
![]()
![]()
![]()
![]()
![]()
![]()
![]()
![]()
![]()
![]()
![]()
![]()
![]()
![]()
![]()
![]()
![]()
![]()
![]()
![]()
![]()
![]()
![]()
![]()
![]()
![]()
![]()
![]()
![]()
![]()
![]()
![]()
![]()
![]()
![]()
![]()
![]()
![]()
![]()
![]()
![]() Fairly difficult, suitable for competent DIY mechanic
Fairly difficult, suitable for competent DIY mechanic
Difficult suitable for experienced DIY mechanic
Very difficult, suitable for expert DIY or professional
Specifications
General
Type . . . . . . . . . . . . . . . . . . . . . . . . . . . . . . . . . . . . . . . . . . . . . . . . . . . . Breakerless electronic ignition system
System type:
1.3 and 1.4 litre carburettor models . . . . . . . . . . . . . . . . . . . . . . . . . . AC Delco system
1.4 and 1.6 litre fuel injection models . . . . . . . . . . . . . . . . . . . . . . . . . Multec MSTS-h Hall effect trigger, microprocessor controlled advance
(integral with Multec CFi system)
1.6 litre carburettor models:
16SH engine models . . . . . . . . . . . . . . . . . . . . . . . . . . . . . . . . . . . . Hall effect trigger distributor
16SV engine models:
Pre 1988 models . . . . . . . . . . . . . . . . . . . . . . . . . . . . . . . . . . . . . Inductive trigger, mic 616f56g roprocessor controlled advance type MZV
1989 onwards models . . . . . . . . . . . . . . . . . . . . . . . . . . . . . . . . . Hall effect trigger, microprocessor controlled advance type E1 Plus
(also known as EZ Plus)
1.8 litre models:
18E engine models . . . . . . . . . . . . . . . . . . . . . . . . . . . . . . . . . . . . . Hall effect trigger distributor
18SE engine models . . . . . . . . . . . . . . . . . . . . . . . . . . . . . . . . . . . . Inductive trigger, mic 616f56g roprocessor controlled advance type E1 61
(formerly known as EZ 61)
![]() 2.0 litre models . . . . . . . . . . . . . . . . . . . . . . .
. . . . . . . . . . . . . . . . . . . Inductive
trigger, microprocessor controlled
advance (integral with
2.0 litre models . . . . . . . . . . . . . . . . . . . . . . .
. . . . . . . . . . . . . . . . . . . Inductive
trigger, microprocessor controlled
advance (integral with
Bosch Motronic system)
Firing order . . . . . . . . . . . . . . . . . . . . . . . . . . . . . . . . . . . . . . . . . . . . . . . 1-3-4-2 (No 1 at timing belt end of engine) 5C
Rotational direction of distributor rotor arm . . . . . . . . . . . . . . . . . . . . . . Anti-clockwise (viewed from cap)
Ignition timing
At idle (with vacuum pipe disconnected - early models only):
1.4 litre models . . . . . . . . . . . . . . . . . . . . . . . . . . . . . . . . . . . . . . . . . . 5º BTDC All other models . . . . . . . . . . . . . . . . . . . . . . . . . . . . . . . . . . . . . . . . . 10º BTDC Ignition coil
Primary winding resistance (approximate) . . . . . . . . . . . . . . . . . . . . . . . 1.2 to 1.6 ohm
Secondary winding resistance (approximate) . . . . . . . . . . . . . . . . . . . . . 7k ohms
Torque wrench settings Nm lbf ft
![]() Spark plugs . . . . . . . . . . . . . . . . . . . . . . . . . . .
. . . . . . . . . . . . . . . . . . . . 0 5
Spark plugs . . . . . . . . . . . . . . . . . . . . . . . . . . .
. . . . . . . . . . . . . . . . . . . . 0 5
![]() General
information
General
information
1.3 and 1.4 litre carburettor models On all 1.3 litre models a Delco breakerless electronic ignition system is used. The system comprises solely of the HT ignition coil and the distributor, the distributor being driven off
the end of the camshaft.
The distributor contains an induction sensor (reluctor) mounted onto its shaft and an ignition module (pick-up) fixed to its body. The system operates as follows.
When the ignition is switched on but the engine is stationary the transistors in the module prevent current flowing through the ignition system primary (LT) circuit.
As the crankshaft rotates, the induction sensor moves through the magnetic field created by the module. When the teeth are in alignment with the module projections a small
AC voltage is created. The module uses this voltage to switch the transistors in the unit and complete the ignition system primary (LT) circuit. As the teeth move out of alignment with the module projections the AC voltage changes and the transistors are switched again to interrupt the primary (LT) circuit. This causes a high voltage to be induced in the coil secondary (HT) windings which then travels down the HT lead to the distributor and onto
the relevant spark plug.
![]() 5C.2 Electronic (breakerless)
ignition systems
5C.2 Electronic (breakerless)
ignition systems
1.6 litre (16SH engine) models and
1.8 litre (18E engine) models
On these models a Bosch (Hall effect) ignition system is fitted. The system comprises of the HT ignition coil, the distributor and the ignition module.
The Hall effect system distributor incorporates a permanent magnet, a detector/amplifier, and four vanes. When a vane is masking the detector/amplifier no voltage is induced in the detector, and under these conditions the module passes current through the low tension windings of the coil. Rotation of the distributor will uncover the detector and cause it to be influenced by the magnetic field of the permanent magnet. The Hall effect induces a small voltage in the detector plate which is then amplified and triggers the module to interrupt the low
tension current in the coil.
The ignition module in the Hall effect system incorporates a circuit which switches off the low tension circuit if the time between consecutive signals exceeds seconds. The coil and internal circuits are therefore protected if the ignition is left switched on inadvertently.
1.6 litre (16SV engine) models
Pre 1988 models
The MZV system is fitted to the 16SV engine in 1987 and 1988 model years. It is an electronic system in which the amount of ignition advance is controlled by a microprocessor which receives information on engine speed, temperature and load. A correction can also be applied for small changes in fuel octane rating by means of the octane rating coding plug. The initial ignition timing is still determined by distributor position. The distributor LT pulse generator is of the inductive sensor type.
A basic adjustment coding plug is provided for use when checking the initial ignition timing. When disconnected, this prevents the control unit from applying ignition advance.
1989 onwards models
The E1 Plus system (also known as EZ Plus) is a development of the MZV system. Externally the components are very similar, but the distributor LT pulses are now produced by a Hall Effect sensor instead of inductively. The microprocessor control unit incorporates a self-diagnosis facility for fault detection, but this is only accessible to Vauxhall dealers or other specialists with dedicated test equipment. The control unit also limits engine maximum speed by cutting off the LT pulses to the coil above 6000 rpm.
1.8 litre (18SE engine) models
The E1 61 system (also known as EZ 61) is fitted to all 1.8 litre engines from 1987 model year. Like the MZV and E1 Plus systems it uses a microprocessor control unit to calculate dynamic ignition advance. LT
signals are derived from an inductive pulse sensor mounted on the front face of the cylinder block and a segmented disc attached to the crankshaft No 1 counterweight.
The distributor in this system serves only to distribute HT voltage to the correct cylinders. The distributor position is not adjustable and has no effect on ignition timing. The only alteration possible to the timing is by means of the octane rating coding plug.
1.4 and 1.6 litre fuel injection models
The MULTEC CFi engine management system is described in Chapter 4B. The system is regulated by an Electronic Control Unit (ECU) which is continuously supplied information from various engine, cooling system and fuel system sensors. The ECU is then able to make the necessary adjustments to the fuel and ignition systems in accordance with the continuously changing demands of the engine. The ECU also has a diagnostic function, which can be used in conjunction with special Vauxhall test equipment, for fault diagnosis in the ignition system.
With the exception of basic checks to ensure that all relevant wiring and connections are in good condition and securely connected, fault diagnosis should be entrusted to a Vauxhall dealer.
2.0 litre models
The Motronic systems are fully described in Chapter 4B. The ignition side is very similar to the E1 61 system described earlier. Again, no alteration to the timing is possible except via the octane rating plug.
The Motronic M2.5 system fitted to
6-valve models compensates for small changes in fuel octane rating automatically as part of the knock control function. The control unit contains two ignition timing 'maps', one for high octane fuel and one for lower octane. If the engine knocks frequently, the control unit switches to the low-octane map. A steady period free of knocking will cause a switch back to the high-octane map. On the C20XE engine the maps are for and octane fuel; on the others they are for and 8 octane. 91 octane fuel must not be used in the engines which are not programmed for it.
![]() Ignition
system - testing
Ignition
system - testing
![]() Warning: Voltages produced by an electronic
ignition system are considerably higher than those
Warning: Voltages produced by an electronic
ignition system are considerably higher than those
produced by conventional ignition systems. Extreme care must be
taken when working on the system with the ignition switched on. Persons with surgically-implanted cardiac pacemaker
devices should keep well clear of the ignition circuits, components and test equipment
Carburettor models and 1.8 litre
(18E engine) models
Note: Refer to the warning given in Section 1 of Part A of this Chapter before starting work. Always switch off the ignition before disconnecting or connecting any component and when using a multi-meter to check resistances.
General
1 The components of electronic ignition systems are normally very reliable; most faults are far more likely to be due to loose or dirty connections or to "tracking" of HT voltage due to dirt, dampness or damaged insulation than to the failure of any of the system's components. Always check all wiring thoroughly before condemning an electrical component and work methodically to eliminate all other possibilities before deciding that a particular component is faulty.
2 The old practice of checking for a spark by holding the live end of an HT lead a short distance away from the engine is not recommended; not only is there a high risk of a powerful electric shock, but the HT coil or amplifier unit will be damaged. Similarly, never try to "diagnose" misfires by pulling off one HT lead at a time.
Engine will not start
3 If the engine either will not turn over at all, or only turns very slowly, check the battery and starter motor. Connect a voltmeter across the battery terminals (meter positive probe to battery positive terminal), disconnect the ignition coil HT lead from the distributor cap and earth it, then note the voltage reading obtained while turning over the engine on the starter for (no more than) ten seconds. If the reading obtained is less than approximately
9.5 volts, first check the battery, starter motor and charging system as described in the relevant Sections of this Chapter.
4 If the engine turns over at normal speed but will not start, check the HT circuit by connecting a timing light (following the manufacturer's instructions) and turning the engine over on the starter motor; if the light flashes, voltage is reaching the spark plugs, so these should be checked first. If the light does not flash, check the HT leads themselves followed by the distributor cap, carbon brush and rotor arm using the information given in Chapter 1.
![]()
![]()
![]()
![]()
![]()
![]()
![]()
![]()
![]()
![]()
![]()
![]()
![]()
![]()
![]()
![]()
![]()
![]()
![]()
![]()
![]()
![]()
![]()
![]()
![]()
![]()
![]()
![]()
![]() 5 If there is a spark, check the fuel system for faults referring to the relevant part of Chapter
5 If there is a spark, check the fuel system for faults referring to the relevant part of Chapter
4 for further information.
6 If there is still no spark, check the voltage at the ignition HT coil "+" terminal; it should be the same as the battery voltage (ie, at least
volts). If the voltage at the coil is more than 1 volt less than that at the battery, check the feed back through the fusebox and ignition switch to the battery and its earth until the fault is found.
7 If the feed to the HT coil is sound, check the coil's primary and secondary winding
![]() Electronic (breakerless) ignition systems 5C.3
Electronic (breakerless) ignition systems 5C.3
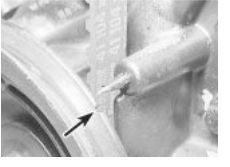
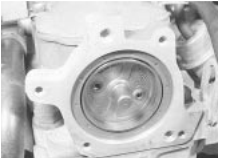
 3.3 Crankshaft pulley timing notch
(arrowed) aligned with pointer (1.3 litre model shown, others similar)
resistance as described later in this Section; renew the coil if faulty, but be careful to check carefully the condition of the LT connections themselves before doing so, to ensure that the fault is not due to dirty or poorly-fastened connectors.
8 If the HT coil is in good condition, the fault is probably within the control unit or distributor assembly. Testing of these components should be entrusted to a Vauxhall dealer.
Engine misfires
9 An irregular misfire suggests either a loose connection or intermittent fault on the primary circuit, or an HT fault on the coil side of the rotor arm.
0 With the ignition switched off, check carefully through the system ensuring that all connections are clean and securely fastened. If the equipment is available, check the LT circuit as described above.
1 Check that the HT coil, the distributor cap and the HT leads are clean and dry. Check the leads themselves and the spark plugs (by substitution, if necessary), then check the distributor cap, carbon brush and rotor arm as described in Chapter 1.
2 Regular misfiring is almost certainly due to a fault in the distributor cap, HT leads or spark plugs. Use a timing light (paragraph 4 above) to check whether HT voltage is present at all leads.
3 If HT voltage is not present on any particular lead, the fault will be in that lead or
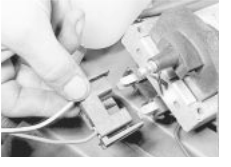
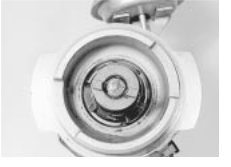
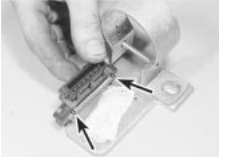
 3.6a Unplugging the distributor LT connector
(1.6 litre carburettor model shown)
3.6a Unplugging the distributor LT connector
(1.6 litre carburettor model shown)
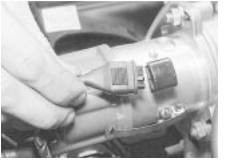
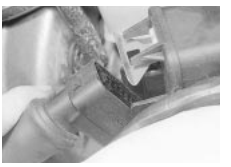
 3.4 Disconnecting the distributor
wiring connector at the ignition coil
3.4 Disconnecting the distributor
wiring connector at the ignition coil
in the distributor cap. If HT is present on all leads, the fault will be in the spark plugs; check and renew them if there is any doubt about their condition.
4 If no HT is present, check the HT coil; its secondary windings may be breaking down under load.
1.8 litre (18SE engine) models and all 1.4, 1.6 and 2.0 litre fuel injection models
5 If a fault appears in the ignition system first ensure that the fault is not due to a poor electrical connection or poor maintenance; ie, check that the air cleaner filter element is clean, the spark plugs are in good condition and correctly gapped, that the engine breather hoses are clear and undamaged, referring to Chapter 1 for further information. Also check that the accelerator cable is correctly adjusted as described in the relevant part of Chapter 4. If the engine is running very roughly, check the compression pressures as described in Chapter 2.
6 If these checks fail to reveal the cause of the problem the vehicle should be taken to a suitably equipped Vauxhall dealer for testing using special diagnostic equipment. The tester will locate the fault quickly and simply alleviating the need to test all the system components individually which is a time consuming operation that carries a high risk of damaging the control unit.
7 The only ignition system checks which can be carried out by the home mechanic are
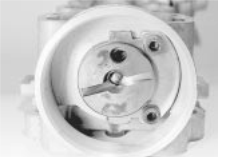
 3.6b Removing the distributor cap
(1.6 litre carburettor model shown)
3.6b Removing the distributor cap
(1.6 litre carburettor model shown)
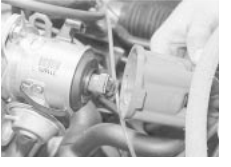
 3.5 Removing the distributor from
the camshaft housing
3.5 Removing the distributor from
the camshaft housing
those described in Chapter relating to the spark plugs, and the ignition coil test described in this Chapter. If necessary, the system wiring and wiring connectors can be checked as described in Chapter 12 ensuring that the control unit wiring connector(s) have first been disconnected.
![]()
![]()
![]()
![]()
![]()
![]()
![]()
![]()
![]()
![]()
![]()
![]()
![]()
![]()
![]()
![]()
![]()
![]()
![]()
![]()
![]()
![]()
![]()
![]()
![]()
![]()
![]()
![]()
![]()
![]()
![]()
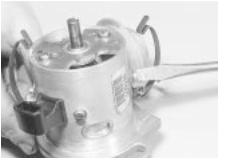
![]() Distributor - removal and refitting
Distributor - removal and refitting
Removal
1.3 and 1.4 litre carburettor models
1 Remove the spark plugs (Chapter 1).
2 Undo the distributor cap retaining screws, lift of the cap and place it to one side.
![]() 3 With the transmission in gear and the handbrake released, pull the car forwards,
until, with a finger over the plug hole, compression can be felt in No 1 cylinder (the
cylinder nearest the crankshaft pulley). Continue moving the car forwards until the
notch on the crankshaft pulley is aligned with the timing pointer
(see illustration) (On automatic transmission models, turn the
3 With the transmission in gear and the handbrake released, pull the car forwards,
until, with a finger over the plug hole, compression can be felt in No 1 cylinder (the
cylinder nearest the crankshaft pulley). Continue moving the car forwards until the
notch on the crankshaft pulley is aligned with the timing pointer
(see illustration) (On automatic transmission models, turn the
engine by means of a spanner on the 5C
crankshaft bolt.) If the distributor cap is temporarily placed in position, the distributor rotor should be pointing towards the No 1 spark plug lead segment in the cap.
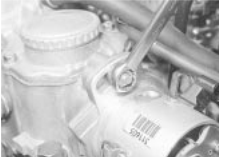
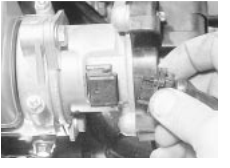
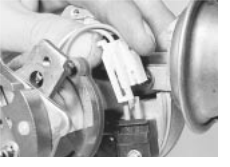
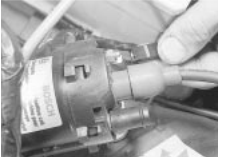
4 Disconnect the distributor wiring connector at the ignition coil (see illustration) and detach the vacuum advance pipe from the distributor vacuum unit.
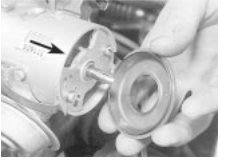
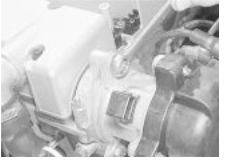
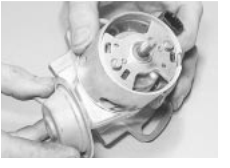
5 Undo the distributor clamp retaining nut (or bolt), lift off the clamp plate, and withdraw the distributor from the camshaft housing (see illustration .
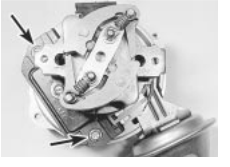
1.6 litre carburettor models and 1.4,
1.6 and 1.8 litre (18E engine) fuel injection models
6 The procedure is similar to that just described in paragraphs to with the following differences.
a) The wiring connector must be unplugged from the distributor, not from the coil (see illustration
b) The distributor cap is secured by two spring clips, not by screws (see illustration
![]() 5C.4 Electronic (breakerless)
ignition systems
5C.4 Electronic (breakerless)
ignition systems
 3.6c Removing the flash shield to expose the No 1 cylinder
reference mark (arrowed)
3.6c Removing the flash shield to expose the No 1 cylinder
reference mark (arrowed)
(1.6 litre carburettor model shown)
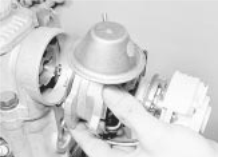
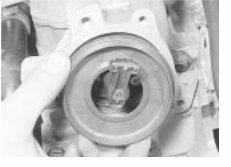
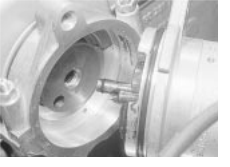
c) There is a mark on the edge of the distributor body to indicate the rotor contact position for No 1 cylinder firing, but the rotor and flash shield must be removed to expose it (see illustration . The rotor can then be refitted to confirm the alignment.
d) The distributor is secured by two nuts, not by a clamp plate. Where no mark is present make one with a scriber or dot of white paint (see illustration)
e) The distributor drive is by means of an offset peg and hole, not by a slot and dogs (see illustration
1.8 litre (18SE engine) models
7 Disconnect the battery leads.
8 Undo the retaining screws and remove the distributor cap from the distributor (see illustration .
9 Extract the insulator. This is an interference
 3.6d Removing the distributor upper
securing nut (1.6 litre carburettor model shown)
3.6d Removing the distributor upper
securing nut (1.6 litre carburettor model shown)
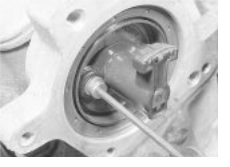
fit in the housing, via an O-ring seal located in a groove on its outer edge, so ease it out of position taking great care not to damage the rotor arm (see illustration .
0 Undo the two retaining screws and remove the rotor arm (see illustrations .
1 If necessary, extract the rotor hub and carefully lever the oil seal out from the cylinder head (see illustrations .
2.0 litre 8-valve models
2 Refer to paragraphs 7 to 11.
2.0 litre 16-valve models
3 Disconnect the battery earth (negative
lead.
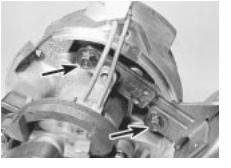
4 Disconnect the Hall sensor multi-plug from the distributor (see illustration .
5 Remove the spark plug lead cover and disconnect the leads from the plugs. Disconnect the HT distributor-to-coil lead
 3.6e Removing the distributor - note peg- and-hole drive (1.6
litre carburettor
3.6e Removing the distributor - note peg- and-hole drive (1.6
litre carburettor
model shown)
from the coil or from the distributor cap.
6 Remove the two bolts which secure the distributor to the cylinder head (see illustration .
7 Withdraw the distributor complete with cap and HT leads. Note how the offset peg on the distributor drive fits into the hole in the exhaust camshaft (see illustration . Refitting
1.3 and 1.4 litre carburettor models
8 Before refitting the distributor, check that the engine has not been inadvertently turned whilst the distributor was removed; if it has, return it to the original position as described in paragraph 3.
9 Position the distributor so that the rotor contact is in line with the arrow or notch in the distributor body. In this position, the offset lug on the distributor drive coupling will be in the
 3.8 On 1.8 litre (18SE engine)
models, undo the distributor cap retaining screws
3.8 On 1.8 litre (18SE engine)
models, undo the distributor cap retaining screws
 3.9 Extract the insulator
 3.10a Undo the two Allen screws . .
.
3.10a Undo the two Allen screws . .
.
 3.10b . . . and remove the rotor 3.11a Extract the rotor hub
. . . 3.11b . . . and
prise out the oil seal
3.10b . . . and remove the rotor 3.11a Extract the rotor hub
. . . 3.11b . . . and
prise out the oil seal
![]() Electronic (breakerless) ignition systems 5C.5
Electronic (breakerless) ignition systems 5C.5
 3.14 On 2.0 litre 16-valve models, disconnect
the Hall sensor wiring . . .
3.14 On 2.0 litre 16-valve models, disconnect
the Hall sensor wiring . . .
 3.16 . . . then undo the retaining
bolts . . .
3.16 . . . then undo the retaining
bolts . . .
 3.17 . . . and remove the
distributor
3.17 . . . and remove the
distributor
 3.19a
Distributor rotor contact, and arrow on distributor body (circled) in alignment
. .
3.19a
Distributor rotor contact, and arrow on distributor body (circled) in alignment
. .
correct position to engage the similarly-offset slot in the end of the camshaft (see illustrations .
0 Check that the O-ring seal is in place on the distributor body, then insert the distributor into its camshaft housing location. With the rotor contact and arrow on the distributor body still in line, refit and secure the distributor clamp.
1 Refit the distributor cap, spark plugs and leads, wiring plug and vacuum pipe.
2 Adjust the ignition timing (Section 5).
1.6 litre carburettor models and 1.4,
1.6 and 1.8 litre (18E engine) fuel injection models
3 Refer to paragraphs to bearing in mind the information given in paragraph 6.
1.8 litre (18SE engine) models
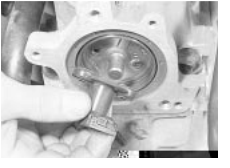
4 Lubricate the lips of the new seal and press the seal squarely into position in the
 3.25 Align the camshaft and rotor
hub bolt holes
3.25 Align the camshaft and rotor
hub bolt holes
 3.19b . . . causing the drive
coupling to be aligned like this . . .
3.19b . . . causing the drive
coupling to be aligned like this . . .
cylinder head, making sure its sealing lip is facing inwards. If necessary, tap the seal into position using a suitable tubular drift which bears only on its hard outer edge.
5 Carefully ease the rotor hub into position aligning its holes with the retaining bolt holes in the camshaft flange (see illustration .
6 Refit the rotor arm and securely tighten its retaining screws.
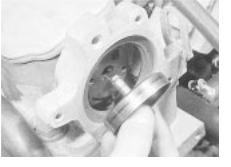
7 Fit a new O-ring to the groove in the insulator. Apply a smear of oil to aid installation and ease the insulator into position
(see illustration
8 Refit the distributor cap, making sure it is correctly located, and securely tighten its retaining screws.
2.0 litre 8-valve models
9 Refer to paragraphs 24 to 27.
2.0 litre 16-valve models
0 Refitting is the reverse of the removal
 3.27 Renewing the insulator sealing
ring
3.27 Renewing the insulator sealing
ring
 3.19c . . . to engage the offset
slot in the camshaft
3.19c . . . to engage the offset
slot in the camshaft
procedure. Renew the O-ring seal if necessary. The distributor can only be fitted in one position and its fixings are not slotted as it has no direct influence on the ignition timing.
![]()
![]()
![]()
![]()
![]()
![]()
![]()
![]()
![]()
![]()
![]()
![]()
![]()
![]()
![]()
![]()
![]()
![]()
![]()
![]()
![]()
![]()
![]()
![]() Distributor - overhaul
Distributor - overhaul
![]() 1.3 and 1.4 litre carburettor
models
1.3 and 1.4 litre carburettor
models
1 Remove the distributor from the engine, as 5C
described in the previous Section.
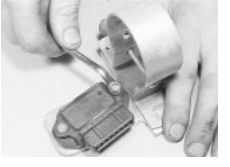
2 Undo the two retaining screws and lift off the rotor (see illustration .
3 Disconnect the two electrical plugs, one at each end, from the ignition module (see illustration .
4 Undo the two module retaining screws (see illustration) and withdraw the unit from the distributor.
5 Undo the two vacuum unit retaining screws
(see illustration disengage the operating rod and remove the vacuum unit.
6 Due to its design and construction, this is the limit of dismantling possible on this distributor. It is possible to renew the rotor, vacuum unit, ignition module and distributor cap separately, but if inspection shows any of the components remaining on the distributor to be in need of attention, the complete distributor assembly must be renewed.
7 Check the distributor cap for corrosion of the segments, and for signs of tracking, indicated by a thin black line between the segments. Make sure that the carbon brush in
5C.6 Electronic (breakerless) ignition systems
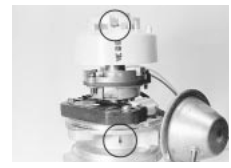
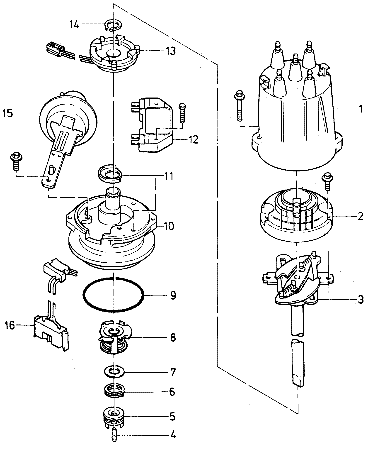
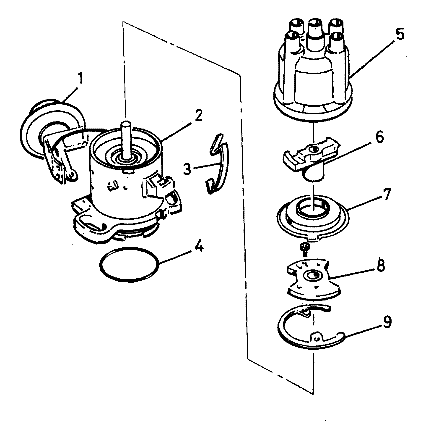
![]() 4.2 Exploded view of AC Delco breakerless type distributor - 1.3
litre models
4.2 Exploded view of AC Delco breakerless type distributor - 1.3
litre models
1 Distributor cap
2 Rotor
3 Shaft
4 Pin
5 Drive dog
6 Spring
7 Washer
8 Spring
9 O-ring
10 Body
11 Seal
12 Ignition module
13 Induction sensor
14 Circlip
15 Vacuum unit
16 Plug to coil
 the centre of the cap moves freely, and stands proud of its holder. Renew the cap if necessary.
8 If the metal portion of the rotor is badly burnt or loose, renew the rotor. If slightly burnt it may be cleaned with a fine file.
9 Suck on the end of the vacuum unit outlet, and check that the operating rod moves in as the suction is applied. Release the suction, and check that the rod returns to its original position. If this is not the case, renew the vacuum unit.
0 Inspect the distributor body and shaft assembly for excessive side movement of the shaft in its bushes. Check that the advance weights are free to move on their pivot posts,
 4.4 Ignition module securing screws
(arrowed)
and that they return under the action of the springs. Check the security of all the components on the distributor shaft, and finally check for wear of the lug on the drive coupling.
1 Reassembly of the distributor is the reverse sequence to dismantling, but apply a few drops of engine oil to the advance weight pivot posts before refitting the rotor. If a new ignition module is being fitted, the new module will be supplied with a small quantity of silicone grease. This should be applied between the module and its housing, to improve heat dissipation.
2 Refit the distributor as described in
Section 3, after reassembly.
 4.5 Vacuum unit retaining screws
(arrowed)
 4.3 Disconnecting an electrical
plug from the ignition module
4.3 Disconnecting an electrical
plug from the ignition module
1.6 litre (16SH engine) and 1.8 litre
(18E engine) models
3 Remove the distributor as described in
Section 3.
4 Pull off the rotor arm, and unclip the flash shield (see illustration .
5 Although the top bearing plate can be removed after undoing its retaining screws, this is of academic interest, since no spare parts are available, neither are there any items requiring adjustment.
6 The vacuum unit can be renewed separately if required. Remove it by undoing the two retaining screws and unhooking the operating arm from the baseplate (see illustrations . Note that the screws are not of equal length; the longer screw also secures one of the distributor cap clips.
7 Test the vacuum unit, as described in paragraph 9.
8 Inspect the distributor cap and rotor, as described in paragraphs 7 and 8.
9 Reassemble the distributor in the reverse order to that followed when dismantling. Make sure that the vacuum unit operating arm is correctly engaged with the peg on the baseplate; several attempts may be needed to reconnect it.
0 Refit the distributor as described in
Section 3, after reassembly.
![]() Electronic (breakerless) ignition systems 5C.7
Electronic (breakerless) ignition systems 5C.7
4.14 Exploded view of the Bosch breakerless type distributor -
1.6 litre (16SH engine) and 1.8 litre (18E engine) models
![]()
 1 Vacuum unit
2 Body
3 Cap retaining clip
4 O-ring
5 Distributor cap
6 Rotor
7 Flash shield
8 Top bearing plate
9 Abutment ring
1.6 (16SV engine) litre carburettor models and 1.4, 1.6 and 2.0 litre
16-valve fuel injection models
1 Overhaul of the distributor should be entrusted to a Vauxhall dealer.
1.8 litre (18SE engine) and 2.0 litre
8-valve models
2 Refer to Section 3.
![]() 5 Ignition
timing - adjustment
5 Ignition
timing - adjustment
 4.16a Removing a vacuum unit retaining
distributor is correctly refitted (Section 3), the timing should be accurate enough to start the engine and permit it to run.
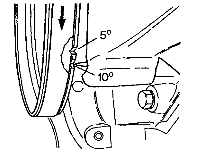
2 Dynamic timing, using a stroboscopic timing light, is carried out as described in Part B, Section 8, paragraphs 10, 11 and 12. Note, however, that the distributor is secured by two nuts instead of a clamp bolt. Note also that on 1.4 litre models, there are two timing notches on the crankshaft pulley; the first represents 10ºBTDC and the second 5ºBTDC
(see illustration
3 Dwell angle checking and adjustment is not necessary with breakerless distributors. Models using unleaded petrol
4 The engines used in Cavalier models are designed to run on high octane unleaded petrol.
5 On litre (13N and 13NB engines) low compression engines, no modifications are required and the ignition timing remains unaltered. However, on all other models the manufacturers recommend that the ignition timing is adjusted in accordance with the following guidelines.
6 If detonation ("pinking" or "knock") occurs, the timing should be retarded by ° (see Part B, Section 8). If detonation occurs, it may be necessary to retard the ignition timing even further; some experimentation may be worthwhile to achieve satisfactory running.
All other models
7 On these models the ignition timing can be checked using a stroboscopic light, but adjustment is not possible. If the ignition timing is incorrect, the car should be taken to a Vauxhall dealer for testing/adjustment (as applicable).
6 Ignition HT coil - removal,
![]()
![]()
![]()
![]()
![]()
![]()
![]()
![]()
![]()
![]()
![]()
![]()
![]()
![]()
![]()
![]()
![]()
![]()
![]()
![]()
![]()
![]()
![]()
![]()
![]()
![]()
![]()
![]()
![]()
![]()
![]()
![]() testing and refitting 5C
testing and refitting 5C
![]()
![]()
![]()
![]()
![]()
![]()
![]()
![]()
![]()
![]()
![]()
![]()
![]()
![]()
![]()
![]()
![]()
![]()
![]()
![]()
![]()
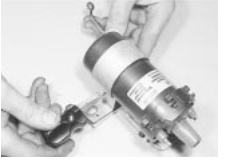
![]() Removal
Removal
1 Disconnect the battery leads.
2 Disconnect the LT wiring connectors from the coil, noting their correct fitted positions
(see illustration
screw
 4.16b Removing the vacuum unit
Warning: Voltages produced by an electronic ignition system are considerably higher than those

![]() produced by conventional ignition systems.
Extreme care must be taken when working on the system with the ignition switched
on. Persons with surgically- implanted cardiac pacemaker devices
produced by conventional ignition systems.
Extreme care must be taken when working on the system with the ignition switched
on. Persons with surgically- implanted cardiac pacemaker devices
should keep well clear of the ignition circuits, components and test equipment
1.3, 1.4 and 1.6 (16SH engine) litre carburettor models and 1.8 litre
(18E engine) fuel injection models
Models using leaded (4-star) petrol
1 Static timing cannot be checked with the breakerless ignition system. However, if the
3 Disconnect the HT lead from the coil. where
5.2 Crankshaft pulley timing marks -
1.4 litre carburettor models
![]() 5C.8 Electronic (breakerless)
ignition systems
5C.8 Electronic (breakerless)
ignition systems
 6.2 Disconnecting a coil LT lead
(1.8 litre model shown)
6.2 Disconnecting a coil LT lead
(1.8 litre model shown)
 6.4b Undoing the coil clamp screw
and nut
6.4b Undoing the coil clamp screw
and nut
necessary, also disconnect the wiring connector from the ignition module (see illustration).
4 Undo the retaining bolts and remove the coil from the car. If necessary, undo the clamp screw and remove the coil from its mounting bracket (see illustrations .
Testing
5 Testing of the coil consists of using a multimeter set to its resistance function, to check the primary (LT '+' to '-' terminals) and secondary (LT to HT lead terminal) windings for continuity, bearing in mind that on the four output, static type HT coil there are two sets of each windings. Compare the results obtained to those given in the
 6.3 Ignition module wiring plug
Specifications at the start of this Chapter. Note the resistance of the coil windings will vary slightly according to the coil temperature, the results in the Specifications are approximate values for when the coil is at
20ºC.
6 Check that there is no continuity between the HT lead terminal and the coil body/mounting bracket.
7 If the coil is thought to be faulty, have your findings confirmed by a Vauxhall dealer before renewing the coil.
Refitting
8 Refitting is a reversal of the relevant removal procedure ensuring that the wiring connectors are correctly and securely reconnected.
![]()
![]()
![]()
![]()
![]()
![]()
![]()
![]()
![]()
![]()
![]()
![]()
![]()
![]()
![]()
![]()
![]()
![]()
![]()
![]()
![]()
![]()
![]()
![]()
![]()
![]() 7 Ignition
module (control unit) - removal and refitting
7 Ignition
module (control unit) - removal and refitting
1.3 and 1.4 litre carburettor models
1 The ignition module is located in the distributor. See Section 4 for details.
1.6 (16SH engine) carburettor models and 1.8 litre (18E engine) fuel injection models
2 The ignition module is located on the coil mounting plate. To gain access, first remove
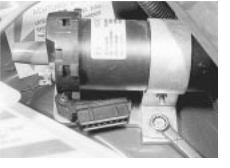 6.4a Removing a coil securing bolt
the coil, as described in Section 6.
3 With the coil removed from its bracket, the module can be unbolted from the mounting plate (see illustration .
4 If a new module is being fitted, it should be supplied with a small quantity of silicone grease, which must be applied to the mounting plate to improve heat dissipation
(see illustration) Similar heat sink compounds can also be obtained from shops selling radio and electronic components.
5 Refit the ignition module in the reverse order to removal. Make sure that the locating pins engage with the holes in the mounting plate.
1.6 litre (16SV engine) carburettor models and 1.8 litre (18SE engine) fuel injection models
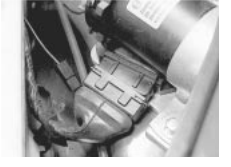
6 The ignition control unit is located in the engine compartment where it is mounted onto the suspension strut turret. To remove the unit, first disconnect the battery leads.
7 Release the spring retaining tangs and disconnect the wiring connector (see illustration .
8 Undo the retaining screws and remove the unit from its mounting bracket.
9 Refitting is the reverse of removal
1.4 and 1.6 fuel injection models and all 2.0 litre models
0 Refer to Chapter 4.
 7.3 Unbolting the ignition module
(1.8 litre model shown)
7.3 Unbolting the ignition module
(1.8 litre model shown)
7.4 Ignition module and mounting plate - note locating pins (arrowed), and heat sink compound on baseplate (1.8 litre model)
 7.7 Disconnecting the control unit
wiring plug - later 1.8 litre model
7.7 Disconnecting the control unit
wiring plug - later 1.8 litre model
|
