|
|
Intel® Application Accelerator -
RAID Edition
User's Manual
Set DocumentTitle "Product Implementation Plan" Product Implementation Plan
TOC \o "1-4"
Scope of This Document
PAGEREF _Toc33001662 \h 5
RAID Introduction
PAGEREF _Toc33001663 \h 5
RAID Benefits [Need updated text from Carlos]
PAGEREF _Toc33001664 \h 5
RAID 0 PAGEREF _Toc33001665 \h 5
RAID Ready Definition
PAGEREF _Toc33001666 \h 6
RAID Ready System Requirements
PAGEREF _Toc33001667 \h 6
Steps Needed to Turn RAID Ready System into RAID
System
PAGEREF _Toc33001668 \h 7
BIOS Importance / Settings
PAGEREF _Toc33001669 \h 7
Configuring BIOS for Intel® RAID for Serial ATA on
Intel® Motherboards
PAGEREF _Toc33001670 \h 7
Creating, Deleting, and Resetting RAID Sets PAGEREF _Toc33001671 \h 8
Create RAID 0 Volume PAGEREF _Toc33001672 \h 8
Delete RAID Volume PAGEREF _Toc33001673 \h 8
Reset RAID Data PAGEREF _Toc33001674 \h 8
Loading the Intel® Application Accelerator 3.0 RAID Edition Driver PAGEREF _Toc33001675 \h 8
Serial ATA (ATA)
PAGEREF _Toc33001676 \h 9
Description
PAGEREF _Toc33001677 \h 9
Comparison of Serial ATA Versus
Parallel ATA (IDE)
PAGEREF _Toc33001678 \h 9
System Requirements
PAGEREF _Toc33001679 \h 9
Serial ATA Data Cable
PAGEREF _Toc33001680 \h 10
Do I Need to Have a Serial ATA Data
and Power Cable for Serial ATA?
PAGEREF _Toc33001681 \h 10
Installing Serial ATA (SATA) Hard
Drives
PAGEREF _Toc33001682 \h 10
Mixing/Matching Serial ATA Hard
Drives with IDE Hard Drives
PAGEREF _Toc33001683 \h 11
Using IDE to Serial ATA
Adaptors [Need to List Reason Why]
PAGEREF _Toc33001684 \h 11
Theoretical Transfer Rates Associated
with Transfer Modes
PAGEREF _Toc33001685 \h 11
How to Identify the Intel Chipset
PAGEREF _Toc33001686 \h 12
Intel® Chipset Software Installation
Utility for Intel Chipsets
PAGEREF _Toc33001687 \h 13
Description
PAGEREF _Toc33001688 \h 13
Obtaining the Intel® Chipset
Software Installation Utility
PAGEREF _Toc33001689 \h 13
Confirming the Intel® Chipset
Software Installation Utility is Installed
PAGEREF _Toc33001690 \h 13
Troubleshooting
PAGEREF _Toc33001691 \h 13
Intel® RAID Option ROM
PAGEREF _Toc33001692 \h 13
Description
PAGEREF _Toc33001693 \h 13
Using the Intel RAID Option ROM
PAGEREF _Toc33001694 \h 14
Creating, Deleting, and Resetting RAID Sets PAGEREF _Toc33001695 \h 14
Create RAID 0 Volume PAGEREF _Toc33001696 \h 14
Delete RAID Volume PAGEREF _Toc33001697 \h 14
Reset RAID Data PAGEREF _Toc33001698 \h 14
Intel® Application Accelerator RAID
Edition
PAGEREF _Toc33001699 \h 15
Description [Need
updated text from Carlos]
PAGEREF _Toc33001700 \h 15
Do You Need the Intel® Application
Accelerator RAID Edition?
PAGEREF _Toc33001701 \h 15
Option for Users with Non-Supported
Intel® 800 Series Chipset and/or Non-Supported Operating System
PAGEREF _Toc33001702 \h 15
Option for Users with Windows* 95
and/or Intel® 440xx/430xx Chipset
PAGEREF _Toc33001703 \h 16
Installation Caution
PAGEREF _Toc33001704 \h 16
Using the Intel® Application
Accelerator RAID Edition
PAGEREF _Toc33001705 \h 16
System Requirements
PAGEREF _Toc33001706 \h 16
Steps to take before installing the
Intel Application Accelerator RAID Edition
PAGEREF _Toc33001707 \h 16
Resolve Conflicts in Device Manager
PAGEREF _Toc33001708 \h 16
Obtaining and Installing the Intel®
Application Accelerator RAID Edition
PAGEREF _Toc33001709 \h 17
Instructions on Creating F6 Floppy
Diskette
PAGEREF _Toc33001710 \h 17
Installation Caution
PAGEREF _Toc33001711 \h 18
Installation Using F6 Method
PAGEREF _Toc33001712 \h 18
Issues During Installation
PAGEREF _Toc33001713 \h 18
Symptom: Incompatible Hardware PAGEREF _Toc33001714 \h 18
Symptom: Operating System Not Supported PAGEREF _Toc33001715 \h 19
RAID Migration Instructions
PAGEREF _Toc33001716 \h 19
Create RAID Volume from Existing
Disk
PAGEREF _Toc33001717 \h 20
Step 1 of 3: Select Source Disk PAGEREF _Toc33001718 \h 21
Step 2 of 3: Select the RAID Volume Name and Strip Size PAGEREF _Toc33001719 \h 21
Strip Size Descriptions PAGEREF _Toc33001720 \h 22
WARNINGS PAGEREF _Toc33001721 \h 22
Step 3 of 3: Confirm Creation of New RAID Volume PAGEREF _Toc33001722 \h 23
Migration Process May Take
Considerable Time to Complete
PAGEREF _Toc33001723 \h 24
Successful Migration
PAGEREF _Toc33001724 \h 24
Create Volume Manually
PAGEREF _Toc33001725 \h 24
Step 1 of 2: Select the RAID Volume Name and Strip Size PAGEREF _Toc33001726 \h 25
Strip Size Descriptions PAGEREF _Toc33001727 \h 26
WARNINGS PAGEREF _Toc33001728 \h 26
Step 2 of 2: Confirm Creation of New RAID Volume PAGEREF _Toc33001729 \h 27
Successful Creation
PAGEREF _Toc33001730 \h 27
Confirming the Intel Application
Accelerator RAID Edition is Installed
PAGEREF _Toc33001731 \h 28
Confirming Version of Intel®
Application Accelerator RAID Edition
Installed
PAGEREF _Toc33001732 \h 29
Using the Intel Application Accelerator RAID Edition Diagnostic Utility: PAGEREF _Toc33001733 \h 29
RAID Driver File Properties: PAGEREF _Toc33001734 \h 29
Confirming Version of Intel® RAID
Option ROM Installed
PAGEREF _Toc33001735 \h 29
Uninstalling the Intel Application
Accelerator RAID Edition
PAGEREF _Toc33001736 \h 30
Uninstall Warning
PAGEREF _Toc33001737 \h 30
Windows* XP
PAGEREF _Toc33001738 \h 30
Disk and Volume Status Parameter
Descriptions
PAGEREF _Toc33001739 \h 31
Status Entries for Physical Disk Parameters: PAGEREF _Toc33001740 \h 31
Status Entries for Volume Parameters: PAGEREF _Toc33001741 \h 31
Unattended Installation Under
Windows XP
PAGEREF _Toc33001742 \h 31
Intel® Application Accelerator RAID
Edition Diagnostic Utility
PAGEREF _Toc33001743 \h 32
Description [Need
updated text from Carlos]
PAGEREF _Toc33001744 \h 32
Generate and View a Report using the
Intel Application Accelerator RAID
Edition Diagnostic Utility
PAGEREF _Toc33001745 \h 32
Support Tab Information
PAGEREF _Toc33001746 \h 33
Troubleshooting
PAGEREF _Toc33001747 \h 33
Frequently Asked Questions (FAQs)
PAGEREF _Toc33001748 \h 34
Glossary
PAGEREF _Toc33001749 \h 35
This document discusses how to properly configure your system when using the Intel® Application Accelerator RAID Edition.
The issues discussed in this guide are only relevant to systems using a supported Intel chipset and supported operating system. [point to supported OS website] Please note that the Intel Application Accelerator RAID Edition does NOT support Beta or pre-released versions of Windows operating systems.
Most of the issues contained in this document are related to either software configuration or hardware integration. Intel is not responsible for the software written by third party vendors or the implementation of Intel components in the products of third party manufacturers.
Customers should always contact the place of purchase or system/software manufacturer with support questions about their specific hardware or software configuration.
RAID
(Redundant Array of Independent Disks) was originally conceived at the
RAID was designed to revolutionize the way computers managed and accessed mass
storage of data by providing an independent and redundant system of disks.
Instead of writing to one Single Large Expensive Disk (SLED), RAID wrote to
multiple independent disks. Originally, the term RAID stood for Redundant Array
of Inexpensive Disks but was revised to Independent disks.
Insert marketing wording here.
Possibly insert Flash
animation in this section as well (visual representation of RAID 0)
RAID accomplishes its goal of redundancy and fault tolerance by doing two
things: one is striping and the other is parity checking. Striping means that
files are written a block at a time over multiple disks. The striping technique
divides data across many drives and improves data transfer rates and total disk
transaction times. Such systems are good for transaction processing, but suffer
from poor reliability because the system is only as reliable as the weakest
individual drive.
RAID 0 stripes data across
all the drives but doesn't utilize parity. If one of the disks fail, the data
must be restored on all five drives from backups. This RAID level is designed
for speed and is the fastest of all the RAID levels but provides the least
protection.
To maximize a disk array subsystem's transaction processing capabilities, data
must be written and read concurrently to and from multiple drives. To
accomplish this, blocks of user data are striped across the array of drives. A
strip consists of a row of sectors (a sector consists of 512 bytes) located in
the same position on each disk across the width of the array. Data striping
eliminates the use of dedicated drives and ensures that the data processing
load is balanced among the available drives, while increasing performance by
writing multiple blocks concurrently.
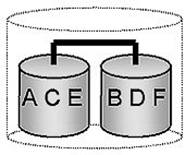
RAID 0 combines two or more hard drives in a way that the data (ABCD. in the
cylinders below) coming from the user is cut into manageable blocks. These
blocks are striped across the different drives of the RAID 0 array. By doing
this, two or more hard drives are combined and the read/write performance,
especially for sequential access, can be improved. This also makes the
operating system see RAID as one large hard drive (e.g. one drive letter). However, no redundancy information is stored in a
RAID 0 array, which means that if one hard drive fails, all data is lost. This
lack of redundancy is also stated in the number 0, which indicates no
redundancy. RAID 0 is thus usually not used in servers where security is a
concern.
RAID 0
Minimum Disks: 2
Advantage: Highest
transfer rates
Fault tolerance: None - if one
disk fails all data will be lost
Application: Typically
used in workstations for temporary data and high I/O rate
"RAID Ready" is a term used to describe a system that an end-user can turn into a RAID system by simply adding a second Serial ATA hard drive and invoking Intel® RAID Migration Technology. Invoking Intel RAID Migration Technology is done by using the Intel Application Accelerator RAID Edition diagnostic utility and initiating the 'Create from Existing Disk' migration process.
NOTE: By using the Intel RAID Migration Technology, a properly configured RAID Ready system can be turned into a RAID system without reinstalling the operating system.
RAID Capable - The term RAID Capable refers to any system which does not
meet the RAID Ready System Requirements (listed under section x.x) but has the
Intel® 865 chipset (Intel® 82801ER I/O Controller Hub)
only.
In order for a system to be considered RAID Ready, it must meet all of the following requirements:
System with an Intel® 865 chipset (Intel® 82801ER I/O Controller Hub) and one Serial ATA (SATA) hard drive
Motherboard BIOS that includes the Intel® RAID Option ROM
Intel® Application Accelerator 3.0 RAID Edition Software Package
RAID Controller is enabled in the BIOS
Note: The steps listed in this section assume that the
operating system has been installed on an existing Serial ATA hard drive as
RAID pass-thru.
To turn a RAID Ready system into a RAID System, complete the following steps:
Physically add one Serial ATA hard drive in the system
Boot to Windows*, install the Intel® Application Accelerator RAID Edition
Open the Intel Application Accelerator RAID Edition diagnostic utility (Start/Programs/Intel Application Accelerator RAID Edition/Intel Application Accelerator)
Create a RAID 0 volume via the Intel Application Accelerator RAID Edition diagnostic utility and perform a 'Create from Pass-thru' migration
Reboot
Optional: Use 3rd party app or Windows* to create and format a new data partition on unused space if any
In order to install the
Intel® Application Accelerator RAID Edition, it is required that the system
BIOS includes the Intel® RAID Option ROM.
It is also necessary that the system BIOS is setup correctly for the RAID
controller before you can install the Intel Application Accelerator RAID
Edition. Refer to the motherboard documentation or contact the motherboard
manufacturer or place or purchase for instructions on properly configuring the
system BIOS for RAID.
If you are using an Intel® motherboard with an Intel® 865 chipset, the
following section (titled 'Configuring BIOS for Intel® RAID for Serial ATA on
Intel® Motherboards) identifies how to configure the BIOS for Intel® RAID for
Serial ATA.
Note: The instructions listed below are specific to motherboards manufactured by Intel with an Intel® 865 chipset. Always follow the instructions that are provided with your motherboard.
The SoftRAID option must be enabled in BIOS before the system can load
the Intel® RAID Option ROM code for Intel RAID.
1. Enter the BIOS Setup program by pressing the <F2> key after the
Power-On-Self-Test
(POST) memory test begins.
2. Select the Advanced menu, then the Drive Configuration menu.
3. Switch the Drive Mode option from Legacy to Enhanced. Next, switch
the SoftRAID option to
Enabled.
4. Press <F10> to save the BIOS settings and exit the BIOS Setup program.
The Serial ATA RAID set must be configured in the RAID Configuration utility.
During the Power-On Self Test (POST), the following message will appear for a
few seconds:
Press <Cntrl-I> to enter Raid Configuration utility
After the above message appears, press the <Ctrl> and <I> keys simultaneously.
1. Select option 1 Create RAID Volume and press the <Enter> key.
2. Select the stripe value for the RAID 0 array by scrolling through the
available values by using
the <_> or <_> keys and
pressing the <Enter> key.
3. The available
values range from 8 KB to 128 KB in 8 KB increments. The strip value should
be chosen based on the planned drive
usage. Some suggested
selections are listed below.
The default selection is 64 KB.
. 16 KB - low disk usage
. 64 KB - typical disk usage
. 128 KB -
performance disk usage
4. Press the <Enter> key again to the Create Volume prompt
to create the array. Confirm this
selection by pressing the <Y>
key after the prompt.
5. Scroll to option 4 Exit and press the <Enter> key to
exit the RAID Configuration utility.
Confirm the exit by pressing
<Y> key.
WARNING: All data on the RAID drives will be lost.
1. Select option 2 Delete RAID Volume and press the <Enter> key to delete the RAID set.
2. Press the <Delete> key to delete the RAID volume. Confirm the
volume deletion by pressing
the <Y> key.
WARNING: All
data on the RAID drives and any internal RAID structures will be lost.
1. Select option 3 Reset RAID Data and press the <Enter>
key to delete the RAID set and
remove any RAID structures from the
drives.
2. Confirm the selection by pressing the <Y> key.
For Microsoft* Windows* XP, follow these steps to install the RAID driver:
1. As Windows Setup begins, press <F6> to specify the RAID driver.
2. When queried by the installation screen, press <S> to specify an additional device.
3. Insert the floppy disk labeled Intel Application Accelerator 3.0 RAID
Edition Driver and press
<Enter>.
4. Press <Enter> to select the Intel RAID Controller.
5. Press <Enter> to continue with Windows Setup.
Serial
ATA (SATA) is a new storage interface
designed to replace parallel ATA (e.g. IDE technology). SATA was designed for a
variety reasons, including performance headroom, cabling issues, and voltage
tolerance requirements. SATA combines software transparency, low cost,
scalability, and design flexibility. Serial ATA has attracted widespread
industry support through the Serial ATA Working Group (www.serialata.org).
SATA is defined as the primary inside-the-box storage connection only, with no
outside-the-box implementation. It is a storage device-centric technology and
does not support other peripherals, such as cameras, scanners, or printers.
The Serial ATA 1.0 specification outlines the following benefits:
- Performance Headroom: SATA provides higher performance than equivalent ATA with performance scaling from 150MB/sec at introduction to 300MB/sec for the second generation, and ultimately to 600MB/sec during its anticipated 10-year roadmap.
- Software Transparency with Legacy Parallel ATA: This enables a relatively easy transition to the new technology.
- Low Cost: SATA is
cost-competitive with equivalent Parallel ATA solutions, including hosts,
devices, and cabling in volume quantities.
The table below is a
comparison of Serial ATA (SATA) versus Parallel ATA (IDE):
|
Serial ATA (SATA) |
Parallel ATA (IDE) |
|||
|
Theoretical Transfer Rate |
150MB/sec |
Theoretical Transfer Rate |
133MB/sec |
|
|
Transfer Mode |
Generation 1 |
Transfer Modes |
PIO - UDMA-6 |
|
|
Data Cable |
4-pin SATA |
Data Cable |
40-pin, 80-conductor IDE |
|
|
Max Data Cable Length |
18 inches |
Max Data Cable Length | ||
|
Power Cable |
SATA Power Cable |
Power Cable |
IDE Power Cable |
|
[Placeholder for SATA and IDE data cable image]
To use Serial ATA (SATA), your system must meet ALL of the following requirements:
SATA compatible logic either on the motherboard or on a Serial ATA adapter card
SATA compatible BIOS
SATA-aware device driver for the operating system
Generation 1-compatible SATA device such as a hard drive
A SATA data cable
A SATA power cable
Serial ATA (SATA) data cables are 4-pin cables. Either end of the SATA data cable can be connected to the SATA hard drive or the connector on the motherboard. SATA data cables can be up to [???] in length.
[Placeholder
for Serial ATA data cable image]
In order to take advantage of Serial ATA (SATA) you need to have a SATA data and power cable. You cannot use older 40-pin 80-conductor IDE or regular IDE power cables with SATA hard drives as they physically will not work.
Installing Serial ATA (SATA) hard drives requires the use of a new SATA data cable (4-conductor) which supports the Serial ATA protocol and a SATA power cable. Either end of the SATA data cable can be connected to the SATA hard drive or the connector on the motherboard.
For correct cable installation** (see illustration below):
1. Attach either cable end to the connector (A) on the motherboard
2. Attach the other cable end (B) to the SATA hard drive
Note: Both the data and power
SATA cables are new cables - you cannot use older 40-pin 80-conductor IDE or
regular IDE power cables with SATA hard drives.
** You should always carefully follow any instructions that come from
the hard drive manufacturer.
If your motherboard has an Intel® 865 chipset and provides both IDE and Serial ATA connections, you should be able to use both Serial ATA and IDE hard drives in the system. Note that Serial ATA hard drives use different data and power cables than IDE devices. In order to use both IDE and Serial ATA hard drives in a RAID configuration, please refer to the section titled 'Create Volume Manually' for additional information.
Using IDE to Serial ATA adaptors (also referred to as "Serial ATA converter" or "device side dongle") to connect IDE hard drives to Serial ATA ports is not recommended. We recommended that you only connect Serial ATA hard drives to Serial ATA ports.
The table below lists different transfer modes that Serial ATA (SATA) devices support along with the theoretical transfer rate. Please refer to the documentation that was bundled with your device or contact the hardware manufacturer for more information about your specific device.
|
Note: This table contains theoretical transfer rates of SATA transfer modes supported by the Intel® 82801ER I/O Controller Hub. Your actual transfer rates can vary from the information contained in this table. In order to take advantage of Serial ATA, your system must meet specific requirements. Please refer to the section titled 'Serial ATA' for more information. |
SERIAL ATA TRANSFER RATES ASSOCIATED WITH TRANSFER MODES
|
Mode |
Theoretical Transfer Rate (MB/s) |
|
Generation 1 |
150MB/s |
If
you are unsure which Intel chipset is located in your computer, first check the
documentation that came with the computer for this information. If this is not
successful, the Intel® Chipset Identification Utility provides an easy way to
identify the specific Intel chipset that is located on your motherboard. The
Intel Chipset Identification Utility can be downloaded from the following Intel
website:
https://support.intel.com/support/chipsets/inf/chipsetid.htm
If Windows* has correctly identified your Intel chipset, you should be able to
look at Device Manager in Windows to identify your Intel chipset:
https://support.intel.com/support/chipsets/deviceman.htm
Note: If the above options do not
provide the necessary information, a qualified professional may be able to
assist you in determining the chipset included in your system. A qualified
professional should be able to properly identify the chipset while taking all
necessary precautions to safeguard your system. (If you choose to take your
system to a qualified professional, you will be responsible for all associated
costs).
|
Important Note The section below is for qualified and trained professionals only. Please do not follow the instructions listed below unless you are a qualified and trained professional. Only qualified and trained professionals should open a computer system. |
|
Note: Some system manufacturers may void your warranty if you open the case. Check with the manufacturer if you have any concerns about this before proceeding. Important
Note Please do not follow the instructions
listed below or attempt to open a computer system unless you are a qualified
and trained professional. |
Identifying the Intel chipset components
located in your computer can usually be done by looking at the motherboard for
the chipset markings. Chipsets are comprised of multiple components and this
page shows the combinations that make up the various Intel® 800 series of
chipsets.
Note: We strongly recommend that you do not try removing any heatsink
attached to your chipset (if present) in order to view the chipset markings.
Chipset
Photo Examples
The Intel® Chipset Software Installation Utility (formerly referred to as Intel® INF Installation Utility) for Intel chipsets was developed for updating certain versions of Windows. The Intel Chipset Software Installation Utility is not required or compatible with Windows NT* 4.0. This utility allows the operating system to correctly identify the Intel chipset components and properly configure the system. The Intel Chipset Software Installation Utility installs specific Windows INF files. The INF files inform the operating system how to properly configure the chipset for specific functionality, such as AGP, USB, Core PCI, and ISA PnP services.
For more details about the specific INF files that are updated, please refer to the README.TXT file that is included with the Intel Chipset Software Installation Utility for Intel chipsets.
|
Note: It is important that your Intel chipset is properly configured prior to installing the Intel® Application Accelerator RAID Edition. If the Intel Chipset Software Installation Utility is needed, it should always be installed prior to installing the Intel Application Accelerator RAID Edition. |
The Intel® Chipset Software Installation Utility for Intel chipsets can be downloaded from the following Intel web site:
https://downloadfinder2.intel.com/scripts-df/Product_Filter.asp?ProductID=816
To confirm that the Intel® Chipset
Software Installation Utility in installed, please refer to the instructions
listed on the following Intel website:
https://support.intel.com/support/chipsets/inf/confirm.htm
After
installing the Intel® Chipset Software Installation Utility for Intel chipsets,
certain symptoms may be seen depending on the system configuration. Please
refer to the following Intel Chipset Software Installation Utility website for
troubleshooting information:
https://support.intel.com/support/chipsets/inf/
The Intel® RAID Option ROM should be integrated with the system BIOS on all motherboards with an Intel® 865 chipset. The Intel RAID Option ROM is a standard PnP option ROM that provides a pre-operating system user interface for the Intel® RAID implementation. It also allows the boot order to be selected from within the BIOSes setup utility.
The Serial ATA RAID set must be configured in the RAID Configuration utility.
This configuration can be done by using the Intel® RAID Option ROM.
During the Power-On Self Test (POST), the following message will appear for a
few seconds:
Press <Cntrl-I> to enter Raid Configuration utility
After the above message appears, press the <Ctrl> and <I>
keys simultaneously.
[Placeholder for screen capture]
1. Select option 1 Create RAID Volume and press the <Enter> key.
2. Select the stripe value for the RAID 0 array by scrolling through the
available values by using
the <_> or <_> keys and
pressing the <Enter> key.
3. The available
values range from 8 KB to 128 KB in 8 KB increments. The strip value should
be chosen based on the planned drive
usage. Some suggested
selections are listed below.
The default selection is 64 KB.
. 16 KB - low disk usage
. 64 KB - typical disk usage
. 128 KB -
performance disk usage
4. Press the <Enter> key again to the Create Volume prompt
to create the array. Confirm this
selection by pressing the <Y>
key after the prompt.
5. Scroll to option 4 Exit and press the <Enter> key to
exit the RAID Configuration utility.
Confirm the exit by pressing
<Y> key.
[Placeholder for screen capture] WARNING: All data on the RAID drives will be lost.
1. Select option 2 Delete RAID Volume and press the <Enter> key to delete the RAID set.
2. Press the <Delete> key to delete the RAID volume. Confirm the
volume deletion by pressing
the <Y> key.
[Placeholder for screen capture]
WARNING: All
data on the RAID drives and any internal RAID structures will be lost.
1. Select option 3 Reset RAID Data and press the <Enter>
key to delete the RAID set and
remove any RAID structures from the
drives.
2. Confirm the selection by pressing the <Y> key.
The Intel® Application Accelerator RAID Edition is a performance software package for Intel desktop PCs that provides:
Faster Boot Time via Accelerated Operating System Load Time
Accelerated Disk I/O for Games, Graphics Applications, Disk Utilities, and Media Authoring Applications
The Intel Application Accelerator reduces the storage sub-system
bottleneck enabling faster delivery
of data from the hard drive to the processor and other system level hardware.
Replacing the Intel® Ultra ATA Storage Driver, the Intel Application
Accelerator supports Microsoft* Windows* XP, Windows Millennium Edition (Me),
Windows 98 Second Edition (SE), Windows 2000, and Windows NT* 4.0.
Also included is the Intel Application Accelerator
RAID Edition diagnostic utility that provides detailed information on all of
the system IDE storage devices including hard drives, CD-ROMS, DVD-ROMs,
CD-RWs, CD-Rs, and removable media.
The Intel® Application
Accelerator RAID Edition reduces the storage sub-system bottleneck, enabling
the processor and other system level hardware to be to be more productive and
efficient. It is a requirement Intel® RAID Technology to work properly. It is not a requirement for
stand-alone (e.g. not configured for RAID) Serial ATA hard drive(s) to work
properly.
The
Intel Application Accelerator RAID Edition was created for users with a
specific system configuration:
System based on a supported Intel chipset and supported operating system [point to supported OS website]
If you have an Intel® 800
Series Chipset and/or an operating system that is not supported by the Intel®
Application Accelerator RAID Edition, you can obtain Intel® Application Accelerator
PV 2.3 for desktops and Intel Application Accelerator PV 2.2.2 for mobile
chipsets. These two versions of the Intel Application Accelerator are available
at the following Intel website:
https://downloadfinder.intel.com/scripts-df/Product_Filter.asp?ProductID=663
If you have retail Windows* 95 (4.00.950), Windows 95 Service Release 1 (4.00.950a), and/or one of the following Intel® chipsets: 440BX/LX/EX/GX/FX 430FX/VX/HX/TX, you can obtain the Intel® Bus Master IDE driver. The Intel Bus Master IDE driver supports a maximum transfer mode of Ultra ATA/33 and it does not have a diagnostic tool. The Intel Bus Master IDE driver is available at the following Intel website:
https://developer.intel.com/design/chipsets/drivers/busmastr/
Troubleshooting information on the Intel Bus Master IDE driver can be found at
the following Intel web site:
https://developer.intel.com/support/chipsets/inf_bm.htm
There is a troubleshooting document available at the above web site that also covers how to enable Bus Mastering using the native Microsoft drivers for users with Windows 95 OSR 2.0 or later (4.00.950b or 4.00.950c) and Windows 98.
Placeholder for WARNING Image
To use the Intel® Application Accelerator RAID Edition, your system must meet ALL of the following requirements:
A supported Intel chipset
A supported operating system [point to supported OS website]
To take advantage of increased storage subsystem performance and overall system performance, your system must meet the following requirement:
A Serial ATA device (e.g. hard drive that supports Generation 1 transfers
|
Note: Serial ATA
has specific requirements. Please refer to the section titled 'Serial ATA'
for |
Before installing the Intel Application Accelerator RAID Edition, there should be NO conflicts (e.g. yellow exclamation points) in Device Manager under Hard Disk Controllers. Device Manager can be accessed by going to: Start Button / Settings / Control Panel / System / Device Manager. Often times, installing the Intel® Chipset Software Installation Utility will resolve conflicts where the operating system does not properly recognize the Intel device. Please refer to the section titled 'Intel® Chipset Software Installation Utility for Intel Chipsets' for more information.
Intel®
Application Accelerator RAID Edition can be downloaded from the following Intel
website:
https://support.intel.com/support/go/iaa/tti.htm
[Update URL]
The Intel Application Accelerator RAID Edition is available for supported operating systems [point to supported OS website] in both English
(iaaxx_enu.exe) and multi-language (iaaxx_multi.exe) versions. An included
README.TXT file covers topics such as system requirements, basic installation
instructions, and advanced installation instructions.
A
Release Notes document is located at the following website:
https://appsr.intel.com/scripts-df/Product_Filter.asp?ProductID=663
[Update URL]
A Known Compatibility Issues document is located at the following website:
https://support.intel.com/support/chipsets/iaa/compat.htm
[Update URL]
After the
Intel Application Accelerator RAID Edition has been downloaded from the Intel
website to a known location on your hard drive, you need to run the file
iaaxx_enu.exe (English version) or iaaxx_multi.exe (multi-language). Running
the file can be done by double-clicking on the file name. The installation
program should launch after you double-click on the file name. Click on the
"Next" button at the Welcome screen. Read the license agreement and
click on the "Yes" button to continue. Click on the "Next"
button to install the driver in the default folder location. Click on the "Next"
button to create the default Program Folder. The driver files will now be
installed. When finished installing, select the "Yes" button for the
reboot option and click on the "Finish" button to restart your
computer. The Intel Application Accelerator RAID Edition should now be installed.
Note: The instructions above assume that the Intel® RAID Option ROM and
BIOS has been configured correctly and the RAID driver has been installed using
the F6 installation method (see section titled 'Installation Using F6 Method'
for additional information).
To create an F6 floppy diskette that contains the necessary files that are needed when installing the driver via an F6 installation method, complete the following steps:
Placeholder for WARNING Image
When you start the
installation of Windows* XP, you most likely will be presented with a message
stating, 'Setup could not determine the type of one or more mass storage
devices installed in your system'. If this occurs, the instructions below
document how to install the RAID driver. To install the Intel® Application
Accelerator RAID Edition driver using the F6 installation method, complete the
following steps:
Note: After completing these steps and the operating system has been
successfully installed, you will still need to install the Intel Application
Accelerator RAID Edition by running the typical Setup.exe process.
Press F6 when prompted with the 'Press F6 if you need to install a third party SCSI or RAID driver' message at the beginning of Windows* XP setup. Note: After pressing F6, setup will temporarily continue loading drivers and then you will be prompted with a screen to load support for mass storage device(s).
Press the 'S' key to 'Specify Additional Device'
You will be prompted to 'Please insert the disk
labeled Manufacturer-supplied hardware support disk into Drive A:' Once
prompted, insert the floppy disk containing the following four files: IASTOR.INF,
IASTOR.SYS, IASTOR.CAT, and TXTSETUP.OEM
and press ENTER.
Note: See the section titled 'Instructions on Creating F6 Floppy
Diskette' for instructions on how to extract these four files from the Intel
Application Accelerator RAID Edition Setup.exe file.
After pressing ENTER, you should be presented with a list of available SCSI Adapters; it should list 'Intel(R) 82801ER Serial RAID Controller'. Select this entry and press ENTER.
The next screen should confirm that you have selected the Intel(R) RAID controller. Press ENTER again to continue.
At this point, you have successfully F6'ed
in the Intel Application Accelerator RAID Edition
driver and Windows XP setup should
continue. Leave the floppy disk in the floppy drive until
the system reboots itself. Windows* setup
will need to copy the files from the floppy again to
the Windows installation folders.
Once Windows setup has copied these four files again, you
should then remove the floppy
diskette so that Windows setup can reboot as needed.
The
following error message occurs during installation:
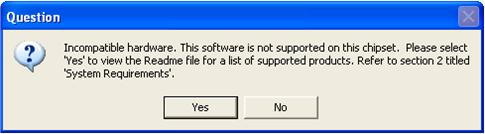
Resolution: This issue is resolved by installing the Intel® Application Accelerator RAID Edition on a system with a supported Intel chipset [update URL]
The
following error message occurs during installation:
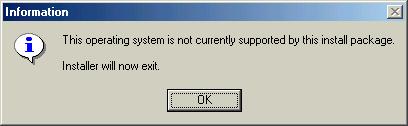
Resolution:
This issue is resolved by installing the Intel Application Accelerator RAID
Edition on a system with a supported operating
system [update
URL]
|
Note For Windows* XP Users: In order to successfully complete installation of the Intel Application Accelerator RAID Edition with Windows* XP, the user must be logged on with Administration Rights. |
The Intel® Application Accelerator RAID Edition offers the flexibility to upgrade from a single Serial ATA (SATA) hard drive to a two drive RAID 0 configuration when an additional SATA hard drive is added to the system. This process will create a new RAID volume from an existing disk. However, several important steps must be followed at the time the system is first configured in order to take advantage of RAID when upgrading to a second SATA hard drive:
To create a volume from an
existing disk, complete the following steps:
Placeholder for WARNING Image
WARNING: A 'Create from Existing Disk' operation will delete all
existing data from the RAID-controlled hard drive(s) and the data cannot be
recovered. It's critical to backup all important data before proceeding.
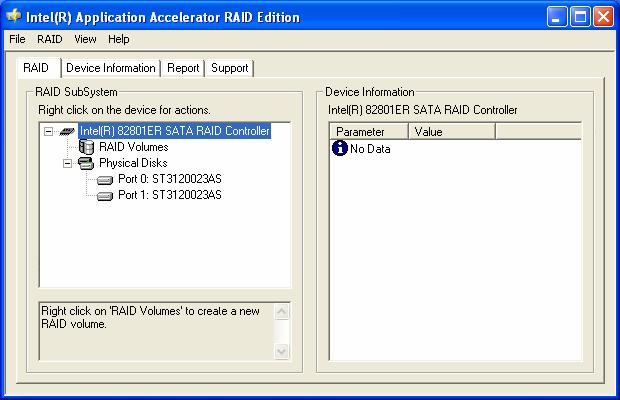
After the Intel Application Accelerator RAID Edition has been successfully
installed and the system has rebooted, click on the Intel Application
Accelerator shortcut link and the following window will appear:
Note: The 'Physical Disks' listed in your system can differ from the following illustration.
To create a RAID volume from an existing disk, right-mouse click on 'RAID Volumes' and select 'Create From Existing Disk' to create a new RAID volume as illustrated below:
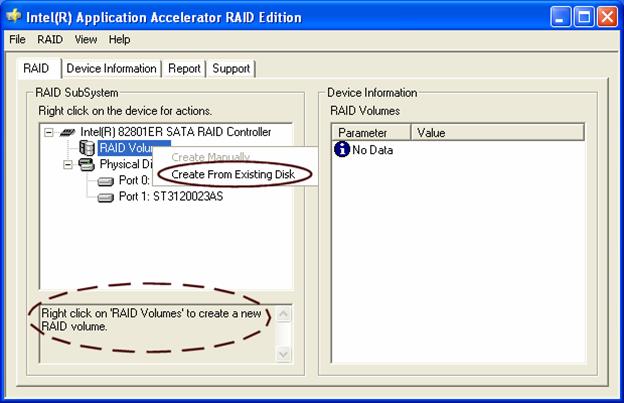
Note: Creating a RAID volume from an existing disk can also be accomplished by clicking on the 'RAID' file menu, and then arrow down and click on 'Create Volume from Existing Disk'.
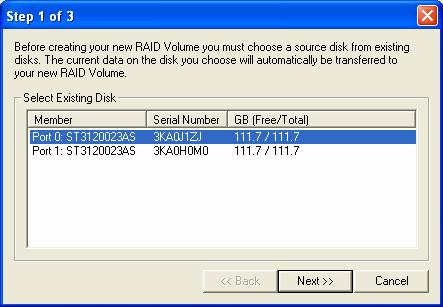
For Step 1, select the source disk that you wish to use and then click 'Next':
For Step 2, select the RAID volume name and strip size and then click 'Next':
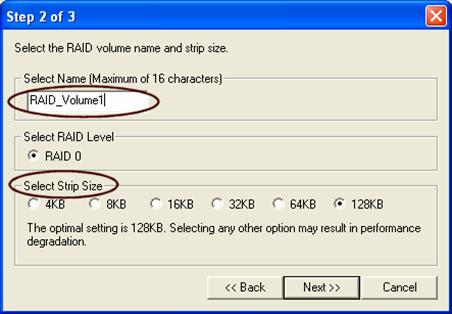
RAID Volume Name:
A desired RAID volume name needs to be typed in where the 'RAID_Volume1' text
currently appears above. The RAID volume name has a maximum limit of 16
characters. The RAID volume name must also be English
alphanumeric ASCII characters.
Strip Sizes:
Select the desired strip size setting. As indicated, the optimal setting is
128KB. Selecting any other option may result in performance degradation. Even
though 128KB is the recommended setting for most users, you should choose the
strip size value which is best suited to your specific RAID usage model.
Additional details on the three most typical strip size settings are listed in
the next section titled 'Strip Size Descriptions':
|
Strip Size Settings |
Descriptions |
|
16KB |
Best for sequential transfers |
|
64KB |
Good general purpose strip size |
|
128KB |
Best performance for most desktops and workstations |
Placeholder for
WARNING Image
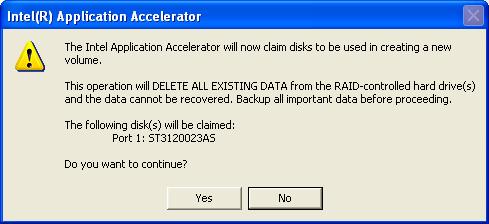
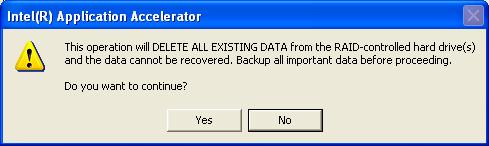
Carefully read the next two dialog boxes that appear and decide if you wish to
continue. Please note that once you have selected 'Yes' on the following two
dialog boxes, the Intel® Application Accelerator RAID Edition will have claimed
the disks to be used in creating a new volume and this operation cannot be
undone. It is critical that you backup all important data before selecting
'Yes' to these dialog boxes:
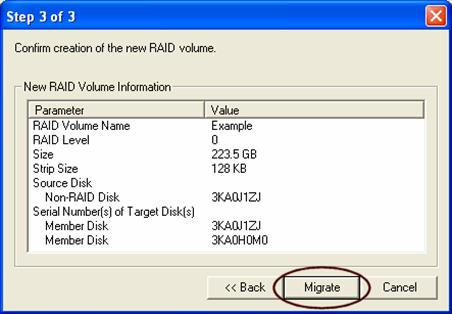
For step 3, confirm the creation of the new RAID volume and then click 'Migrate':
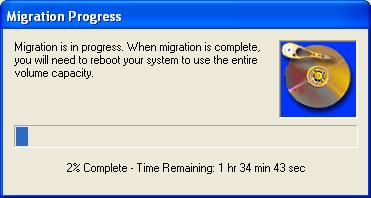
The migration process may take up to two hours to complete depending on the amount of data that needs to be migrated. A dialog window will appear stating that the migration process may take considerable time to complete and you must click 'Yes' in order to start the migration. While you can still continue working on your computer during the migration process, once the migration process starts, it cannot be stopped. If the migration process gets interrupted and your system gets rebooted for any reason, it will pick up the migration process where it left off. You will be provided with an estimated completion time once the migration process starts as illustrated in the following example:
Note: The time remaining for your system can differ from the following example.
If the migration process was completed successfully, the following dialog window will appear:
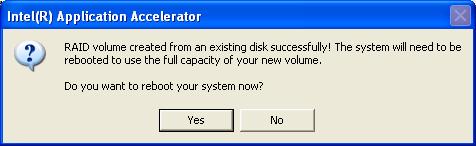
Note: You must reboot your system in order to use the full capacity of the new volume.
The
Intel® Application Accelerator RAID Edition offers the ability to create a RAID
volume manually. This option should be used if you are using a third bootable
device such as an IDE or SCSI hard drive - in addition to using two Serial ATA
hard drives. One benefit of using a third bootable device and creating a RAID
volume manually is that the operating system is not located on the RAID volume.
Should something happen to the RAID volume, the operating system should not be
impacted.
Note: The 'Create Volume Manually' option is not selectable unless a
third bootable device (such as an IDE or SCSI hard drive) is installed in the
system - in addition to using two Serial ATA hard drives.
To manually create a RAID volume, right-mouse click on 'RAID Volumes' and
select 'Create Manually' to create a new RAID volume as illustrated below:
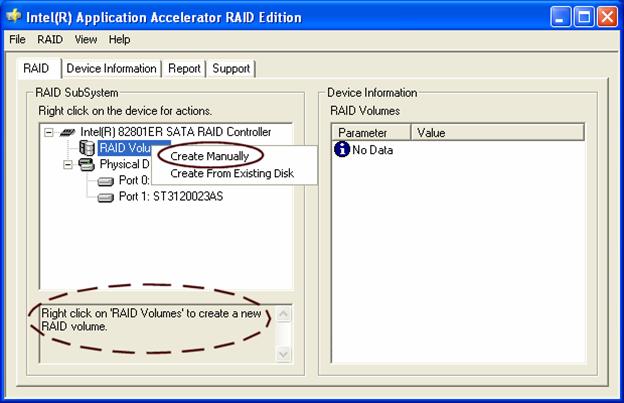
Note: Manually creating a RAID volume can also be
accomplished by clicking on the 'RAID' file menu, and then arrow down and click
on 'Create Volume Manually'.
For Step 1, select the RAID volume name and strip size and then click 'Next':

RAID Volume Name:
A desired RAID volume name needs to be typed in where the 'RAID_Volume1' text
currently appears above. The RAID volume name has a maximum limit of 16
characters. The RAID volume name must also be English
alphanumeric ASCII characters.
Strip Sizes:
Select the desired strip size setting. As indicated, the optimal setting is
128KB. Selecting any other option may result in performance degradation. Even
though 128KB is the recommended setting for most users, you should choose the
strip size value which is best suited to your specific RAID usage model.
Additional details on the three most typical strip size settings are listed in
the next section titled 'Strip Size Descriptions':
|
Strip Size Settings |
Descriptions |
|
16KB |
Best for sequential transfers |
|
64KB |
Good general purpose strip size |
|
128KB |
Best performance for most desktops and workstations |
Placeholder for WARNING Image
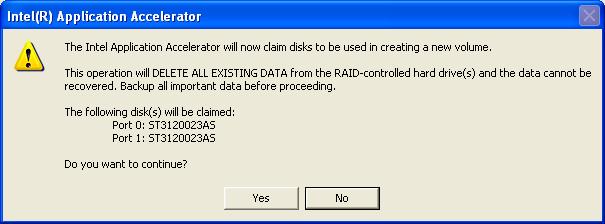
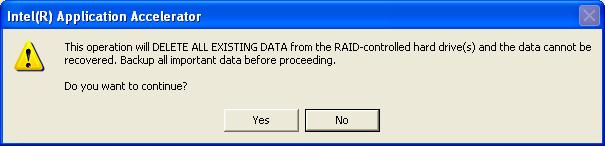
Carefully
read the next two dialog boxes that appear and decide if you wish to continue.
Please note that once you have selected 'Yes' on the following two dialog
boxes, the Intel® Application Accelerator RAID Edition will have claimed the
disks to be used in creating a new volume and this operation cannot be undone.
It is critical that you backup all important data before selecting 'Yes' to
these dialog boxes:
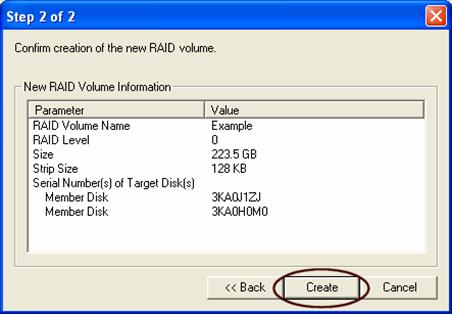
For Step 2, confirm the creation of the new RAID volume and then click 'Create':
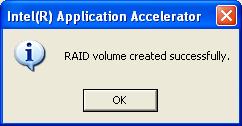
If the manual volume creation process was completed successfully, the following dialog window will appear:
To confirm that the Intel® Application Accelerator RAID Edition has been installed, complete the following steps:
Click on Start Button / All Programs
Find the 'Intel Application Accelerator RAID Edition' program group
Select the 'Intel Application Accelerator' shortcut
The Intel Application Accelerator RAID Edition diagnostic utility should be shown
If
installation was done via have-disk, F6, or unattended installation methods,
you can confirm that the Intel Application Accelerator RAID Edition has been
loaded by completing the following steps:
Windows XP
Note: The following instructions
assume classic mode:
Click on Start Button / Control Panel
Double-click on the 'System' icon
Select the 'Hardware' tab
Select 'Device Manager' button
Expand the 'SCSI and RAID Controllers' entry
Right-click on the 'Intel(R) 82801ER SATA RAID Controller'
Select the 'Driver' tab
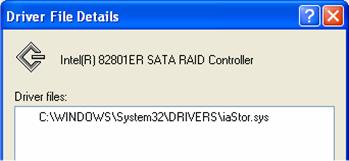
Select the 'Driver Details' button
'iaStor.sys' should be displayed in the window as the following image illustrates:
There are two different ways to determine which version of the Intel® Application Accelerator RAID Edition is installed. The first way is to use the Intel Application Accelerator RAID Edition diagnostic utility. It reports the current version of the RAID Driver installed. The second way is to locate the RAID driver (iaStor.sys) itself and view the file properties.
Run the Intel Application Accelerator RAID Edition diagnostic utility from the following Start Menu path:
o Start All Programs Intel Application Accelerator RAID Edition Intel Application Accelerator
Click the 'Device Information' Tab
Single left click the 'Intel(R) 82801ER SATA RAID Controller' item in the Devices tree
Then look for a parameter in the Parameters list box titled 'Driver Version'. This should have a version number in the following format:
o 3.0.0.xxxx
Locate the file "iaStor.sys" within the following path:
o <System Root>\Windows\System32\Drivers
Right click on "iaStor.sys" and select 'Properties'
Select the 'Version' tab
Located at the top of this tab's view should be a parameter call "File version". Next to it is the RAID Driver version. It should have a version number in the following format:
o 3.0.0.xxxx
There is only one way to determine which version of the Intel® RAID Option ROM has been integrated into the system BIOS:
Press the CTRL + I keys when you see the 'Intel(R) RAID for Serial ATA' status screen appear (should appear early in system boot-up, during the Power-On Self Test (POST))
Located in the top right corner you should see a version number in the following format:
o V3.0.0.xxxx
Placeholder for
WARNING Image
CRITICAL
WARNING: Removing the Intel®
Application Accelerator RAID Edition from a system that has been configured as
RAID will DELETE ALL EXISTING DATA from the RAID-controlled hard drive(s) and
the data cannot be recovered. It is critical that you backup all important data
before proceeding.
Uninstalling the Intel Application Accelerator would render all data on any
existing RAID Volumes inaccessible and therefore it cannot be automatically
uninstalled. It is recommended that any
RAID volume be deleted before disabling the Intel® 82801ER SATA RAID
Controller. Disabling the Intel 82801ER SATA RAID Controller would re-enable
the SATA controller and the operating system would no longer use the Intel
Application Accelerator RAID Edition driver.
For instructions on how to manually uninstall the Intel Application Accelerator RAID Edition, please refer to the following section titled 'Windows* XP'.
To manually uninstall the
Intel Application RAID Edition from your system, complete the following steps:
IMPORTANT NOTE: All the data on the RAID-controlled hard drive(s) will
be DELETED and will not be accessible after completing these steps. Backup all
important data before proceeding.
1. Reboot the system
2. Depending on your system
configuration, complete one of the following set of tasks:
If System has Intel® RAID Option ROM
Installed:
2a.
Enter the Intel RAID Option ROM Setup by pressing the 'Ctrl' and 'i' (CTRL + I)
keys
at the appropriate time during boot-up.
(Note: If your system does not appear to
have Intel RAID Option
ROM installed, skip to step '2d' below)
2b.
Once you have entered the Intel RAID Option ROM Setup, select menu option #3
to
'Reset disks to non-RAID'.
2c.
Exit the Intel Option ROM Setup
-or-
If System Does Not Have Intel RAID Option ROM Installed:
2d.
Enter the system BIOS Setup (usually done by pressing a key such as 'F2' or
'Delete' during boot-up)
2e.
Change the IDE configuration for the RAID-controlled hard drive(s) from 'RAID'
to
'IDE'.
3. Delete any partitions on the hard drives that were previously connected to the RAID controller
4. Reinstall the operating
system
Note: If you experience any difficulties making these changes to the
system BIOS, please contact the motherboard manufacturer or place of purchase
for assistance.
The Intel® Application Accelerator RAID Edition diagnostic utility displays a wide variety of information including the status of the physical disk parameters and the volume parameters. The status of the physical disk parameters indicates the health of the disk while the status of the volume parameters indicates the health of the RAID volume. Listed below are descriptions on the different disk and volume parameters that could appear:
|
Status |
Indicates the health of the disk
|
|
Status |
Indicates the health of the RAID volume
|
To install the Intel Application Accelerator RAID Edition as outlined in the Microsoft* document "Deployment Guide Automating Windows NT Setup," use the supplied TXTSETUP.OEM file included in the application package and insert the lines below into the UNATTEND.TXT file. This method is available for Windows* XP. For Windows XP, the IASTOR.INF, IASTOR.SYS, IASTOR.CAT, and TXTSETUP.OEM files need to first be extracted from the compressed .CAB file. To extract these files, run 'C:\SETUP.EXE -A -P C:\<path>' as described in the 'Advanced Installation Instructions' section of the README.TXT.)
Windows XP:
// Insert the lines below into the UNATTEND.TXT file
[MassStorageDrivers]
"Intel(R) 82801ER SATA RAID Controller" = OEM
[OEMBootFiles]
iaStor.inf
iaStor.sys
iaStor.cat
Txtsetup.oem
The Intel® Application Accelerator diagnostic utility provides detailed, useful information on all of the system IDE storage devices including hard drives, CD-ROMs, DVD-ROMs, CD-RWs, CD-Rs, and removable media. The diagnostic utility queries the Intel Application Accelerator to obtain detailed Ultra ATA Controller and device information, which is displayed on the screen and can be saved to a log file. The Intel Application Accelerator diagnostic utility can also be used to set a particular ATA or ATAPI device's transfer mode limit.
The Intel Application Accelerator diagnostic utility is installed via the Intel Application Accelerator Setup program. For more information on running the setup program, please refer to the section titled "Obtaining and Installing the Intel® Application Accelerator."
The Intel Application Accelerator RAID Edition diagnostic utility allows you to generate and view a report. Everything that appears for each device in your system (except for the Serial #'s), can be generated into a report. This information can be very helpful if you need assistance from Intel Customer Support.
To generate
and view a report, simply arrow up and click on 'File' (located at the top left
of the window), arrow down to 'Report' and then over to the right and click on
'View' as illustrated in the following example:
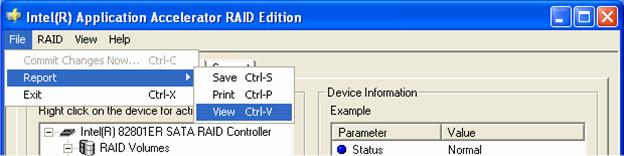
Selecting 'View' option:
The report will be generated and you will automatically be taken to the 'Report' tab where you can view all the system information.
Selecting 'Save' option:
The report can be saved to a location on your hard drive and then viewed with a text viewer such as Notepad* or WordPad.*
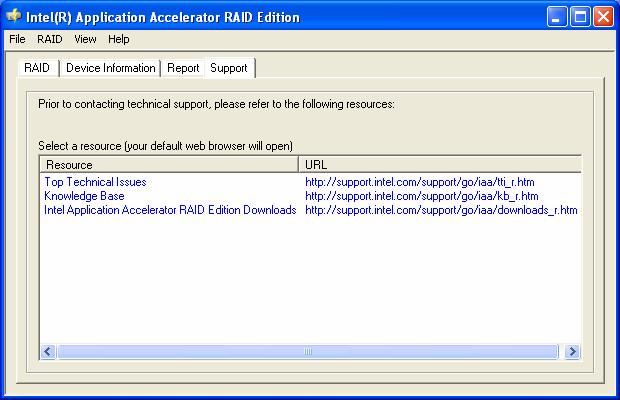
The 'Support' tab contains links to different Intel Customer Support websites if you would like to obtain information on any of the following topics related to the Intel Application Accelerator RAID Edition:
Top Technical Issues
Knowledge Base
Intel Application Accelerator RAID Edition Downloads
The following illustration shows an example of the 'Support' tab:
Please refer to the
following Intel® Application Accelerator RAID Edition website for troubleshooting
information:
[Insert IAA URL]
Please refer to the
following Intel® Application Accelerator RAID Edition website for Frequently
Asked Questions (FAQs): [Note to Shane: rollback driver, defrag, failure in the
middle of a migration, etc.}
[Insert IAA URL]
|
48-bit LBA |
Technology used with hard drives larger than 137GB |
|
Array Roaming |
Ability to move a complete RAID array from one computer system to another computer system and preserve the RAID configuration information and user data on that RAID array. |
|
BIOS |
Basic Input/Output System |
|
Block size |
Same term as 'Strip size': Grouping of data on a single physical disk within a RAID Volume |
|
Create From Existing Disk |
Feature in the Intel Application Accelerator RAID Edition which allows flexibility to upgrade from a single Serial ATA (SATA) hard drive to a two drive RAID 0 configuration when an additional SATA hard drive is added to the system. |
|
Disks |
Physical disks attached to a RAID controller |
|
IDE |
Integrated Drive Electronics |
|
IDE to Serial ATA Adaptor |
Also referred to as "Serial ATA converter" or "device side dongle." Connects IDE hard drive to Serial ATA port |
|
ICH5R |
Intel® 865 Chipset |
|
Intel® Option ROM |
Standard PnP option ROM that provides a pre-operating system user interface for the Intel RAID implementation. Also allows boot order to be selected from within the BIOSes setup utility. |
|
Mirroring |
When data is written on the primary disk and a write also occurs on the mirror disk. The mirroring process is invisible to the user and it is also called transparent mirroring. |
|
Port0 |
Serial ATA port (connector) on a motherboard identified as Port0 |
|
Port1 |
Serial ATA port (connector) on a motherboard identified as Port1 |
|
POST |
Power-On Self Test |
|
RAID |
Redundant Array of Independent Disks |
|
RAID 0 |
Data striping Array. RAID 0 stripes the data across all the drives but doesn't utilize parity. This RAID level is designed for speed and is the fastest of the RAID levels but provides the least protection. |
|
RAID 1 |
Mirrored Disk Array. RAID 1 requires that each primary data disk have a mirrored disk. The contents of the primary disk and the mirror disk are identical. RAID 1 provides the best data protection but is slower than RAID levels 0 or 5. |
|
RAID 5 |
Independent Actuators with parity spread across all drives. RAID 5 stripes data at the block level and also utilizes parity. With RAID 5, user information and parity are combined on every disk in the array. RAID 5 is not as fast as RAID 0 and does not provide as much protection as RAID 1 mirroring. RAID 5 provides good speed and good protection. |
|
RAID Array |
A group of physical disk drives managed by either hardware, software, or a combination of both |
|
RAID Ready |
Term used to describe a system that an end-user can turn into a RAID system by simply adding a second Serial ATA hard drive and invoking Intel® RAID Migration Technology |
|
RAID Volume |
A block of capacity, allocated from a RAID Array and arranged into a RAID topology. The operating system sees a RAID Volume as a physical disk. |
|
SCSI |
Small Computer System Interface |
|
Serial ATA (SATA) |
New storage interface designed to replace parallel ATA (e.g. IDE technology). SATA was designed for a variety reasons, including performance headroom, cabling issues, and voltage tolerance requirements. |
|
Strip |
Grouping of data on a single physical disk within a RAID Volume |
|
Stripe |
The sum of all strips in a horizontal axis across physical disks within a RAID Volume |
|
