Thank
you very much for choosing MixVibes 5.
MixVibes 5 is a powerful DJ and mixer software.
We'd like to think that MixVibes sets new standards in DJ software with a high
level of user-friendliness and at the same time providing features expected by
professional DJ's.
With MixVibes, mixing music on your computer has never been so easy, f 14514k1022o un, and
powerful: up to 16 simultaneous virtual CD players, equalizer, sound effects,
loops, skins and many more... MixVibes supports the most popular sound formats,
including mp3, wav and wma.
MixVibes Pro 5 brings the best solution for mixing mp3's on your computer and
for professional DJ's.
Why MixVibes 5:
Performance and streaming technology : all files start in less than 10ms
Real time BPM counting and batch BPM counting
Auto synchronization with 1 click
Mix Edit Function
Mixer with custom number of channels (2 to 16)
Wave Display
Up to 4 sound cards with switch "on the fly" and monitoring
Skinned Interface (all windows are resizable and all controls can be moved)
Easy to use on multiple display environments (all windows are independent)
All functions included (cue, master tempo, 3 bands eq, headphones monitor ... )
12 internal effects plus DirectX, Winamp and DSP plug-ins support
Visualizations
Media Base management with ID3 V2
Sequencer
Loops
Midi controllable
External controller
Getting on-line Help :
You can always
get on-line help by accessing the MixVibes Forum.
Minimal Requirements
Processor:
PENTIUM III 500Mhz or equivalent
RAM :
128 Mb
Sound card:
one DirectX compatible sound card.
Video card:
one video card that supports 800*600 with 16 bits color depth.
Operating system :
Windows 98/ME, Windows 2000, Windows XP
RECOMMENDATIONS
For some skins, you will need a minimum resolution of 1024*768 with 32 bits color depth.
We also recommend a good processor (800Mhz or better).
MixVibes works the same on any operating system mentioned above, but Windows 2000 and XP are generally more reliable. Then for professionals, we advise the use of one of these two operating systems.
You should have the latest version of DirectX installed.
INSTALLATION
Download the distribution demo file from the MixVibes web site.
Run the distribution demo file
The installation will display the software licensing contract, read it, accept or refuse the terms
Choose the directory where MixVibes will be installed
Finish the installation
Launch MixVibes by clicking the desktop shortcut, thru the Windows "Start" menu or by executing mixvibespro5.exe .
Select the way MixVibes will manage your
audio card(s) from File / Options / System .
If you have done
some changes in the audio settings, you have to restart MixVibes
If you cannot hear anything or have other problems with the audio see the FAQ.
To upgrade to the full version read the registration info.
SOUND CARD CONNECTIONS
To
take advantage of the monitor function, you should have two sound cards
installed on your computer.
To set your sound cards see File / Options / DirectX menu.
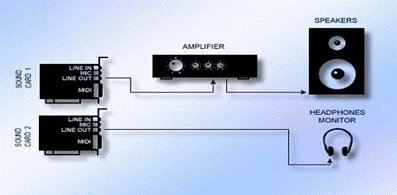
There are 4 ways to connect audio cards with MixVibes:
1. Without a mixer / with two sound cards / directly to speaker or
amplifier
You will be able
to switch audio cards on the fly using the output selector or the monitor
button for streaming a song through the headphones also.
2. With a mixer /
and two audio cards
The mixer will enable monitoring of both audio cards through the
headphones.
Switch the mixer channel 1 to audio output 1 and channel 2 to audio output 2.
Right click on the mixer channel and check the menu item Mixer control lock / Out port.
This setting locks the out port so, even if you load another media file into
the mixer channel, the out port will not change. 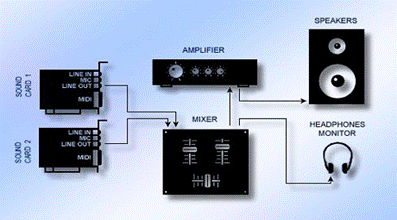
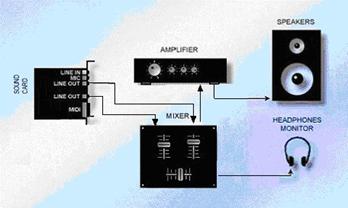
3. With a
mixer / and one
Multi-channel audio card
The mixer
will enable monitoring of both audio cards through the headphones.
Switch the mixer channel 1 to audio output 1 (front) and channel 2 to audio
output 2 (back).
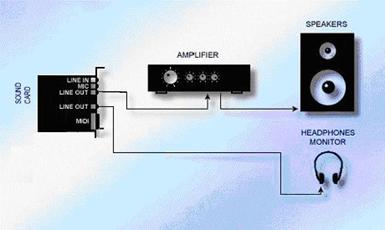
3. Without a
mixer / with one
Multi-channel audio card
Switch the amplifier to audio output 1 (front) and your head phones to audio
output 2 (back).
Add a file
There are many ways to add music (or other media files) in MixVibes:
1. Add single file:
Press the open button on the mixer channel.
Go to edit / add menu. (Shortcuts: CTRL+I for music file , CTRL+E for movie file)
Right click on media base and go to the add menu item.
2. Add multiple files:
Drag and drop selected media from a windows folder directly
to the Media Base view. 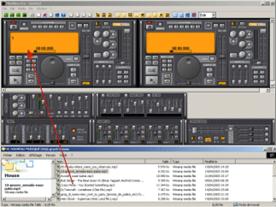
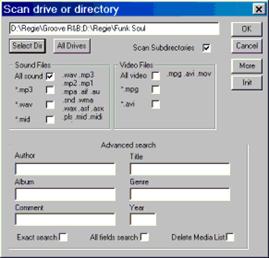
Use the scan command. (shortcut: ALT+ENTER) ![]()
If
you have used the open button on the mixer the media is loaded directly into
the channel.
If not, you have to load the media yourself by a simple drag and drop
operation. Drag the selected file from the media base to a mixer channel.
After
loading the 2 music tracks that you want to mix in the Mixer channels,
Mixing will require 7 operations:
1. Find the BPM for the two music tracks
There are 4 ways in MixVibes to find the BPM:
1. Automatic scan media (see media / beat counting
auto)
2. Automatic real time BPM counter button on toolbar (see auto BPM in settings)
3. Manual interval calculation (see media / beat counting manual)
4. Manual tap in method calculation (see media / beat counting manual)
To execute beat counting, right click on the mixer channel and Select menu "Beat counting"->"Auto" or "Manual". The automatic beat counting works better with dance / house / techno music (boom boom well marked).
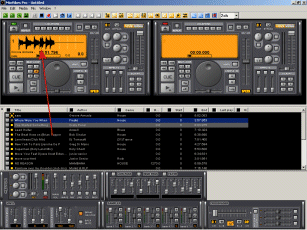
2. Switch the audio port or enable headphones monitor
![]()
![]()
For the next operation you can use your headphones so
you listen previously.
There are 2 ways.
1. Select second audio port and after you find your cue point, you will then
switch back to the main audio out for live playback.
2. Enable headphones monitor in the mixer channel.
To find out how to configure your audio ports and monitor see file / options /
directx.
3. Locate position in each music track where you want to start
MixVibes provides 2 ways you can locate positions in the music files:
With the Jog & Shuttle you can move thru the music to find the exact start position (for example the first bass beat) and set it as a Cue point with the Cue button.
4. Adjust the speed of both tracks so they have the same Bpm (beat matching)
There are many ways to do beat matching with MixVibes.
Here's the easiest method:
The easiest way is to use the "A=B" (B=A)
function that you can find in the crossfader bar:
If you want to beatmatch the song in channel B, with the song in channel A,
just click on the B=A button and MixVibes will automatically adjust the speed
of the song in channel B.

Beatmatching can only be done if you have identified the BPM (using manual or auto) for both channels for the media files to match properly.
1. The two music tracks to be beat-matched are in
mixer channels 1 and 2
2. Left-click and hold on the channel mixer to begin a drag and drop
and press the SHIFT key
3. Move the mouse cursor to channel 2 while still holding down the SHIFT
key
4. Release the mouse in channel 2. MixVibes has updated the pitch of the music
track in channel 1 so the BPM of both tracks have been matched.
Beatmatching can only be done if you have identified the BPM (using manual or auto) for both channels for the media files to match properly.
ATTENTION!
If you do not hold the SHIFT key pressed, MixVibes will simply move the track
from channel 2 to channel 1. To be sure you don't do this by mistake, you
should activate the security option on the toolbar.
5. Start music
After finding the start position, you are ready to start the new music. You can use the Play / pause button in the channel mixer or use keyboard shortcuts.
6. Cross fade the volume
You can use the cross fader control to update the both tracks' volume levels at the same time or use their individual volume sliders.
7. Use the pitch bend controls to keep the beats of the two songs in sync
You can use the pitch bend slider to temporarily adjust the speed.
There are also programmable shortcut keys (F1 ... F8). These keyboard shortcuts can be very useful for keeping the beats in sync.
There are two ways to record your mix with MixVibes.
How to connect the DMC-1 to your computer.
The package
includes the connection wires.
You will connect the controller to one of the computer serial ports.
Depending on the serial port where you connect it, the DMC-1 to will use one of
the internal COM ports (COM1, COM2, etc.)
The picture below describes all the functions
associated by default to each button of the console. The functions that are
written in black color are available by directly pressing on the button. To use
the blue functions, you have to hold the SHIFT key pressed.
All the buttons are customizable. That means that you can change the function
of each control (see external console definition file).
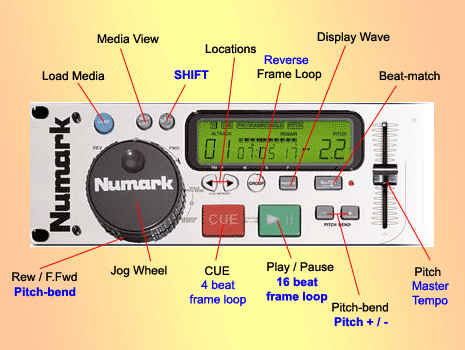
The default list of functions:
1. Inner Jog Wheel: When the Channel is paused or stopped you can use it for searching the cue point. When the Channel is playing, you can use it as pitchbend. If you rotate it clockwise, the media will be temporarily speed up and if you rotate it counter-clockwise the media will be temporarily slowed down.
2. Outer Jog Wheel: Seek function. Depending on the direction
of the rotation, it will go Fast Forward or Rewind
3. Load Media: Quick load one media into Channel.
4. Media View: Toggles the Mediabase show / hide.
5. Shift: This key is used in combination with other keys to
access more functions. For example, holding down SHIFT and pressing the
PLAY/PAUSE button will change the frame length to 16 beats (if not already set)
and loop the whole frame.
6. Locations: These buttons are used to scroll up or down thru
the Locations (if you previously set any). You can use it as multiple Cue
points memory. If you go to a location and press mouse right-click on the CUE
button (or CUESET key - see keyboard definition file (*.vkb)), the current
location is set as the default Cue point.
7. Frame Loop: Loop the whole frame. (you can set the frame to
0.5, 1, 2, 4, 8, 16, or 32 beats on each channel). If you hold down the SHIFT
button, it will reverse the entire frame.
8. Display Wave: Display the Wave window.
9. Beat-Match: Match the BPM of the current channel to the BPM
of the other channel.
10. Pitch
Slider:
Using this slider you can control the Speed of the media. If you hold SHIFT,
this slider will control the Master Tempo function.
You can also use this sliders to control the volume of each channel. Go to file
/ options / controller and chose "mvdmcvol" instead of
"mvdmc".
11. Cue: Works as CUE function. If you hold the SHIFT button,
the frame length will be changed to 4 beats (if not already set) and the whole
frame will be looped.
12. Play: Works as PLAY/PAUSE function. If you hold the SHIFT
button, the frame length will be changed to 16 beats (if not already set) and
the whole frame will be looped.
13. Pitch Bend: Bend the pitch of the song that is playing in
the channel. You can use them to synchronize the beat of the current channel
with the beat of the other channel. If you hold the SHIFT button, they will
work as pitch +/ -.
|
