Objective |
This chapter introduces:
Establishing Parent-Child Relationships
Controlling Parent-Child Relationships
Breaking Parent-Child Relationships
A parent-child relationship in Pro/ENGINEER is defined as the dependency of one feature on another. The independent feature is referred to as the parent and the dependent feature is referred to as the child. When such a dependency exists, the parent feature is used by Pro/ENGINEER to place or locate the child feature. If the parent feature 818u202i is deleted, the child must also be deleted or rerouted since Pro/ENGINEER no longer has the necessary references to place the feature. To avoid affecting the child when deleting the parent, there are methods of breaking the dependency.
Modification of a parent feature can also affect the children. For example, if a child is dimensioned to an edge of the parent feature 818u202i and modifying the parent moves this edge, the child feature moves accordingly. This is a very powerful aspect of Pro/ENGINEER and if thoroughly understood, you can use it to great advantage.
There are a variety of ways of establishing parent-child relationships. A thorough understanding of these concepts is valuable.
The following examples illustrate some of the ways that parent-child relationships are established:
Dimensioning
Dimensioning to an edge or surface in Sketcher establishes the feature (that defines that edge or surface) as a parent of the sketched feature. In Figure 8-1, the square cut was located by dimensioning it to the hole and the chamfer. The cut is now a child of the hole and the chamfer.
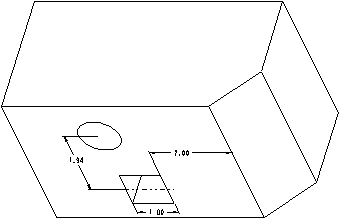
Figure 8-
Aligning
Alignments to surfaces or edges in Sketcher establish the feature (that defines that surface or edge) as a parent of the sketched feature. In Figure 8-2, the cut was located by aligning an edge of the cut to an edge or surface of the square protrusion. The cut is now a child of the protrusion.
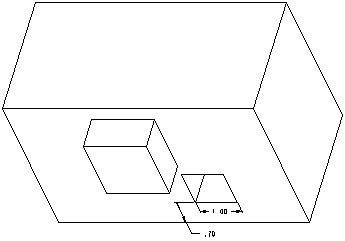
Figure 8-
Geometry Duplication
Certain Sketcher operations such as Use Edge create implied alignments and therefore establish parent-child relationships. In Figure 8-3, the protrusion around the oval cut was created with Use Edge. The protrusion is a child of the cut. A parent-child relationship would have also been established had either Offset Edge or Concentric Arcs been used to create the protrusion.

Figure 8-
Sketching Plane
The selection of a sketching plane makes the feature that defines the selected plane, a parent of the sketched feature. This includes Make Datum references. In Figure 8-4, the sketch plane for the square cut was the surface created by the cylindrical cut. This makes the square cut a child of the cylindrical cut.
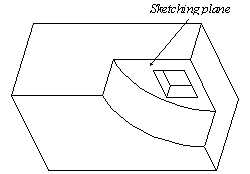
Figure 8-
In Figure 8-5, the Make Datum option was used to create a sketching plane for the square cut Tangent to the cylinder and Parallel to a surface on the rectangular protrusion. This makes the cut a child of the protrusion.
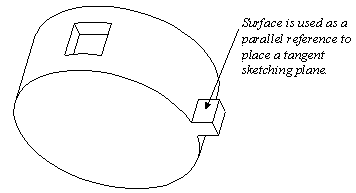
Figure 8-
Horizontal and Vertical References
The selection of a horizontal or vertical sketching reference plane makes the feature that defines the reference plane, a parent of the sketched feature. This includes Make Datum references. In Figure 8-6, a surface on the rectangular protrusion was chosen as a horizontal reference for the circular cut. This makes the cut a child of the protrusion.
Sketching plane Top![]()
![]()
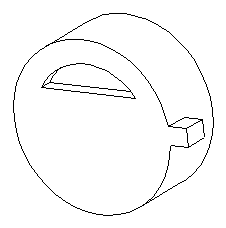
Figure 8-
Depth Options
A feature whose depth is defined as Thru Until or Up to Surface is a child of the feature that creates the selected surface. This also applies to from-to surfaces. In Figure 8-7, the depth of the protrusion was defined as Up to Surface and the surface of the cut selected. This makes the protrusion a child of the cut.
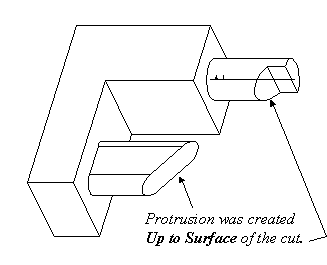
Figure 8-
Parent-child relationships should not be considered a drawback or a hindrance. Instead, they should be used to make models more robust and powerful. Consider the following tips for controlling parent-child relationships.
Create and use default datum planes. Since these are never deleted, they can be ideal in some circumstances for use as sketching and reference plane selections. This establishes the datums, rather than a geometric feature, as parents of the sketched feature.
When in Sketcher, align in 3D to understand exactly which entity of which feature you are aligning to. Use Query Sel to identify what is being selected. The Message Window will describe the selected entity and the system will highlight surfaces in red and edges in blue.
When in Sketcher, dimension in 3D to understand exactly which entity of which feature you are dimensioning to. Use Query Sel to identify what is being selected.
When in Sketcher, consider the references used with tools such as Use Edge, Offset Edge, and Concentric arcs and circles.
Think about the surface you are choosing for a sketching or reference plane. Is this surface the best choice of a parent for this feature?
Think about the surface that you are choosing when using depth options such as Thru Until and Up to Surface. Is this surface the best choice of a parent for this feature?
If the design intent of the model changes or if unwanted relationships are established, Pro/ENGINEER has methods for breaking these relationships. The Redefine and Reroute options can be used for breaking parent-child relationships. These options are in the FEAT and COMPONENT menus of Part and Assembly Modes, respectively.
Redefine |
The Redefine command can be used to break parent-child relationships by re-assigning different references to the previously defined elements.
Using Redefine to break relationships requires that the references be known. In some cases, investigation is required to determine the references used.
Reroute |
The Reroute command can also be used to break parent-child relationships. When a feature is being rerouted, the system prompts "Do you want to roll back the part? [N]:" The system is asking if it should display the part, as it was when the rerouted feature was created. Rolling back the part makes it easier to see highlighted references and select appropriate alternative references.
The system highlights and toggles through each entity that was used as a reference when the feature was created. As each referenced entity is highlighted, the option to maintain the reference or select an alternate reference is given.
This page intentionally left blank.
Exercise 8a Redefine and Reroute |
Objective |
After you complete this exercise, you will be able to:
Use Redefine to Break Relationships
Use Reroute to Break Relationships
Open the part called pc01.prt.
Open pc01.prt.

Figure 8-
Investigate the part.
Choose Info, Regen Info from the menu bar.
Choose Beginning from the START OPTS menu and choose Continue until the part is completely regenerated.
Choose Modify and select the square cut to see the dimensioning scheme used. The cut was located with respect to the chamfer.
Modify the chamfer dimension. What happens to the square cut? Why is it generally not a good idea to dimension to edges created by features such as rounds and chamfers?
Redefine the cut.
Redefine the sketch of the cut feature and dimension the cut from the right side surface of base feature, not the chamfer edge.
Delete the chamfer. Is the square cut affected?
Erase the part from memory without saving it.
Use the Reroute command to remove the references of the square cut to the chamfer.
Again, Open pc01.prt.
Choose Feature, Reroute and select the cut.
Enter [Y] to roll back the part. Any feature created after the cut, is not displayed. The system now highlights and toggles through all the references used to create the cut.
Read the Message Window and choose Same Ref from the REROUTE menu to keep the same sketching plane and then again, to keep the horizontal reference plane.
Choose Alternate when the chamfer edge is highlighted and select the right hand surface of the block.
Choose Same Ref to keep the same dimensioning reference to the hole.
After the reroute is complete choose Modify and select the square cut to verify the dimensioning references.
Delete the hole.
Choose Delete and select the hole. To delete the hole, the cut has to be dealt with because it is a child.
Read the Message Window and choose Reroute to reroute the square child.
Enter [Y] to roll back the part.
Toggle through the highlights keeping all of the same references except for the dimensioning reference to hole. Choose Alternate and select the top surface of the block. The cut feature should fail because the alternate reference, which was chosen (top flat surface) during the reroute, was a different type of entity than the original reference (cylindrical surface).
Choose Quick Fix, Redefine and properly dimension the cut.
Save the part and Erase it from memory.
Exercise 8b Reroute |
Objective |
After you complete this exercise, you will be able to:
Reroute Children of Deleted Features
Open the part called pc02.prt.
Open pc02.prt. The cut, when originally created, was sketched on a surface of the center protrusion. The design intent has changed. The center protrusion is no longer required.
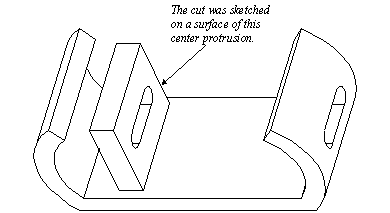
Figure 8-
Reroute the cut.
Reroute the cut so the middle protrusion can be deleted without affecting the cut. Do not delete and recreate the cut.
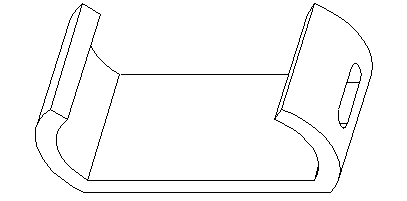
Figure 8-
Save the part and Erase it from memory.
This page intentionally left blank.
|