OPERATION MANUAL
Table of Contents
|
Chapter 1. |
About SecuMan |
|
|
|
|
1.1 SecuMan Introdcution |
|
|
|
|
1.2 Recommended System Specification |
|
|
|
|
|
|
|
|
Chapter 2. |
Installation |
|
|
|
|
2.1 SecuMan Installation |
|
|
|
|
|
|
|
|
Chapter 3. |
SecuMan Operation |
|
|
|
|
3.1 Site Managerment |
|
|
|
|
3.2 Connection To Remote Sites |
|
|
|
|
3.3 View Video From Remote Sites |
|
|
|
|
3.4 Site View |
|
|
|
|
3.5 Remote Controls To Remote Sites |
|
|
|
|
3.6 Event Management |
|
|
|
|
3.7 Remote Pan/Tilt Control |
|
|
|
|
3.8 Retrieving Remote Recording Files |
|
|
|
|
|
|
|
|
|
|
|
|
|
|
|
|
|
|
|
|
|
|
|
|
|
|
|
|
|
|
|
|
|
|
|
|
|
|
|
|
|
|
|
|
|
|
|
|
|
|
|
|
|
|
|
|
|
|
|
|
|
|
|
|
|
|
|
|
|
|
|
|
|
|
|
|
|
|
|
|
|
|
|
|
|
|
|
|
|
|
|
|
|
|
|
|
|
|
|
|
|
|
|
|
|
|
|
|
|
|
|
|
|
|
|
|
|
|
|
|
|
|
|
|
|
|
|
|
|
|
|
|
|
|
|
|
|
|
|
|
|
|
CHAPTER
About SecuMan
![]()
1.1 SecuMan Introduction
![]()
 |
Its main features are ;
1. Simultaneous connection to max. 100 sites
2. Simultaneous monitoring to max. 16 sites
3. Support multi monitor up to 4 nos
4. 1/4/9 screen split on real-time monitoring and remote playback mode
5. Remote PTZ control
6. Remote playback
7. Event management and instant action
8. Remote menu setup and rebooting
9. Site information management by database function
1.2 Recommend System Specification
![]()
We recommend the system specification to install and run SecuMan smoothly as follows ;
- CPU : Pentium 4 1.7Ghz or above
- Motherboard : Intel chipset
- Operating System : Windows 2000 or XP (with the latest Service Pack)
- Memory : 256Mbyte or above
- HDD : 40Gbyte or above
- VGA : AGP VGA 32Mbyte / Color Setting High Color(16 bit) or above
- Internet Environment : T1 or xDSL(1Mb) or above
- Direct X : Version 8.1 or above
CHAPTER
Installation
![]()
2.1. SecuMan Installation
![]()
1. Run Setup.exe in the CD-Rom provided to start installing SecuMan
2. Enter the serial no. labelled on USB lock key when the install wizard asks for.
3. The system will reboot after the completion of installation.
4. Insert USB lock key into one of USB ports after rebooting. Its device driver will be installed automatically.
5. Then double-click the shortcut of SecuMan on desktop to run SecuMan.
CHAPTER
SecuMan Operation
![]()
3.1 Site Management
![]()
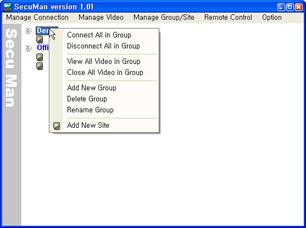
In order to add new group or new site in the group, use "Manage Group/Site Tab" of SecuMan or use the menu after right-mouse click.
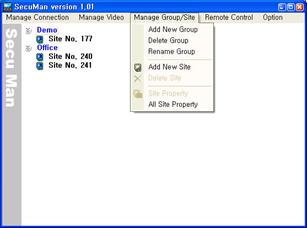 |  |
1) Add New Group : You can add the new group where a number of remote sites can be belonged. Enter the group name when dialogue box pops up.
2) Delete Group : Right-mouse click on the group and select "Delete Group". Before running "Delete Group", all sites belonged should be deleted.
3) Rename Group : Right-mouse click on the group and select "Rename Group". Enter new name when dialogue box pops up.
4) Add New Site : You can add the remote site to monitor to the specific group. Right-mouse click on the group and select "Add New Site". Then the dialogue box asking for site information will pop up. Complete the all blanks.
The Login ID & Password must be registered from the remote DVR setup menu firstly.
5) Delete Site : Right-mouse click on the site and select "Delete Site". The site must be disconnected before running deletion.
6) Site Property : In order to correct the site information, right-mouse click on the site and select "Site Property"
7) All Site Property : It shows information of all sites registered on SecuMan.
3.2 Connection To Remote Sites
![]()
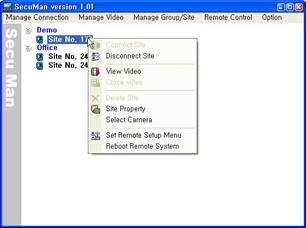
Connection to remote sites should be made before viewing the videos from remote site. Use "Manage Connection Tab" of SecuMan or use the menu after right-mouse click on the group or the site.
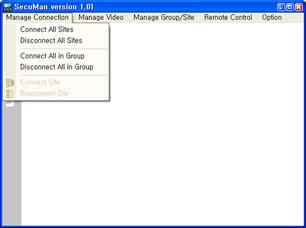 |  |
1) Connect All Sites : It connects all sites registered on SecuMan.
2) Disconnect All Sites : It disconnects all sites registered on SecuMan.
3) Connect All in Group : It connects to sites in the group. Right-mouse click on the group and select "Connect All Sites".
4) Disconnect All in Group : It disconnects all sites in the group. Right-mouse click on the group and select "Disconnect All Sites".
5) Connect Site : It connects one site selected. Right-mouse click on the site and select "Connect Site".
6) Disconnect Site : It disconnects one site selected. Right-mouse click on the site and select "Disconnect Site".
3.3 View Video From Remote Sites
![]()
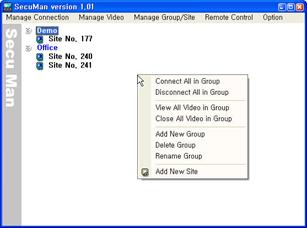
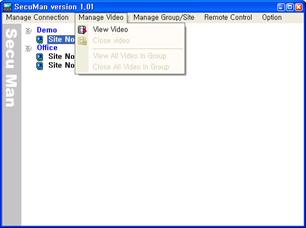
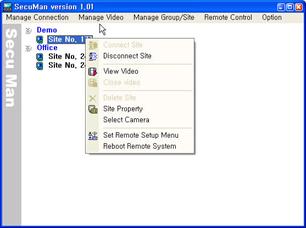
In order to view the video from remote sites after connection, use "Manage Video Tab" of SecuMan or use the menu after right-mouse click on the group or the site.
 |
|||
 |
|||
1) View Video : It shows videos from one remote site selected. Right-mouse click on the site and select "View Video".
2) Close Video : It stops showing videos from one remote site selected. Right-mouse click on the site and select "Stop Video".
3) View All Videos in Group : It shows videosa from all remote sites in the group. Right-mouse click on the group and select "View Video All in Group".
4) Close All Videos in Group : It stops showing videos from all remote site in the group. Right-mouse click on the group and select "Stop Video All in Group".
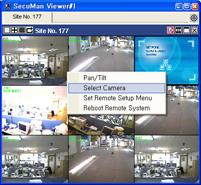
5) Select Camera : You can select the camera channels that you want to view only from remote site. Right-mouse click on the site and select "Select Camera". Then check on camera no. that you want to view only as shown below. Or right-mouse click on site viewer window and select "Select Camera".
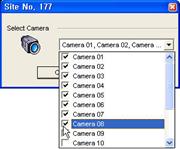 |  |
||
3.4 Site Viewer
![]()
The site viewer will be shown after selecting "View Video". The functionalities are as follows.
 |
In order to view the next channels in full, 4 or 9-split view, repeat clicking the split-button.
Ex) Total 16ch. In 9-split view, initially 1 to 9 ch are view. Clicking 9-split button will show the next 10 to 16 ch.
3.5 Remote Control To Remote Sites
![]()
You can reboot or set the setup menu of the remote systems from remote control menu.
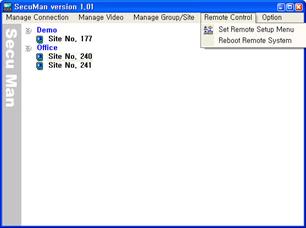 |  |
1) Set Remote Setup Menu : Right-mouse click on the site and select "Set Remote Setup Menu" . Then setup menu of the remote system will pop up.
2) Reboot Remote System : Right-mouse click on the site and select "Remote Remote System". Then the remote system will reboot.
3.6 Event Management
![]()
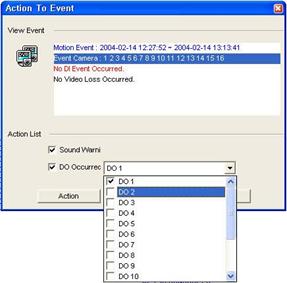
You can carry out real-time event monitoring and take intant action by sending beep sound, digital output to remote sites to warn them. Select "View Event Viewer" from "Option Tab" of SecuMan.
 |
![]() In order to
take instant action click action button [ ] on the event. Then chose the
measure of warning. The measures can be sound warning through PC speaker or
digital output as shown below.
In order to
take instant action click action button [ ] on the event. Then chose the
measure of warning. The measures can be sound warning through PC speaker or
digital output as shown below.
 |
3.7 Remote Pan/Tilt Control
![]()
To control PTZ of the camera at remote site, right-mouse click on the window and select "Pan/Tilt". Then PTZ remote control will pop up. Or click Pan/Tilt button on the right top of site viewer window.
3.8 Retrieving Remote Recording Files
![]()
To retrieve the recording files on remote site, click "Remote Playback Button" on the right top of site view window. Then the box with recording date and time information will pop up as below. Select the hour and double-click.
 |
You can adjust the speed of playback by using "Play Speed Button" . Speed ranges from -4X to 8X.
|
||||
 |
||||
|
