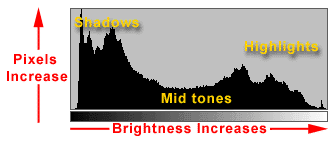
Most serious photo-editing programs such as Photoshop and Picture Window let you use a histogram as a guide when editing your images. Since most image corrections can be diagnosed by looking at a histogram, it helps to look at it while still in a position to reshoot the image. It's for this reason that histograms can be displayed on the monitor of some high-end digital cameras. As you've seen, each pixel in an image can be set to any of 256 levels of brightness from pure black (0) to pure white (255). A histogram is a graph that shows how the 256 possible levels of brightness are distri 959i83j buted in the image.

To read the histogram, you look at the distribution of pixels. An image that uses the entire dynamic range of the camera will have a reasonable number of pixels at every level of brightness. An image that has low contrast will have the pixels clumped together and have a narrower dynamic range.
The way a histogram looks depends on the scene your are shooting and how you expose it. There's no such thing as a good or bad histogram. Whether a particular histogram is good or bad depends on what you are trying to accomplish. If fact, you may prefer to trust your visual reaction to the image more than the very numeric image data provided by a histogram. However, even if you never use it, you can learn about digital images by understanding what a histogram can shows about an image. Here are some histograms from good images along with a brief summary of what the histogram reveals.
|
|
|
|
In this typical well exposed portrait there is a fairly even distribution of values in both the shadow and highlight areas of the image. One thing you can see immediately from the histogram is that there are no pure blacks in the image. This is shown by the gap at the far left end of the scale. |
|
|
|
|
|
This brown moth on a gray card has most of its values in the midrange. That's why there is a number of high vertical lines grouped in the middle of the horizontal axis. |
|
|
|
|
|
This high-key fog scene has most of its values towards the highlight end of the scale. The distinct vertical line to the left of middle gray shows how many pixels there are in the uniformly gray frame border (which I added in Photoshop). You can see that there are no really dark values in the image. In fact, the image uses only a little more than half the camera's dynamic range. |
|
|
|
|
|
This low-key scene has the majority of its values in the shadow area with another large grouping around middle gray. There are wide levels of brightness that have only a few pixels. |
|
|
|
|
|
This night scene with flash has a lot of dark pixels but then there are other values fairly evenly distributed across the entire range. |
|
One reason to check a histogram is to see if there is enough detail in the shadow, midtone, and highlight areas. If there is enough detail, even if the image is somewhat off, it can be corrected in a program such as Photoshop using the Levels command or in Picture Window using the Brightness Curve. These controls allow you to adjust the shadow, mid, and highlight areas independently without affecting the other areas. This lets you lighten or darken selected areas of your images without loosing detail.
From the histogram you can determine the image's darkest shadow and brightest highlights; called the black point and white point. In fact, it's the range between these two points that defines the dynamic range (also called the tonal range, or contrast) of the image. If the image is low contrast, you can also tell if it's low-key or high-key from the histogram. A low key image has details concentrated at the dark end of the scale. A high-key image has them concentrated at the light end.
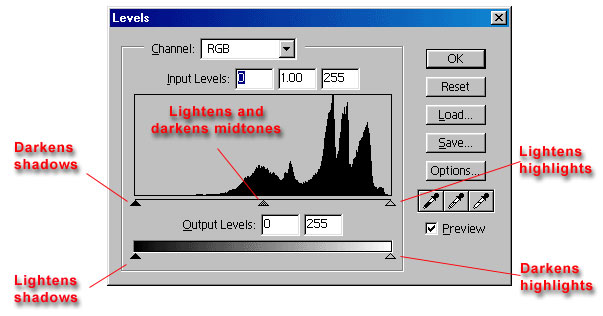
In Photoshop the Levels dialog box gives you five dragable triangles to adjust the distribution of brightness in your image.

The three dragable triangles below the histogram work as follows:
The two dragable triangles below the Output Levels grayscale bar also adjust the image, having almost the opposite affect of the triangles above.
|
|
|
|
In this image the histogram shows there are no pixels at the shadow end of the scale. Blacks will looked washed out. Underneath the histogram are three dragable points. The far left is dragged to set the black point, the right to set the white point, and the middle one to set middle gray. |
|
|
|
|
|
By dragging in the black point marker (above right) to where the first pixels appear, the dynamic range will be expanded so there are pure blacks in the image. The histogram for the corrected image (right) now shows that the dynamic range has been "stretched" so there are pixels at all levels of brightness. The fact that you can't see changes in the image itself is because at these reduced sizes they don't show. This is just a draft of this section so I'll try to find a better example. |
|
|