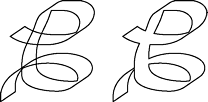
Instead of using a tool such as the Pointer or Knife to modify a path, you can also use commands. The Remove Overlap command changes a path so that areas that overlap each other are eliminated. This is very helpful when working with the Pencil tool.
To use the Remove Overlap command:
Select the object.
Click the Remove Overlap icon in the Xtra Operations toolbar
![]()
or
Choose Modify > Alter Path > Remove Overlap.
or
Choose Xtras > Cleanup > Remove Overlap. Notice that the overlapping areas are eliminated
Too many points on a path makes it difficult to reshape and work with paths. The Simplify command lets you remove excess points.
To use the Simplify command:
Select the object.
Click the Simplify icon in the Xtra Operations toolbar

or
Choose Modify > Alter Path > Simplify.
or
Choose Xtras > Cleanup > Simplify. The Simplify dialog box appears
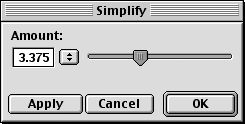
Drag the slider to change the value in the Amount field. The greater the number, the more points will be eliminated

Click the Apply button to see the effects of the setting.
Click OK to apply the command.
Certain effects need
additional points on the path to look good. For instance, more points create a
different look when the
To use the Add Points command:
Select an object.
Click the Add Points icon in the Xtras Operations toolbar

or
Choose Xtras > Distort > Add Points.
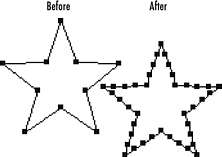
Each time you choose the command, a new point is added between each existing pair of points
The Intersect command creates a new object from the area where two objects overlap.
To use the Intersect command:
Select two or more paths that overlap each other.
Click the Intersect icon in the Xtras Operations toolbar

or
Choose Modify > Combine > Intersect.
or
Choose Xtras > Path Operations > Intersect.
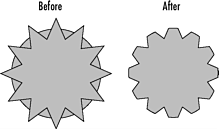
A new path is created that is the shape of the overlapping area
TIP
The Intersect command deletes from the selection any objects that do not overlap.
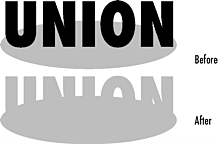
The Union command allows you to take many objects and turn them into one path.
To use the
Select two or more objects that overlap each other.
Click the Union icon in the Xtras Operations toolbar
![]()
or
Choose Modify > Combine >
or
Choose Xtras > Path
Operations >
The multiple paths join into one
TIP
If the selected objects for the
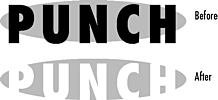
The Punch command allows you to use one object to punch a hole in another.
To use the Punch command:
Select two or more objects that overlap each other.
Click the Punch icon in the Xtras Operations toolbar

or
Choose Modify > Combine > Punch.
or
Choose Xtras > Path Operations > Punch.
The top object punches through the bottom object
TIP
To have multiple objects act as the punch, first apply the Union command.
TIP
To save the original objects while creating new ones, hold the Shift key as you apply the Intersect or Punch commands or change the Preferences setting for Path operations consume original paths (see page 391).
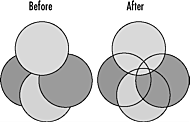
The Divide command creates new paths from the overlapping areas of objects.
To use the Divide command:
Select two or more objects that overlap each other.
Click the Divide icon in the Xtra Operations toolbar
![]()
or
Choose Modify > Combine > Divide.
or
Choose Xtras > Path Operations > Divide.
The paths divide into new paths wherever they overlapped
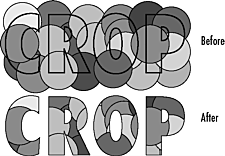
The Crop command allows you to use the top object as a cookie cutter that trims away parts of the path that are outside the top object.
To use the Crop command:
Select various objects with one object on top.
Click the Divide icon in the Xtra Operations toolbar
![]()
or
Choose Modify > Combine > Crop.
or
Choose Xtras > Path Operations > Crop.
All the objects at the bottom are trimmed so that only those portions that were under the topmost object remain
Using the Repeat Xtra CommandAlthough many path operations are under the Modify menu, you have an extra feature if you choose the commands via the Xtras menu or the Operations toolbar. That command will be listed at the top of the Xtras menu as the Repeat [Xtra] command. This means that if you want to apply the command again, you can choose it from the top of the menu. |
FreeHand offers you a way to convert lines or open paths to closed paths by using the Expand Stroke command. This allows you to convert stroked paths into closed paths that can have fills such as the Lens or Gradient fills. (See Chapter 15 Strokes " for more information on creating stroked paths.)
To use the Expand Stroke command:
Select the stroked path you wish to convert.
Click the Expand Stroke icon in the Xtra Operations toolbar
![]()
or
Choose Modify > Alter Path> Expand Stroke.
or
Choose Xtras > Path Operations > Expand Stroke. The Expand Stroke dialog box appears
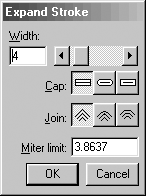
Enter the width you want for the final object.
Choose one of the Cap settings for the end of the path. (See page 197 for details of the Cap settings.)
Choose one of the Join settings for the corners of the path. (See page 198 for details of the Join settings.)
Enter an amount for the Miter limit for the corners of the path. (See page 198 for details of the Miter limit settings.)
TIP
Note that while these settings are the same as the settings for a stroke, the final object will actually be a filled path.
Click OK to create a new filled path
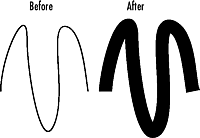
The Inset Path command allows you to make multiple copies of an object. These copies can be smaller or larger than the original.
To use the Inset Path command:
Select a closed path.
Click the Inset Path icon in the Xtra Operations toolbar
![]()
or
Choose Modify > Alter Path> Inset Path.
or
Choose Xtras > Path Operations > Inset Path. The Inset Path dialog box appears
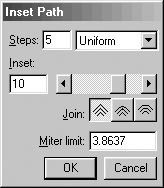
In the Steps field, enter the number of copies you want to create.
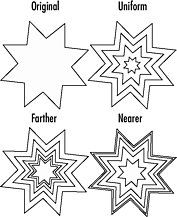
If the number of steps is greater than 1, choose one of the following from the list:
o Uniform spaces each copy the same distance from the previous object.
o Farther spaces each copy slightly closer than the previous object.
o Nearer spaces each copy slightly further away from the previous object.
Use the slider to set the size of the new objects as follows:
o Positive numbers place the new objects inside the original.
o Negative numbers place the new object outside the original.
Click OK. This creates copies of the object inset from the original
TIP
Multiples created by the Inset Path command are created as grouped objects.
The Emboss command allows you to create the look of raised or depressed areas on a background.
To use the Emboss command:
Select one or more objects.
Click the Emboss icon in the Xtra Operations toolbar
![]()
or
Choose Xtras > Create > Emboss. This opens the Emboss dialog box
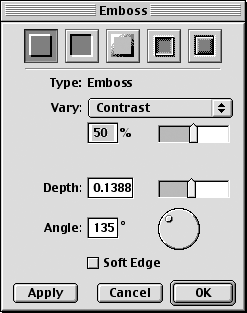
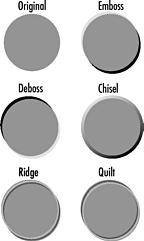
Click one of the top icons to choose from the five types of embossing effects: emboss, deboss, chisel, ridge, or quilt.
Set the Vary controls as follows:
o Contrast lets you use the slider to control how much to change the existing colors in the object to create the light and dark portions of the emboss.
o Color lets you set the color for the highlight and shadows of the emboss.
Set the Depth field for how obvious the embossing should be.
Set the angle to control where the light and dark areas of the emboss should be.
Click the Soft Edge box to make the transition less abrupt.
Click Apply to see how the settings affect the object.
Click OK when you are satisfied to view the results
I admit that not all commands are as useful as others. It takes a lot of creativity to find any practical uses for the Fractalize command. But it does create interesting snow-flake effects.
To use the Fractalize command:
Select the object.
Make sure the Even/Odd fill box is checked in the Object Inspector.
Click the Fractalize icon in the Xtra Operations toolbar

or
Choose Xtras > Distort > Fractalize.
Repeat the command until you are satisfied with the effect

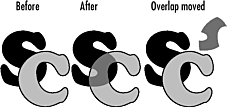
The Transparency command lets you simulate a see-through effect. It doesn't actually make the objects transparent and is not as important now that FreeHand has transparency in the lens fills (see page 184).
To use the Transparency command:
Create two or more overlapping objects filled with different colors.
Click the Transparency icon in the Xtra Operations toolbar
![]()
or
Choose Xtras > Path Operations > Transparency. This opens the Transparency dialog box
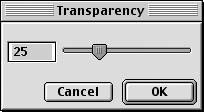
Set the amount of the transparency.
TIP
If the amount is less than 50%, the front color is more obvious. If it is more than 50%, the back color looks more obvious.
Click OK to see the transparency effect
TIP
The Transparency command creates a new object that simulates the transparency effect.
|